Cirkit Designer
Your all-in-one circuit design IDE
Home /
Component Documentation
How to Use Capacitive Touch Breakout: Examples, Pinouts, and Specs
Introduction
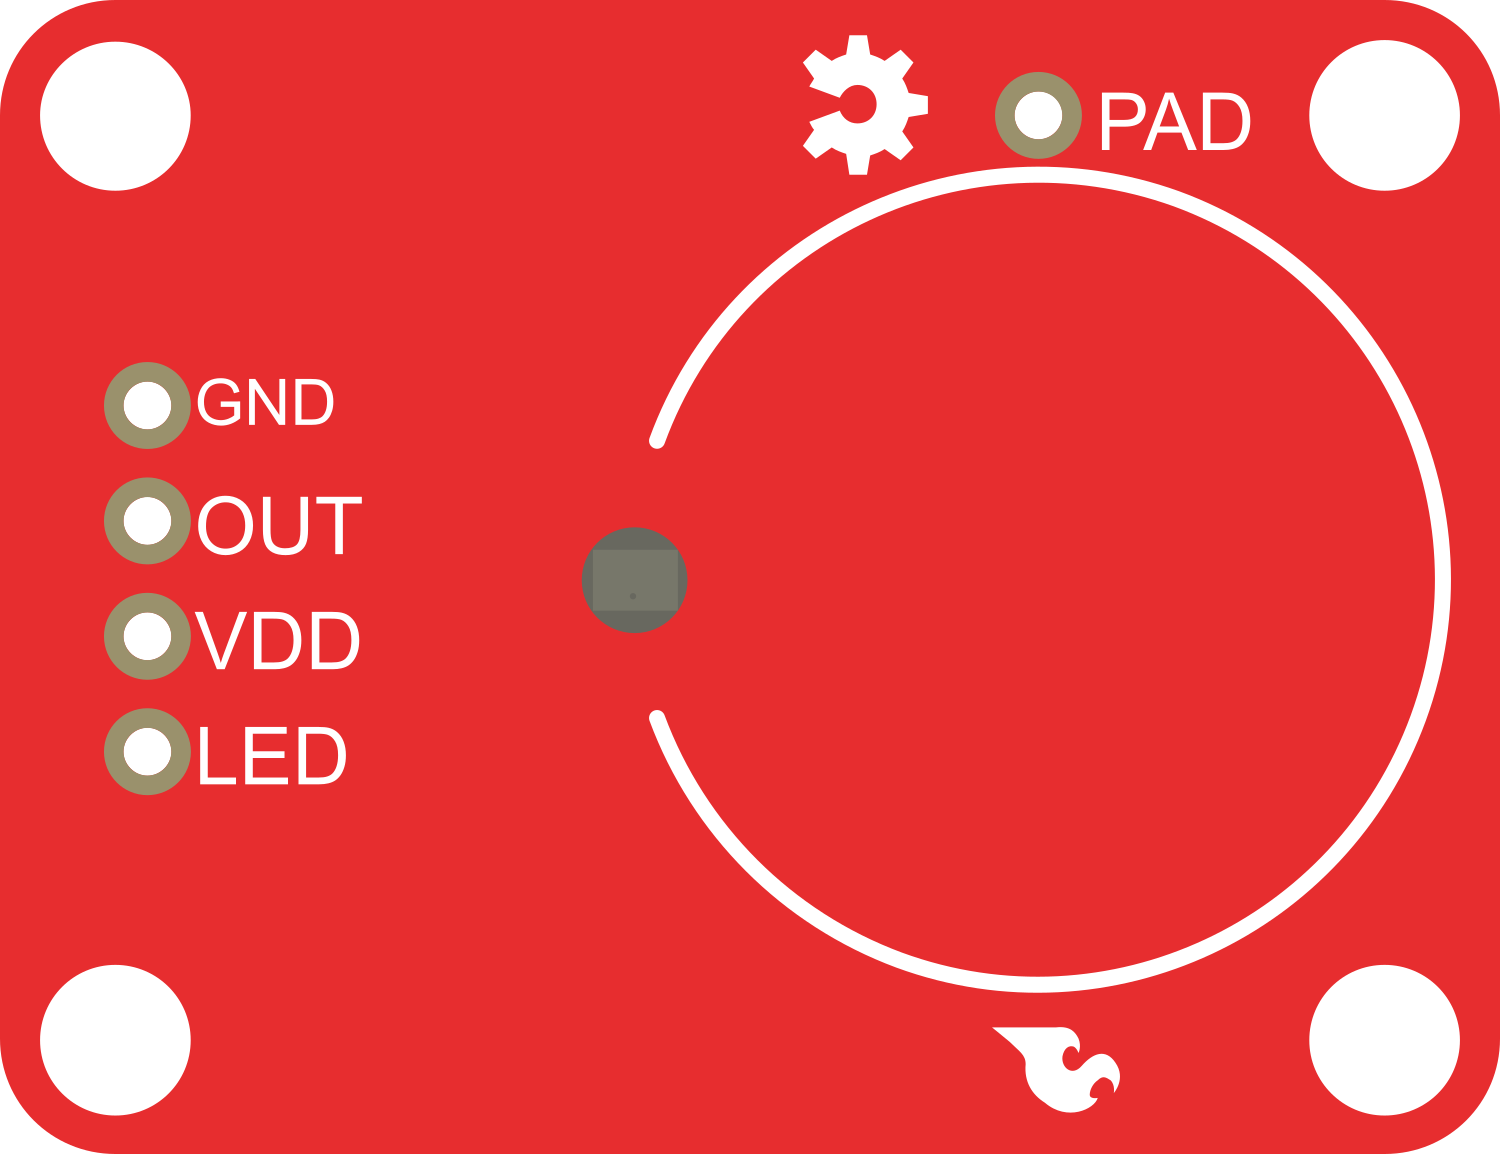
The Capacitive Touch Breakout is an innovative electronic component that leverages the Atmel AT42QT1010 sensor to provide capacitive touch sensing capabilities. This breakout board is designed to detect touch or proximity by sensing changes in capacitance on a conductive pad. It is commonly used to create touch buttons or to replace traditional mechanical switches in a variety of applications, including consumer electronics, home automation, and interactive installations.
Explore Projects Built with Capacitive Touch Breakout
Capacitive Touch and Ultrasonic Sensor Interface with Adafruit Feather nRF52840 Sense

This circuit features an Adafruit Feather nRF52840 Sense microcontroller connected to an ultrasonic sensor for distance measurement and an Adafruit AT42QT1010 capacitive touch sensor for touch input. The ultrasonic sensor's Trigger and Echo pins are interfaced with the microcontroller's digital pins D6 and D9, respectively, to send and receive ultrasonic signals. Additionally, a pressure-sensitive conductive sheet (Velostat) is connected in series with a 10k Ohm resistor to the microcontroller's analog pin A0, likely forming a pressure sensor.
Raspberry Pi 3B Powered 15.6-inch Touchscreen Display with USB Type-C Power Delivery

This circuit powers a 15.6-inch capacitive touch display and a Raspberry Pi 3B using a USB Type C power delivery breakout and two buck converters. The Raspberry Pi connects to the display via HDMI and USB for touch functionality, while the power delivery breakout provides regulated power to both the display and the Raspberry Pi through the buck converters.
Arduino UNO Controlled Interface with TFT Display and Feedback Indicators
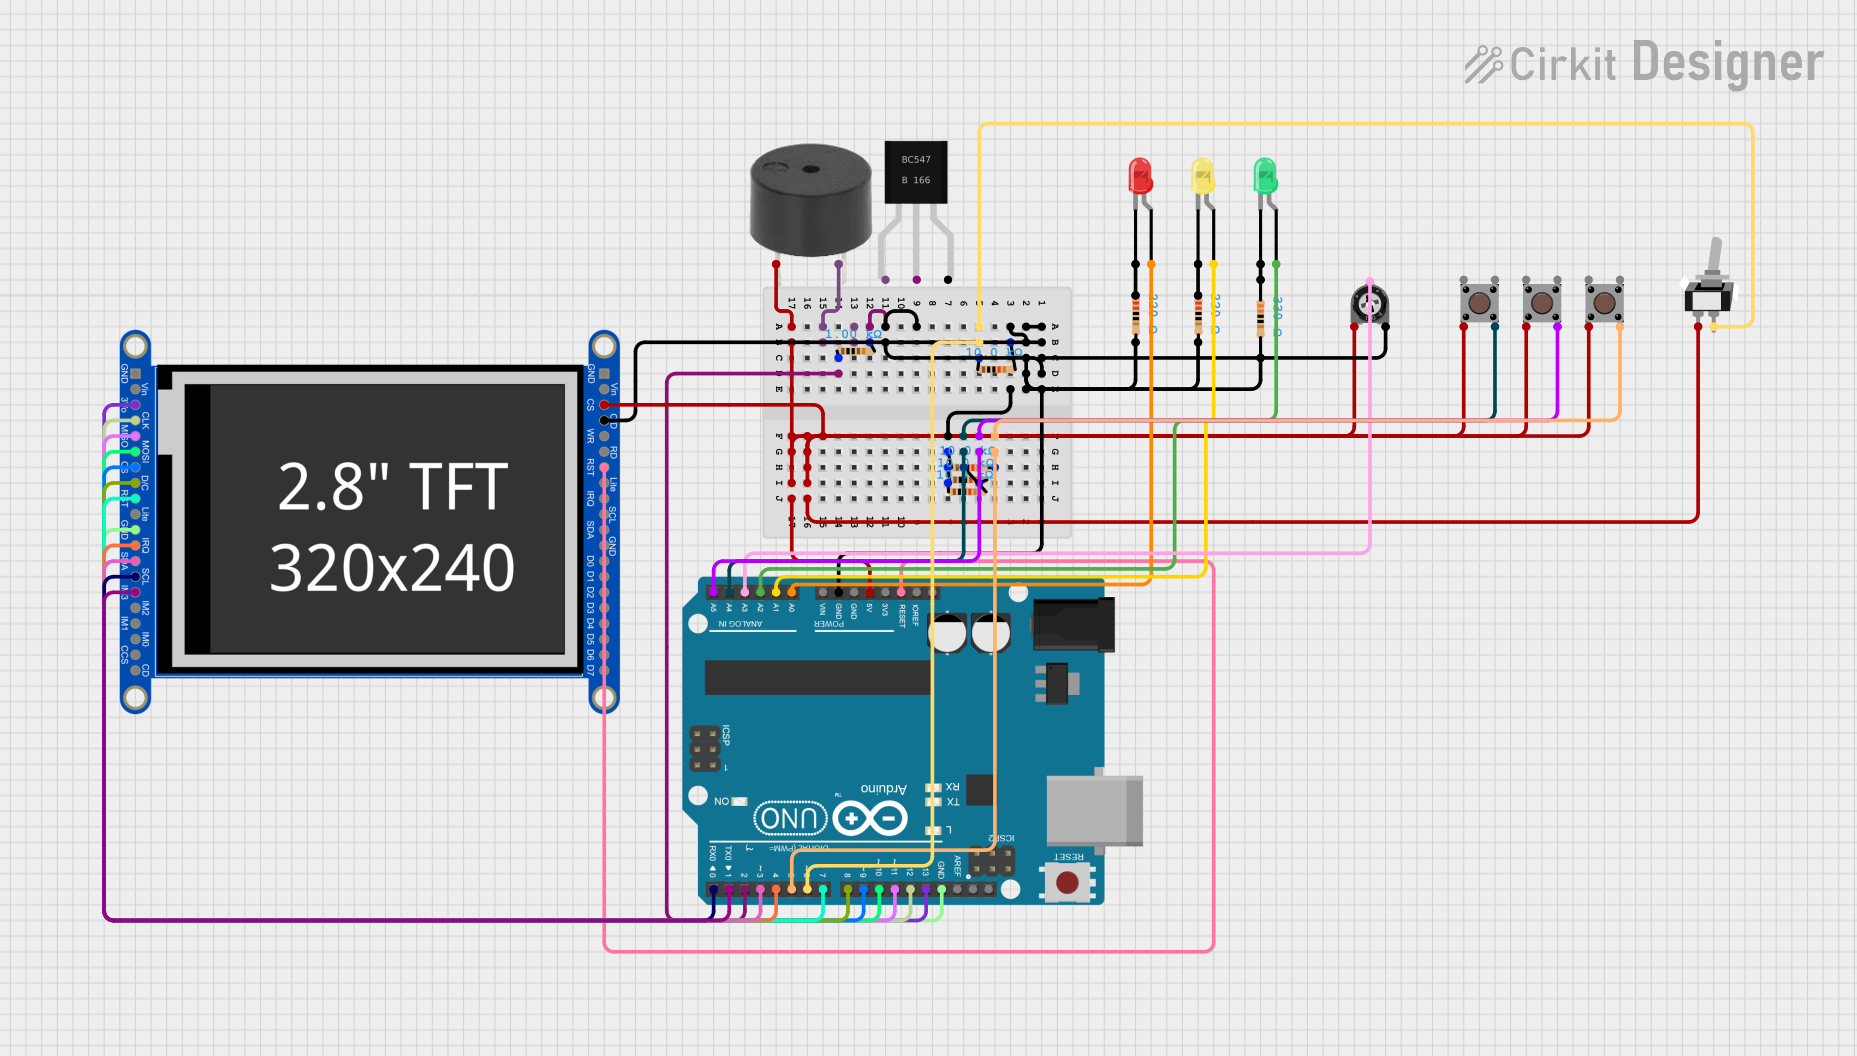
This circuit features an Arduino UNO microcontroller connected to a capacitive touch TFT display for user interface, three LEDs for visual feedback, a buzzer for audio alerts, and multiple pushbuttons for user input. It is designed to interact with users through the display and buttons, control visual and audio indicators, and can be customized via the provided code template.
Arduino UNO Capacitive Touch Sensor Interface
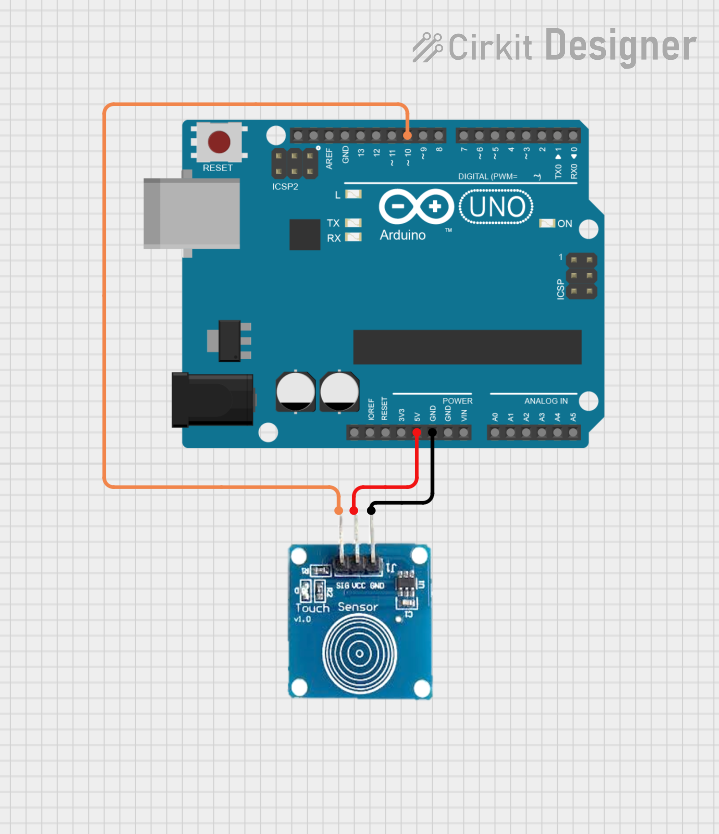
This circuit consists of an Arduino UNO microcontroller connected to a capacitive touch sensor. The sensor's VCC and GND pins are powered by the Arduino's 5V and GND pins, respectively, and the sensor's output is connected to the Arduino's digital pin D10. The Arduino can read touch inputs from the sensor to perform various actions based on the provided code.
Explore Projects Built with Capacitive Touch Breakout
Capacitive Touch and Ultrasonic Sensor Interface with Adafruit Feather nRF52840 Sense
This circuit features an Adafruit Feather nRF52840 Sense microcontroller connected to an ultrasonic sensor for distance measurement and an Adafruit AT42QT1010 capacitive touch sensor for touch input. The ultrasonic sensor's Trigger and Echo pins are interfaced with the microcontroller's digital pins D6 and D9, respectively, to send and receive ultrasonic signals. Additionally, a pressure-sensitive conductive sheet (Velostat) is connected in series with a 10k Ohm resistor to the microcontroller's analog pin A0, likely forming a pressure sensor.
Raspberry Pi 3B Powered 15.6-inch Touchscreen Display with USB Type-C Power Delivery
This circuit powers a 15.6-inch capacitive touch display and a Raspberry Pi 3B using a USB Type C power delivery breakout and two buck converters. The Raspberry Pi connects to the display via HDMI and USB for touch functionality, while the power delivery breakout provides regulated power to both the display and the Raspberry Pi through the buck converters.
Arduino UNO Controlled Interface with TFT Display and Feedback Indicators
This circuit features an Arduino UNO microcontroller connected to a capacitive touch TFT display for user interface, three LEDs for visual feedback, a buzzer for audio alerts, and multiple pushbuttons for user input. It is designed to interact with users through the display and buttons, control visual and audio indicators, and can be customized via the provided code template.
Arduino UNO Capacitive Touch Sensor Interface
This circuit consists of an Arduino UNO microcontroller connected to a capacitive touch sensor. The sensor's VCC and GND pins are powered by the Arduino's 5V and GND pins, respectively, and the sensor's output is connected to the Arduino's digital pin D10. The Arduino can read touch inputs from the sensor to perform various actions based on the provided code.
Technical Specifications
Key Technical Details
- Operating Voltage: 2.0V to 5.5V
- Current Consumption: 1.8µA (typical) when idle, 17µA (max) in active mode
- Interface: Digital output (active low)
- Response Time: 60ms (max) to touch or release
- Sensitivity: Adjustable with external capacitor (Cs)
- Dimensions: Typically in a small form factor (exact dimensions vary by manufacturer)
Pin Configuration and Descriptions
| Pin Number | Name | Description |
|---|---|---|
| 1 | OUT | Digital output; active low when touched |
| 2 | VDD | Power supply; 2.0V to 5.5V |
| 3 | GND | Ground connection |
| 4 | SNSK | Connection to one side of external capacitor (Cs) |
| 5 | SNS | Connection to sensor pad and other side of Cs |
Usage Instructions
Integrating with a Circuit
- Power Supply: Connect VDD to a 2.0V to 5.5V power source and GND to the ground.
- Sensor Pad: Attach a conductive pad to the SNS pin. The size of the pad can affect sensitivity.
- Sensitivity Adjustment: Connect an external capacitor (Cs) between SNSK and SNS to set the sensitivity.
- Output Signal: Connect the OUT pin to a digital input on your microcontroller to read the touch state.
Best Practices
- Use a stable power supply to minimize false triggering.
- Keep the sensor pad and traces away from noisy power lines or high-frequency signals.
- Calibrate the sensitivity using the external capacitor (Cs) to suit your application.
- Implement software debouncing to filter out spurious signals.
Example Code for Arduino UNO
// Define the touch sensor output pin
const int touchPin = 2; // Connect the OUT pin of the breakout to digital pin 2

void setup() {
  pinMode(touchPin, INPUT_PULLUP); // Set the touch pin as an input with an internal pull-up resistor
  Serial.begin(9600); // Start serial communication at 9600 baud
}

void loop() {
  // Read the state of the touch sensor
  bool isTouched = digitalRead(touchPin) == LOW; // Active low means touched

  // Print the state to the serial monitor
  Serial.println(isTouched ? "Touched" : "Not touched");

  delay(100); // Small delay to debounce and prevent flooding the serial output
}
Troubleshooting and FAQs
Common Issues
- No response to touch: Ensure the sensor pad is properly connected and the sensitivity is correctly set.
- False triggering: Check for noise in the power supply or nearby high-frequency signals. Adjust the external capacitor for better filtering.
- Intermittent operation: Verify that all connections are secure and there are no cold solder joints.
Solutions and Tips
- Calibrating Sensitivity: Start with a 10pF capacitor and adjust as needed for your specific application.
- Debouncing: Implement a software debounce by requiring a consistent read over multiple cycles before changing state.
- Power Supply Noise: Use capacitors to filter the power supply if noise is suspected.
Remember, the Capacitive Touch Breakout is a versatile component that can enhance the user interface of your project. With proper setup and calibration, it can provide a reliable touch interface.