Cirkit Designer Logo
Cirkit Designer
Your all-in-one circuit design IDE
Home / 
Component Documentation

How to Use sim 800l: Examples, Pinouts, and Specs

Image of sim 800l
Cirkit Designer LogoDesign with sim 800l in Cirkit Designer

Introduction

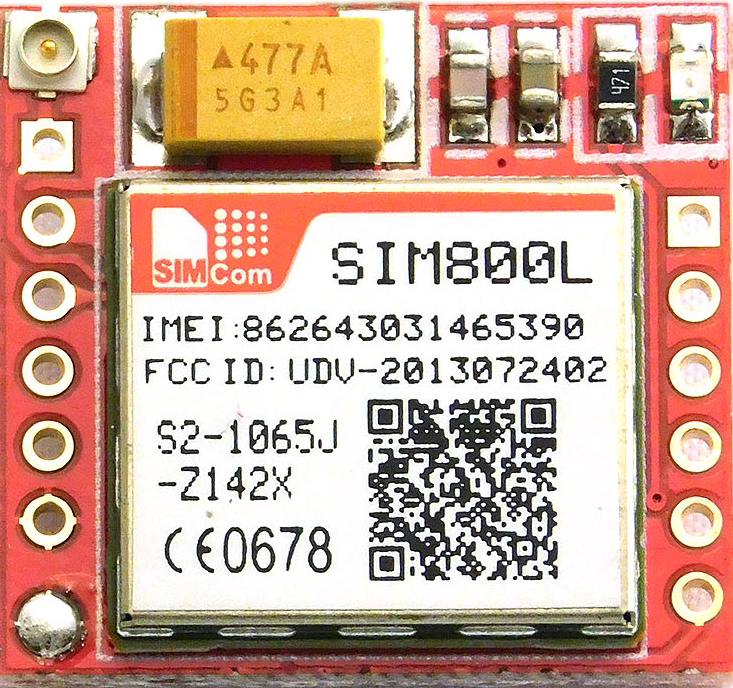
The SIM800L is a compact and versatile GSM/GPRS module that allows embedded systems to communicate over cellular networks. It is capable of sending SMS messages, making voice calls, connecting to the internet via GPRS, and even supporting Bluetooth communication. This module is widely used in IoT projects, remote monitoring systems, and mobile communication applications.

Explore Projects Built with sim 800l

Use Cirkit Designer to design, explore, and prototype these projects online. Some projects support real-time simulation. Click "Open Project" to start designing instantly!
Arduino UNO and SIM800L SMS Communication System
Image of GSM MODULE: A project utilizing sim 800l in a practical application
This circuit integrates an Arduino UNO with a SIM 800L module to enable SMS communication. The Arduino controls the SIM 800L module via software serial communication, allowing it to send and receive SMS messages based on commands received from the serial monitor.
Cirkit Designer LogoOpen Project in Cirkit Designer
Arduino UNO and Sim800L GSM Module-Based Battery-Powered Smart Light Control System
Image of smoke detector: A project utilizing sim 800l in a practical application
This circuit integrates an Arduino UNO with a SIM800L GSM module, a photo diode light sensor, a relay, and an LED. The Arduino controls the relay and LED based on input from the light sensor and communicates with the SIM800L for GSM functionalities. Power is supplied by a lithium-ion battery, with a rocker switch for power control.
Cirkit Designer LogoOpen Project in Cirkit Designer
Arduino UNO and SIM800L GSM Module for Wireless Communication with LM2596 Power Regulation
Image of theft: A project utilizing sim 800l in a practical application
This circuit features an Arduino UNO microcontroller interfaced with a SIM 800L GSM module for communication purposes. The SIM 800L is powered by an LM2596 step-down module, which provides the necessary voltage regulation. The Arduino communicates with the SIM 800L via digital pins D2 and D3 for RX and TX respectively.
Cirkit Designer LogoOpen Project in Cirkit Designer
Arduino UNO and SIM800L SMS Communication System
Image of GSM MODULE: A project utilizing sim 800l in a practical application
This circuit consists of an Arduino UNO connected to a SIM 800L GSM module. The Arduino UNO communicates with the SIM 800L module via software serial to send and receive SMS messages, with the Arduino providing power and ground connections to the GSM module.
Cirkit Designer LogoOpen Project in Cirkit Designer

Explore Projects Built with sim 800l

Use Cirkit Designer to design, explore, and prototype these projects online. Some projects support real-time simulation. Click "Open Project" to start designing instantly!
Image of GSM MODULE: A project utilizing sim 800l in a practical application
Arduino UNO and SIM800L SMS Communication System
This circuit integrates an Arduino UNO with a SIM 800L module to enable SMS communication. The Arduino controls the SIM 800L module via software serial communication, allowing it to send and receive SMS messages based on commands received from the serial monitor.
Cirkit Designer LogoOpen Project in Cirkit Designer
Image of smoke detector: A project utilizing sim 800l in a practical application
Arduino UNO and Sim800L GSM Module-Based Battery-Powered Smart Light Control System
This circuit integrates an Arduino UNO with a SIM800L GSM module, a photo diode light sensor, a relay, and an LED. The Arduino controls the relay and LED based on input from the light sensor and communicates with the SIM800L for GSM functionalities. Power is supplied by a lithium-ion battery, with a rocker switch for power control.
Cirkit Designer LogoOpen Project in Cirkit Designer
Image of theft: A project utilizing sim 800l in a practical application
Arduino UNO and SIM800L GSM Module for Wireless Communication with LM2596 Power Regulation
This circuit features an Arduino UNO microcontroller interfaced with a SIM 800L GSM module for communication purposes. The SIM 800L is powered by an LM2596 step-down module, which provides the necessary voltage regulation. The Arduino communicates with the SIM 800L via digital pins D2 and D3 for RX and TX respectively.
Cirkit Designer LogoOpen Project in Cirkit Designer
Image of GSM MODULE: A project utilizing sim 800l in a practical application
Arduino UNO and SIM800L SMS Communication System
This circuit consists of an Arduino UNO connected to a SIM 800L GSM module. The Arduino UNO communicates with the SIM 800L module via software serial to send and receive SMS messages, with the Arduino providing power and ground connections to the GSM module.
Cirkit Designer LogoOpen Project in Cirkit Designer

Common Applications and Use Cases

  • Remote data logging and telemetry
  • SMS-based remote control
  • Vehicle tracking systems
  • Home automation and security systems
  • Wearable devices with communication capabilities

Technical Specifications

Key Technical Details

  • Frequency Bands: Quad-band 850/900/1800/1900MHz
  • Supply Voltage: 3.4V to 4.4V (Typical 4.0V)
  • Operating Current: Approx. 2A during transmission, 1mA in sleep mode
  • Temperature Range: -40°C to +85°C
  • Sensitivity: -109dBm

Pin Configuration and Descriptions

Pin Number Pin Name Description
1 VCC Power supply (3.4V to 4.4V)
2 RST Reset pin (active low)
3 RXD Serial data receive pin
4 TXD Serial data transmit pin
5 GND Ground connection

Usage Instructions

How to Use the Component in a Circuit

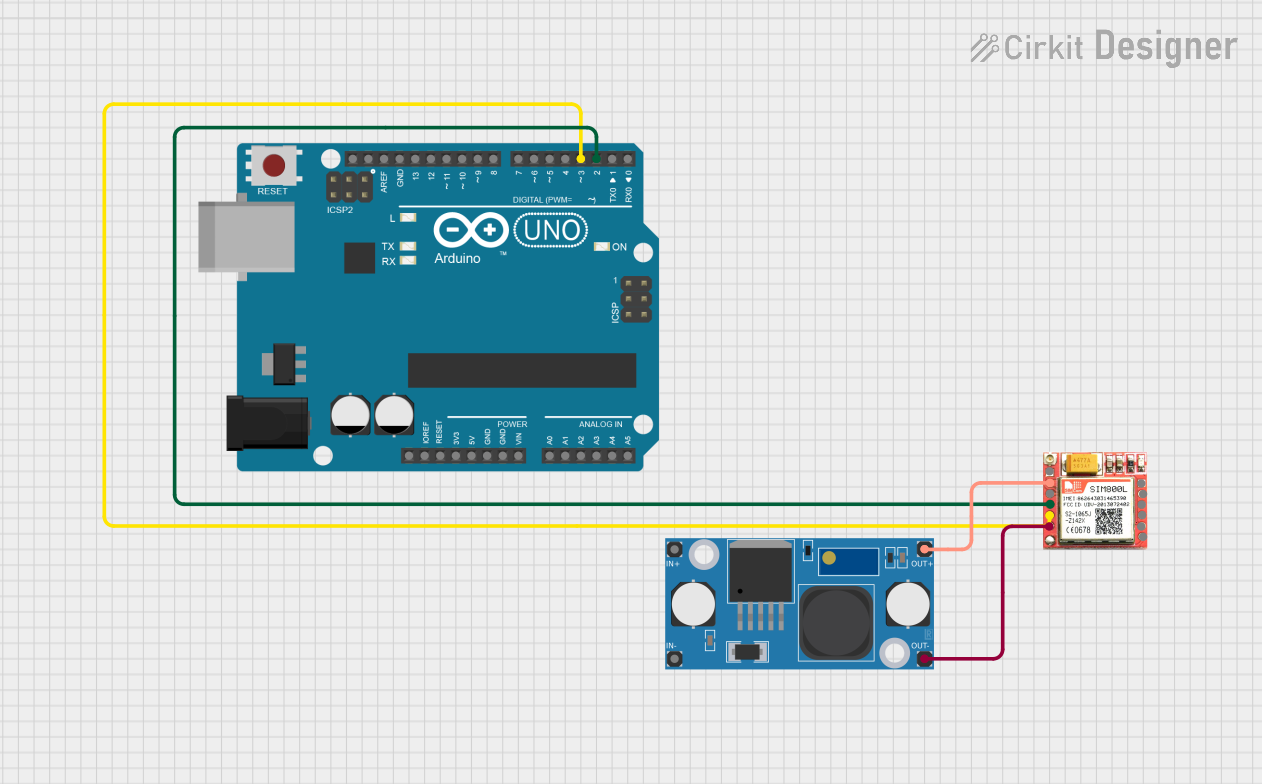
  1. Power Supply: Connect a stable power source capable of delivering up to 2A to the VCC and GND pins. A voltage regulator may be necessary to ensure the voltage remains within the specified range.

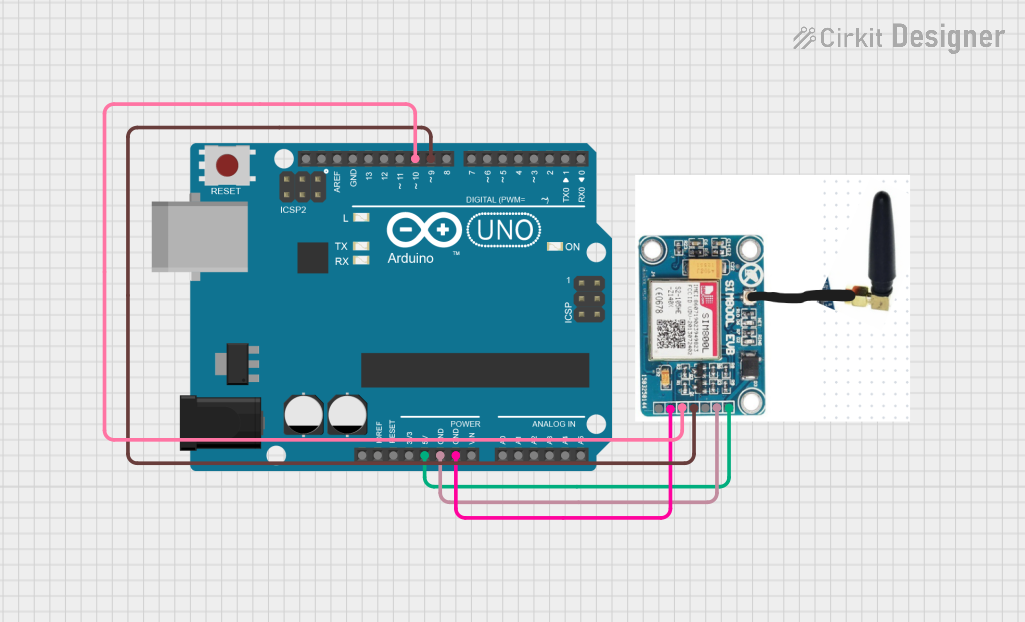
  2. Serial Communication: Connect the RXD and TXD pins to the corresponding TX and RX pins of your microcontroller (e.g., Arduino UNO). Remember to cross-connect RX to TX and TX to RX.

  3. Antenna: Attach the supplied GSM antenna to the antenna connector on the module.

  4. SIM Card: Insert a micro SIM card into the SIM card holder.

Important Considerations and Best Practices

  • Ensure that the power supply can handle the peak current requirements during transmission.
  • Use a level shifter if the microcontroller operates at a different logic level than the SIM800L.
  • Place the module away from noise sources and ensure the antenna has a clear view of the sky for better signal reception.
  • Follow ESD precautions when handling the module to prevent damage.

Example Code for Arduino UNO

#include <SoftwareSerial.h>

SoftwareSerial sim800l(7, 8); // RX, TX

void setup() {
  // Begin serial communication with Arduino and SIM800L
  sim800l.begin(9600);
  Serial.begin(9600);

  // Set SIM800L to fixed baud rate (optional)
  sim800l.println("AT+IPR=9600");
  delay(1000);

  // Check communication with SIM800L
  sim800l.println("AT");
  delay(1000);
  updateSerial();
}

void loop() {
  updateSerial();
}

void updateSerial() {
  // Forward every message from SIM800L to the Arduino Serial Monitor
  while (sim800l.available()) {
    Serial.write(sim800l.read());
  }
  // Forward every message from the Serial Monitor to SIM800L
  while (Serial.available()) {
    sim800l.write(Serial.read());
  }
}

Troubleshooting and FAQs

Common Issues Users Might Face

  • Power Issues: The module may restart or not work if the power supply is insufficient.
  • Signal Strength: Poor signal strength can lead to communication failure.
  • SIM Card Issues: Ensure the SIM card is activated and has no PIN code set.

Solutions and Tips for Troubleshooting

  • Power Supply: Use a high-quality power source and check connections.
  • Antenna Placement: Relocate the antenna or module to improve signal reception.
  • SIM Card: Check the SIM card on a phone to ensure it's working.

FAQs

Q: Can I use the SIM800L with a 5V microcontroller? A: Yes, but you will need a level shifter for the RX and TX pins.

Q: How do I know if the SIM800L is connected to the network? A: Send the command AT+CREG? and check for a response indicating registration.

Q: What is the default baud rate of the SIM800L? A: The default baud rate is auto-bauding, but it can be set to a fixed rate using AT commands.

Remember to always consult the SIM800L datasheet for the most accurate and detailed information.