How to Use Pantalla 3.5" Táctil Resistiva SPI ILI9488 y XPT2046: Examples, Pinouts, and Specs
Introduction
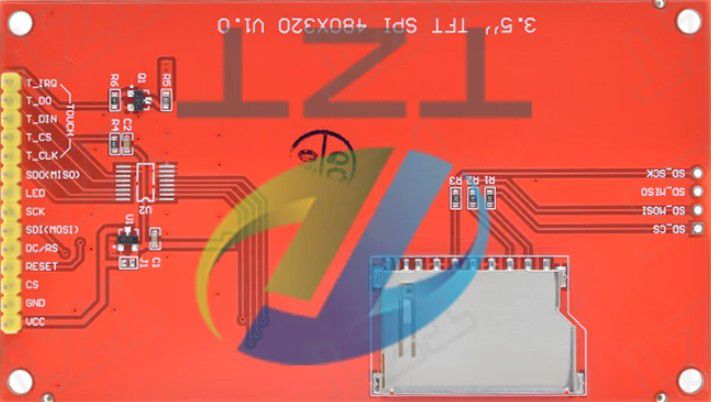
The Pantalla 3.5" Táctil Resistiva SPI ILI9488 y XPT2046, manufactured by TZT, is a versatile 3.5-inch resistive touchscreen display designed for embedded systems. It features the ILI9488 driver for high-quality graphics rendering and the XPT2046 controller for precise touch input detection. This display is ideal for creating interactive user interfaces in projects requiring both visual output and touch-based input.
Explore Projects Built with Pantalla 3.5" Táctil Resistiva SPI ILI9488 y XPT2046


Explore Projects Built with Pantalla 3.5" Táctil Resistiva SPI ILI9488 y XPT2046
Common Applications
- Embedded systems and IoT devices
- Industrial control panels
- DIY projects with microcontrollers (e.g., Arduino, Raspberry Pi)
- Portable devices with graphical user interfaces
- Educational and prototyping purposes
Technical Specifications
Key Technical Details
| Parameter | Specification |
|---|---|
| Display Type | 3.5-inch TFT LCD |
| Resolution | 480 x 320 pixels |
| Touchscreen Type | Resistive |
| Display Driver IC | ILI9488 |
| Touch Controller IC | XPT2046 |
| Interface | SPI |
| Operating Voltage | 3.3V / 5V (logic level compatible) |
| Backlight Voltage | 3.3V |
| Backlight Current | ~120mA |
| Dimensions | 85.5mm x 55.8mm x 3.5mm |
| Operating Temperature | -20°C to 70°C |
Pin Configuration
The display module has a 14-pin interface. Below is the pinout description:
| Pin No. | Name | Description |
|---|---|---|
| 1 | GND | Ground |
| 2 | VCC | Power supply (3.3V or 5V) |
| 3 | CS | Chip Select for ILI9488 (active low) |
| 4 | RESET | Reset pin for ILI9488 (active low) |
| 5 | DC | Data/Command control for ILI9488 |
| 6 | SDI | Serial Data Input (MOSI for ILI9488) |
| 7 | SCK | Serial Clock for ILI9488 |
| 8 | LED | Backlight control (connect to 3.3V for always on) |
| 9 | T_CS | Chip Select for XPT2046 (active low) |
| 10 | T_IRQ | Interrupt pin for XPT2046 (active low) |
| 11 | T_DO | Data Output (MISO for XPT2046) |
| 12 | T_DIN | Data Input (MOSI for XPT2046) |
| 13 | T_CLK | Serial Clock for XPT2046 |
| 14 | T_VCC | Power supply for XPT2046 (3.3V or 5V) |
Usage Instructions
Connecting the Display to an Arduino UNO
To use the Pantalla 3.5" Táctil Resistiva SPI with an Arduino UNO, connect the pins as follows:
| Display Pin | Arduino Pin |
|---|---|
| GND | GND |
| VCC | 5V |
| CS | D10 |
| RESET | D9 |
| DC | D8 |
| SDI | D11 |
| SCK | D13 |
| LED | 3.3V |
| T_CS | D4 |
| T_IRQ | D3 |
| T_DO | D12 |
| T_DIN | D11 |
| T_CLK | D13 |
| T_VCC | 5V |
Arduino Code Example
Below is an example of how to initialize and use the display and touchscreen with the Arduino UNO. This example uses the Adafruit_GFX, Adafruit_ILI9488, and XPT2046_Touchscreen libraries.
#include <Adafruit_GFX.h>          // Graphics library for ILI9488
#include <Adafruit_ILI9488.h>      // Driver for ILI9488
#include <XPT2046_Touchscreen.h>   // Touchscreen library for XPT2046

// Define pins for the display
#define TFT_CS   10  // Chip Select for ILI9488
#define TFT_DC   8   // Data/Command for ILI9488
#define TFT_RST  9   // Reset for ILI9488

// Define pins for the touchscreen
#define TOUCH_CS 4   // Chip Select for XPT2046
#define TOUCH_IRQ 3  // Interrupt pin for XPT2046

// Create display and touchscreen objects
Adafruit_ILI9488 tft = Adafruit_ILI9488(TFT_CS, TFT_DC, TFT_RST);
XPT2046_Touchscreen ts(TOUCH_CS, TOUCH_IRQ);

void setup() {
  // Initialize serial communication for debugging
  Serial.begin(9600);

  // Initialize the display
  tft.begin();
  tft.setRotation(1);  // Set display orientation
  tft.fillScreen(ILI9488_BLACK);  // Clear the screen

  // Initialize the touchscreen
  if (!ts.begin()) {
    Serial.println("Touchscreen initialization failed!");
  } else {
    Serial.println("Touchscreen initialized successfully.");
  }
}

void loop() {
  // Check if the touchscreen is being touched
  if (ts.touched()) {
    TS_Point p = ts.getPoint();  // Get touch coordinates

    // Map touch coordinates to screen dimensions
    int x = map(p.x, 200, 3800, 0, tft.width());
    int y = map(p.y, 200, 3800, 0, tft.height());

    // Draw a circle at the touch point
    tft.fillCircle(x, y, 5, ILI9488_RED);

    // Print touch coordinates to the serial monitor
    Serial.print("Touch at: ");
    Serial.print("X=");
    Serial.print(x);
    Serial.print(", Y=");
    Serial.println(y);
  }
}
Important Considerations
- Power Supply: Ensure the display is powered with the correct voltage (3.3V or 5V). Incorrect voltage may damage the module.
- SPI Speed: Use a moderate SPI clock speed (e.g., 4 MHz) to ensure stable communication.
- Touch Calibration: The touchscreen may require calibration for accurate touch detection. Adjust the
map()function values in the code as needed. - Backlight Control: The backlight pin (LED) can be connected to a PWM pin for brightness control.
Troubleshooting and FAQs
Common Issues
No Display Output:
- Verify all connections are secure and match the pinout table.
- Ensure the power supply voltage is correct.
- Check if the
Adafruit_ILI9488library is properly installed.
Touchscreen Not Responding:
- Confirm the
XPT2046_Touchscreenlibrary is installed. - Check the
T_CSandT_IRQconnections. - Ensure the touchscreen is not physically damaged.
- Confirm the
Incorrect Touch Coordinates:
- Adjust the
map()function values in the code to calibrate the touchscreen. - Ensure the display orientation (
setRotation()) matches the touch mapping.
- Adjust the
Tips for Troubleshooting
- Use a multimeter to check for continuity and proper voltage levels.
- Test the display and touchscreen separately to isolate issues.
- Refer to the library documentation for additional configuration options.
By following this documentation, you can successfully integrate the Pantalla 3.5" Táctil Resistiva SPI ILI9488 y XPT2046 into your projects and create interactive user interfaces with ease.