How to Use Round Rocker Switch with led: Examples, Pinouts, and Specs
Introduction
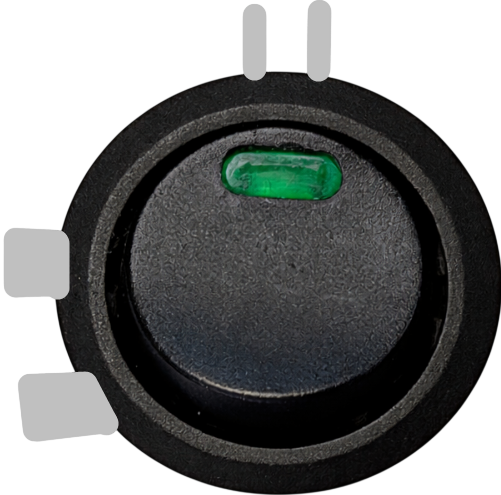
The Round Rocker Switch with LED is a versatile and user-friendly component designed for power control in electronic circuits. It features an integrated LED indicator that provides a clear visual representation of the switch's status (on/off). This switch is widely used in household appliances, automotive applications, and DIY electronics projects due to its compact design and ease of use.
Explore Projects Built with Round Rocker Switch with led

Explore Projects Built with Round Rocker Switch with led
Common Applications:
- Power control in electronic devices and appliances
- Automotive dashboards and control panels
- DIY electronics and hobbyist projects
- Industrial equipment and machinery
Technical Specifications
Below are the key technical details of the Round Rocker Switch with LED:
| Parameter | Value |
|---|---|
| Operating Voltage | 12V DC (typical) |
| LED Voltage | 12V DC |
| Current Rating | 6A @ 125V AC / 3A @ 250V AC |
| Contact Resistance | ≤ 50 mΩ |
| Insulation Resistance | ≥ 100 MΩ |
| Operating Temperature | -25°C to +85°C |
| Mounting Hole Diameter | 20mm |
| Switch Type | SPST (Single Pole Single Throw) |
| LED Color | Red (varies by model) |
Pin Configuration and Descriptions
The Round Rocker Switch with LED typically has three pins. The table below describes each pin:
| Pin Number | Label | Description |
|---|---|---|
| 1 | Load | Connects to the load (e.g., the device or circuit being powered). |
| 2 | Power | Connects to the positive terminal of the power supply. |
| 3 | Ground | Connects to the negative terminal of the power supply (common ground). |
Usage Instructions
How to Use the Component in a Circuit
Mounting the Switch:
- Drill a 20mm hole in your enclosure or panel to securely mount the switch.
- Insert the switch into the hole and ensure it fits snugly.
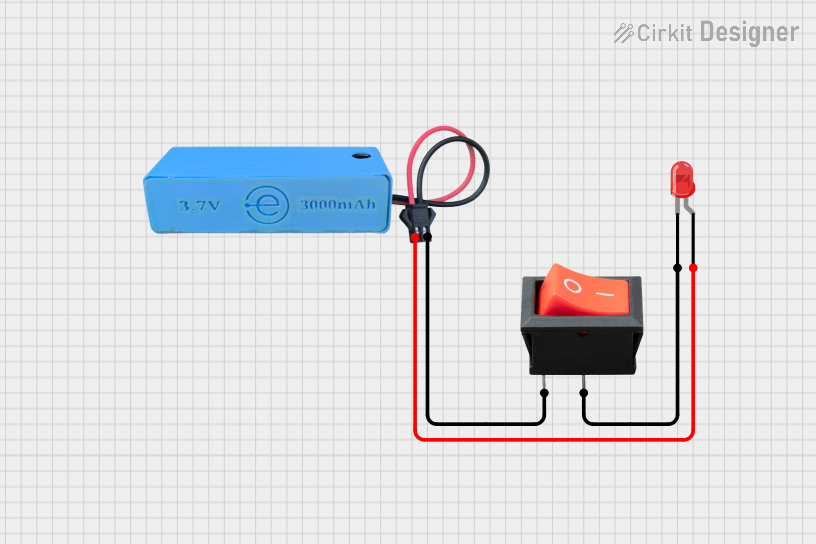
Wiring the Switch:
- Connect the Power (Pin 2) to the positive terminal of your power supply.
- Connect the Load (Pin 1) to the positive terminal of the device or circuit you want to control.
- Connect the Ground (Pin 3) to the negative terminal of the power supply and the device's ground.
LED Indicator:
- The LED indicator will light up when the switch is in the "ON" position, providing a visual cue.
Important Considerations and Best Practices
- Ensure the operating voltage and current of your circuit do not exceed the switch's rated values.
- Use appropriate wire gauges to handle the current safely.
- If the LED does not light up, verify the polarity of the connections (LEDs are polarity-sensitive).
- Avoid exposing the switch to excessive moisture or dust to maintain its longevity.
Example: Connecting to an Arduino UNO
The Round Rocker Switch with LED can be used to control a 12V device in conjunction with an Arduino UNO. Below is an example circuit and code:
Circuit Description:
- The switch controls a 12V DC motor.
- The Arduino monitors the switch's state via a digital input pin.
Code Example:
// Arduino code to monitor the state of a Round Rocker Switch with LED
// and control an LED on the Arduino board accordingly.

const int switchPin = 2;  // Pin connected to the switch's Load pin
const int ledPin = 13;    // Built-in LED on the Arduino board

void setup() {
  pinMode(switchPin, INPUT_PULLUP); // Configure switch pin as input with pull-up resistor
  pinMode(ledPin, OUTPUT);          // Configure LED pin as output
}

void loop() {
  int switchState = digitalRead(switchPin); // Read the state of the switch

  if (switchState == LOW) { // Switch is ON (connected to ground)
    digitalWrite(ledPin, HIGH); // Turn on the Arduino's LED
  } else {
    digitalWrite(ledPin, LOW);  // Turn off the Arduino's LED
  }
}
Note: The switch's Load pin is connected to the Arduino's digital pin with a pull-up resistor enabled. When the switch is ON, it pulls the pin LOW.
Troubleshooting and FAQs
Common Issues and Solutions
LED Does Not Light Up:
- Cause: Incorrect polarity or insufficient voltage.
- Solution: Verify the wiring and ensure the power supply matches the LED's voltage rating.
Switch Does Not Control the Load:
- Cause: Loose or incorrect connections.
- Solution: Double-check all connections and ensure the load is properly connected to Pin 1.
Switch Feels Loose in the Mounting Hole:
- Cause: Incorrect hole size or improper mounting.
- Solution: Ensure the mounting hole is exactly 20mm in diameter and secure the switch firmly.
Switch Overheats:
- Cause: Exceeding the current rating.
- Solution: Ensure the load's current does not exceed the switch's rated current (6A @ 125V AC or 3A @ 250V AC).
FAQs
Q1: Can I use this switch for DC circuits other than 12V?
A1: Yes, but ensure the voltage and current ratings of the switch are not exceeded.
Q2: Can the LED indicator be replaced with a different color?
A2: No, the LED is integrated into the switch and cannot be replaced.
Q3: Is the switch waterproof?
A3: Most models are not waterproof. If you need a waterproof switch, look for an IP-rated version.
Q4: Can I use this switch to control high-power devices?
A4: Only if the device's power requirements are within the switch's rated current and voltage. For higher power, use a relay in conjunction with the switch.