Cirkit Designer Logo
Cirkit Designer
Your all-in-one circuit design IDE
Home / 
Component Documentation

How to Use ProtoSnap - Pro Mini - Light Sensor: Examples, Pinouts, and Specs

Image of ProtoSnap - Pro Mini - Light Sensor
Cirkit Designer LogoDesign with ProtoSnap - Pro Mini - Light Sensor in Cirkit Designer

Introduction

The ProtoSnap - Pro Mini - Light Sensor is a compact electronic module designed for detecting ambient light levels. It integrates a light-sensitive element with a microcontroller-friendly interface, making it an ideal choice for projects such as automatic lighting control, light-activated alarms, and environmental monitoring. Its small form factor and ease of use allow it to be incorporated into a wide range of applications, from hobbyist projects to professional systems.

Explore Projects Built with ProtoSnap - Pro Mini - Light Sensor

Use Cirkit Designer to design, explore, and prototype these projects online. Some projects support real-time simulation. Click "Open Project" to start designing instantly!
Arduino Nano Controlled Ambient Light Sensing and NeoPixel Display
Image of GuesturLED: A project utilizing ProtoSnap - Pro Mini - Light Sensor in a practical application
This circuit features an Arduino Nano microcontroller interfaced with an APDS-9930 Proximity and Ambient Light Sensor for sensing environmental light and proximity. The Arduino Nano also controls an Adafruit Quarter 60 NeoPixel Ring, likely for visual feedback or display purposes. The sensor communicates with the Arduino via I2C (SDA and SCL connections), and the NeoPixel Ring is driven by a digital output (D8) from the Arduino.
Cirkit Designer LogoOpen Project in Cirkit Designer
Arduino Pro Mini-Based Battery-Powered Laser Emitter with Temperature Sensing and OLED Display
Image of temp gun: A project utilizing ProtoSnap - Pro Mini - Light Sensor in a practical application
This circuit is a sensor and display system powered by a 9V battery, featuring an Arduino Pro Mini microcontroller. It includes a momentary switch to control power, a KY-008 laser emitter, an MLX90614 temperature sensor, and an OLED display for output. The system is designed to read temperature data and display it on the OLED screen, with the laser emitter potentially used for targeting or indication purposes.
Cirkit Designer LogoOpen Project in Cirkit Designer
ESP32-Based Ambient Light Sensing System
Image of color sensor interfacing: A project utilizing ProtoSnap - Pro Mini - Light Sensor in a practical application
This circuit integrates an ESP32 Wroom microcontroller with an APDS-9930 Proximity and Ambient Light Sensor. The ESP32 provides power to the sensor and communicates with it via I2C, using its GPIO21/SDA and GPIO22/SCL pins for data transfer. The circuit is designed to measure proximity and ambient light levels, which can be processed and utilized by the ESP32 for various applications.
Cirkit Designer LogoOpen Project in Cirkit Designer
Arduino Pro Mini-Based Battery-Powered Temperature and Laser Display System
Image of thermal temperture gun: A project utilizing ProtoSnap - Pro Mini - Light Sensor in a practical application
This circuit features an Arduino Pro Mini microcontroller interfaced with a USB Serial TTL for programming and power, a momentary switch for user input, and a 9V battery for power supply. It includes a KY-008 laser emitter, a 0.96" OLED display, and an MLX90614 temperature sensor, all connected to the Arduino for a potential temperature measurement and display application.
Cirkit Designer LogoOpen Project in Cirkit Designer

Explore Projects Built with ProtoSnap - Pro Mini - Light Sensor

Use Cirkit Designer to design, explore, and prototype these projects online. Some projects support real-time simulation. Click "Open Project" to start designing instantly!
Image of GuesturLED: A project utilizing ProtoSnap - Pro Mini - Light Sensor in a practical application
Arduino Nano Controlled Ambient Light Sensing and NeoPixel Display
This circuit features an Arduino Nano microcontroller interfaced with an APDS-9930 Proximity and Ambient Light Sensor for sensing environmental light and proximity. The Arduino Nano also controls an Adafruit Quarter 60 NeoPixel Ring, likely for visual feedback or display purposes. The sensor communicates with the Arduino via I2C (SDA and SCL connections), and the NeoPixel Ring is driven by a digital output (D8) from the Arduino.
Cirkit Designer LogoOpen Project in Cirkit Designer
Image of temp gun: A project utilizing ProtoSnap - Pro Mini - Light Sensor in a practical application
Arduino Pro Mini-Based Battery-Powered Laser Emitter with Temperature Sensing and OLED Display
This circuit is a sensor and display system powered by a 9V battery, featuring an Arduino Pro Mini microcontroller. It includes a momentary switch to control power, a KY-008 laser emitter, an MLX90614 temperature sensor, and an OLED display for output. The system is designed to read temperature data and display it on the OLED screen, with the laser emitter potentially used for targeting or indication purposes.
Cirkit Designer LogoOpen Project in Cirkit Designer
Image of color sensor interfacing: A project utilizing ProtoSnap - Pro Mini - Light Sensor in a practical application
ESP32-Based Ambient Light Sensing System
This circuit integrates an ESP32 Wroom microcontroller with an APDS-9930 Proximity and Ambient Light Sensor. The ESP32 provides power to the sensor and communicates with it via I2C, using its GPIO21/SDA and GPIO22/SCL pins for data transfer. The circuit is designed to measure proximity and ambient light levels, which can be processed and utilized by the ESP32 for various applications.
Cirkit Designer LogoOpen Project in Cirkit Designer
Image of thermal temperture gun: A project utilizing ProtoSnap - Pro Mini - Light Sensor in a practical application
Arduino Pro Mini-Based Battery-Powered Temperature and Laser Display System
This circuit features an Arduino Pro Mini microcontroller interfaced with a USB Serial TTL for programming and power, a momentary switch for user input, and a 9V battery for power supply. It includes a KY-008 laser emitter, a 0.96" OLED display, and an MLX90614 temperature sensor, all connected to the Arduino for a potential temperature measurement and display application.
Cirkit Designer LogoOpen Project in Cirkit Designer

Technical Specifications

Key Technical Details

  • Operating Voltage: 3.3V to 5V
  • Output Signal: Analog voltage proportional to light intensity
  • Sensitivity Range: Detects a wide range of light conditions
  • Interface: Analog
  • Dimensions: Miniature footprint for easy integration

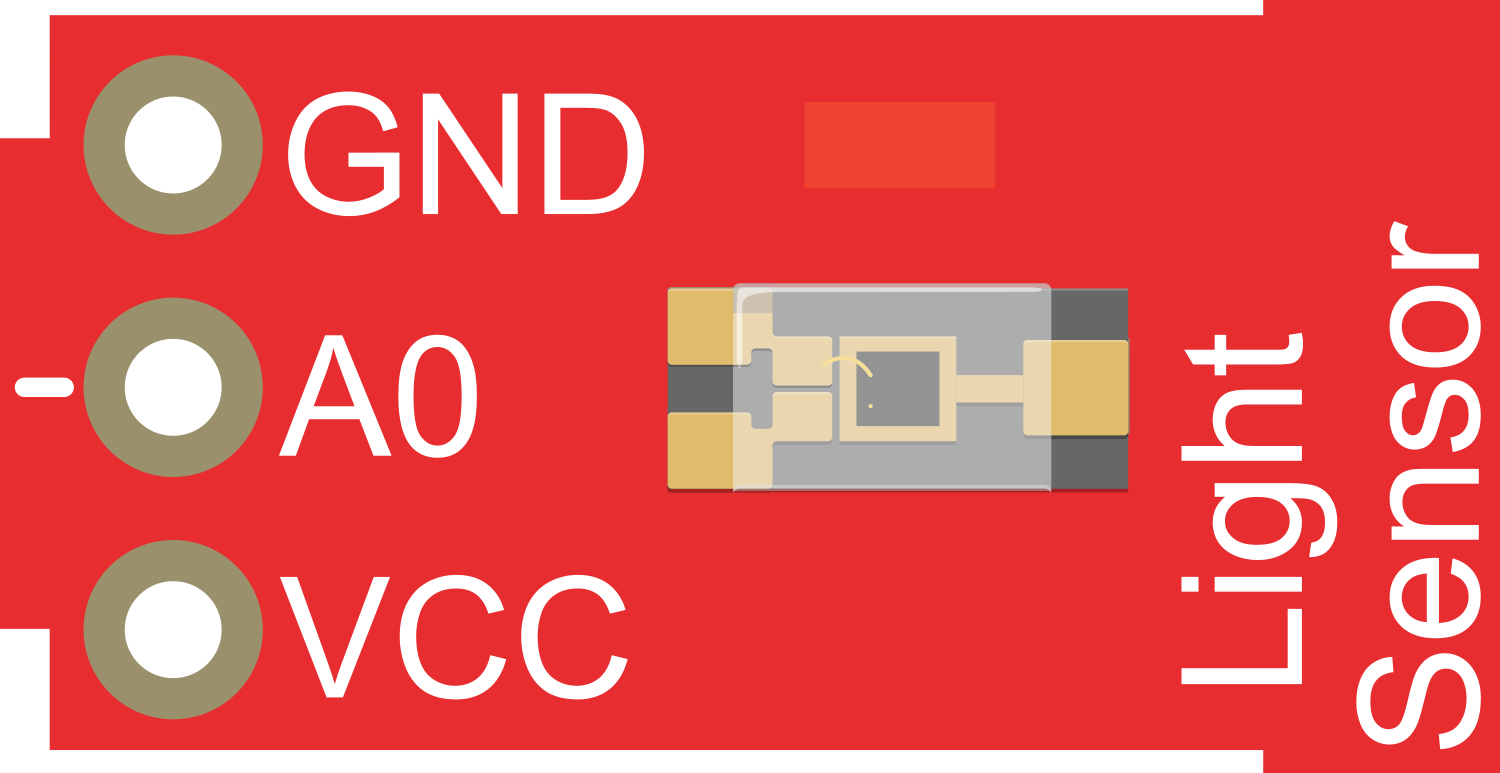
Pin Configuration and Descriptions

Pin Number Name Description
1 VCC Power supply (3.3V - 5V)
2 GND Ground connection
3 AOUT Analog output signal

Usage Instructions

Integration into a Circuit

To use the ProtoSnap - Pro Mini - Light Sensor in a circuit, follow these steps:

  1. Connect the VCC pin to a 3.3V or 5V power supply.
  2. Connect the GND pin to the ground of the power supply.
  3. Connect the AOUT pin to an analog input pin on your microcontroller (e.g., Arduino UNO).

Best Practices

  • Avoid exposing the sensor to direct sunlight or strong artificial light sources that could damage the sensor or cause inaccurate readings.
  • Use a pull-down resistor if necessary to ensure a stable output signal.
  • Calibrate the sensor in the environment where it will be used to account for ambient light conditions.

Example Code for Arduino UNO

// Define the pin connected to the light sensor
const int lightSensorPin = A0; // Analog input pin that the sensor is attached to

void setup() {
  // Initialize serial communication at 9600 bits per second:
  Serial.begin(9600);
}

void loop() {
  // Read the value from the light sensor:
  int sensorValue = analogRead(lightSensorPin);
  // Convert the analog reading (which goes from 0 - 1023) to a voltage (0 - 5V):
  float voltage = sensorValue * (5.0 / 1023.0);
  // Print out the value in volts:
  Serial.println(voltage);
  
  // Wait for a second to get stable readings
  delay(1000);
}

Troubleshooting and FAQs

Common Issues

  • Inaccurate Readings: Ensure that the sensor is not exposed to direct light sources that could skew the readings. Also, check for any obstructions or dirt on the sensor surface.
  • No Output: Verify that all connections are secure and the power supply is within the specified voltage range. Check the analog input pin for proper configuration in your code.

Solutions and Tips

  • Calibration: Perform calibration in the actual environment where the sensor will be used to ensure accurate readings.
  • Shielding: Use a shield or cover to protect the sensor from direct light and to minimize the impact of sudden changes in light conditions.

FAQs

Q: Can the sensor be used outdoors? A: Yes, but it should be protected from direct sunlight and harsh weather conditions.

Q: What is the resolution of the sensor? A: The resolution depends on the analog-to-digital converter (ADC) of the microcontroller. For an Arduino UNO, it is 10 bits (0-1023).

Q: How long does the sensor take to respond to changes in light? A: The sensor responds almost instantaneously, but the overall response time will also depend on the sampling rate set in your code.

Q: Can I use this sensor with a 3.3V system? A: Yes, the sensor can operate at 3.3V, but the output voltage range will be lower, affecting the resolution.