
How to Use TP4056 + DW01: Examples, Pinouts, and Specs
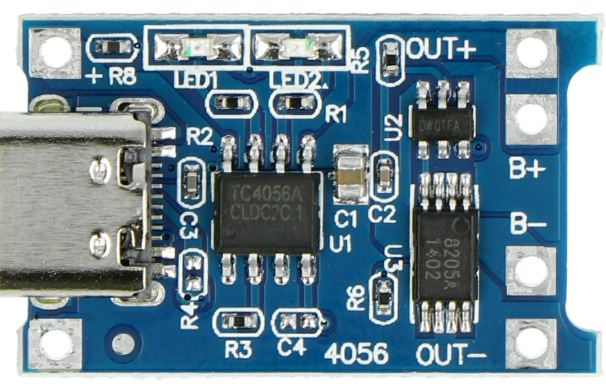
 Design with TP4056 + DW01 in Cirkit Designer
Introduction
The TP4056 + DW01 is a lithium-ion battery charging and protection module manufactured by Makers. It combines the TP4056 linear battery charger IC with the DW01 battery protection IC, providing a compact and efficient solution for charging and safeguarding single-cell lithium-ion or lithium-polymer batteries. The module is widely used in portable electronics, DIY projects, and battery-powered devices due to its simplicity, reliability, and integrated safety features.
Explore Projects Built with TP4056 + DW01
 Open Project in Cirkit Designer
 Open Project in Cirkit Designer
 Open Project in Cirkit Designer
 Open Project in Cirkit Designer
Explore Projects Built with TP4056 + DW01
Open Project in Cirkit DesignerOpen Project in Cirkit DesignerOpen Project in Cirkit DesignerOpen Project in Cirkit DesignerCommon Applications
- Charging single-cell lithium-ion or lithium-polymer batteries
- Power banks and portable chargers
- Wearable devices
- DIY electronics projects
- Battery-powered IoT devices
Technical Specifications
Key Technical Details
| Parameter | Value |
|---|---|
| Input Voltage Range | 4.5V to 5.5V |
| Charging Voltage | 4.2V ± 1% |
| Maximum Charging Current | 1A (adjustable via external resistor) |
| Battery Overcharge Protection | 4.3V ± 0.05V |
| Battery Overdischarge Protection | 2.4V ± 0.1V |
| Overcurrent Protection | 3A (typical) |
| Operating Temperature Range | -40°C to +85°C |
| Dimensions | ~25mm x 19mm |
Pin Configuration and Descriptions
| Pin Name | Description |
|---|---|
| IN+ | Positive input terminal for the charging voltage (4.5V to 5.5V). |
| IN- | Negative input terminal (ground) for the charging voltage. |
| BAT+ | Positive terminal for the lithium-ion battery connection. |
| BAT- | Negative terminal for the lithium-ion battery connection. |
| OUT+ | Positive output terminal for the load connected to the battery. |
| OUT- | Negative output terminal for the load connected to the battery. |
Usage Instructions
How to Use the TP4056 + DW01 in a Circuit
- Power Supply Connection: Connect a 5V DC power source (e.g., USB) to the
IN+andIN-pins. Ensure the input voltage is within the 4.5V to 5.5V range. - Battery Connection: Connect the positive terminal of the lithium-ion battery to the
BAT+pin and the negative terminal to theBAT-pin. - Load Connection: If you want to power a load while charging the battery, connect the load to the
OUT+andOUT-pins. - Adjust Charging Current: The charging current can be adjusted by changing the value of the resistor connected to the
PROGpin of the TP4056 IC. For example:- 1.2kΩ resistor = 1A charging current (default)
- 2kΩ resistor = 0.5A charging current
- LED Indicators:
- Red LED: Charging in progress.
- Blue LED: Charging complete.
Important Considerations and Best Practices
- Battery Compatibility: Use only single-cell lithium-ion or lithium-polymer batteries with a nominal voltage of 3.7V.
- Heat Dissipation: The TP4056 IC may heat up during charging. Ensure proper ventilation or add a heatsink if necessary.
- Avoid Reverse Polarity: Double-check the polarity of the battery and power supply connections to prevent damage.
- Load Current: Ensure the load current does not exceed the module's overcurrent protection limit (3A typical).
Example: Using TP4056 + DW01 with Arduino UNO
The TP4056 + DW01 module can be used to power an Arduino UNO from a lithium-ion battery. Below is an example of how to monitor the battery voltage using the Arduino's analog input.
Circuit Connections
- Connect the
OUT+pin of the TP4056 module to the Arduino'sVINpin. - Connect the
OUT-pin of the TP4056 module to the Arduino'sGNDpin. - Use a voltage divider circuit to step down the battery voltage for safe measurement by the Arduino's analog pin.
Arduino Code
// Define the analog pin connected to the voltage divider
const int batteryPin = A0;

// Define the voltage divider ratio (e.g., R1 = 10kΩ, R2 = 10kΩ)
const float voltageDividerRatio = 2.0;

// Reference voltage of the Arduino (5V for most boards)
const float referenceVoltage = 5.0;

void setup() {
  Serial.begin(9600); // Initialize serial communication
}

void loop() {
  int analogValue = analogRead(batteryPin); // Read the analog pin
  float batteryVoltage = (analogValue / 1023.0) * referenceVoltage * voltageDividerRatio;

  // Print the battery voltage to the Serial Monitor
  Serial.print("Battery Voltage: ");
  Serial.print(batteryVoltage);
  Serial.println(" V");

  delay(1000); // Wait for 1 second before the next reading
}
Troubleshooting and FAQs
Common Issues and Solutions
Module Overheating:
- Cause: High charging current or insufficient ventilation.
- Solution: Reduce the charging current by increasing the resistor value on the
PROGpin or improve ventilation.
Battery Not Charging:
- Cause: Incorrect connections or damaged battery.
- Solution: Verify all connections and ensure the battery is functional.
No Output Voltage:
- Cause: Battery is overdischarged or module is damaged.
- Solution: Check the battery voltage. If it is below 2.4V, precharge the battery using a dedicated charger.
LEDs Not Working:
- Cause: Faulty LEDs or incorrect wiring.
- Solution: Inspect the LEDs and connections. Replace faulty components if necessary.
FAQs
Q: Can I use the TP4056 + DW01 module to charge multiple batteries in series?
A: No, the module is designed for single-cell lithium-ion or lithium-polymer batteries only.
Q: How do I adjust the charging current?
A: Change the resistor connected to the PROG pin of the TP4056 IC. Refer to the datasheet for resistor values corresponding to different charging currents.
Q: Is it safe to leave the battery connected to the module after charging?
A: Yes, the DW01 protection IC prevents overcharging and overdischarging, ensuring battery safety.
Q: Can I power a load while charging the battery?
A: Yes, the module supports simultaneous charging and discharging, but ensure the load current does not exceed the module's limits.