How to Use Finger Print: Examples, Pinouts, and Specs
Introduction
The AS608 Fingerprint Sensor, manufactured by IDK, is a biometric device designed to capture and recognize the unique patterns of ridges and valleys on a person's finger. This sensor is widely used for identification and authentication purposes in various applications, including security systems, time attendance systems, and access control systems.
Explore Projects Built with Finger Print

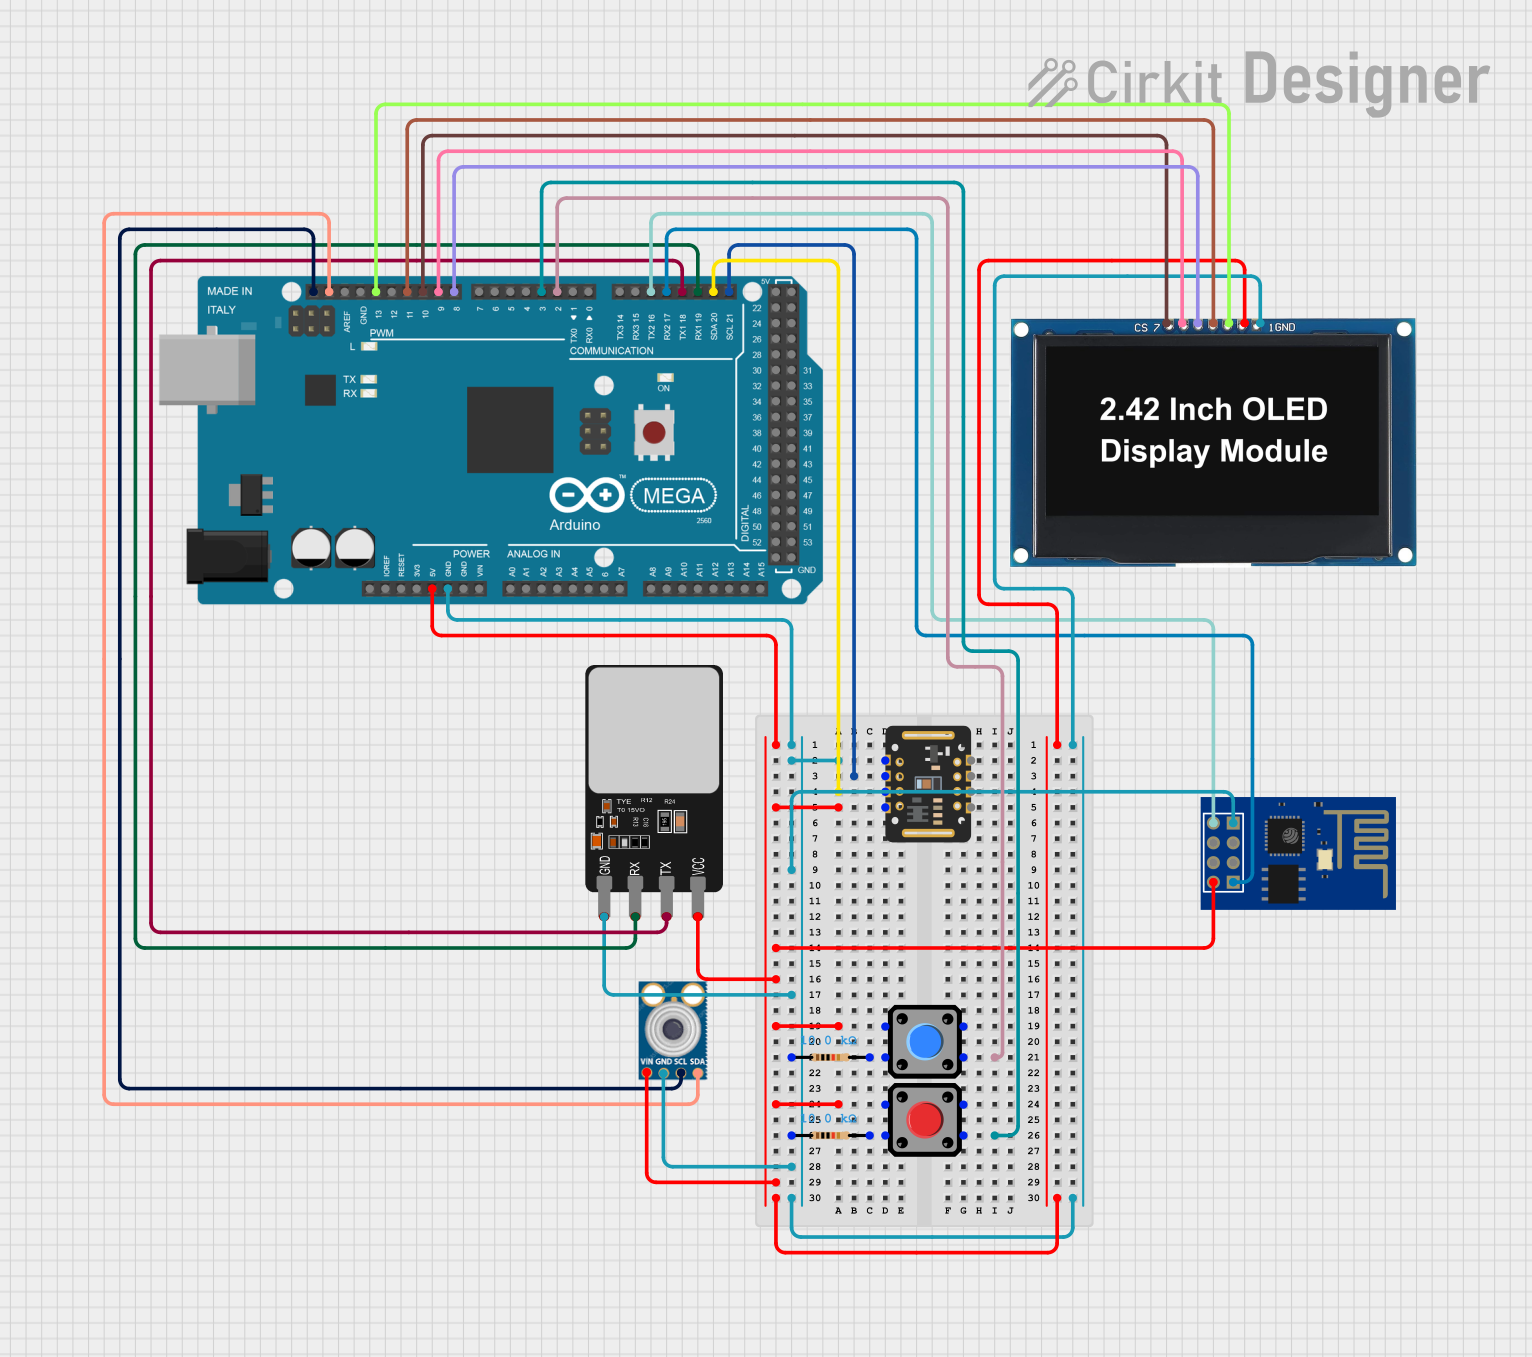
Explore Projects Built with Finger Print
Technical Specifications
Key Technical Details
| Parameter | Value |
|---|---|
| Operating Voltage | 3.6V - 6.0V |
| Operating Current | < 120mA |
| Peak Current | < 150mA |
| Fingerprint Capacity | 162 templates |
| Interface | UART (TTL logic level) |
| Baud Rate | 9600 (default), adjustable |
| Image Resolution | 508 DPI |
| Working Temperature | -20°C to +50°C |
| Storage Temperature | -40°C to +85°C |
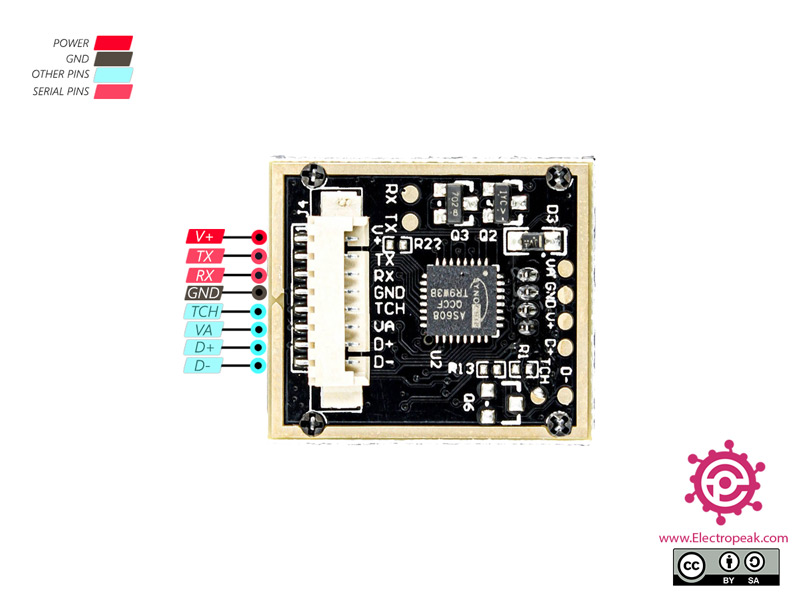
Pin Configuration and Descriptions
| Pin Number | Pin Name | Description |
|---|---|---|
| 1 | VCC | Power Supply (3.6V - 6.0V) |
| 2 | GND | Ground |
| 3 | TX | UART Transmit (Data output) |
| 4 | RX | UART Receive (Data input) |
| 5 | TOUCH | Touch signal output (active low) |
| 6 | WAKE | Wake-up signal input (active high) |
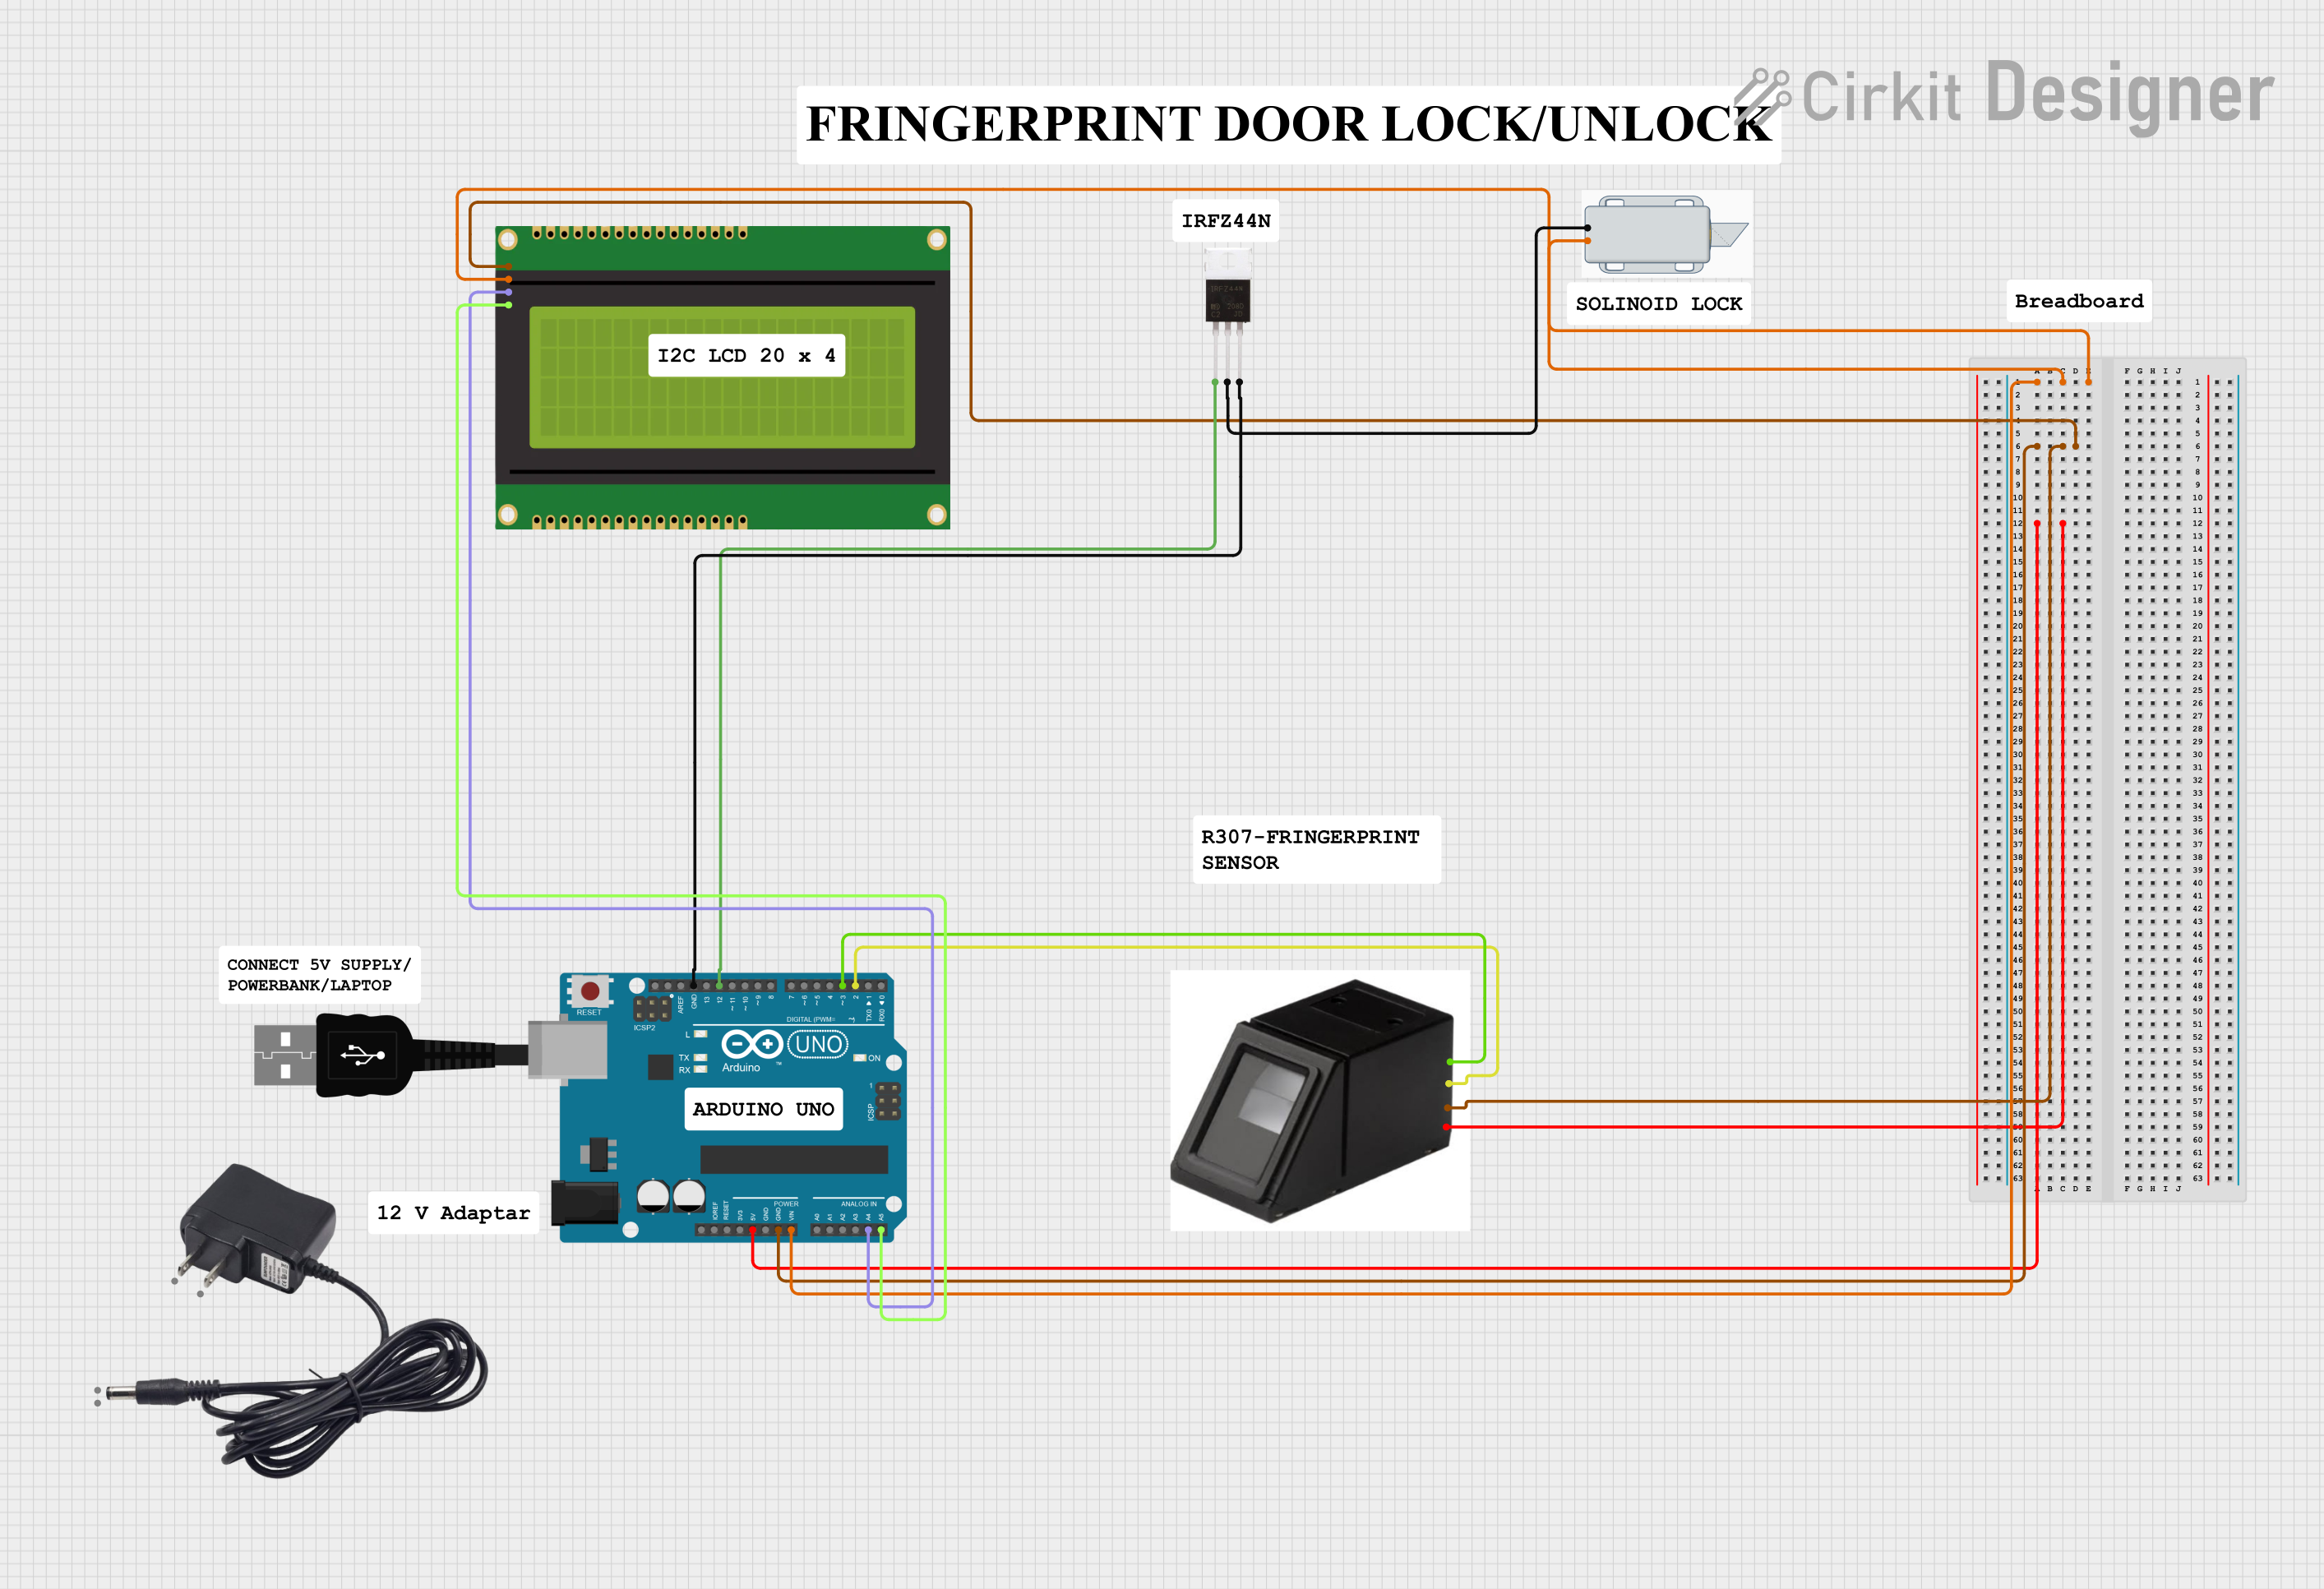
Usage Instructions
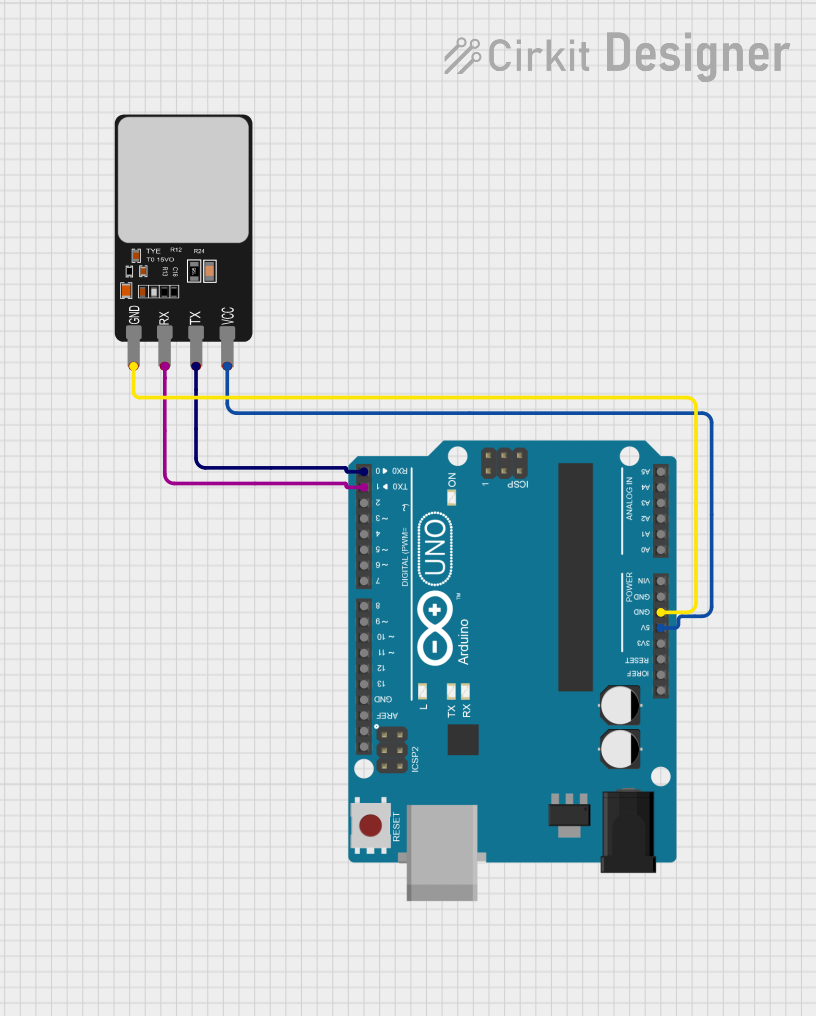
How to Use the AS608 Fingerprint Sensor in a Circuit
- Power Supply: Connect the VCC pin to a 3.6V - 6.0V power supply and the GND pin to the ground of your circuit.
- UART Communication: Connect the TX pin of the sensor to the RX pin of your microcontroller (e.g., Arduino UNO) and the RX pin of the sensor to the TX pin of your microcontroller.
- Touch Signal: The TOUCH pin can be used to detect when a finger is placed on the sensor. This pin goes low when a finger is detected.
- Wake-up Signal: The WAKE pin can be used to wake up the sensor from sleep mode. This pin should be driven high to wake up the sensor.
Important Considerations and Best Practices
- Ensure that the power supply is stable and within the specified range to avoid damage to the sensor.
- Use proper UART communication settings (default baud rate is 9600) to ensure reliable data transfer.
- Avoid placing the sensor in direct sunlight or dusty environments to maintain accurate fingerprint recognition.
- Regularly clean the sensor surface to ensure optimal performance.
Example Code for Arduino UNO
Below is an example code to interface the AS608 Fingerprint Sensor with an Arduino UNO:
#include <Adafruit_Fingerprint.h>
#include <SoftwareSerial.h>

// Define the pins for the software serial communication
SoftwareSerial mySerial(2, 3); // RX, TX

Adafruit_Fingerprint finger = Adafruit_Fingerprint(&mySerial);

void setup() {
  Serial.begin(9600);
  while (!Serial);  // Wait for serial port to be available
  delay(100);
  Serial.println("AS608 Fingerprint Sensor Test");

  // Initialize the fingerprint sensor
  finger.begin(57600);
  if (finger.verifyPassword()) {
    Serial.println("Found fingerprint sensor!");
  } else {
    Serial.println("Did not find fingerprint sensor :(");
    while (1) { delay(1); }
  }
}

void loop() {
  Serial.println("Waiting for valid finger...");
  uint8_t id = getFingerprintID();
  if (id != -1) {
    Serial.print("Fingerprint ID: ");
    Serial.println(id);
  }
  delay(1000);
}

uint8_t getFingerprintID() {
  uint8_t p = finger.getImage();
  switch (p) {
    case FINGERPRINT_OK:
      Serial.println("Image taken");
      break;
    case FINGERPRINT_NOFINGER:
      Serial.println("No finger detected");
      return -1;
    case FINGERPRINT_PACKETRECIEVEERR:
      Serial.println("Communication error");
      return -1;
    case FINGERPRINT_IMAGEFAIL:
      Serial.println("Imaging error");
      return -1;
    default:
      Serial.println("Unknown error");
      return -1;
  }

  p = finger.image2Tz();
  switch (p) {
    case FINGERPRINT_OK:
      Serial.println("Image converted");
      break;
    case FINGERPRINT_IMAGEMESS:
      Serial.println("Image too messy");
      return -1;
    case FINGERPRINT_PACKETRECIEVEERR:
      Serial.println("Communication error");
      return -1;
    case FINGERPRINT_FEATUREFAIL:
      Serial.println("Could not find fingerprint features");
      return -1;
    case FINGERPRINT_INVALIDIMAGE:
      Serial.println("Could not find fingerprint features");
      return -1;
    default:
      Serial.println("Unknown error");
      return -1;
  }

  p = finger.fingerSearch();
  if (p == FINGERPRINT_OK) {
    Serial.println("Fingerprint found!");
    return finger.fingerID;
  } else if (p == FINGERPRINT_NOTFOUND) {
    Serial.println("Fingerprint not found");
    return -1;
  } else {
    Serial.println("Communication error");
    return -1;
  }
}
Troubleshooting and FAQs
Common Issues and Solutions
Sensor Not Detected:
- Solution: Ensure that the power supply is connected properly and the voltage is within the specified range. Check the UART connections and ensure the correct baud rate is set.
Fingerprint Not Recognized:
- Solution: Clean the sensor surface to remove any dirt or smudges. Ensure that the finger is placed correctly on the sensor. Re-enroll the fingerprint if necessary.
Communication Errors:
- Solution: Check the UART connections and ensure that the TX and RX pins are connected correctly. Verify that the baud rate settings match between the sensor and the microcontroller.
FAQs
Can the AS608 Fingerprint Sensor store multiple fingerprints?
- Yes, the AS608 can store up to 162 fingerprint templates.
What is the default baud rate for the AS608 Fingerprint Sensor?
- The default baud rate is 9600, but it can be adjusted if needed.
How do I clean the fingerprint sensor?
- Use a soft, lint-free cloth slightly dampened with water or a mild cleaning solution. Gently wipe the sensor surface to remove any dirt or smudges.
Can the AS608 Fingerprint Sensor be used outdoors?
- It is recommended to use the sensor in a controlled environment to ensure accurate fingerprint recognition. Avoid direct sunlight and dusty environments.
By following this documentation, users can effectively integrate and utilize the AS608 Fingerprint Sensor in their projects, ensuring reliable and accurate fingerprint recognition.