Cirkit Designer Logo
Cirkit Designer
Your all-in-one circuit design IDE
Home / 
Component Documentation

How to Use AEM10941 mini Evaluation Board: Examples, Pinouts, and Specs

Image of  AEM10941 mini Evaluation Board
Cirkit Designer LogoDesign with AEM10941 mini Evaluation Board in Cirkit Designer

Introduction

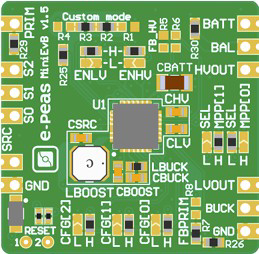
The AEM10941 mini Evaluation Board is a compact and versatile platform designed to evaluate the performance of the AEM10941M energy harvesting IC, manufactured by e-peas. This board enables users to efficiently convert energy from ambient sources, such as solar panels or thermoelectric generators, into usable power for low-power electronic applications. It is ideal for prototyping and testing energy harvesting solutions in IoT devices, wireless sensors, and other battery-independent systems.

Explore Projects Built with AEM10941 mini Evaluation Board

Use Cirkit Designer to design, explore, and prototype these projects online. Some projects support real-time simulation. Click "Open Project" to start designing instantly!
I2C-Controlled OLED Display with External EEPROM and Interactive Pushbuttons
Image of godmode: A project utilizing  AEM10941 mini Evaluation Board in a practical application
This is a microcontroller-based interactive device featuring a Wemos D1 Mini, an OLED display, external EEPROM, and an I/O expander. It includes user input buttons and status LEDs, with potential MIDI interface capabilities.
Cirkit Designer LogoOpen Project in Cirkit Designer
Wi-Fi Controlled Vibration-Sensing Robot with Battery Monitoring
Image of Vibration Trash: A project utilizing  AEM10941 mini Evaluation Board in a practical application
This circuit features a Wemos D1 Mini microcontroller connected to a MX1508 DC Motor Driver for controlling a DC motor, a SW-420 Vibration Sensor for detecting vibrations, and a Type-c Power Bank Module with an 18650 battery holder for power supply. The microcontroller monitors the vibration sensor and controls the motor driver based on the sensor's output, while also measuring the battery voltage through an ADC pin with a connected resistor for voltage scaling. The embedded code enables WiFi connectivity, OTA updates, and integration with Home Assistant for remote monitoring and control.
Cirkit Designer LogoOpen Project in Cirkit Designer
Nucleo 401RE Controlled Robotic Motor with Vibration Feedback and ADXL345 Accelerometer
Image of MLKIT: A project utilizing  AEM10941 mini Evaluation Board in a practical application
This circuit features a Nucleo 401RE microcontroller as the central processing unit, interfacing with an ADXL345 accelerometer and an INA219 current sensor over an I2C bus for motion sensing and power monitoring, respectively. A DC motor with an encoder is driven by an L298N motor driver, with speed control potentially provided by a connected potentiometer and vibration feedback through a vibration motor. The system is powered by a 12V battery, with voltage regulation provided for the various components.
Cirkit Designer LogoOpen Project in Cirkit Designer
Arduino Pro Mini-Based Battery-Powered Temperature and Laser Display System
Image of thermal temperture gun: A project utilizing  AEM10941 mini Evaluation Board in a practical application
This circuit features an Arduino Pro Mini microcontroller interfaced with a USB Serial TTL for programming and power, a momentary switch for user input, and a 9V battery for power supply. It includes a KY-008 laser emitter, a 0.96" OLED display, and an MLX90614 temperature sensor, all connected to the Arduino for a potential temperature measurement and display application.
Cirkit Designer LogoOpen Project in Cirkit Designer

Explore Projects Built with AEM10941 mini Evaluation Board

Use Cirkit Designer to design, explore, and prototype these projects online. Some projects support real-time simulation. Click "Open Project" to start designing instantly!
Image of godmode: A project utilizing  AEM10941 mini Evaluation Board in a practical application
I2C-Controlled OLED Display with External EEPROM and Interactive Pushbuttons
This is a microcontroller-based interactive device featuring a Wemos D1 Mini, an OLED display, external EEPROM, and an I/O expander. It includes user input buttons and status LEDs, with potential MIDI interface capabilities.
Cirkit Designer LogoOpen Project in Cirkit Designer
Image of Vibration Trash: A project utilizing  AEM10941 mini Evaluation Board in a practical application
Wi-Fi Controlled Vibration-Sensing Robot with Battery Monitoring
This circuit features a Wemos D1 Mini microcontroller connected to a MX1508 DC Motor Driver for controlling a DC motor, a SW-420 Vibration Sensor for detecting vibrations, and a Type-c Power Bank Module with an 18650 battery holder for power supply. The microcontroller monitors the vibration sensor and controls the motor driver based on the sensor's output, while also measuring the battery voltage through an ADC pin with a connected resistor for voltage scaling. The embedded code enables WiFi connectivity, OTA updates, and integration with Home Assistant for remote monitoring and control.
Cirkit Designer LogoOpen Project in Cirkit Designer
Image of MLKIT: A project utilizing  AEM10941 mini Evaluation Board in a practical application
Nucleo 401RE Controlled Robotic Motor with Vibration Feedback and ADXL345 Accelerometer
This circuit features a Nucleo 401RE microcontroller as the central processing unit, interfacing with an ADXL345 accelerometer and an INA219 current sensor over an I2C bus for motion sensing and power monitoring, respectively. A DC motor with an encoder is driven by an L298N motor driver, with speed control potentially provided by a connected potentiometer and vibration feedback through a vibration motor. The system is powered by a 12V battery, with voltage regulation provided for the various components.
Cirkit Designer LogoOpen Project in Cirkit Designer
Image of thermal temperture gun: A project utilizing  AEM10941 mini Evaluation Board in a practical application
Arduino Pro Mini-Based Battery-Powered Temperature and Laser Display System
This circuit features an Arduino Pro Mini microcontroller interfaced with a USB Serial TTL for programming and power, a momentary switch for user input, and a 9V battery for power supply. It includes a KY-008 laser emitter, a 0.96" OLED display, and an MLX90614 temperature sensor, all connected to the Arduino for a potential temperature measurement and display application.
Cirkit Designer LogoOpen Project in Cirkit Designer

Common Applications and Use Cases

  • IoT devices powered by solar or thermal energy
  • Wireless sensor networks
  • Wearable electronics
  • Remote monitoring systems
  • Battery-free or battery-assisted devices

Technical Specifications

Key Technical Details

  • Input Voltage Range: 50 mV to 5 V
  • Output Voltage (Primary): Configurable to 1.8 V, 2.5 V, 3.3 V, or 4.1 V
  • Output Voltage (Secondary): Fixed at 1.8 V
  • Cold Start Voltage: 380 mV (minimum input voltage required to start operation)
  • Quiescent Current: Ultra-low, enabling efficient energy harvesting
  • Energy Storage: Supports supercapacitors or rechargeable batteries
  • Maximum Power Point Tracking (MPPT): Configurable for optimal energy harvesting
  • Dimensions: Compact form factor for easy integration

Pin Configuration and Descriptions

The AEM10941 mini Evaluation Board features several key pins and connectors for input, output, and configuration. Below is a detailed description:

Input and Output Pins

Pin Name Type Description
VIN Input Connects to the energy source (e.g., solar panel or thermoelectric generator).
GND Ground Common ground for the circuit.
VOUT1 Output Primary output voltage (configurable to 1.8 V, 2.5 V, 3.3 V, or 4.1 V).
VOUT2 Output Secondary output voltage (fixed at 1.8 V).

Configuration Pins

Pin Name Type Description
MPPT Input Configures the Maximum Power Point Tracking (MPPT) ratio for optimal efficiency.
CFG Input Used to set the primary output voltage (VOUT1).

Energy Storage Pins

Pin Name Type Description
VBAT Input/Output Connects to the energy storage element (e.g., supercapacitor or battery).

Usage Instructions

How to Use the Component in a Circuit

  1. Connect the Energy Source: Attach a solar panel, thermoelectric generator, or other energy source to the VIN and GND pins.
  2. Configure MPPT: Set the MPPT ratio using the MPPT pin to match the characteristics of your energy source. For example:
    • Use a resistor divider or external circuit to set the desired MPPT voltage.
  3. Select Output Voltage: Configure the primary output voltage (VOUT1) using the CFG pin. Refer to the datasheet for specific resistor values or jumper settings.
  4. Connect Energy Storage: Attach a supercapacitor or rechargeable battery to the VBAT pin to store harvested energy.
  5. Connect the Load: Attach your low-power device to the VOUT1 and/or VOUT2 pins.

Important Considerations and Best Practices

  • Ensure the input voltage is within the specified range (50 mV to 5 V) for proper operation.
  • Use a high-quality energy storage element to maximize efficiency and reliability.
  • When configuring MPPT, match the ratio to the energy source's maximum power point for optimal performance.
  • Avoid exceeding the maximum output current of the board to prevent damage.

Example: Using the AEM10941 with an Arduino UNO

The AEM10941 mini Evaluation Board can be used to power an Arduino UNO in low-power applications. Below is an example of how to connect and use the board:

Circuit Connection

  1. Connect a small solar panel to the VIN and GND pins.
  2. Attach a supercapacitor to the VBAT pin for energy storage.
  3. Set the CFG pin to output 3.3 V on VOUT1.
  4. Connect the VOUT1 pin to the Arduino UNO's 3.3 V input pin.

Sample Arduino Code

// Example code to read a sensor and send data via serial
// Powered by the AEM10941 mini Evaluation Board

void setup() {
  Serial.begin(9600); // Initialize serial communication at 9600 baud
  pinMode(A0, INPUT); // Set A0 as input for sensor reading
}

void loop() {
  int sensorValue = analogRead(A0); // Read the sensor value from pin A0
  float voltage = sensorValue * (3.3 / 1023.0); // Convert to voltage (3.3V reference)
  
  // Print the sensor value and voltage to the serial monitor
  Serial.print("Sensor Value: ");
  Serial.print(sensorValue);
  Serial.print(" | Voltage: ");
  Serial.println(voltage);
  
  delay(1000); // Wait for 1 second before the next reading
}

Troubleshooting and FAQs

Common Issues and Solutions

  1. The board does not start harvesting energy.

    • Ensure the input voltage is at least 380 mV for cold start.
    • Verify the energy source is properly connected to the VIN and GND pins.
  2. Output voltage is incorrect or unstable.

    • Check the configuration of the CFG pin to ensure the correct output voltage is set.
    • Verify the energy storage element is properly connected and functioning.
  3. The load is not receiving power.

    • Ensure the load's power requirements do not exceed the board's output capabilities.
    • Check all connections for proper contact and secure attachment.
  4. MPPT is not functioning as expected.

    • Verify the MPPT ratio is correctly configured for the energy source.
    • Consult the datasheet for recommended MPPT settings for specific sources.

Tips for Troubleshooting

  • Use a multimeter to measure input and output voltages at various points in the circuit.
  • Refer to the AEM10941M datasheet for detailed configuration and performance guidelines.
  • If issues persist, contact e-peas technical support for assistance.