How to Use 6v6 tube: Examples, Pinouts, and Specs
Introduction
The 6V6 tube, manufactured by Brimar (Part ID: Power Tube), is a vacuum tube widely recognized for its warm tonal characteristics and moderate power output. It is a beam power tetrode, commonly used in audio amplifiers, particularly in guitar amplifiers and hi-fi systems. The 6V6 tube is celebrated for its ability to produce rich harmonic content and smooth overdrive, making it a favorite among audiophiles and musicians.
Explore Projects Built with 6v6 tube


Explore Projects Built with 6v6 tube
Common Applications and Use Cases
- Guitar Amplifiers: Known for its warm, vintage sound, the 6V6 is a staple in many classic guitar amp designs.
- Hi-Fi Audio Systems: Used in high-fidelity tube amplifiers for its clean and detailed sound reproduction.
- DIY Audio Projects: Popular among hobbyists building custom tube amplifiers.
- Vintage Equipment Restoration: Frequently used to replace or replicate tubes in vintage audio gear.
Technical Specifications
The following table outlines the key technical specifications of the Brimar 6V6 tube:
| Parameter | Value |
|---|---|
| Manufacturer | Brimar |
| Part ID | Power Tube |
| Tube Type | Beam Power Tetrode |
| Maximum Plate Voltage | 315V |
| Maximum Plate Dissipation | 14W |
| Heater Voltage | 6.3V |
| Heater Current | 0.45A |
| Amplification Factor | 9 |
| Typical Output Power | 5W (Single-Ended), 14W (Push-Pull) |
| Base Type | Octal (8-pin) |
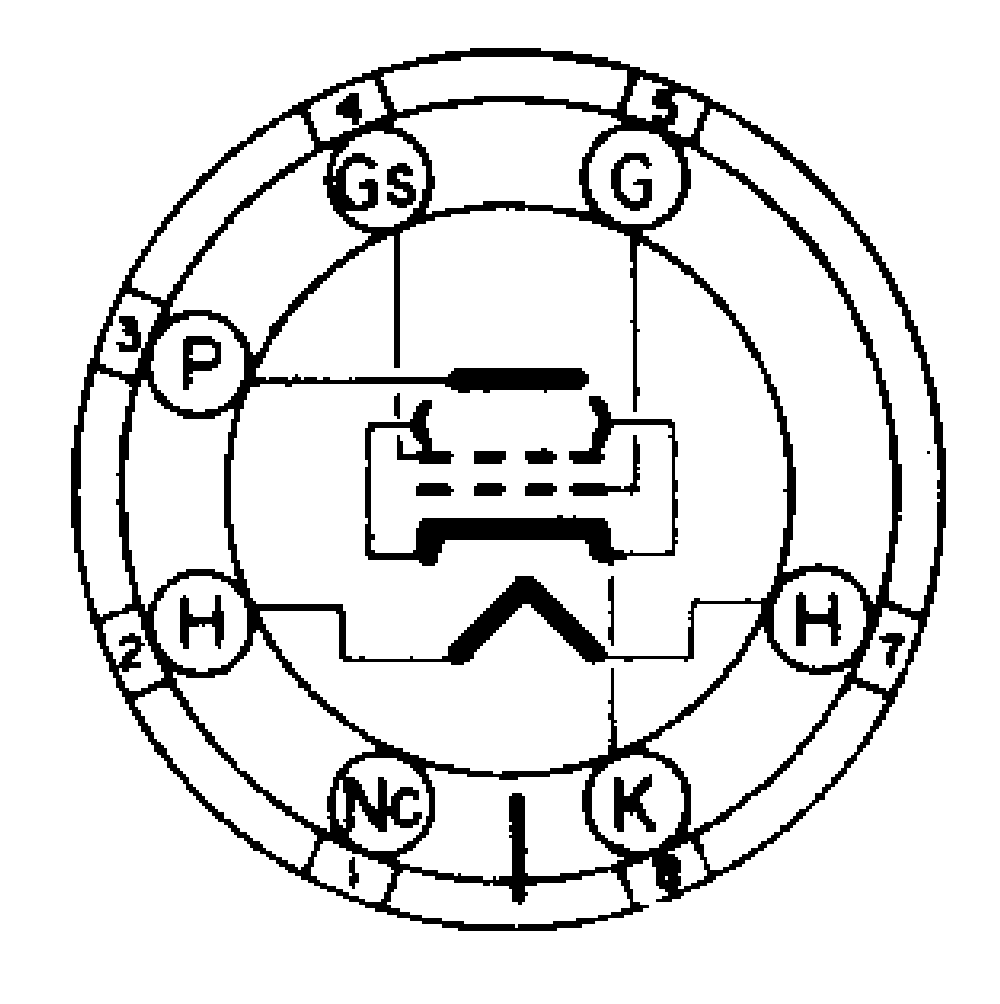
Pin Configuration and Descriptions
The 6V6 tube uses an octal base with the following pinout:
| Pin Number | Connection | Description |
|---|---|---|
| 1 | No Connection (NC) | Not internally connected |
| 2 | Heater | Heater filament (6.3V) |
| 3 | Plate (Anode) | High-voltage input for signal amplification |
| 4 | Screen Grid (G2) | Controls electron flow, improves efficiency |
| 5 | Control Grid (G1) | Input signal connection |
| 6 | No Connection (NC) | Not internally connected |
| 7 | Heater | Heater filament (6.3V) |
| 8 | Cathode and Beam Forming Plate | Electron emitter and beam control |
Usage Instructions
How to Use the 6V6 Tube in a Circuit
- Power Supply: Ensure the tube is powered with a heater voltage of 6.3V and a plate voltage not exceeding 315V.
- Biasing: Properly bias the control grid (G1) to ensure optimal operation. For a single-ended amplifier, a cathode resistor is typically used for self-biasing.
- Load Impedance: Match the output transformer to the tube's recommended load impedance (e.g., 5kΩ for single-ended operation).
- Socket: Use an octal socket for mounting the tube securely in the circuit.
- Ventilation: Allow adequate ventilation to dissipate heat generated during operation.
Important Considerations and Best Practices
- Avoid Overvoltage: Exceeding the maximum plate voltage (315V) or plate dissipation (14W) can damage the tube.
- Warm-Up Time: Allow the tube to warm up for a few seconds before applying high voltage to the plate.
- Handle with Care: Vacuum tubes are fragile; avoid dropping or applying excessive force.
- Use a Fuse: Protect the circuit with a fuse to prevent damage in case of a short circuit.
Example: Using the 6V6 Tube with an Arduino UNO
While the 6V6 tube is not directly compatible with microcontrollers like the Arduino UNO, it can be used in conjunction with an Arduino to control a tube amplifier. For example, the Arduino can be used to switch relays or control volume via a digital potentiometer.
Here is an example of Arduino code to control a relay for powering the 6V6 tube amplifier:
// Arduino code to control a relay for powering a 6V6 tube amplifier
const int relayPin = 7; // Pin connected to the relay module

void setup() {
  pinMode(relayPin, OUTPUT); // Set the relay pin as an output
  digitalWrite(relayPin, LOW); // Ensure the relay is off at startup
}

void loop() {
  // Turn on the relay to power the tube amplifier
  digitalWrite(relayPin, HIGH);
  delay(10000); // Keep the amplifier on for 10 seconds (example duration)

  // Turn off the relay to power down the amplifier
  digitalWrite(relayPin, LOW);
  delay(5000); // Wait for 5 seconds before turning it back on
}
Note: Ensure proper isolation between the Arduino and the high-voltage circuit of the 6V6 tube amplifier. Use optocouplers or relay modules with adequate voltage ratings.
Troubleshooting and FAQs
Common Issues and Solutions
No Sound Output:
- Cause: Incorrect wiring or biasing.
- Solution: Double-check the circuit connections, especially the control grid (G1) and cathode (K).
Tube Overheating:
- Cause: Excessive plate voltage or current.
- Solution: Verify that the plate voltage does not exceed 315V and the cathode resistor is correctly sized.
Distorted Sound:
- Cause: Improper biasing or load impedance mismatch.
- Solution: Adjust the bias voltage and ensure the output transformer matches the recommended load impedance.
Tube Not Lighting Up:
- Cause: Heater not receiving power.
- Solution: Check the heater connections (pins 2 and 7) and ensure a 6.3V supply is present.
FAQs
Q: Can I use the 6V6 tube in a push-pull amplifier configuration?
A: Yes, the 6V6 tube is well-suited for push-pull configurations, providing up to 14W of output power with proper design.
Q: How long does a 6V6 tube typically last?
A: With proper use, a 6V6 tube can last thousands of hours. However, lifespan depends on operating conditions and usage.
Q: Can I replace a 6V6 tube with a 6L6 tube?
A: While both are beam power tetrodes, the 6L6 has different electrical characteristics and may not be a direct replacement. Check your circuit's specifications before substituting.
Q: Is the 6V6 tube suitable for beginners?
A: Yes, the 6V6 is a great choice for beginners due to its moderate power requirements and forgiving nature in audio amplifier circuits.