Cirkit Designer Logo
Cirkit Designer
Your all-in-one circuit design IDE
Home / 
Component Documentation

How to Use 2.8 inch IPS Capacitive Touch Screen SPI Display Module: Examples, Pinouts, and Specs

Image of 2.8 inch IPS Capacitive Touch Screen SPI Display Module
Cirkit Designer LogoDesign with 2.8 inch IPS Capacitive Touch Screen SPI Display Module in Cirkit Designer

Introduction

The 2.8 inch IPS Capacitive Touch Screen SPI Display Module, manufactured by Hosyond with the part ID ILI9341V, is a high-quality display module featuring an In-Plane Switching (IPS) screen. This module offers capacitive touch functionality, allowing for intuitive user interaction. The display communicates using the Serial Peripheral Interface (SPI) protocol, which is widely used in embedded systems for its simplicity and efficiency. Common applications include handheld devices, touch-based control panels, and interactive projects that require a compact and reliable display solution.

Explore Projects Built with 2.8 inch IPS Capacitive Touch Screen SPI Display Module

Use Cirkit Designer to design, explore, and prototype these projects online. Some projects support real-time simulation. Click "Open Project" to start designing instantly!
ESP32-C6 and ST7735S Display: Wi-Fi Controlled TFT Display Module
Image of ESP32-C6sm-ST7735: A project utilizing 2.8 inch IPS Capacitive Touch Screen SPI Display Module in a practical application
This circuit features an ESP32-C6 microcontroller interfaced with a China ST7735S 160x128 TFT display. The ESP32-C6 controls the display via SPI communication, providing power, ground, and control signals to render graphics and text on the screen.
Cirkit Designer LogoOpen Project in Cirkit Designer
ESP32-Powered 1.3 inch TFT Display Module for Visual Data Output
Image of ESP32+ST7789: A project utilizing 2.8 inch IPS Capacitive Touch Screen SPI Display Module in a practical application
This circuit connects an ESP32 microcontroller to a 1.3 inch TFT display module (ST7789). The ESP32 provides power and control signals to the display, enabling it to show graphical data.
Cirkit Designer LogoOpen Project in Cirkit Designer
Raspberry Pi 3B Powered 15.6-inch Touchscreen Display with USB Type-C Power Delivery
Image of Pi Touch Screen Kiosk: A project utilizing 2.8 inch IPS Capacitive Touch Screen SPI Display Module in a practical application
This circuit powers a 15.6-inch capacitive touch display and a Raspberry Pi 3B using a USB Type C power delivery breakout and two buck converters. The Raspberry Pi connects to the display via HDMI and USB for touch functionality, while the power delivery breakout provides regulated power to both the display and the Raspberry Pi through the buck converters.
Cirkit Designer LogoOpen Project in Cirkit Designer
Wi-Fi Controlled RGB LED and OLED Display with ESP8266
Image of ESP thermometer reciever: A project utilizing 2.8 inch IPS Capacitive Touch Screen SPI Display Module in a practical application
This circuit features an ESP8266 microcontroller interfaced with a 128x64 OLED display via I2C for visual output and an RGB LED controlled through current-limiting resistors. The ESP8266 provides power and control signals to both the display and the LED, enabling visual feedback and status indication.
Cirkit Designer LogoOpen Project in Cirkit Designer

Explore Projects Built with 2.8 inch IPS Capacitive Touch Screen SPI Display Module

Use Cirkit Designer to design, explore, and prototype these projects online. Some projects support real-time simulation. Click "Open Project" to start designing instantly!
Image of ESP32-C6sm-ST7735: A project utilizing 2.8 inch IPS Capacitive Touch Screen SPI Display Module in a practical application
ESP32-C6 and ST7735S Display: Wi-Fi Controlled TFT Display Module
This circuit features an ESP32-C6 microcontroller interfaced with a China ST7735S 160x128 TFT display. The ESP32-C6 controls the display via SPI communication, providing power, ground, and control signals to render graphics and text on the screen.
Cirkit Designer LogoOpen Project in Cirkit Designer
Image of ESP32+ST7789: A project utilizing 2.8 inch IPS Capacitive Touch Screen SPI Display Module in a practical application
ESP32-Powered 1.3 inch TFT Display Module for Visual Data Output
This circuit connects an ESP32 microcontroller to a 1.3 inch TFT display module (ST7789). The ESP32 provides power and control signals to the display, enabling it to show graphical data.
Cirkit Designer LogoOpen Project in Cirkit Designer
Image of Pi Touch Screen Kiosk: A project utilizing 2.8 inch IPS Capacitive Touch Screen SPI Display Module in a practical application
Raspberry Pi 3B Powered 15.6-inch Touchscreen Display with USB Type-C Power Delivery
This circuit powers a 15.6-inch capacitive touch display and a Raspberry Pi 3B using a USB Type C power delivery breakout and two buck converters. The Raspberry Pi connects to the display via HDMI and USB for touch functionality, while the power delivery breakout provides regulated power to both the display and the Raspberry Pi through the buck converters.
Cirkit Designer LogoOpen Project in Cirkit Designer
Image of ESP thermometer reciever: A project utilizing 2.8 inch IPS Capacitive Touch Screen SPI Display Module in a practical application
Wi-Fi Controlled RGB LED and OLED Display with ESP8266
This circuit features an ESP8266 microcontroller interfaced with a 128x64 OLED display via I2C for visual output and an RGB LED controlled through current-limiting resistors. The ESP8266 provides power and control signals to both the display and the LED, enabling visual feedback and status indication.
Cirkit Designer LogoOpen Project in Cirkit Designer

Technical Specifications

Key Technical Details

  • Display Size: 2.8 inches
  • Display Type: IPS LCD
  • Resolution: 240x320 pixels
  • Interface: SPI
  • Touch Screen: Capacitive touch panel
  • Logic Level Voltage: 3.3V/5V compatible
  • Input Voltage: 4.5V - 5.5V
  • Operating Current: Typically 90mA (depends on backlight brightness)
  • Operating Temperature: -20°C to 70°C

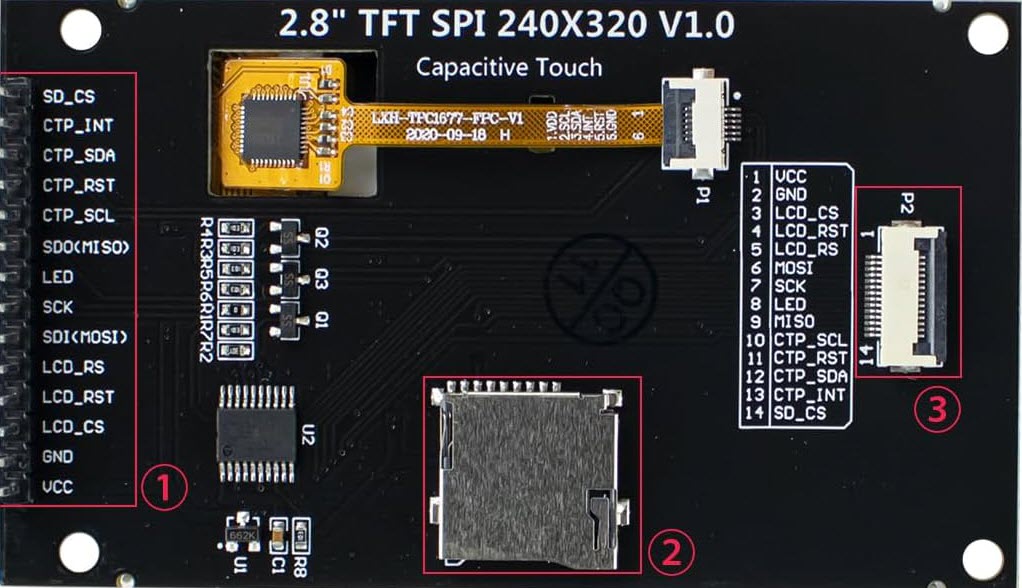
Pin Configuration and Descriptions

Pin Number Pin Name Description
1 VCC Power supply (4.5V - 5.5V)
2 GND Ground
3 CS Chip Select for SPI
4 RESET Reset pin, active low
5 DC/RS Data/Command control pin
6 SDI/MOSI SPI data input
7 SCK SPI clock input
8 LED Backlight control, active high
9 SDO/MISO SPI data output (not used in all setups)
10 T_IRQ Touch interrupt, active low
11 T_DO SPI touch data output
12 T_DIN SPI touch data input
13 T_CS Chip Select for touch SPI
14 T_CLK SPI touch clock input

Usage Instructions

Integration with a Circuit

To use the display module in a circuit:

  1. Connect the VCC and GND pins to your power supply, ensuring it is within the specified voltage range.
  2. Interface the SPI pins (CS, RESET, DC/RS, SDI/MOSI, SCK, SDO/MISO) with your microcontroller, such as an Arduino UNO.
  3. If touch functionality is required, connect the touch SPI pins (T_IRQ, T_DO, T_DIN, T_CS, T_CLK) to the microcontroller.
  4. Control the backlight by applying a high signal to the LED pin.

Best Practices

  • Use a level shifter if your microcontroller operates at a different logic level than the display.
  • Implement proper decoupling and filtering to minimize noise, especially in touch functionality.
  • Avoid exposing the display to extreme temperatures or direct sunlight for extended periods.

Example Code for Arduino UNO

#include <SPI.h>
#include <Adafruit_GFX.h>
#include <Adafruit_ILI9341.h>

// Pin definitions for the Arduino UNO
#define TFT_CS     10
#define TFT_RST    9
#define TFT_DC     8

// Initialize the display
Adafruit_ILI9341 tft = Adafruit_ILI9341(TFT_CS, TFT_DC, TFT_RST);

void setup() {
  // Start the serial communication
  Serial.begin(9600);
  // Initialize the display
  tft.begin();
  // Set the rotation of the display
  tft.setRotation(1);
  // Fill the screen with black color
  tft.fillScreen(ILI9341_BLACK);
}

void loop() {
  // Check for touch events and handle them
  // ...
}

Ensure you have installed the Adafruit_GFX and Adafruit_ILI9341 libraries before uploading this code to your Arduino UNO.

Troubleshooting and FAQs

Common Issues

  • Display not powering on: Check the power supply and connections to VCC and GND.
  • No touch response: Verify the touch SPI connections and ensure the touch controller is correctly initialized in your code.
  • Garbled or no display output: Ensure that the SPI connections are secure and that the correct pins are used in your code.

Solutions and Tips

  • Double-check wiring against the pin configuration table.
  • Use the example code as a starting point and modify it according to your needs.
  • If using long wires, consider using shielded cables to reduce electromagnetic interference.

FAQs

Q: Can I use this display with a 5V microcontroller? A: Yes, the display is 5V tolerant, but it is recommended to use a level shifter for optimal performance.

Q: How do I adjust the brightness of the backlight? A: You can adjust the brightness by applying a PWM signal to the LED pin.

Q: What should I do if the display works but the touch does not? A: Check the touch SPI connections and ensure that the touch controller library is correctly included and initialized in your code.

For further assistance, consult the manufacturer's datasheet and technical forums specific to the ILI9341V display module.