
How to Use terminalblock-04-01: Examples, Pinouts, and Specs
 Design with terminalblock-04-01 in Cirkit Designer
Introduction
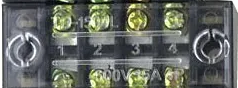
The TerminalBlock-04-01 is a versatile and reliable terminal block designed for connecting multiple wires together in a secure and organized manner. It is commonly used in electrical and electronic systems to simplify wiring, reduce clutter, and ensure stable connections. This component is ideal for applications in industrial control panels, home automation systems, and prototyping circuits.
Explore Projects Built with terminalblock-04-01
 Open Project in Cirkit Designer
 Open Project in Cirkit Designer
 Open Project in Cirkit Designer
 Open Project in Cirkit Designer
Explore Projects Built with terminalblock-04-01
Open Project in Cirkit DesignerOpen Project in Cirkit DesignerOpen Project in Cirkit DesignerOpen Project in Cirkit DesignerCommon Applications:
- Industrial control systems
- Home and building automation
- Power distribution in electrical panels
- Prototyping and testing circuits
- Audio and speaker connections
Technical Specifications
Key Technical Details:
- Model Number: TerminalBlock-04-01
- Number of Terminals: 4
- Rated Voltage: 300V AC/DC
- Rated Current: 15A
- Wire Gauge Compatibility: 22-12 AWG
- Material: Flame-retardant thermoplastic (UL94-V0)
- Mounting Type: Screw-down or DIN rail compatible
- Operating Temperature: -40°C to +105°C
- Dimensions: 40mm x 12mm x 15mm (L x W x H)
Pin Configuration and Descriptions:
The TerminalBlock-04-01 does not have traditional "pins" like an IC but instead features screw terminals for wire connections. Below is a description of the terminal layout:
| Terminal Number | Description | Notes |
|---|---|---|
| 1 | Input/Output Terminal 1 | Connect wire 1 here |
| 2 | Input/Output Terminal 2 | Connect wire 2 here |
| 3 | Input/Output Terminal 3 | Connect wire 3 here |
| 4 | Input/Output Terminal 4 | Connect wire 4 here |
Each terminal is electrically isolated, allowing for independent connections.
Usage Instructions
How to Use the TerminalBlock-04-01 in a Circuit:
Prepare the Wires:
- Strip the insulation from the ends of the wires to expose approximately 5-7mm of conductor.
- Ensure the wire gauge is within the supported range (22-12 AWG).
Connect the Wires:
- Loosen the screw on the desired terminal using a flathead or Phillips screwdriver.
- Insert the stripped end of the wire into the terminal opening.
- Tighten the screw securely to clamp the wire in place. Avoid overtightening to prevent damage.
Verify Connections:
- Gently tug on the wires to ensure they are firmly secured.
- Double-check that no exposed conductor is touching adjacent terminals.
Mount the Terminal Block:
- If using a DIN rail, snap the terminal block onto the rail.
- For screw-down mounting, use screws to secure the block to a panel or enclosure.
Important Considerations and Best Practices:
- Always ensure the power is turned off before making or modifying connections.
- Use a multimeter to verify continuity and proper connections after installation.
- Avoid exceeding the rated voltage and current to prevent overheating or damage.
- For high-vibration environments, periodically check and retighten screws to maintain secure connections.
Example: Connecting to an Arduino UNO
While the TerminalBlock-04-01 is not directly connected to an Arduino UNO, it can be used to organize and distribute power or signals to multiple components in an Arduino-based project. Below is an example of how to use it for power distribution:
// Example: Distributing 5V power from Arduino UNO to multiple components
// Connect the Arduino's 5V and GND pins to the terminal block, then distribute
// power to sensors or modules from the terminal block.

void setup() {
  // No specific code is required for the terminal block itself.
  // Ensure proper wiring as described in the usage instructions.
}

void loop() {
  // Your main Arduino code goes here.
  // The terminal block simply acts as a passive connection point.
}
Troubleshooting and FAQs
Common Issues and Solutions:
Loose Connections:
- Issue: Wires are not securely held in place.
- Solution: Ensure screws are tightened properly. Use the correct wire gauge.
Overheating:
- Issue: Terminal block becomes hot during operation.
- Solution: Check that the current does not exceed the 15A rating. Use thicker wires if necessary.
Intermittent Connections:
- Issue: Circuit behaves erratically or loses connection intermittently.
- Solution: Inspect for frayed wires or poor contact. Re-strip and reconnect wires if needed.
Corrosion or Oxidation:
- Issue: Terminals show signs of corrosion over time.
- Solution: Use anti-corrosion paste or ensure the terminal block is used in a dry environment.
FAQs:
Q: Can I use this terminal block for AC and DC circuits?
- A: Yes, the TerminalBlock-04-01 is suitable for both AC and DC circuits up to 300V.
Q: How many wires can I connect to each terminal?
- A: It is recommended to connect only one wire per terminal for optimal performance. If necessary, use a wire ferrule for combining multiple wires.
Q: Is the terminal block reusable?
- A: Yes, the TerminalBlock-04-01 can be reused. Ensure the screws and terminals are not damaged during removal.
Q: Can I mount this terminal block on a PCB?
- A: No, this terminal block is designed for screw-down or DIN rail mounting, not for PCB use.
By following this documentation, you can effectively use the TerminalBlock-04-01 to manage and organize your electrical connections with ease and reliability.