Cirkit Designer Logo
Cirkit Designer
Your all-in-one circuit design IDE
Home / 
Component Documentation

How to Use VoiceRecognitionV3: Examples, Pinouts, and Specs

Image of VoiceRecognitionV3
Cirkit Designer LogoDesign with VoiceRecognitionV3 in Cirkit Designer

Introduction

The VoiceRecognitionV3 by ElectroHouse is a sophisticated module designed for recognizing and processing voice commands. This component is widely used in automation and control systems, enabling hands-free operation and enhancing user interaction with electronic devices. Its applications range from home automation, robotics, and security systems to interactive toys and voice-controlled appliances.

Explore Projects Built with VoiceRecognitionV3

Use Cirkit Designer to design, explore, and prototype these projects online. Some projects support real-time simulation. Click "Open Project" to start designing instantly!
ESP32-Based Voice Assistant with Battery-Powered Microphone and Speaker
Image of Minor: A project utilizing VoiceRecognitionV3 in a practical application
This circuit is a voice-controlled system that uses an ESP32 microcontroller to process audio input from a microphone, send the data to a Gemini API for speech-to-text conversion, and output responses through a speaker. It includes an IR sensor for additional input, an LED for status indication, and a battery with a charging module for power management.
Cirkit Designer LogoOpen Project in Cirkit Designer
Arduino UNO Voice Assistant with KY-037 Microphone and Speaker
Image of VOICE PY 2: A project utilizing VoiceRecognitionV3 in a practical application
This circuit is a voice assistant project that uses an Arduino UNO to interface with a KY-037 microphone and a speaker. The microphone detects voice commands, which are processed by the Arduino, and the speaker provides audio feedback based on the detected commands.
Cirkit Designer LogoOpen Project in Cirkit Designer
Arduino UNO Based Voice-Controlled Bluetooth Interface with OLED Display
Image of skripsi: A project utilizing VoiceRecognitionV3 in a practical application
This circuit features an Arduino UNO microcontroller interfaced with a voice recognition module for audio input commands, an HC-05 Bluetooth module for wireless communication, and a 0.96" OLED display for visual output. The Arduino is programmed to handle inputs and outputs, with the voice recognition module connected to digital pins for serial communication, and the OLED display connected via I2C to the analog pins A4 (SDA) and A5 (SCL). The Bluetooth module is also connected to the Arduino's serial pins for remote data exchange.
Cirkit Designer LogoOpen Project in Cirkit Designer
ESP32-Based Voice-Controlled Speaker
Image of Main Design: A project utilizing VoiceRecognitionV3 in a practical application
This circuit is a digital voice playback and recording system powered by a 3.7V battery. It features an ESP32 microcontroller for processing, an Adafruit MAX98357A amplifier to drive a loudspeaker for audio output, and an Adafruit MAX9814 microphone amplifier for audio input. A pushbutton provides user interaction, and a 3.3V regulator ensures stable power supply to the components.
Cirkit Designer LogoOpen Project in Cirkit Designer

Explore Projects Built with VoiceRecognitionV3

Use Cirkit Designer to design, explore, and prototype these projects online. Some projects support real-time simulation. Click "Open Project" to start designing instantly!
Image of Minor: A project utilizing VoiceRecognitionV3 in a practical application
ESP32-Based Voice Assistant with Battery-Powered Microphone and Speaker
This circuit is a voice-controlled system that uses an ESP32 microcontroller to process audio input from a microphone, send the data to a Gemini API for speech-to-text conversion, and output responses through a speaker. It includes an IR sensor for additional input, an LED for status indication, and a battery with a charging module for power management.
Cirkit Designer LogoOpen Project in Cirkit Designer
Image of VOICE PY 2: A project utilizing VoiceRecognitionV3 in a practical application
Arduino UNO Voice Assistant with KY-037 Microphone and Speaker
This circuit is a voice assistant project that uses an Arduino UNO to interface with a KY-037 microphone and a speaker. The microphone detects voice commands, which are processed by the Arduino, and the speaker provides audio feedback based on the detected commands.
Cirkit Designer LogoOpen Project in Cirkit Designer
Image of skripsi: A project utilizing VoiceRecognitionV3 in a practical application
Arduino UNO Based Voice-Controlled Bluetooth Interface with OLED Display
This circuit features an Arduino UNO microcontroller interfaced with a voice recognition module for audio input commands, an HC-05 Bluetooth module for wireless communication, and a 0.96" OLED display for visual output. The Arduino is programmed to handle inputs and outputs, with the voice recognition module connected to digital pins for serial communication, and the OLED display connected via I2C to the analog pins A4 (SDA) and A5 (SCL). The Bluetooth module is also connected to the Arduino's serial pins for remote data exchange.
Cirkit Designer LogoOpen Project in Cirkit Designer
Image of Main Design: A project utilizing VoiceRecognitionV3 in a practical application
ESP32-Based Voice-Controlled Speaker
This circuit is a digital voice playback and recording system powered by a 3.7V battery. It features an ESP32 microcontroller for processing, an Adafruit MAX98357A amplifier to drive a loudspeaker for audio output, and an Adafruit MAX9814 microphone amplifier for audio input. A pushbutton provides user interaction, and a 3.3V regulator ensures stable power supply to the components.
Cirkit Designer LogoOpen Project in Cirkit Designer

Technical Specifications

Key Technical Details

Parameter Value
Operating Voltage 4.5V - 5.5V
Operating Current < 40mA
Communication UART (9600 bps default)
Recognition Speed < 1 second
Recognition Accuracy 95% (under ideal conditions)
Dimensions 30mm x 20mm x 5mm

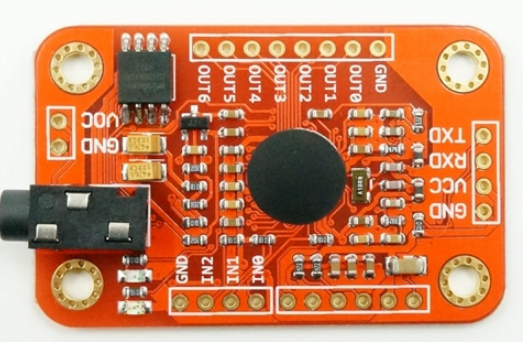
Pin Configuration and Descriptions

Pin Number Pin Name Description
1 VCC Power supply (4.5V - 5.5V)
2 GND Ground
3 TX UART Transmit (connect to RX of microcontroller)
4 RX UART Receive (connect to TX of microcontroller)
5 MIC+ Microphone positive terminal
6 MIC- Microphone negative terminal

Usage Instructions

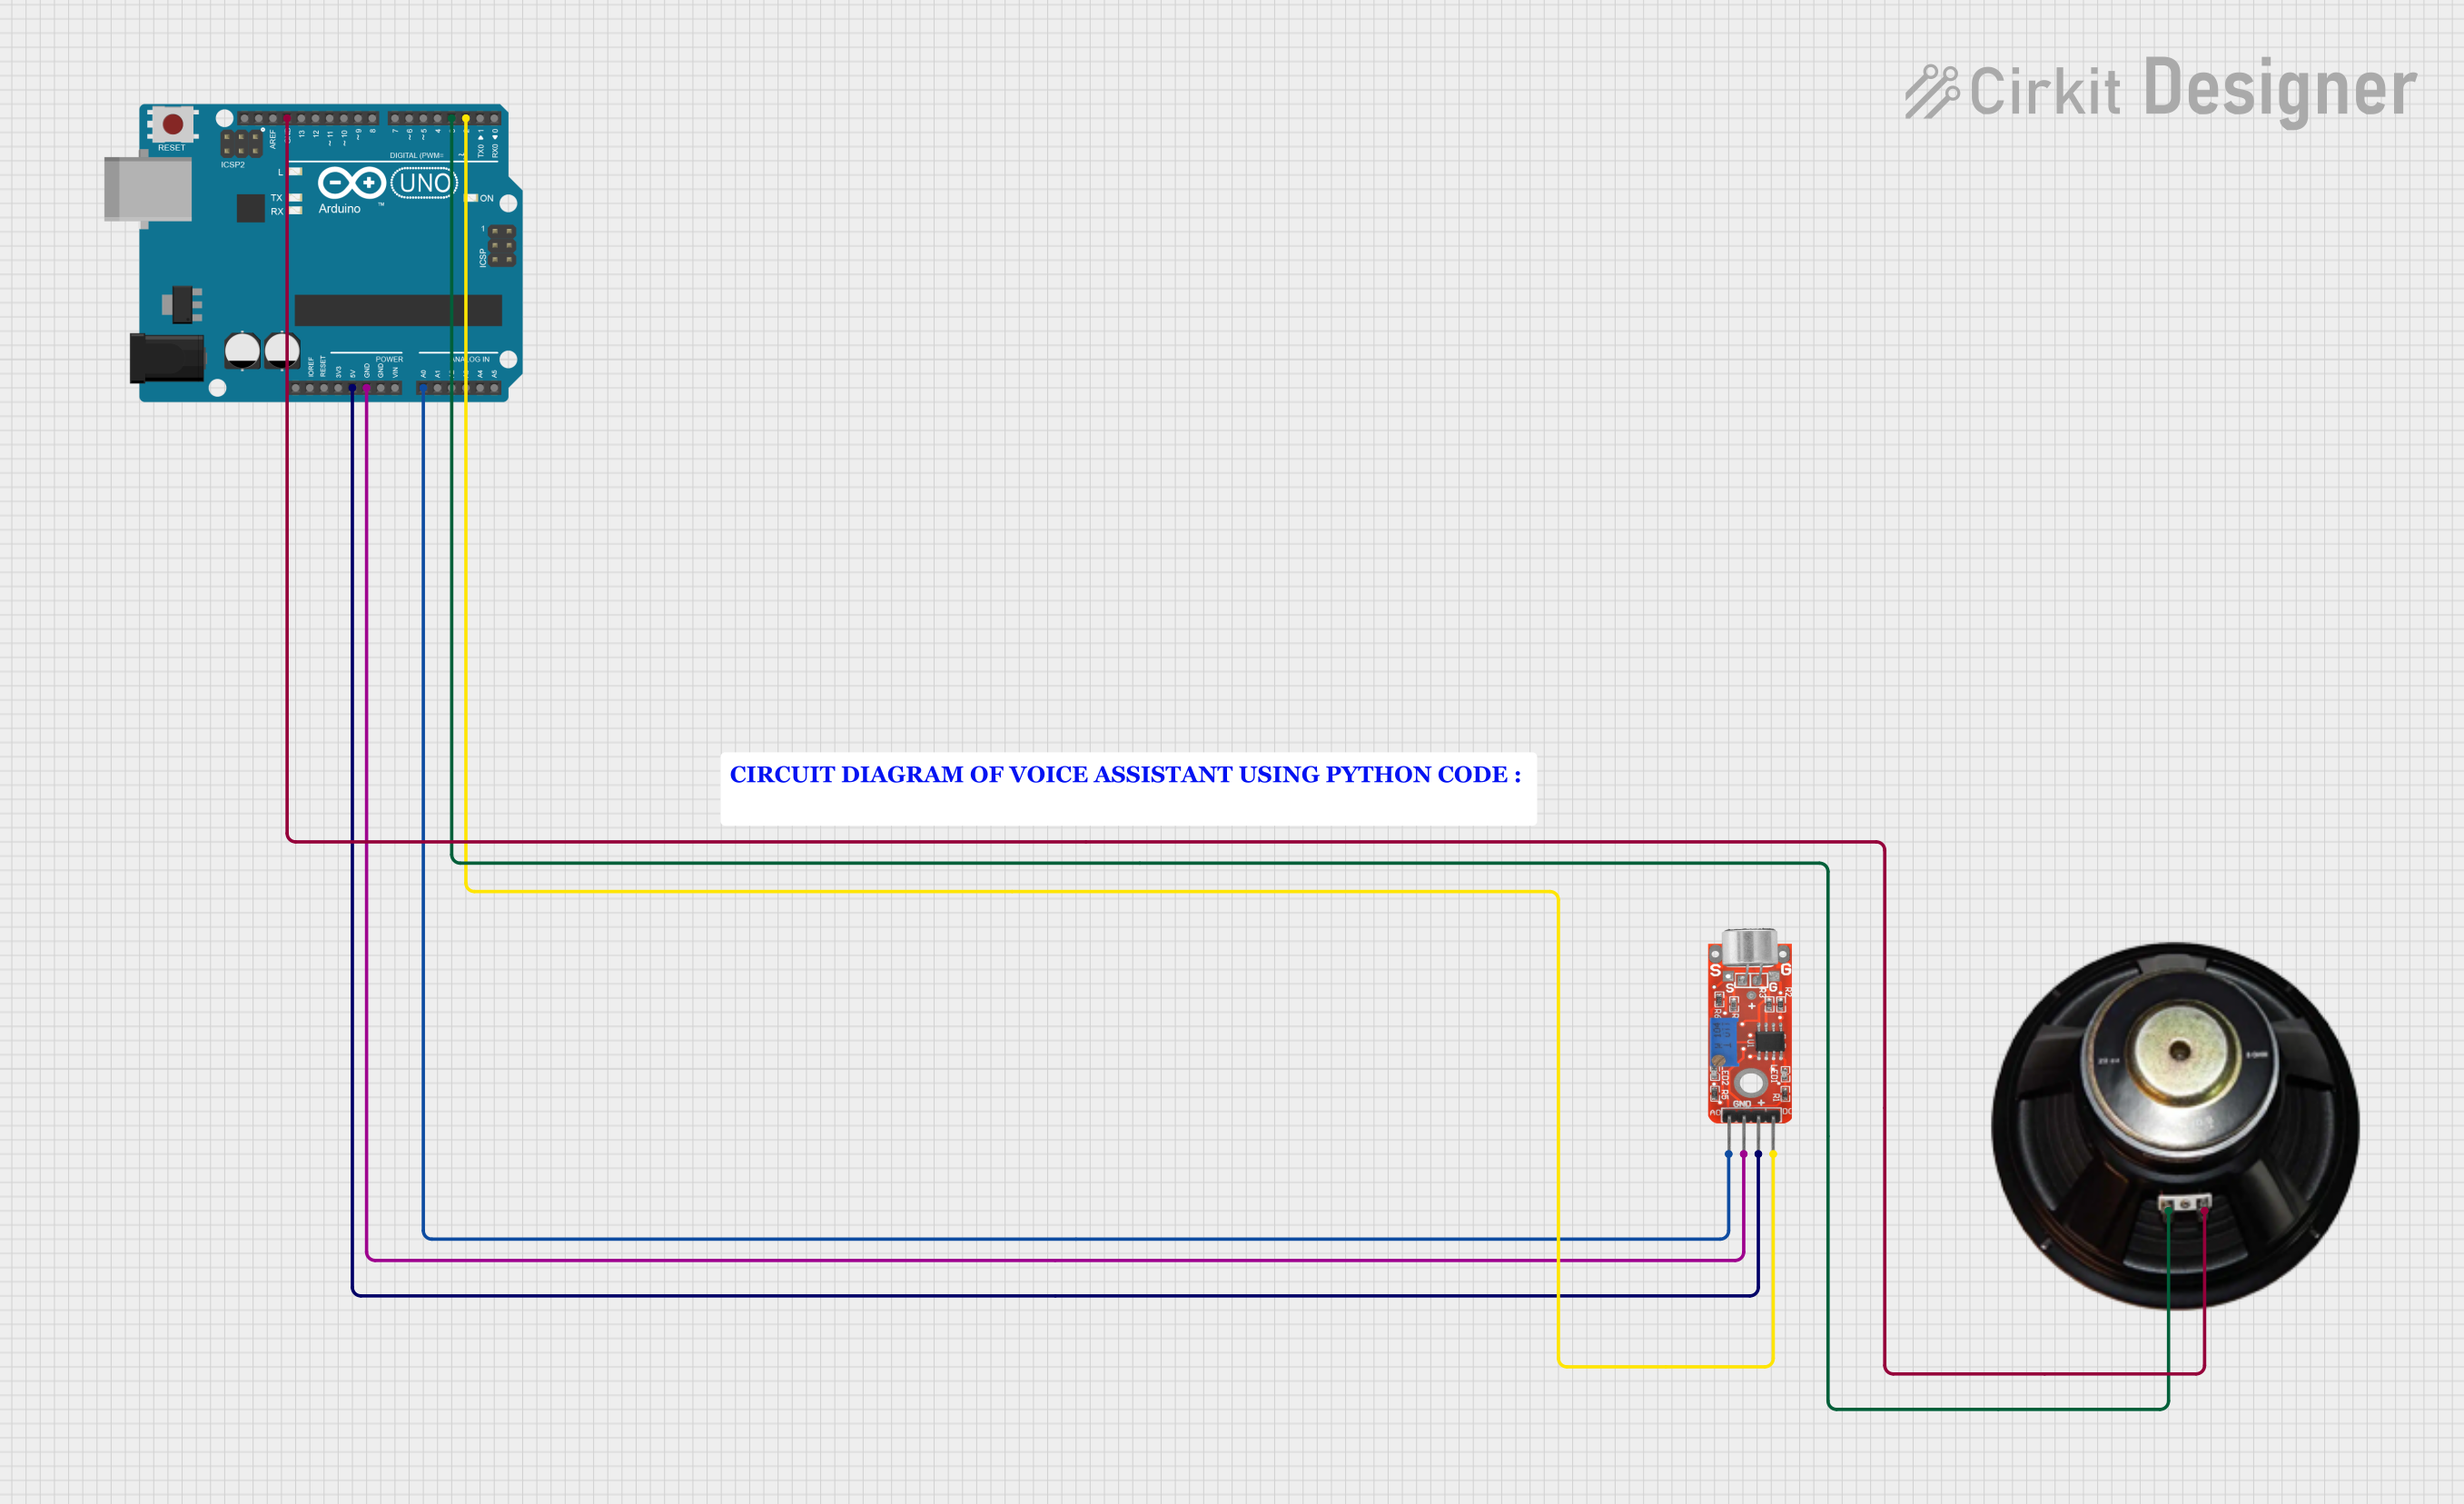
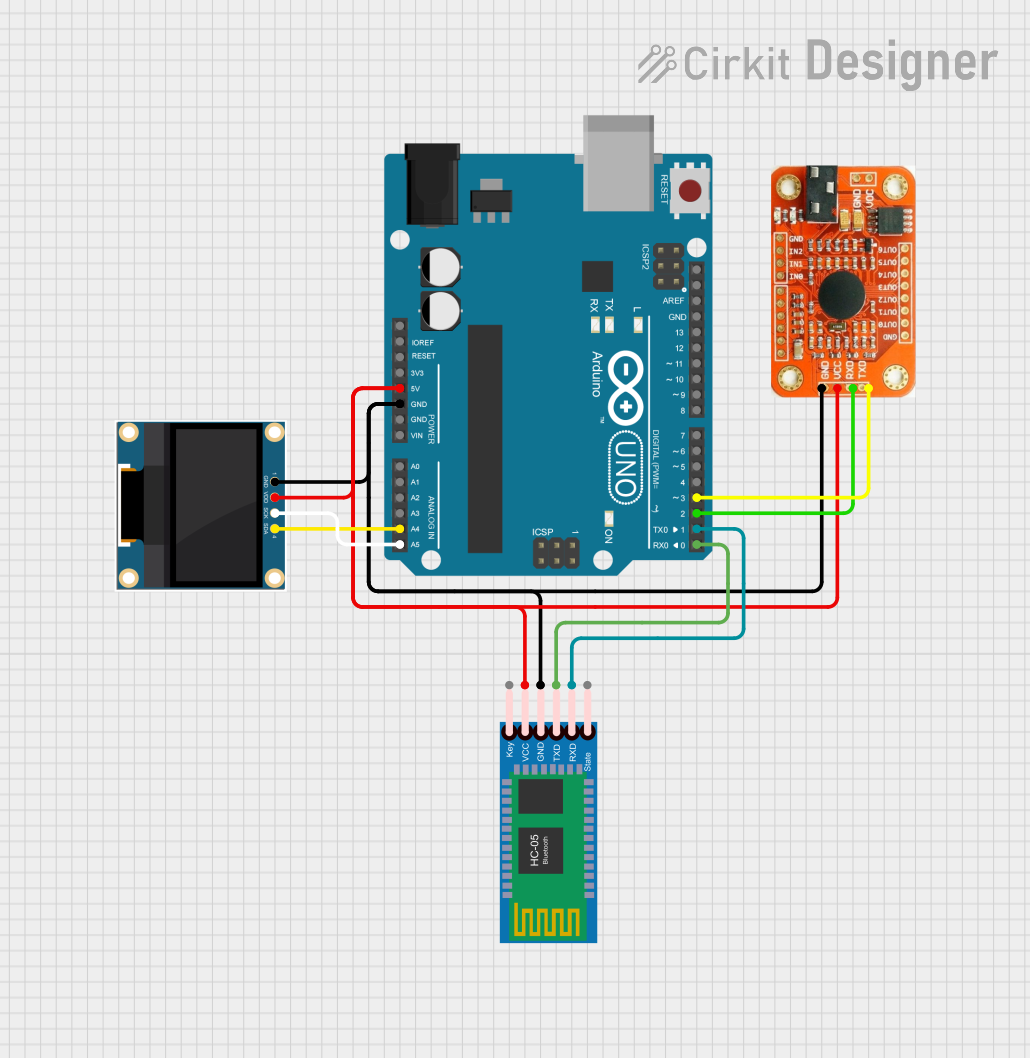
How to Use the Component in a Circuit

  1. Power Connection: Connect the VCC pin to a 5V power supply and the GND pin to the ground.
  2. UART Connection: Connect the TX pin of the VoiceRecognitionV3 to the RX pin of the microcontroller (e.g., Arduino UNO) and the RX pin of the module to the TX pin of the microcontroller.
  3. Microphone Connection: Connect the MIC+ and MIC- pins to the respective terminals of the microphone.

Important Considerations and Best Practices

  • Power Supply: Ensure a stable power supply within the specified voltage range to avoid malfunction.
  • Noise Reduction: Place the microphone in a location with minimal background noise to improve recognition accuracy.
  • Command Training: Train the module with clear and distinct voice commands for better performance.
  • UART Settings: The default baud rate is 9600 bps. Ensure the microcontroller's UART settings match this rate.

Sample Arduino Code

Below is a sample code to interface the VoiceRecognitionV3 with an Arduino UNO:

#include <SoftwareSerial.h>

// Create a software serial port on pins 2 (RX) and 3 (TX)
SoftwareSerial voiceRec(2, 3);

void setup() {
  // Start the hardware serial port for communication with the PC
  Serial.begin(9600);
  // Start the software serial port for communication with the module
  voiceRec.begin(9600);
  Serial.println("Voice Recognition Module Initialized");
}

void loop() {
  // Check if data is available from the module
  if (voiceRec.available()) {
    // Read the incoming data
    String command = voiceRec.readString();
    Serial.print("Command Received: ");
    Serial.println(command);
    
    // Process the command
    if (command.indexOf("TURN ON LIGHT") >= 0) {
      Serial.println("Turning on the light...");
      // Add code to turn on the light
    } else if (command.indexOf("TURN OFF LIGHT") >= 0) {
      Serial.println("Turning off the light...");
      // Add code to turn off the light
    } else {
      Serial.println("Unknown command");
    }
  }
}

Troubleshooting and FAQs

Common Issues Users Might Face

  1. No Response from Module:

    • Solution: Check the power connections and ensure the module is receiving the correct voltage. Verify the UART connections and baud rate settings.
  2. Poor Recognition Accuracy:

    • Solution: Ensure the microphone is placed in a quiet environment. Re-train the module with clear and distinct voice commands.
  3. Interference with Other Devices:

    • Solution: Ensure the module is not placed near other electronic devices that may cause interference. Use shielded cables if necessary.

FAQs

Q1: Can the VoiceRecognitionV3 recognize multiple languages?

  • A1: The module can recognize any language, but it must be trained with voice commands in the desired language.

Q2: How many voice commands can the module store?

  • A2: The VoiceRecognitionV3 can store up to 80 voice commands.

Q3: Can I use the module with microcontrollers other than Arduino?

  • A3: Yes, the module can be used with any microcontroller that supports UART communication.

Q4: What is the maximum distance for voice recognition?

  • A4: The effective distance for voice recognition is typically up to 1 meter, depending on the environment and microphone quality.

By following this documentation, users can effectively integrate the VoiceRecognitionV3 module into their projects, ensuring reliable and accurate voice command recognition.