Cirkit Designer Logo
Cirkit Designer
Your all-in-one circuit design IDE
Home / 
Component Documentation

How to Use Sensor FC-51 IR: Examples, Pinouts, and Specs

Image of Sensor FC-51 IR
Cirkit Designer LogoDesign with Sensor FC-51 IR in Cirkit Designer

Introduction

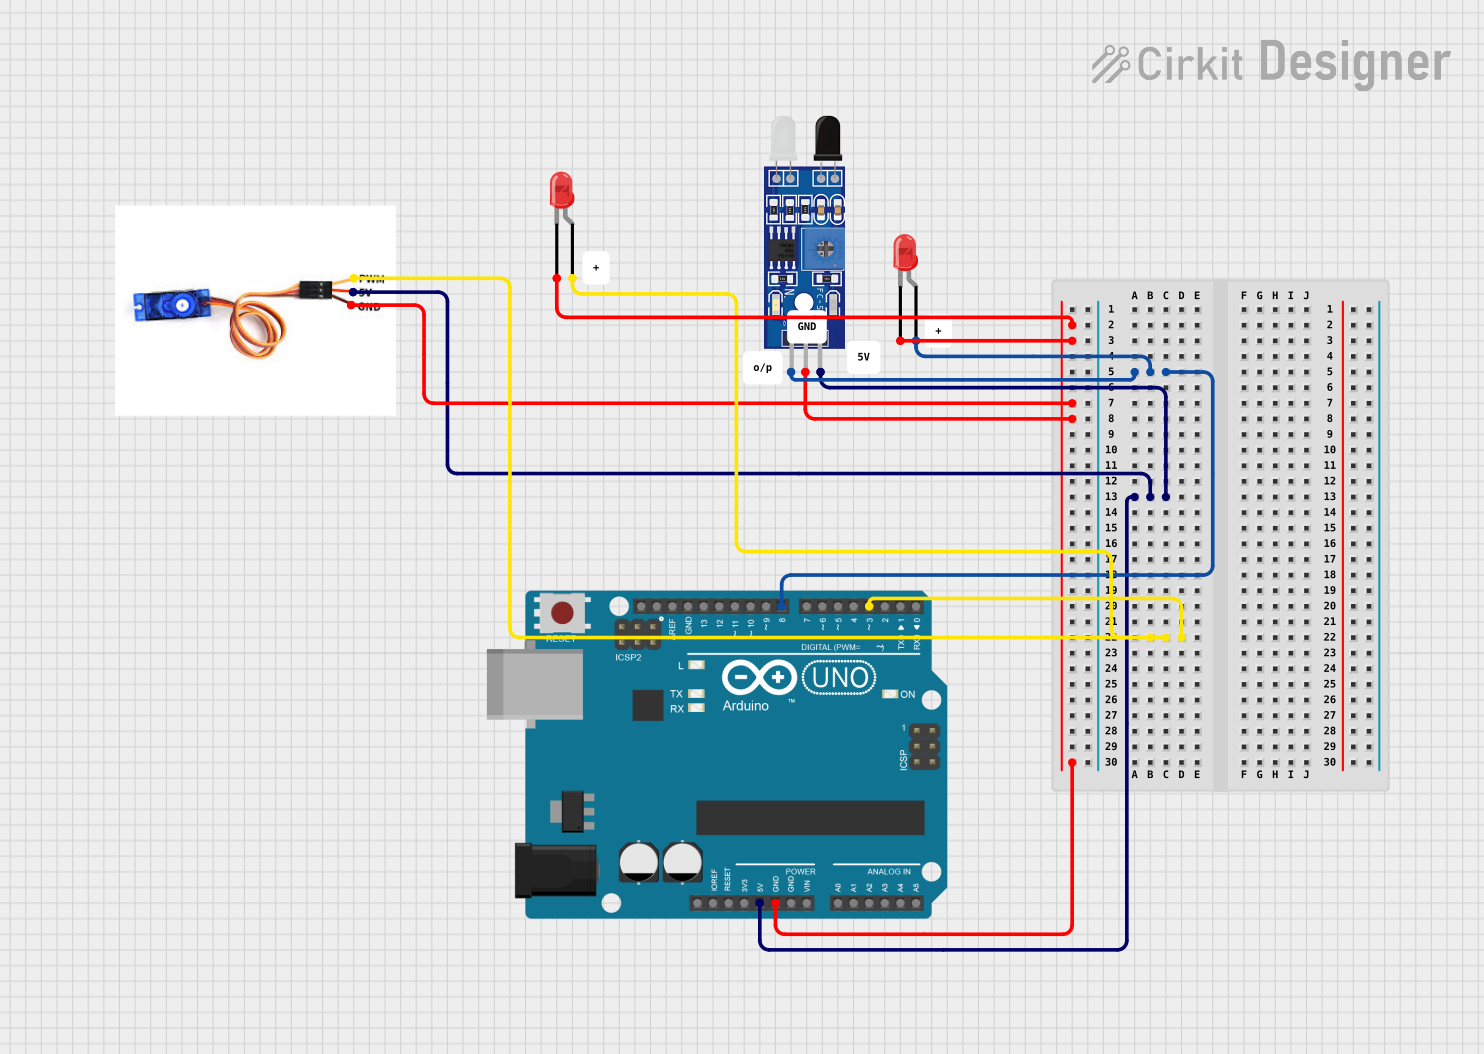
The Sensor FC-51 IR is an infrared proximity sensor module that utilizes infrared radiation to detect the presence of objects within its sensing range. It is widely used in robotics, security systems, and various automation applications where non-contact object detection is required. The sensor operates by emitting an infrared signal and then detecting the reflected signal from nearby objects.

Explore Projects Built with Sensor FC-51 IR

Use Cirkit Designer to design, explore, and prototype these projects online. Some projects support real-time simulation. Click "Open Project" to start designing instantly!
Arduino-Controlled IR Sensor and Servo Motor Obstacle Interaction
Image of IR sensor: A project utilizing Sensor FC-51 IR in a practical application
This circuit features an Arduino UNO microcontroller interfaced with an FC-51 IR sensor, two red LEDs, and an SG90 servo motor. The IR sensor output is connected to the Arduino's digital pin D8, which also controls one LED, while the other LED is controlled by pin D3 along with the servo motor's PWM signal. The Arduino runs a sketch that activates the servo and lights up the corresponding LED when the IR sensor detects an obstacle, indicating the servo's position and sensor status visually.
Cirkit Designer LogoOpen Project in Cirkit Designer
Battery-Powered Sumo Robot with IR Sensors and DC Motors
Image of MASSIVE SUMO AUTO BOARD: A project utilizing Sensor FC-51 IR in a practical application
This circuit is designed for a robotic system, featuring a Massive Sumo Board as the central controller. It integrates multiple FS-80NK diffuse IR sensors and IR line sensors for obstacle detection and line following, respectively, and controls two GM25 DC motors via MD13s motor drivers for movement. Power is supplied by an 11.1V LiPo battery.
Cirkit Designer LogoOpen Project in Cirkit Designer
Raspberry Pi Zero W Based Line Tracking and Obstacle Detection System
Image of CSC615-Assignment#4-LineSensor: A project utilizing Sensor FC-51 IR in a practical application
This circuit integrates a Raspberry Pi Zero W with two sensors: a KY-033 Line Tracking Sensor and an FC-51 IR Sensor. The Raspberry Pi is configured to receive digital input signals from the KY-033 sensor on GPIO 04 and from the FC-51 sensor on GPIO 24. The circuit is designed for object detection and line tracking applications, with the Raspberry Pi processing the sensor inputs for decision-making tasks.
Cirkit Designer LogoOpen Project in Cirkit Designer
Battery-Powered Line Following Robot with IR Sensors and Cytron URC10 Motor Controller
Image of URC10 SUMO AUTO: A project utilizing Sensor FC-51 IR in a practical application
This circuit is a robotic control system that uses multiple IR sensors for line detection and obstacle avoidance, powered by a 3S LiPo battery. The Cytron URC10 motor driver, controlled by a microcontroller, drives two GM25 DC motors based on input from the sensors and a rocker switch, with a 7-segment panel voltmeter displaying the battery voltage.
Cirkit Designer LogoOpen Project in Cirkit Designer

Explore Projects Built with Sensor FC-51 IR

Use Cirkit Designer to design, explore, and prototype these projects online. Some projects support real-time simulation. Click "Open Project" to start designing instantly!
Image of IR sensor: A project utilizing Sensor FC-51 IR in a practical application
Arduino-Controlled IR Sensor and Servo Motor Obstacle Interaction
This circuit features an Arduino UNO microcontroller interfaced with an FC-51 IR sensor, two red LEDs, and an SG90 servo motor. The IR sensor output is connected to the Arduino's digital pin D8, which also controls one LED, while the other LED is controlled by pin D3 along with the servo motor's PWM signal. The Arduino runs a sketch that activates the servo and lights up the corresponding LED when the IR sensor detects an obstacle, indicating the servo's position and sensor status visually.
Cirkit Designer LogoOpen Project in Cirkit Designer
Image of MASSIVE SUMO AUTO BOARD: A project utilizing Sensor FC-51 IR in a practical application
Battery-Powered Sumo Robot with IR Sensors and DC Motors
This circuit is designed for a robotic system, featuring a Massive Sumo Board as the central controller. It integrates multiple FS-80NK diffuse IR sensors and IR line sensors for obstacle detection and line following, respectively, and controls two GM25 DC motors via MD13s motor drivers for movement. Power is supplied by an 11.1V LiPo battery.
Cirkit Designer LogoOpen Project in Cirkit Designer
Image of CSC615-Assignment#4-LineSensor: A project utilizing Sensor FC-51 IR in a practical application
Raspberry Pi Zero W Based Line Tracking and Obstacle Detection System
This circuit integrates a Raspberry Pi Zero W with two sensors: a KY-033 Line Tracking Sensor and an FC-51 IR Sensor. The Raspberry Pi is configured to receive digital input signals from the KY-033 sensor on GPIO 04 and from the FC-51 sensor on GPIO 24. The circuit is designed for object detection and line tracking applications, with the Raspberry Pi processing the sensor inputs for decision-making tasks.
Cirkit Designer LogoOpen Project in Cirkit Designer
Image of URC10 SUMO AUTO: A project utilizing Sensor FC-51 IR in a practical application
Battery-Powered Line Following Robot with IR Sensors and Cytron URC10 Motor Controller
This circuit is a robotic control system that uses multiple IR sensors for line detection and obstacle avoidance, powered by a 3S LiPo battery. The Cytron URC10 motor driver, controlled by a microcontroller, drives two GM25 DC motors based on input from the sensors and a rocker switch, with a 7-segment panel voltmeter displaying the battery voltage.
Cirkit Designer LogoOpen Project in Cirkit Designer

Common Applications and Use Cases

  • Obstacle avoidance for robots
  • Line tracking in automation
  • Security systems for intrusion detection
  • User interaction in devices (e.g., gesture control)
  • Counting items on a conveyor belt

Technical Specifications

Key Technical Details

  • Operating Voltage: 3.3V to 5V DC
  • Current Consumption: 20mA (typical)
  • Output Signal: Digital (high/low)
  • Sensing Range: 2cm to 30cm (adjustable)
  • Response Time: 2ms
  • Ambient Light Resistance: Good
  • Dimensions: 3.2cm x 1.4cm

Pin Configuration and Descriptions

Pin Number Name Description
1 VCC Power supply (3.3V to 5V DC)
2 GND Ground
3 OUT Digital output signal (high/low)
4 EN Enable pin (optional, not always present)

Usage Instructions

How to Use the Sensor in a Circuit

  1. Connect the VCC pin to the power supply (3.3V to 5V).
  2. Connect the GND pin to the ground of the power supply.
  3. Connect the OUT pin to a digital input pin on a microcontroller, such as an Arduino UNO.
  4. If present, the EN pin can be left unconnected or connected to a digital output pin for enabling/disabling the sensor.

Important Considerations and Best Practices

  • Ensure that the sensor is mounted in a stable position to avoid false triggering.
  • Adjust the onboard potentiometer to set the desired detection range.
  • Avoid exposing the sensor to direct sunlight or strong infrared sources to prevent interference.
  • Use pull-up resistors if the microcontroller's input pins are not internally pulled up.

Example Code for Arduino UNO

// Define the connection pin
const int IRPin = 2; // Connect the OUT pin of FC-51 to digital pin 2

void setup() {
  pinMode(IRPin, INPUT); // Set the IRPin as an input
  Serial.begin(9600);   // Start serial communication at 9600 baud rate
}

void loop() {
  int sensorValue = digitalRead(IRPin); // Read the sensor value
  if (sensorValue == HIGH) {
    // When the sensor detects an object, it outputs HIGH
    Serial.println("Object Detected!");
  } else {
    // When no object is detected, it outputs LOW
    Serial.println("No Object Detected");
  }
  delay(200); // Wait for 200 milliseconds before reading again
}

Troubleshooting and FAQs

Common Issues Users Might Face

  • Sensor not responding: Ensure that the power supply is within the specified range and connections are secure.
  • Inconsistent detection: Adjust the potentiometer for sensitivity and ensure that the sensor is not subjected to environmental interferences.
  • False triggers: Stabilize the sensor mounting and avoid placing it near sources of infrared radiation.

Solutions and Tips for Troubleshooting

  • Double-check wiring, especially the VCC and GND connections.
  • Use a multimeter to verify the voltage at the VCC pin.
  • Replace the sensor if it appears to be damaged or if it continues to malfunction after troubleshooting.

FAQs

Q: Can the FC-51 sensor detect the color of an object? A: No, the FC-51 sensor cannot detect color as it only measures the presence of objects based on reflected infrared light.

Q: What is the maximum sensing range of the FC-51 sensor? A: The maximum sensing range is approximately 30cm, but it can vary based on the object's surface and environmental conditions.

Q: Is the FC-51 sensor waterproof? A: No, the FC-51 sensor is not waterproof. Precautions should be taken to avoid exposure to moisture.

Q: Can the sensor work in the dark? A: Yes, the sensor can work in the dark as it uses its own infrared emitter for detection.