How to Use Power Supply Transformer 230 V to 12 V : Examples, Pinouts, and Specs
Introduction
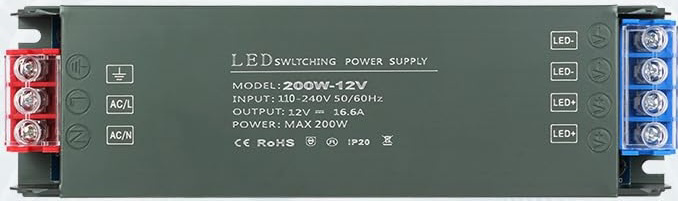
The URAQT 200W-12 Power Supply Transformer is a robust and reliable device designed to step down high voltage AC (230 V) to a safer, lower voltage AC (12 V). This transformer is commonly used in electronic circuits to provide a stable power source for low-voltage devices. Its high efficiency and durable construction make it suitable for a wide range of applications, including home appliances, industrial equipment, and DIY electronics projects.
Explore Projects Built with Power Supply Transformer 230 V to 12 V


Explore Projects Built with Power Supply Transformer 230 V to 12 V
Common Applications and Use Cases
- Powering low-voltage electronic circuits
- LED lighting systems
- Industrial control systems
- DIY electronics and prototyping
- Home automation systems
Technical Specifications
The following table outlines the key technical details of the URAQT 200W-12 Power Supply Transformer:
| Parameter | Specification |
|---|---|
| Manufacturer | URAQT |
| Part ID | 200W-12 |
| Input Voltage | 230 V AC ±10% |
| Output Voltage | 12 V AC ±5% |
| Maximum Power Output | 200 W |
| Frequency Range | 50 Hz / 60 Hz |
| Efficiency | ≥ 90% |
| Insulation Resistance | ≥ 100 MΩ |
| Operating Temperature | -10°C to 50°C |
| Dimensions | 120 mm x 80 mm x 70 mm |
| Weight | 1.2 kg |
Pin Configuration and Descriptions
The transformer has four terminals for input and output connections. The table below describes each terminal:
| Terminal | Label | Description |
|---|---|---|
| 1 | L | Live wire input (230 V AC) |
| 2 | N | Neutral wire input (230 V AC) |
| 3 | 12V~ | 12 V AC output (positive terminal) |
| 4 | 12V~ | 12 V AC output (negative terminal) |
Note: The output terminals (3 and 4) provide an alternating current (AC) voltage of 12 V. Polarity is not fixed for AC outputs.
Usage Instructions
How to Use the Transformer in a Circuit
- Safety First: Ensure the transformer is disconnected from any power source before handling or wiring.
- Input Connection:
- Connect the live wire (L) of the 230 V AC power source to the terminal labeled "L."
- Connect the neutral wire (N) of the 230 V AC power source to the terminal labeled "N."
- Output Connection:
- Connect the load (e.g., an electronic circuit or device) to the 12 V AC output terminals (3 and 4).
- Ensure the load does not exceed the transformer's maximum power output of 200 W.
- Power On:
- After verifying all connections, power on the transformer by supplying 230 V AC to the input terminals.
- Measure the output voltage using a multimeter to confirm it is approximately 12 V AC.
Important Considerations and Best Practices
- Overload Protection: Do not exceed the maximum power rating of 200 W to avoid overheating or damage.
- Ventilation: Ensure adequate airflow around the transformer to prevent overheating.
- Grounding: Properly ground the transformer to enhance safety and reduce electrical noise.
- Isolation: Use the transformer in circuits where electrical isolation between the input and output is required.
- AC to DC Conversion: If your application requires DC voltage, use a rectifier circuit and a smoothing capacitor after the transformer's output.
Example: Connecting to an Arduino UNO
If you need to power an Arduino UNO, you must first convert the 12 V AC output to 12 V DC using a rectifier circuit. Below is an example of how to connect the transformer to an Arduino UNO:
- Use a bridge rectifier and a smoothing capacitor to convert the 12 V AC output to 12 V DC.
- Connect the DC output to the Arduino's VIN pin and GND pin.
// Example Arduino code to blink an LED
// Connect an LED to pin 13 with a 220-ohm resistor

void setup() {
  pinMode(13, OUTPUT); // Set pin 13 as an output
}

void loop() {
  digitalWrite(13, HIGH); // Turn the LED on
  delay(1000);            // Wait for 1 second
  digitalWrite(13, LOW);  // Turn the LED off
  delay(1000);            // Wait for 1 second
}
Note: Ensure the rectified DC voltage is within the Arduino's input voltage range (7-12 V recommended).
Troubleshooting and FAQs
Common Issues and Solutions
No Output Voltage:
- Check the input connections to ensure the live and neutral wires are properly connected.
- Verify that the power source is supplying 230 V AC.
- Inspect the transformer for visible damage or overheating.
Output Voltage Too Low or Too High:
- Measure the input voltage to confirm it is within the specified range (230 V AC ±10%).
- Ensure the load connected to the output does not exceed the transformer's power rating.
Overheating:
- Check for proper ventilation around the transformer.
- Reduce the load if it exceeds the maximum power rating of 200 W.
Humming Noise:
- A slight humming noise is normal due to the magnetic field in the transformer.
- If the noise is excessive, ensure the transformer is securely mounted and not under excessive load.
FAQs
Q: Can this transformer be used outdoors?
A: No, the transformer is not weatherproof. Use it in a dry, indoor environment.
Q: Can I use this transformer to power DC devices directly?
A: No, the transformer outputs 12 V AC. You need a rectifier circuit to convert it to DC.
Q: What happens if I connect the output terminals in reverse?
A: Since the output is AC, polarity does not matter. However, ensure proper connections when converting to DC.
Q: Is the transformer compatible with 110 V AC input?
A: No, the transformer is designed for 230 V AC input only. Using 110 V AC will result in reduced output voltage.