How to Use Multi Coin Acceptor: Examples, Pinouts, and Specs
Introduction
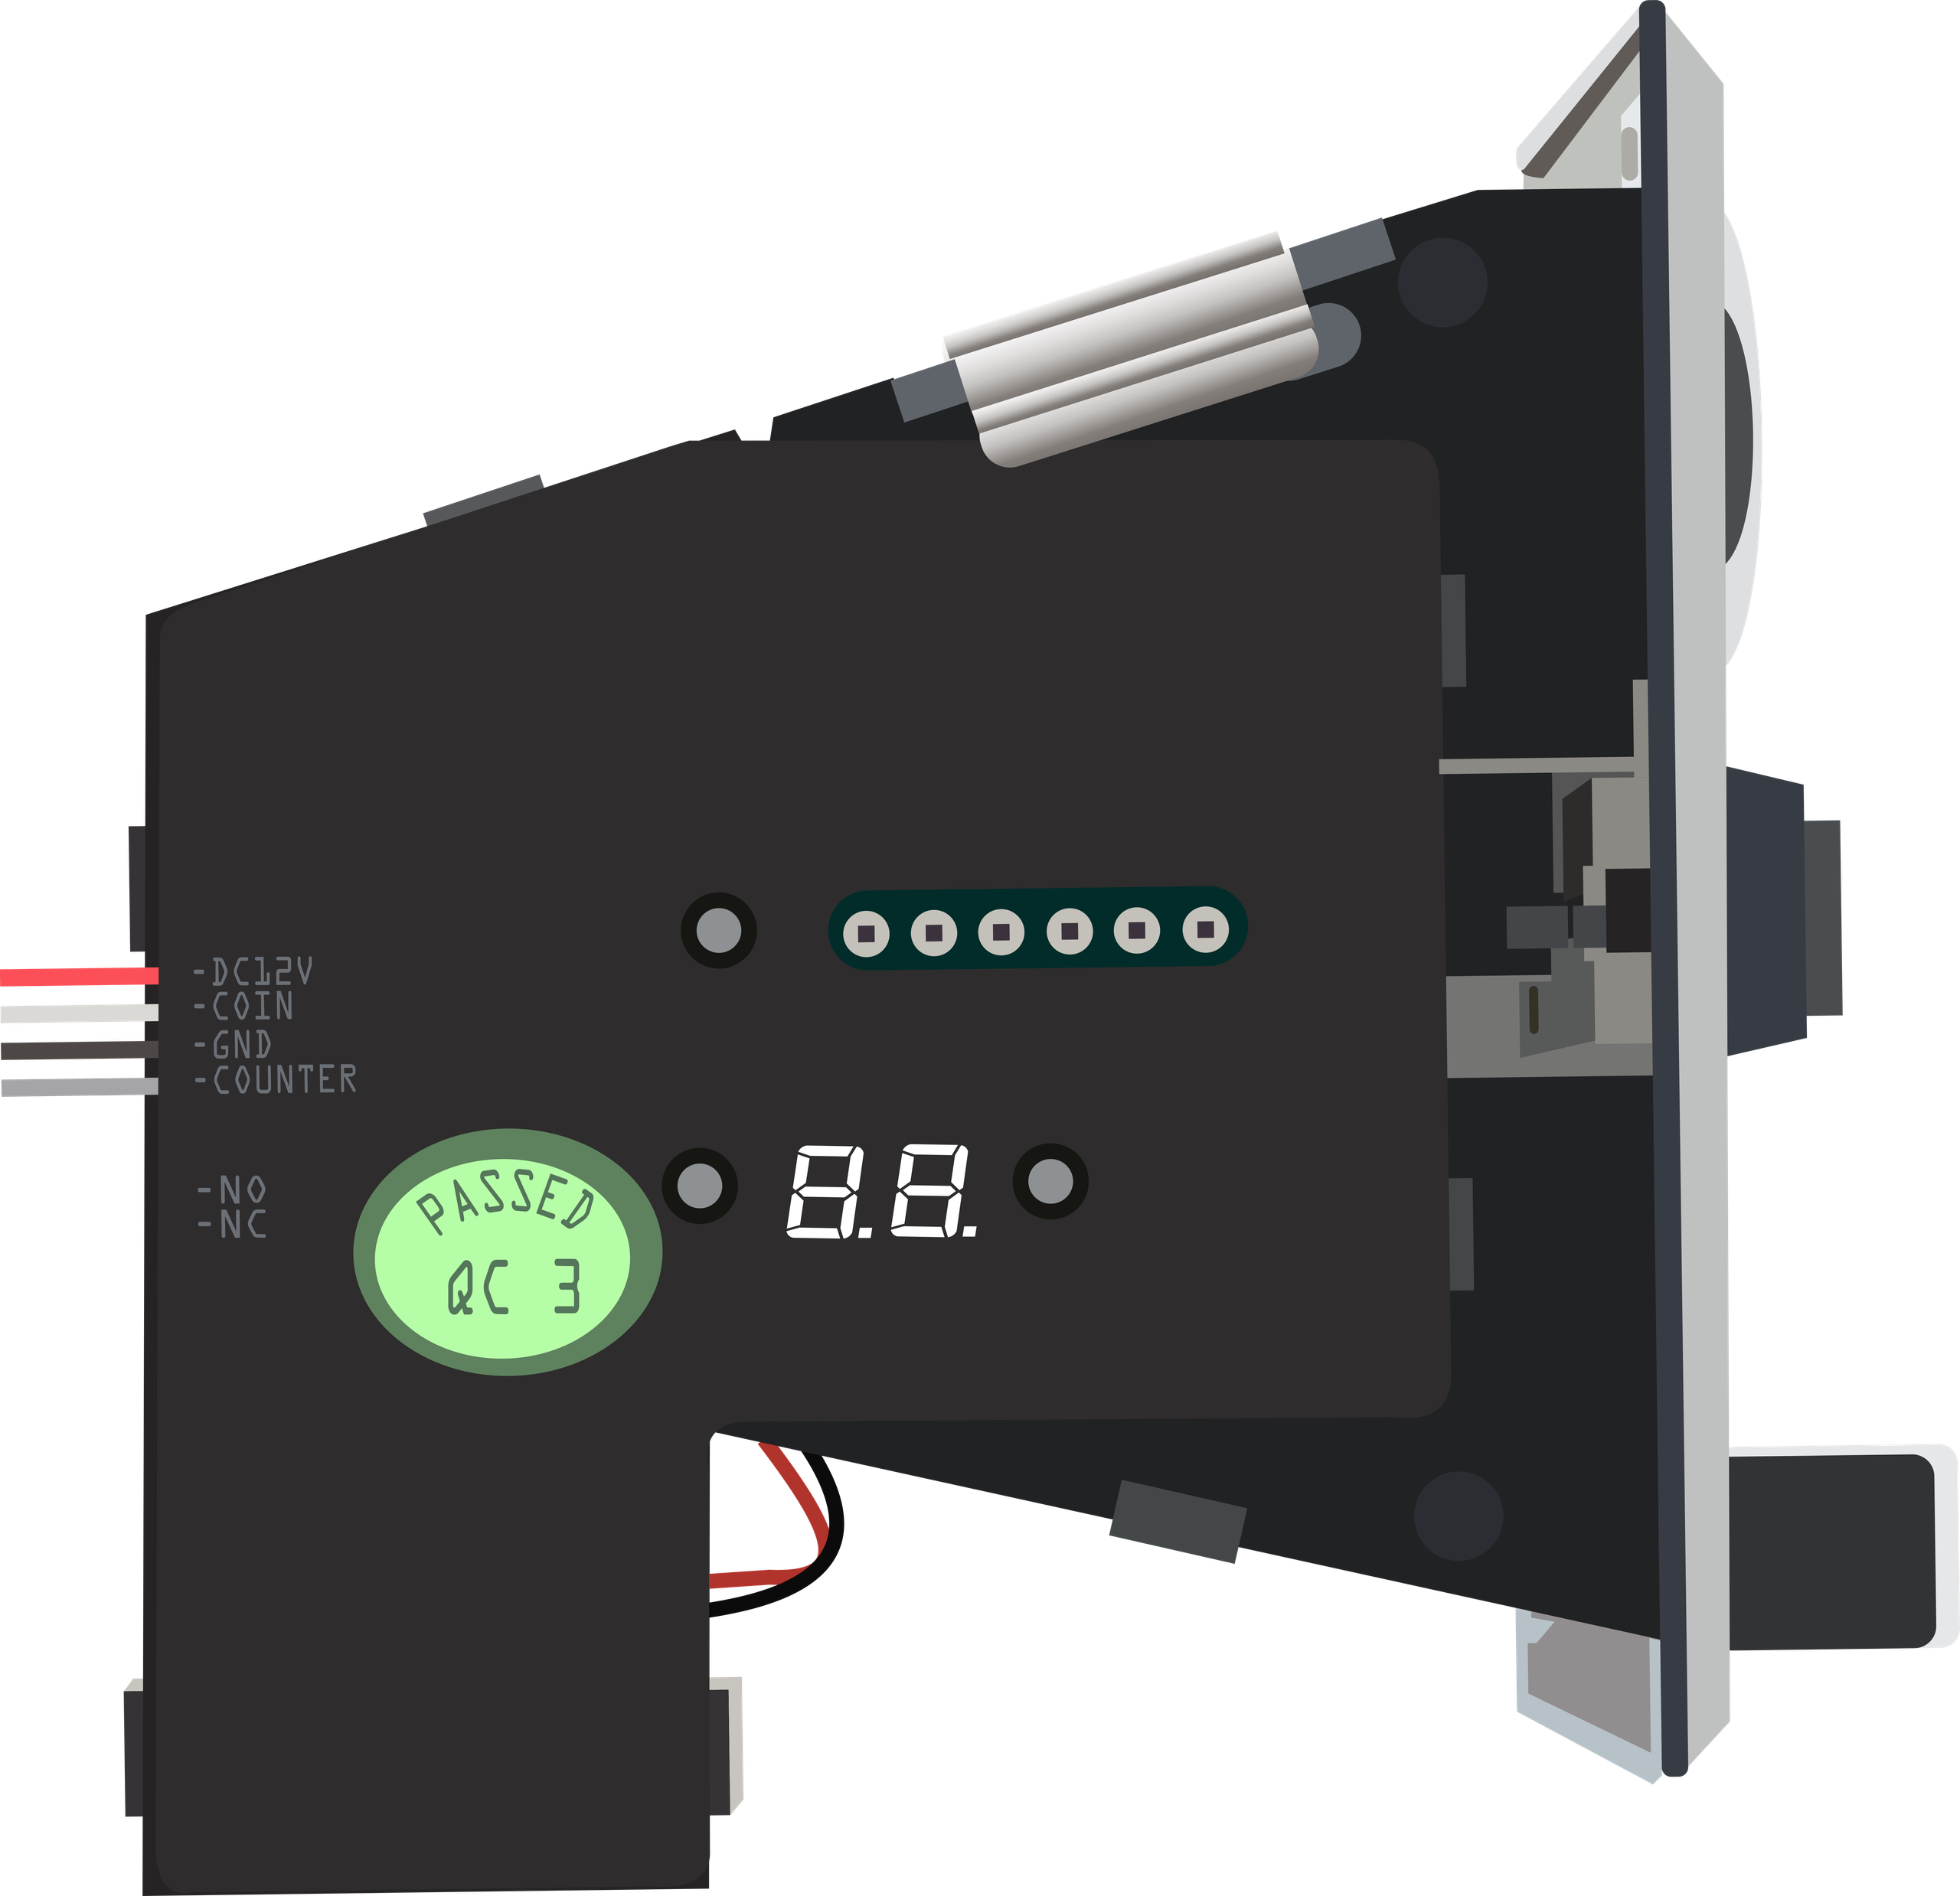
A Multi Coin Acceptor is an electronic device designed to recognize and accept multiple types of coins. This component is essential for automated service machines such as vending machines, arcade systems, and public transport ticketing machines. It uses a combination of weight, size, and metal composition sensors to identify different coins and validate their authenticity.
Explore Projects Built with Multi Coin Acceptor
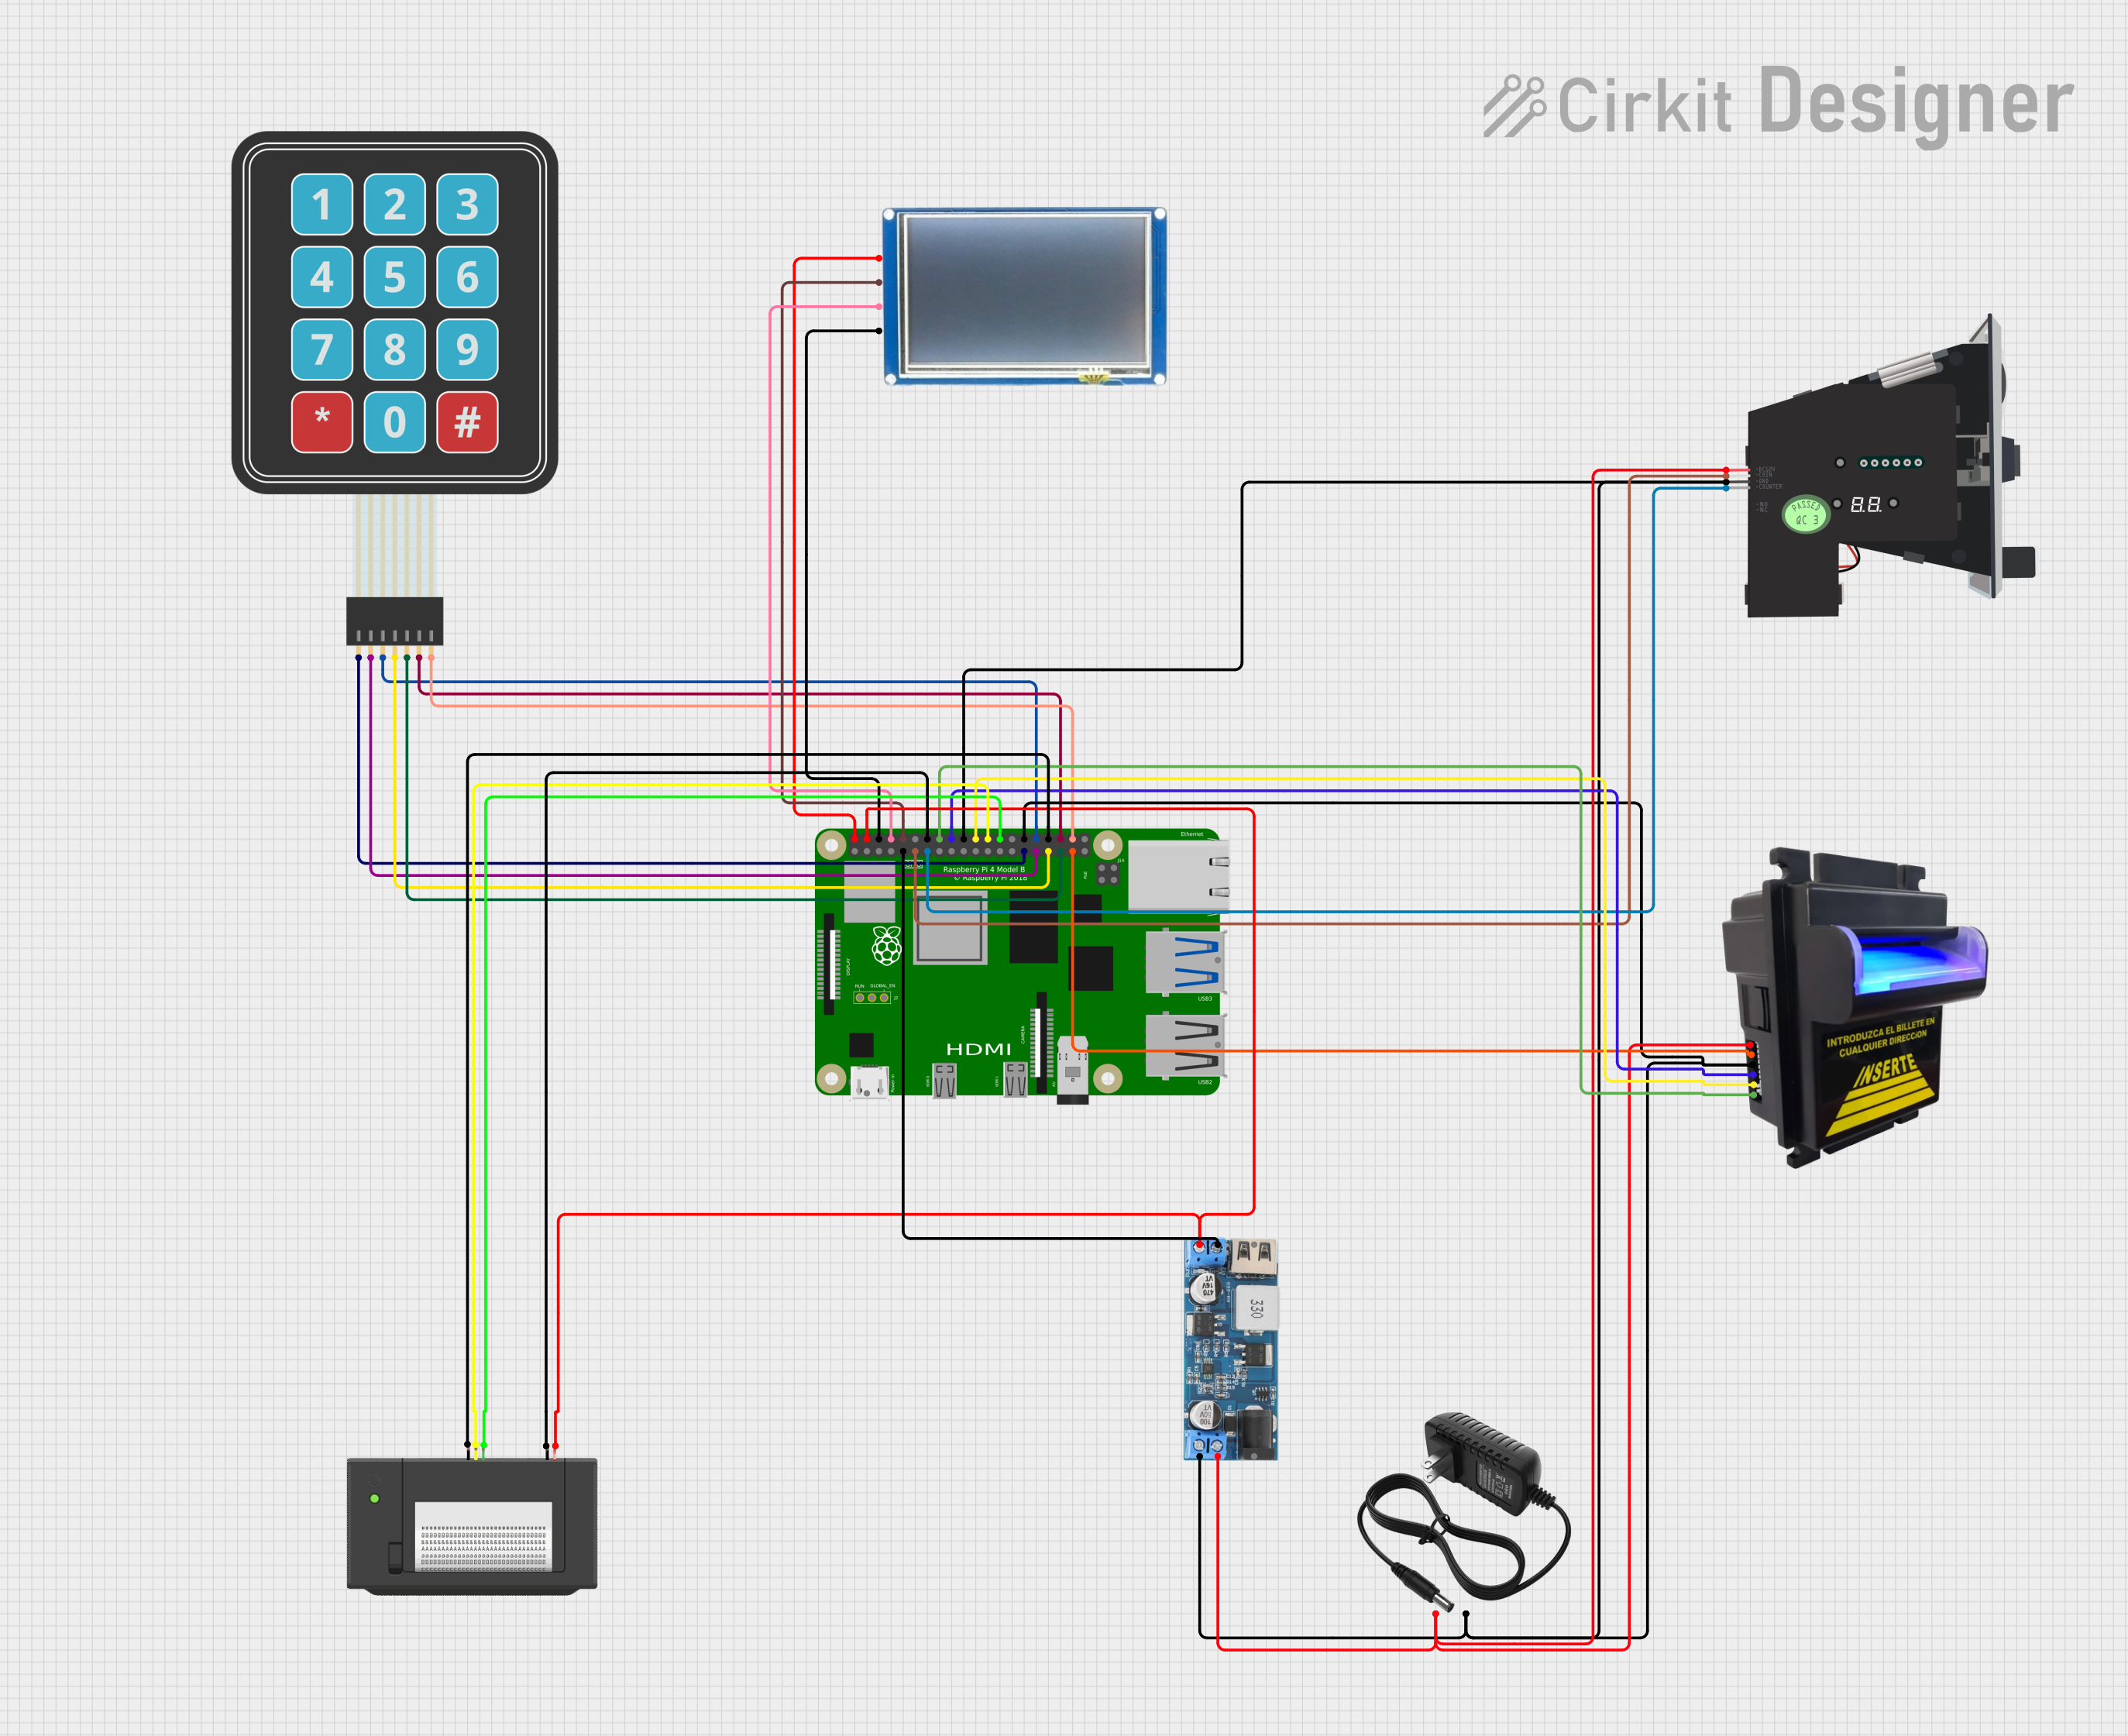
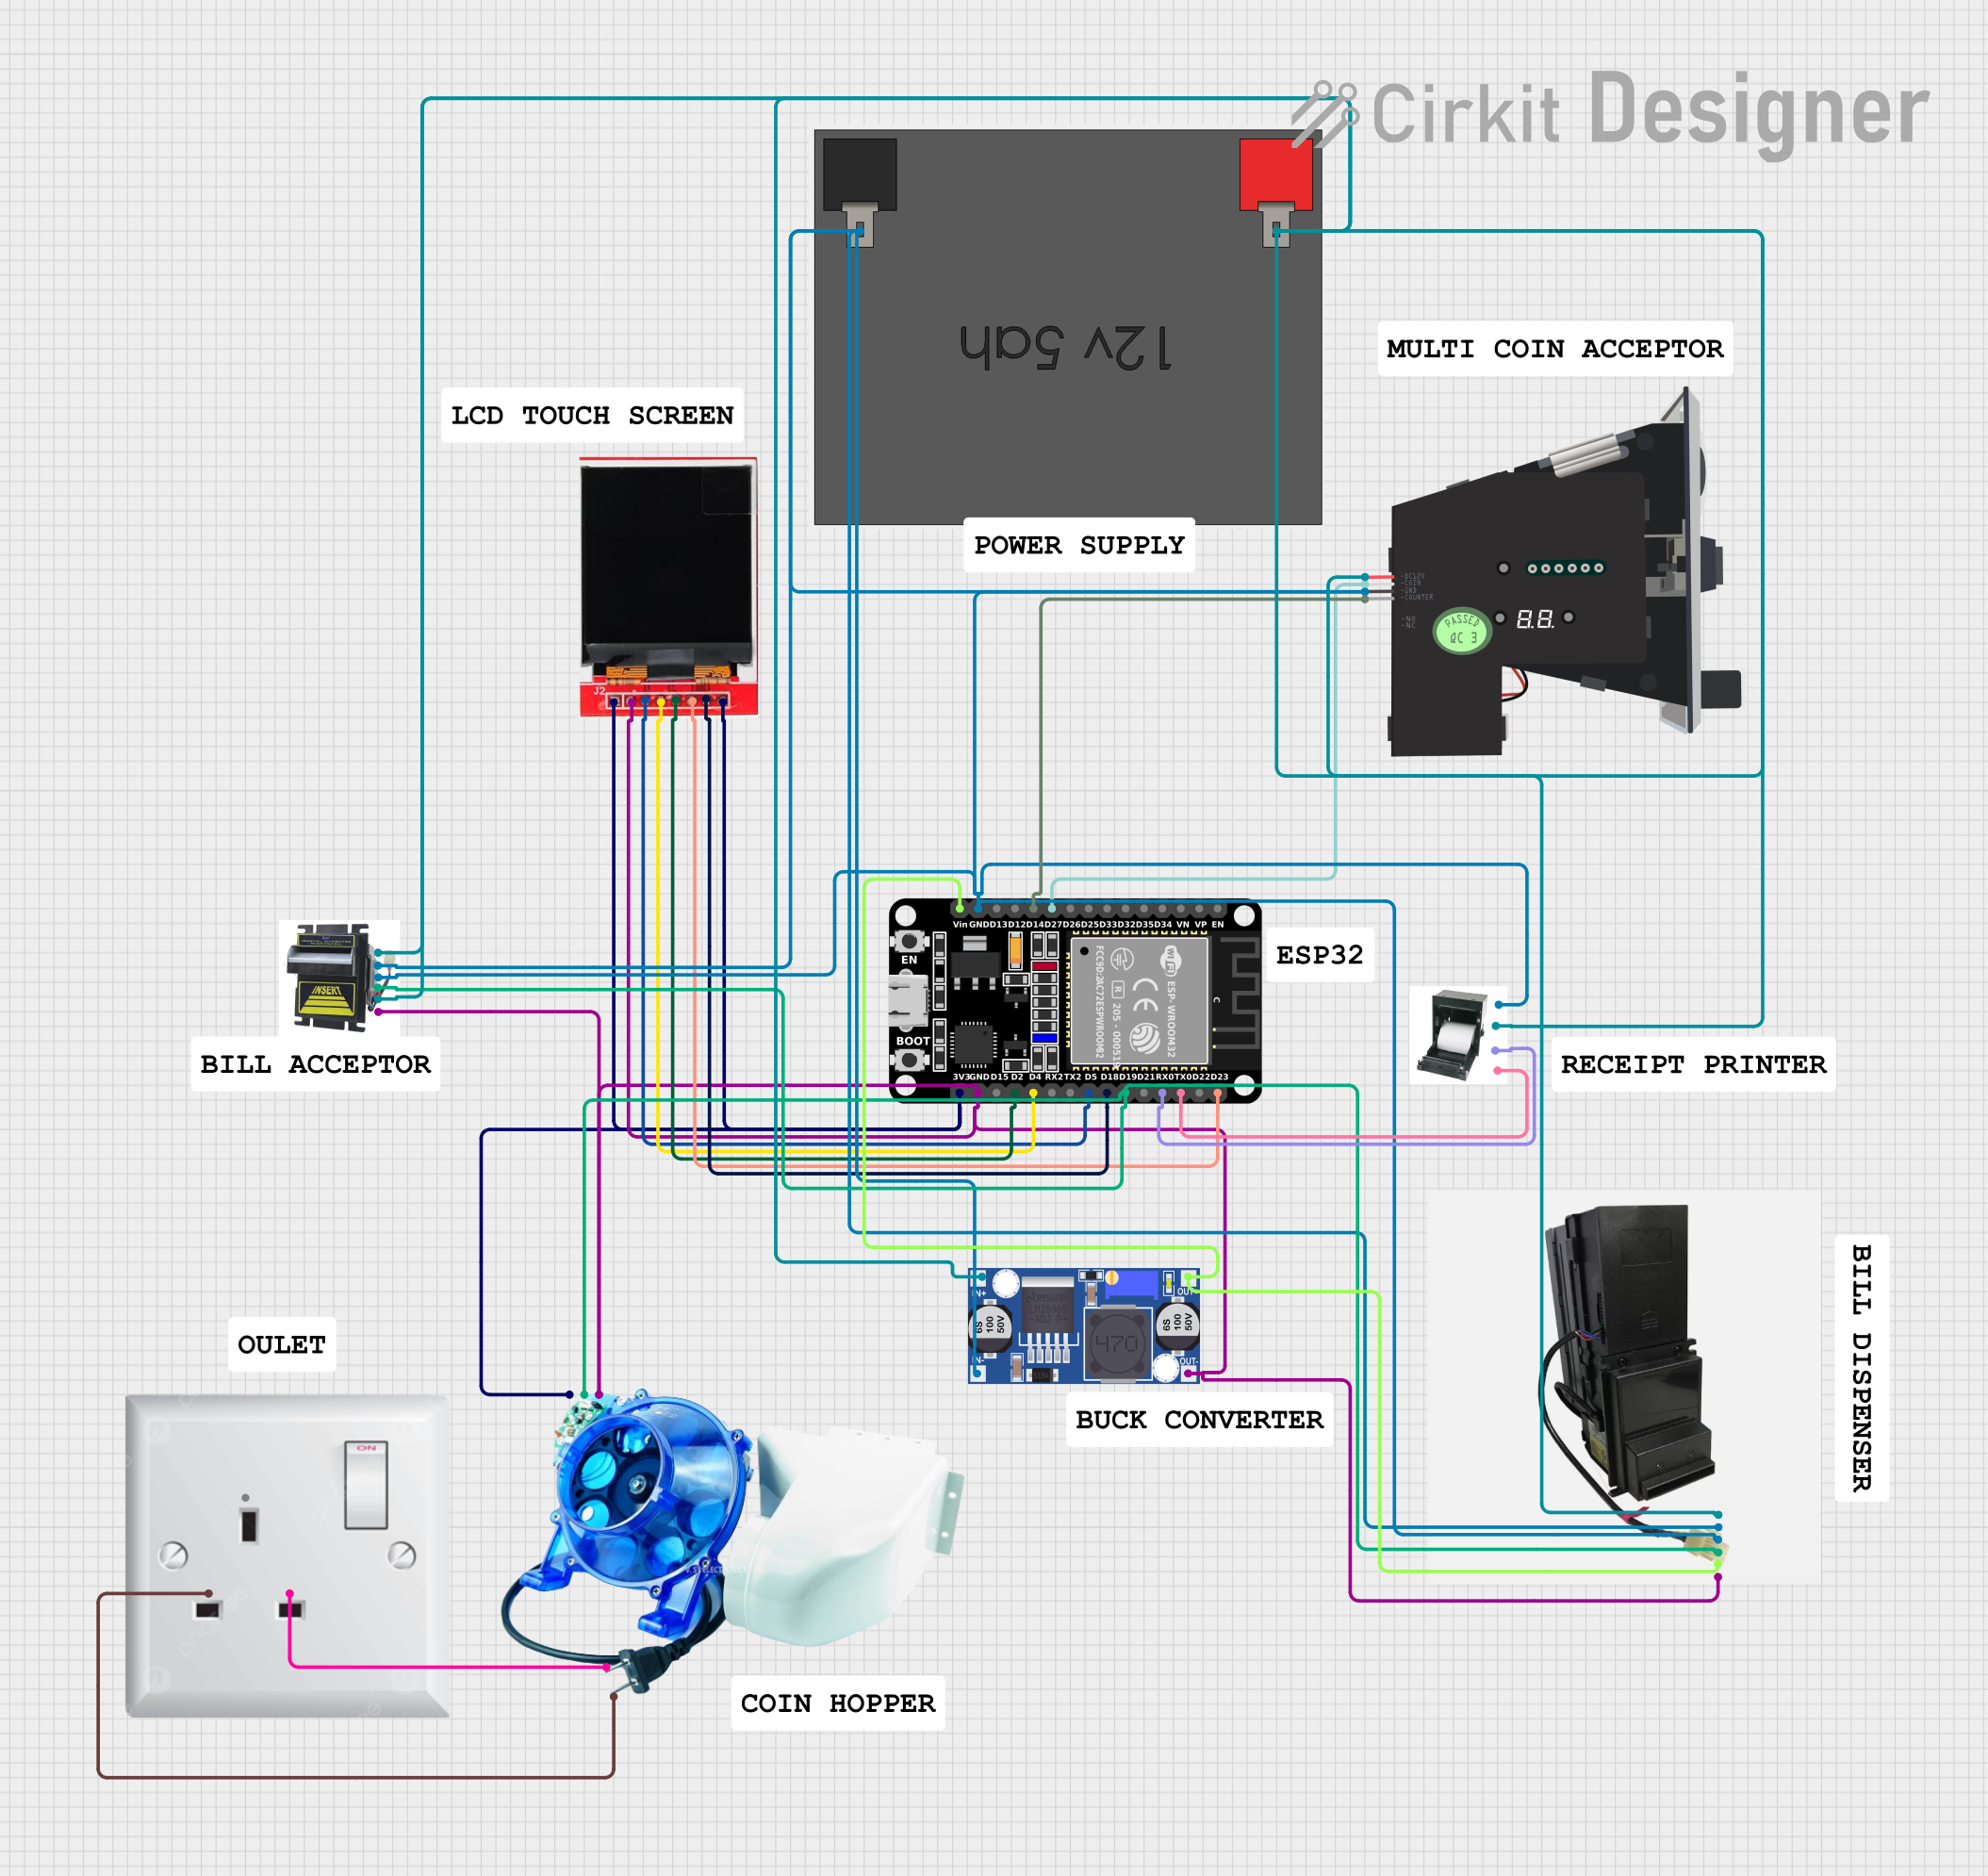

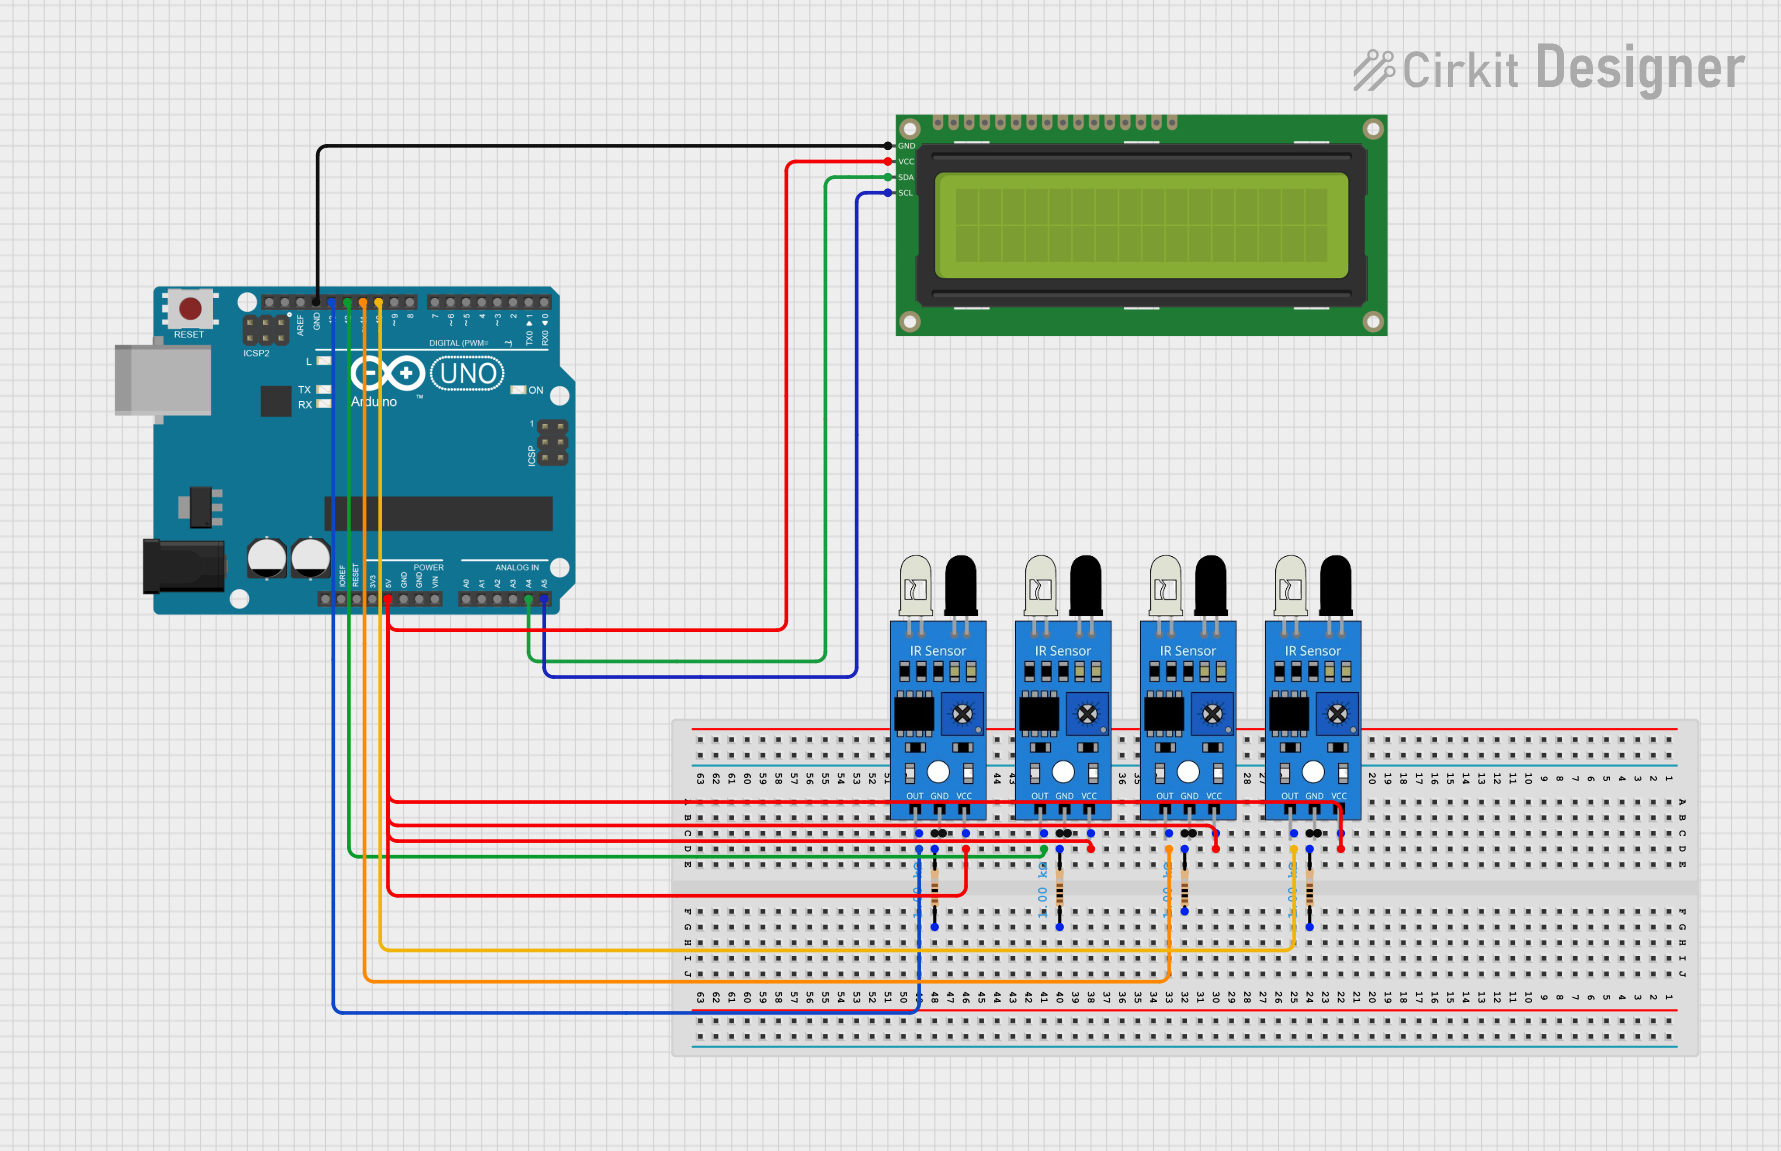
Explore Projects Built with Multi Coin Acceptor
Common Applications and Use Cases
- Vending machines for snacks, beverages, or tickets
- Arcade gaming machines
- Public transportation ticket vending
- Coin-operated laundry machines
- Any self-service kiosk requiring coin payments
Technical Specifications
Key Technical Details
- Voltage: Typically 12V DC
- Current: Varies depending on the model, usually around 50-100mA during standby and up to 2A during coin acceptance
- Coin Diameter Range: Usually 15mm to 29mm
- Coin Thickness Range: Typically 1.8mm to 3.0mm
- Acceptance Rate: 95% or higher
- Speed: 2-3 seconds per coin
Pin Configuration and Descriptions
| Pin Number | Description | Notes |
|---|---|---|
| 1 | Ground (GND) | Connect to system ground |
| 2 | Coin Signal Output | Outputs pulse signal when a coin is accepted |
| 3 | +12V Power Supply | Connect to 12V DC power source |
| 4 | Counter Output (optional) | Outputs pulse for coin metering |
| 5 | Inhibit Input (optional) | Logic input to disable coin acceptance |
Usage Instructions
How to Use the Component in a Circuit
- Power Connection: Connect the +12V and GND pins to a suitable 12V DC power supply.
- Signal Output: Connect the Coin Signal Output to the input pin of a microcontroller (e.g., Arduino) to detect when a coin is accepted.
- Counter Output (if available): Connect this to a counter module or another input pin on your microcontroller if you need to keep track of the number of coins inserted.
- Inhibit Input (if available): Apply a logic high signal to temporarily disable the coin acceptor if your system requires this functionality.
Important Considerations and Best Practices
- Ensure the power supply can handle the peak current draw when a coin is being accepted.
- Regularly calibrate the coin acceptor for the types of coins it needs to accept.
- Keep the coin path clean to prevent acceptance errors or jams.
- Use debounce algorithms in your code to handle signal output effectively.
Example Arduino Code
// Define the pin connected to the Coin Signal Output
const int coinSignalPin = 2;

void setup() {
  // Set the coin signal pin as input
  pinMode(coinSignalPin, INPUT_PULLUP);
  Serial.begin(9600);
}

void loop() {
  // Check for a low pulse from the coin acceptor
  if (digitalRead(coinSignalPin) == LOW) {
    // Debounce by waiting for the signal to go high again
    delay(50);
    if (digitalRead(coinSignalPin) == HIGH) {
      Serial.println("Coin Accepted");
      // Add your code here to increment credit or perform an action
    }
  }
}
Troubleshooting and FAQs
Common Issues Users Might Face
- Coin not accepted: Ensure the coin matches the acceptor's calibration. Check for blockages or dirt in the coin path.
- False triggers: Implement a debounce algorithm in your code to filter out noise.
- Inconsistent detection: Verify the power supply is stable and within the specified voltage range.
Solutions and Tips for Troubleshooting
- Cleaning: Regularly clean the coin path with a soft cloth and mild cleaner.
- Calibration: Follow the manufacturer's instructions to recalibrate the acceptor for different coins.
- Power Supply: Use a regulated power supply to prevent voltage fluctuations that could affect performance.
FAQs
Q: Can the multi-coin acceptor work with any currency? A: The acceptor must be calibrated for the specific coins it needs to accept, which can include multiple currencies.
Q: How do I program the acceptor for different coins? A: Programming methods vary by model. Refer to the manufacturer's manual for specific instructions.
Q: What should I do if the acceptor keeps rejecting all coins? A: Check for proper calibration, clean the coin path, and ensure the power supply is within the specified range. If the problem persists, consult the manufacturer's support.
Remember to always refer to the specific model's datasheet and manufacturer's manual for precise information and instructions.