Cirkit Designer Logo
Cirkit Designer
Your all-in-one circuit design IDE
Home / 
Component Documentation

How to Use Adafruit TLV493D: Examples, Pinouts, and Specs

Image of Adafruit TLV493D
Cirkit Designer LogoDesign with Adafruit TLV493D in Cirkit Designer

Introduction

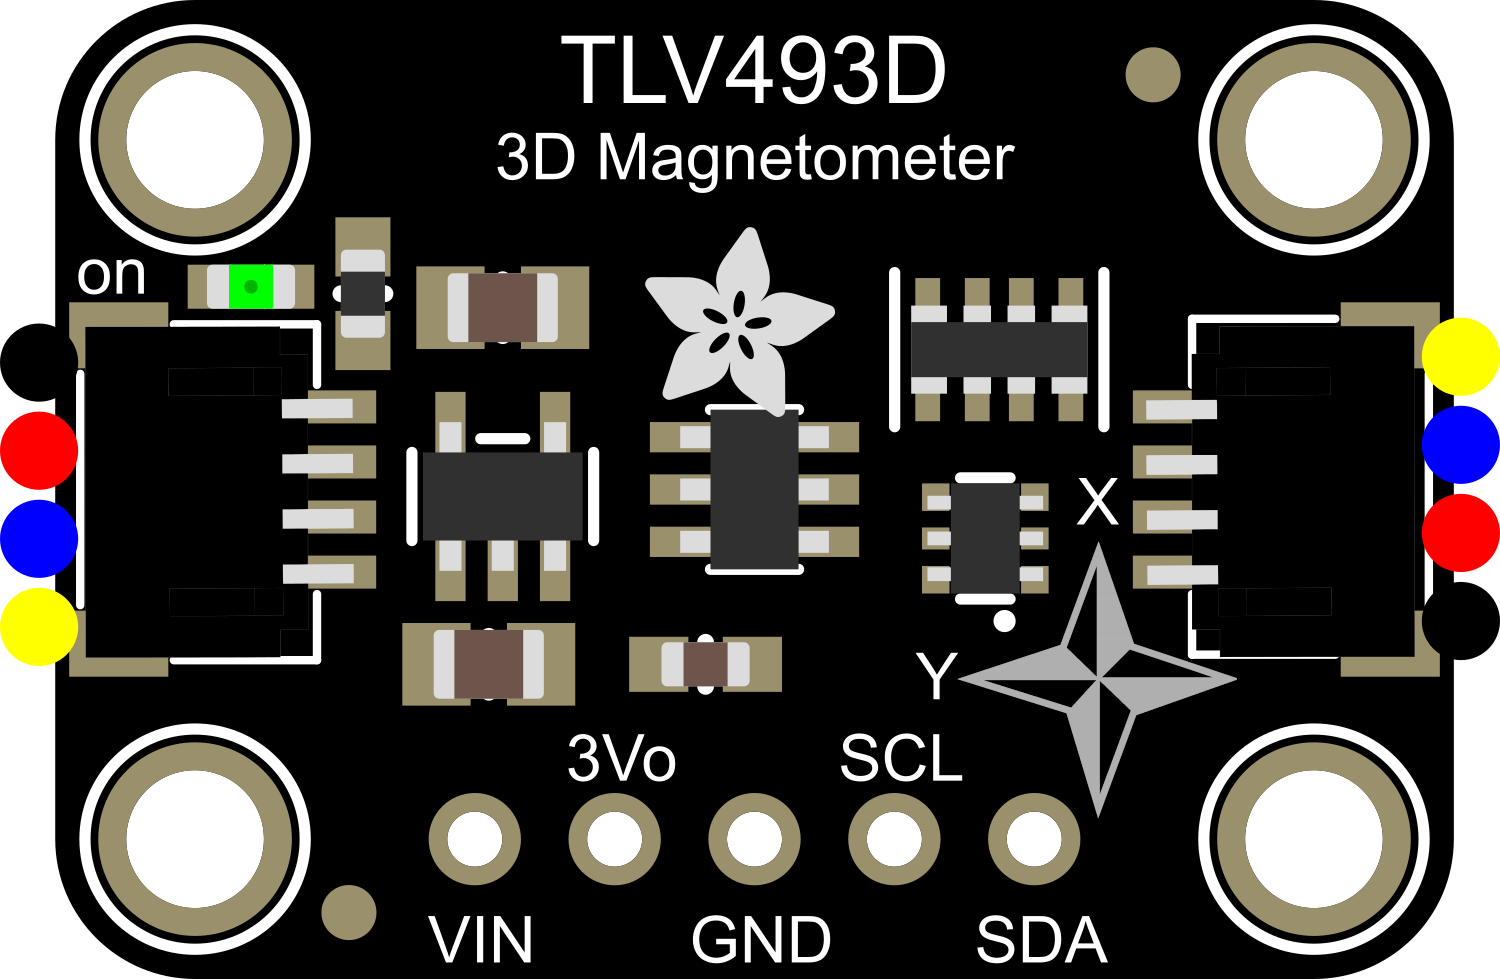
The Adafruit TLV493D is a compact 3-axis magnetic sensor module capable of sensing magnetic fields in three dimensions. It is based on the TLV493D-A1B6 magnetic sensor chip from Infineon Technologies, which offers high precision and low power consumption. This module is ideal for applications such as position tracking, compassing, and gesture detection. It communicates with microcontrollers like the Arduino UNO via the I2C interface, making it a versatile component for hobbyists and professionals alike.

Explore Projects Built with Adafruit TLV493D

Use Cirkit Designer to design, explore, and prototype these projects online. Some projects support real-time simulation. Click "Open Project" to start designing instantly!
Battery-Powered Smart Sensor Hub with Adafruit QT Py RP2040
Image of wearable final: A project utilizing Adafruit TLV493D in a practical application
This circuit features an Adafruit QT Py RP2040 microcontroller interfaced with an APDS9960 proximity sensor, an MPU6050 accelerometer and gyroscope, and an OLED display via I2C communication. It also includes a buzzer controlled by the microcontroller and is powered by a 3.7V LiPo battery with a toggle switch for power control.
Cirkit Designer LogoOpen Project in Cirkit Designer
Battery-Powered Arduino UNO Smart Light with NeoPixel and ADXL345
Image of Cubagick: A project utilizing Adafruit TLV493D in a practical application
This circuit is a battery-powered system featuring an Arduino UNO that controls an Adafruit NeoPixel Stick and interfaces with an ADXL345 accelerometer and an ILI9341 TFT display. The TP4056 module charges a 18650 battery, which powers the system through a DC-DC converter. The Arduino code drives the NeoPixel Stick to display a red light sequence.
Cirkit Designer LogoOpen Project in Cirkit Designer
Arduino Nano Controlled Robotics System with Wireless Communication and Touch Sensing
Image of AI: A project utilizing Adafruit TLV493D in a practical application
This circuit features two Arduino Nanos controlling a variety of components. One Arduino interfaces with a 12-bit PWM servo driver to manage multiple servos, an OLED display, a stepper motor via an A4988 driver, and communicates using an NRF24L01 wireless module. The other Arduino handles inputs from several TTP233 touch sensors and also communicates wirelessly using its own NRF24L01 module. Power management is handled by a 12V battery, a step-down converter to 5V, and rocker switches to control power flow.
Cirkit Designer LogoOpen Project in Cirkit Designer
ESP32-Powered Wi-Fi Controlled Robotic Car with OLED Display and Ultrasonic Sensor
Image of playbot: A project utilizing Adafruit TLV493D in a practical application
This circuit is a battery-powered system featuring an ESP32 microcontroller that controls an OLED display, a motor driver for two hobby motors, an ultrasonic sensor for distance measurement, and a DFPlayer Mini for audio output through a loudspeaker. The TP4056 module manages battery charging, and a step-up boost converter provides a stable 5V supply to the components.
Cirkit Designer LogoOpen Project in Cirkit Designer

Explore Projects Built with Adafruit TLV493D

Use Cirkit Designer to design, explore, and prototype these projects online. Some projects support real-time simulation. Click "Open Project" to start designing instantly!
Image of wearable final: A project utilizing Adafruit TLV493D in a practical application
Battery-Powered Smart Sensor Hub with Adafruit QT Py RP2040
This circuit features an Adafruit QT Py RP2040 microcontroller interfaced with an APDS9960 proximity sensor, an MPU6050 accelerometer and gyroscope, and an OLED display via I2C communication. It also includes a buzzer controlled by the microcontroller and is powered by a 3.7V LiPo battery with a toggle switch for power control.
Cirkit Designer LogoOpen Project in Cirkit Designer
Image of Cubagick: A project utilizing Adafruit TLV493D in a practical application
Battery-Powered Arduino UNO Smart Light with NeoPixel and ADXL345
This circuit is a battery-powered system featuring an Arduino UNO that controls an Adafruit NeoPixel Stick and interfaces with an ADXL345 accelerometer and an ILI9341 TFT display. The TP4056 module charges a 18650 battery, which powers the system through a DC-DC converter. The Arduino code drives the NeoPixel Stick to display a red light sequence.
Cirkit Designer LogoOpen Project in Cirkit Designer
Image of AI: A project utilizing Adafruit TLV493D in a practical application
Arduino Nano Controlled Robotics System with Wireless Communication and Touch Sensing
This circuit features two Arduino Nanos controlling a variety of components. One Arduino interfaces with a 12-bit PWM servo driver to manage multiple servos, an OLED display, a stepper motor via an A4988 driver, and communicates using an NRF24L01 wireless module. The other Arduino handles inputs from several TTP233 touch sensors and also communicates wirelessly using its own NRF24L01 module. Power management is handled by a 12V battery, a step-down converter to 5V, and rocker switches to control power flow.
Cirkit Designer LogoOpen Project in Cirkit Designer
Image of playbot: A project utilizing Adafruit TLV493D in a practical application
ESP32-Powered Wi-Fi Controlled Robotic Car with OLED Display and Ultrasonic Sensor
This circuit is a battery-powered system featuring an ESP32 microcontroller that controls an OLED display, a motor driver for two hobby motors, an ultrasonic sensor for distance measurement, and a DFPlayer Mini for audio output through a loudspeaker. The TP4056 module manages battery charging, and a step-up boost converter provides a stable 5V supply to the components.
Cirkit Designer LogoOpen Project in Cirkit Designer

Technical Specifications

Key Features

  • Magnetic field detection in 3 dimensions (X, Y, Z)
  • I2C interface for communication
  • Operating Voltage: 2.7V to 3.6V
  • Measurement Range: ±130 mT (millitesla) per axis
  • Resolution: typically 98 µT (microtesla)
  • Low Power Consumption: 10 µA in power-down mode
  • Operating Temperature Range: -40°C to 85°C

Pin Configuration and Descriptions

Pin Number Name Description
1 VDD Power supply (2.7V to 3.6V)
2 GND Ground connection
3 SDA I2C Data line
4 SCL I2C Clock line
5 ADDR I2C Address selection (connect to GND or VDD)
6 SDAI Interrupt (not used in default operation)

Usage Instructions

Integration into a Circuit

  1. Power Connections: Connect the VDD pin to a 2.7V to 3.6V power supply and the GND pin to the ground of your system.
  2. I2C Communication: Connect the SDA and SCL pins to the corresponding I2C data and clock lines on your microcontroller.
  3. Address Selection: The ADDR pin can be connected to GND or VDD to select between two possible I2C addresses for the device.

Best Practices

  • Ensure that the power supply is stable and within the specified voltage range.
  • Use pull-up resistors on the I2C data and clock lines if they are not already provided by the microcontroller board.
  • Avoid placing the sensor near strong electromagnetic fields that may interfere with measurements.
  • Implement proper decoupling techniques by placing a capacitor close to the VDD pin of the sensor.

Example Code for Arduino UNO

#include <Wire.h>
#include <Adafruit_TLV493D.h>

// Create sensor instance
Adafruit_TLV493D tlv = Adafruit_TLV493D();

void setup() {
  Serial.begin(9600);
  // Wait for serial monitor to open
  while (!Serial) { delay(10); }

  // Initialize the sensor
  if (!tlv.begin()) {
    Serial.println("Failed to find TLV493D sensor");
    while (1) { delay(10); }
  }
  Serial.println("TLV493D sensor found!");
}

void loop() {
  tlv.read(); // Read the sensor

  // Print out the X, Y, and Z axis values
  Serial.print("X: "); Serial.print(tlv.x, 4); Serial.print(" mT");
  Serial.print("\tY: "); Serial.print(tlv.y, 4); Serial.print(" mT");
  Serial.print("\tZ: "); Serial.print(tlv.z, 4); Serial.println(" mT");

  delay(500); // Delay between readings
}

Troubleshooting and FAQs

Common Issues

  • No Data from Sensor: Ensure that the I2C connections are correct and secure. Check that the correct I2C address is being used in your code.
  • Inaccurate Readings: Verify that the sensor is not being affected by nearby magnetic fields or metals. Calibrate the sensor if necessary.
  • Intermittent Communication: Check for loose connections and ensure that pull-up resistors are installed if required.

FAQs

Q: Can the TLV493D sensor be used with a 5V microcontroller? A: Yes, but ensure that the sensor's VDD is connected to a 3.3V supply, and use level shifters for the I2C lines if the microcontroller operates at 5V.

Q: How can I change the I2C address of the sensor? A: The I2C address can be changed by connecting the ADDR pin to either GND or VDD.

Q: What is the default I2C address of the TLV493D? A: The default I2C address is 0x5E when the ADDR pin is connected to GND.

Q: How do I calibrate the sensor? A: Calibration procedures can vary; refer to the TLV493D datasheet for detailed instructions.

For further assistance, consult the Adafruit TLV493D datasheet and the support forums.