
How to Use PCB Circuit 5x7: Examples, Pinouts, and Specs
 Design with PCB Circuit 5x7 in Cirkit Designer
Introduction
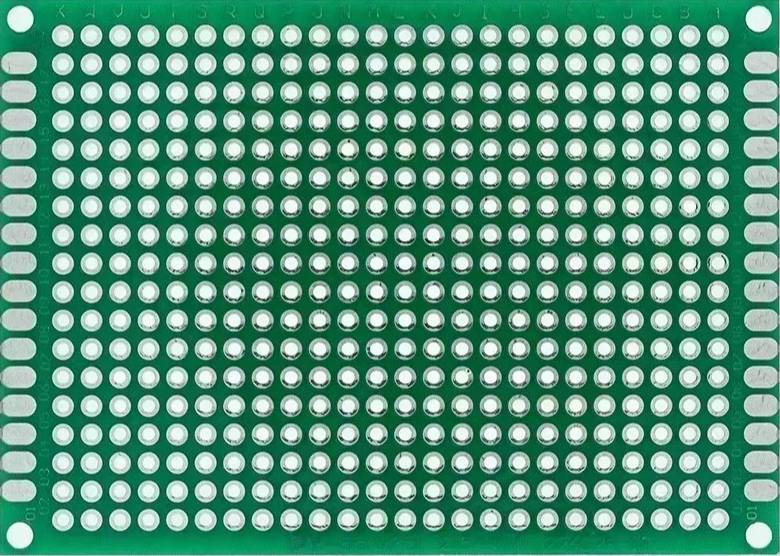
The PCB Circuit 5x7 is a versatile printed circuit board (PCB) measuring 5x7 inches, designed for mounting and interconnecting electronic components. Manufactured in China, this PCB is ideal for prototyping, DIY electronics projects, and small-scale production. It provides a reliable platform for creating custom circuits and ensures stable electrical connections between components.
Explore Projects Built with PCB Circuit 5x7
 Open Project in Cirkit Designer
 Open Project in Cirkit Designer
 Open Project in Cirkit Designer
 Open Project in Cirkit Designer
Explore Projects Built with PCB Circuit 5x7
Open Project in Cirkit DesignerOpen Project in Cirkit DesignerOpen Project in Cirkit DesignerOpen Project in Cirkit DesignerCommon Applications and Use Cases
- Prototyping and testing electronic circuits
- DIY electronics projects
- Educational purposes for learning circuit design
- Small-scale production of custom electronic devices
- Repair and modification of existing circuits
Technical Specifications
The PCB Circuit 5x7 is designed to meet the needs of hobbyists and professionals alike. Below are its key technical details:
Key Technical Details
| Parameter | Specification |
|---|---|
| Dimensions | 5 x 7 inches (127 x 178 mm) |
| Material | FR4 (Flame Retardant 4) |
| Thickness | 1.6 mm |
| Copper Layer Thickness | 1 oz/ft² (35 µm) |
| Hole Diameter | 1.0 mm (standard) |
| Hole Pitch | 2.54 mm (0.1 inch) grid spacing |
| Surface Finish | HASL (Hot Air Solder Leveling) |
| Solder Mask Color | Green |
| Number of Layers | Single-layer or double-layer |
Pin Configuration and Descriptions
The PCB Circuit 5x7 does not have predefined pins but features a grid of plated through-holes for mounting components. Below is a description of its layout:
| Feature | Description |
|---|---|
| Plated Through-Holes | Holes with conductive plating for soldering components and creating connections. |
| Grid Spacing | Standard 2.54 mm (0.1 inch) spacing for compatibility with DIP components. |
| Copper Traces | Predefined or user-designed traces for electrical connections. |
| Mounting Holes | Four corner holes for securing the PCB to an enclosure or workspace. |
Usage Instructions
How to Use the PCB Circuit 5x7 in a Circuit
- Plan Your Circuit Design: Use a schematic diagram to map out the connections and components.
- Place Components: Insert components (e.g., resistors, capacitors, ICs) into the plated through-holes.
- Solder Components: Secure components by soldering their leads to the copper pads on the PCB.
- Create Connections: Use solder bridges, jumper wires, or copper traces to establish electrical connections.
- Test the Circuit: Verify the functionality of your circuit using a multimeter or other testing tools.
Important Considerations and Best Practices
- Component Placement: Ensure components are placed in alignment with the grid for a clean and organized layout.
- Soldering Tips: Use a soldering iron with a fine tip and apply solder sparingly to avoid short circuits.
- Heat Management: Avoid overheating the PCB to prevent damage to the copper traces or solder mask.
- Trace Design: For custom traces, use a PCB design software to plan and etch the desired connections.
- Arduino Compatibility: The 2.54 mm grid spacing makes this PCB compatible with Arduino UNO shields and modules.
Example: Connecting an LED to an Arduino UNO
Below is an example of how to use the PCB Circuit 5x7 to connect an LED to an Arduino UNO:
// Arduino code to blink an LED connected via the PCB Circuit 5x7

const int ledPin = 13; // Pin 13 is connected to the LED

void setup() {
  pinMode(ledPin, OUTPUT); // Set pin 13 as an output
}

void loop() {
  digitalWrite(ledPin, HIGH); // Turn the LED on
  delay(1000);               // Wait for 1 second
  digitalWrite(ledPin, LOW);  // Turn the LED off
  delay(1000);               // Wait for 1 second
}
Wiring Instructions:
- Connect the LED's positive leg (anode) to pin 13 on the Arduino via the PCB.
- Connect the LED's negative leg (cathode) to a 220-ohm resistor, and then to the Arduino's GND pin.
- Use the PCB's plated through-holes and solder to secure the connections.
Troubleshooting and FAQs
Common Issues Users Might Face
Poor Solder Joints:
- Cause: Insufficient heat or solder applied during soldering.
- Solution: Reheat the joint and apply a small amount of solder to ensure a solid connection.
Short Circuits:
- Cause: Excess solder bridging adjacent pads or traces.
- Solution: Use a solder wick or desoldering pump to remove excess solder.
Damaged Traces:
- Cause: Overheating or excessive force during soldering.
- Solution: Repair the trace using a thin wire or conductive pen.
Misaligned Components:
- Cause: Incorrect placement of components on the grid.
- Solution: Desolder and reposition the components carefully.
FAQs
Q: Can I use this PCB for high-frequency circuits?
A: While the PCB Circuit 5x7 is suitable for general-purpose use, it may not be ideal for high-frequency circuits due to potential signal integrity issues. Consider using a PCB with controlled impedance for such applications.
Q: Is the PCB reusable?
A: Yes, the PCB can be reused if components are carefully desoldered and the board is not damaged.
Q: Can I cut the PCB to a smaller size?
A: Yes, the PCB can be cut using a PCB cutter or a fine saw. Ensure the edges are smoothed to prevent damage.
Q: Does the PCB support surface-mount components?
A: This PCB is primarily designed for through-hole components, but surface-mount components can be used with additional soldering techniques.
By following this documentation, users can effectively utilize the PCB Circuit 5x7 for a wide range of electronic projects.