Cirkit Designer Logo
Cirkit Designer
Your all-in-one circuit design IDE
Home / 
Component Documentation

How to Use Servo MG996R: Examples, Pinouts, and Specs

Image of Servo MG996R
Cirkit Designer LogoDesign with Servo MG996R in Cirkit Designer

Introduction

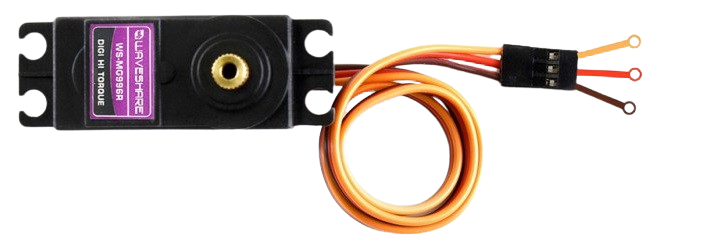
The MG996R is a high-torque servo motor widely used in robotics, automation, and remote-controlled systems. It is known for its robust metal gear design, which ensures durability and reliability under heavy loads. The servo provides precise control of angular position, making it ideal for applications requiring accurate movement, such as robotic arms, RC vehicles, and pan-tilt camera systems. Its wide operating voltage range and high torque output make it a versatile choice for both hobbyists and professionals.

Explore Projects Built with Servo MG996R

Use Cirkit Designer to design, explore, and prototype these projects online. Some projects support real-time simulation. Click "Open Project" to start designing instantly!
Arduino-Controlled Robotic Arm with Joystick and Push Button Interface
Image of ppp: A project utilizing Servo MG996R in a practical application
This is a servo control system featuring an Arduino UNO that processes input from a dual-axis joystick and push switches to operate multiple MG996R servo motors. It is designed for precise multi-axis control, potentially for applications like robotics or remote-controlled mechanisms.
Cirkit Designer LogoOpen Project in Cirkit Designer
Arduino-Controlled Bluetooth Servo System with Adafruit PWM Driver
Image of glove new: A project utilizing Servo MG996R in a practical application
This circuit is designed to wirelessly control multiple MG996R servos using an Arduino UNO and an Adafruit 16-Channel PWM Servo Driver. The HC-05 Bluetooth module enables remote command input, and a 3.7V battery provides power to the system.
Cirkit Designer LogoOpen Project in Cirkit Designer
Arduino UNO and 16-Channel PWM Servo Driver Controlled Robotic Arm with Battery Power
Image of Khang: A project utilizing Servo MG996R in a practical application
This circuit uses an Arduino UNO to control four MG996R servos via two 16-Channel PWM Servo Drivers. The Arduino communicates with the servo drivers over I2C and provides PWM signals to the servos to control their positions, powered by a 5V battery.
Cirkit Designer LogoOpen Project in Cirkit Designer
Arduino Uno Controlled 6-Servo Robot Arm with 3 Analog Joysticks
Image of Robot Arm: A project utilizing Servo MG996R in a practical application
This circuit controls a robot arm with six MG996R servos using an Arduino Uno R3 and three analog joysticks. The joysticks provide analog input to the Arduino, which then maps these inputs to control the angles of the servos, allowing for precise movement of the robot arm.
Cirkit Designer LogoOpen Project in Cirkit Designer

Explore Projects Built with Servo MG996R

Use Cirkit Designer to design, explore, and prototype these projects online. Some projects support real-time simulation. Click "Open Project" to start designing instantly!
Image of ppp: A project utilizing Servo MG996R in a practical application
Arduino-Controlled Robotic Arm with Joystick and Push Button Interface
This is a servo control system featuring an Arduino UNO that processes input from a dual-axis joystick and push switches to operate multiple MG996R servo motors. It is designed for precise multi-axis control, potentially for applications like robotics or remote-controlled mechanisms.
Cirkit Designer LogoOpen Project in Cirkit Designer
Image of glove new: A project utilizing Servo MG996R in a practical application
Arduino-Controlled Bluetooth Servo System with Adafruit PWM Driver
This circuit is designed to wirelessly control multiple MG996R servos using an Arduino UNO and an Adafruit 16-Channel PWM Servo Driver. The HC-05 Bluetooth module enables remote command input, and a 3.7V battery provides power to the system.
Cirkit Designer LogoOpen Project in Cirkit Designer
Image of Khang: A project utilizing Servo MG996R in a practical application
Arduino UNO and 16-Channel PWM Servo Driver Controlled Robotic Arm with Battery Power
This circuit uses an Arduino UNO to control four MG996R servos via two 16-Channel PWM Servo Drivers. The Arduino communicates with the servo drivers over I2C and provides PWM signals to the servos to control their positions, powered by a 5V battery.
Cirkit Designer LogoOpen Project in Cirkit Designer
Image of Robot Arm: A project utilizing Servo MG996R in a practical application
Arduino Uno Controlled 6-Servo Robot Arm with 3 Analog Joysticks
This circuit controls a robot arm with six MG996R servos using an Arduino Uno R3 and three analog joysticks. The joysticks provide analog input to the Arduino, which then maps these inputs to control the angles of the servos, allowing for precise movement of the robot arm.
Cirkit Designer LogoOpen Project in Cirkit Designer

Technical Specifications

  • Model: MG996R
  • Operating Voltage: 4.8V to 7.2V
  • Stall Torque:
    • 9.4 kg·cm at 4.8V
    • 11 kg·cm at 6V
  • Operating Speed:
    • 0.19 sec/60° at 4.8V
    • 0.14 sec/60° at 6V
  • Control Signal: PWM (Pulse Width Modulation)
  • PWM Pulse Range: 500 µs to 2500 µs
  • Angle Range: 0° to 180°
  • Gear Type: Metal
  • Weight: 55g
  • Dimensions: 40.7mm x 19.7mm x 42.9mm

Pin Configuration and Descriptions

The MG996R servo motor has a 3-wire interface for power, ground, and control signal. The pinout is as follows:

Pin Color Function Description
Red VCC (Power) Connect to a 4.8V–7.2V power source.
Brown GND (Ground) Connect to the ground of the circuit.
Orange Signal (PWM) Receives the PWM signal for control.

Usage Instructions

How to Use the MG996R in a Circuit

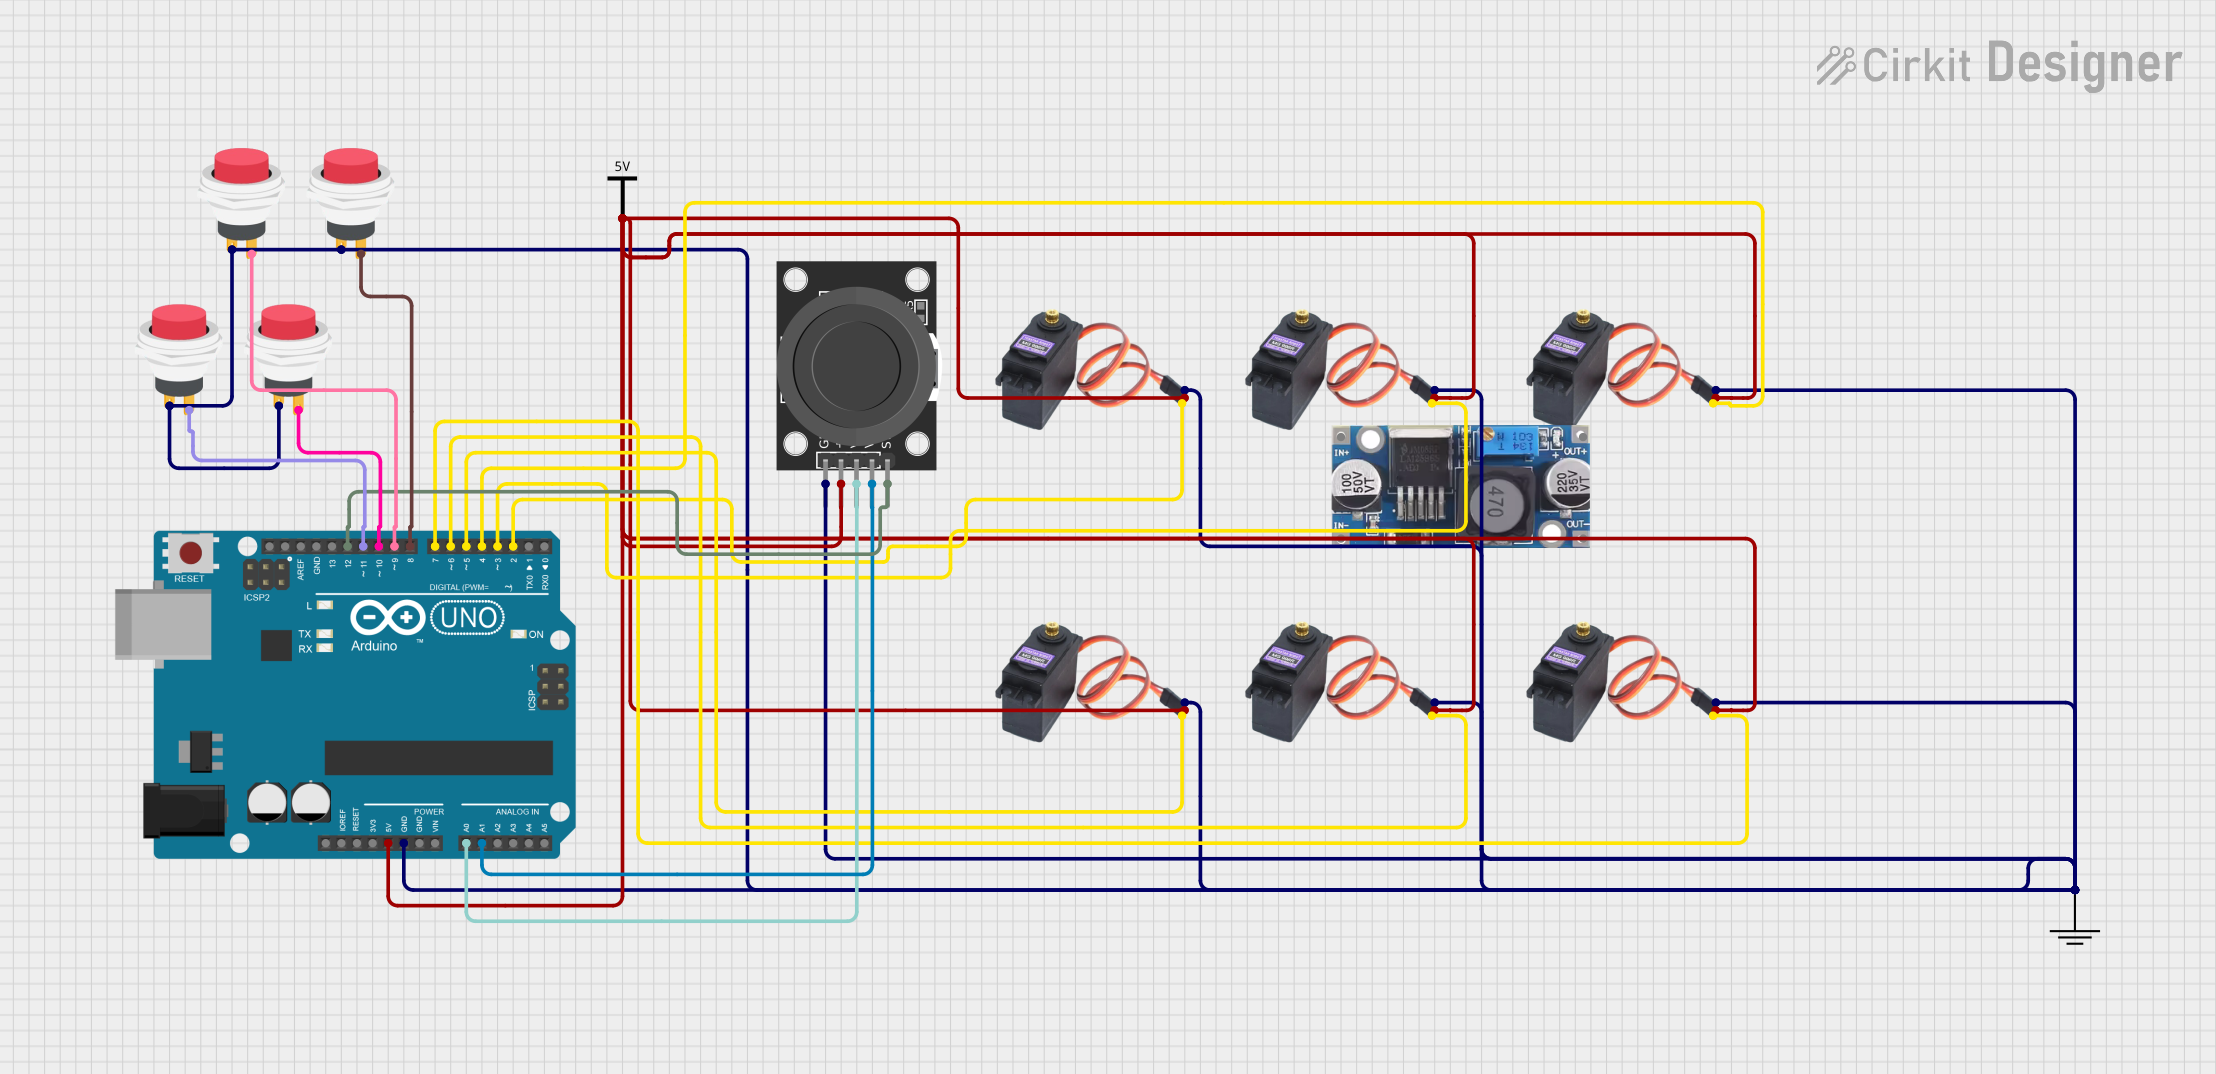
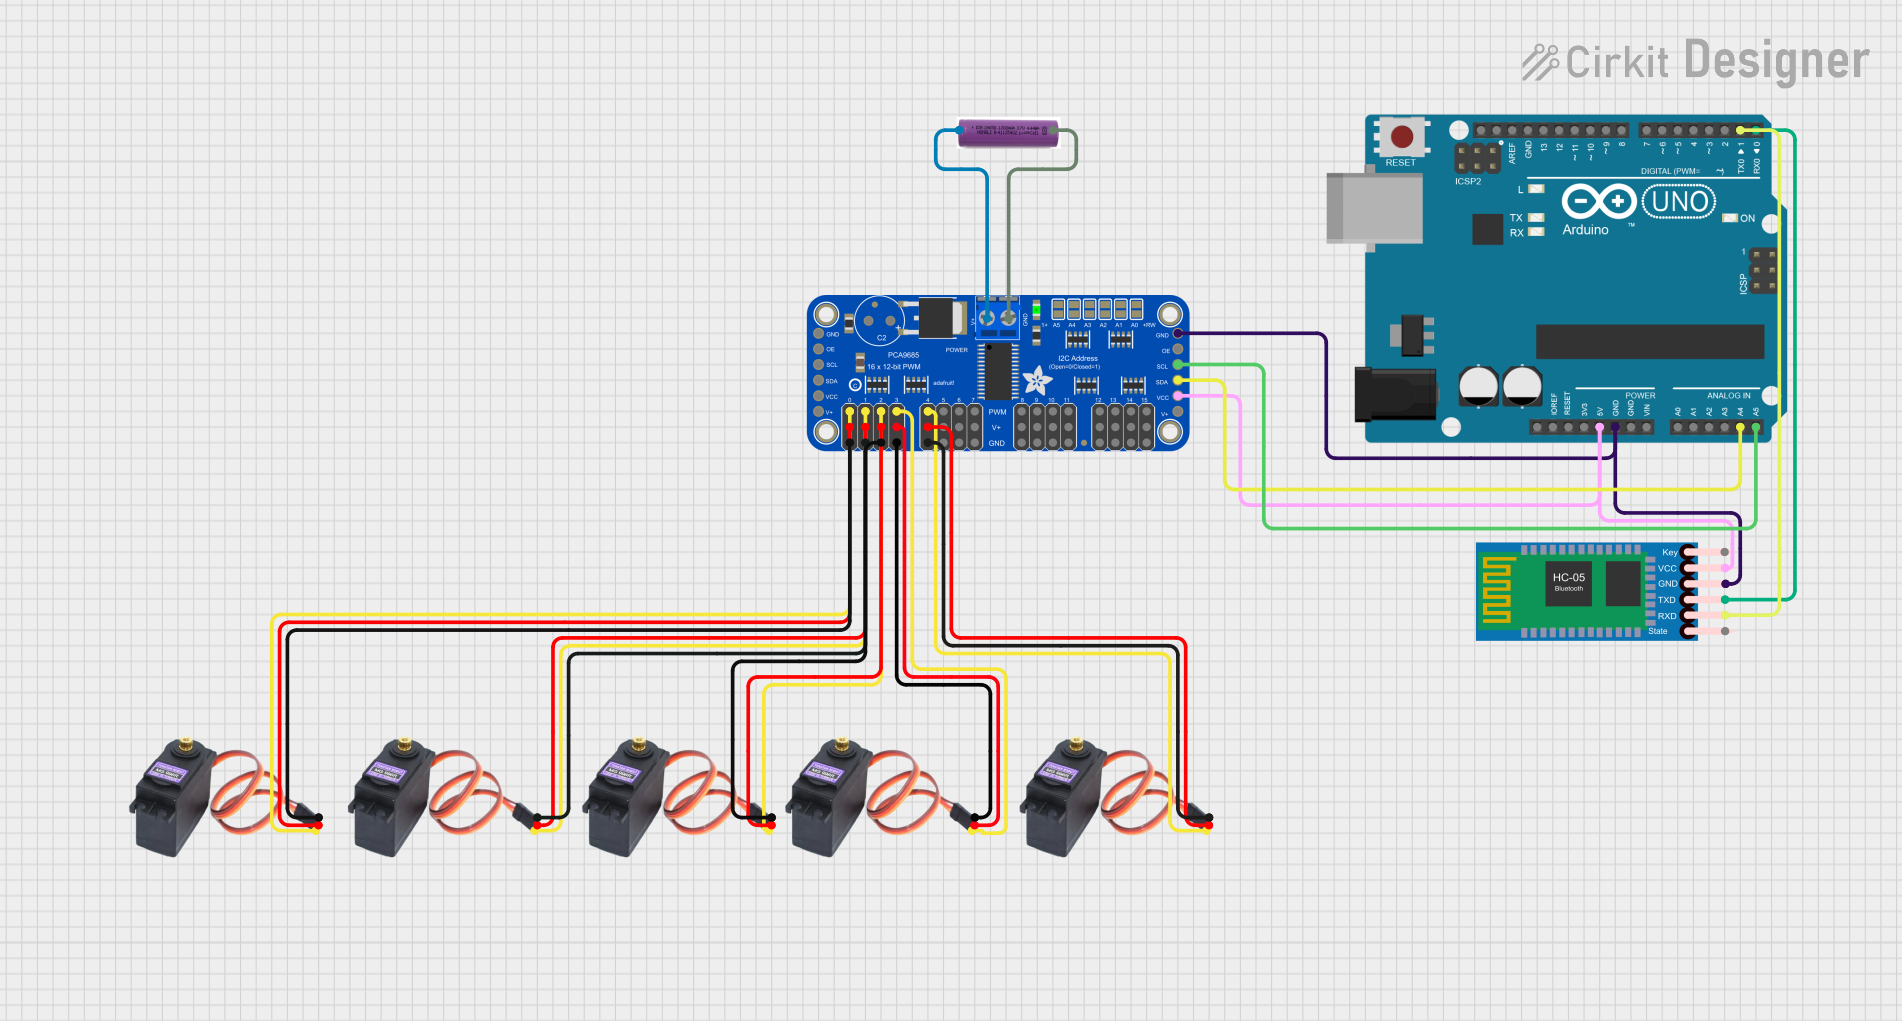
  1. Power Supply: Connect the red wire to a power source (4.8V–7.2V) capable of supplying sufficient current. The servo can draw up to 2.5A under load, so ensure your power supply can handle this.
  2. Ground Connection: Connect the brown wire to the ground of your circuit.
  3. PWM Signal: Connect the orange wire to a PWM-capable pin of your microcontroller (e.g., Arduino UNO). The PWM signal controls the servo's angular position.

Important Considerations

  • Power Requirements: Use a separate power supply for the servo if your microcontroller cannot provide sufficient current.
  • PWM Signal: Ensure the PWM signal is within the range of 500 µs to 2500 µs for proper operation. A pulse width of 1500 µs corresponds to the neutral position (90°).
  • Mechanical Load: Avoid overloading the servo to prevent overheating or damage to the gears.

Example Code for Arduino UNO

The following example demonstrates how to control the MG996R servo using an Arduino UNO:

#include <Servo.h> // Include the Servo library

Servo myServo; // Create a Servo object to control the MG996R

void setup() {
  myServo.attach(9); // Attach the servo to pin 9 on the Arduino
}

void loop() {
  myServo.write(0); // Move the servo to 0 degrees
  delay(1000);      // Wait for 1 second

  myServo.write(90); // Move the servo to 90 degrees
  delay(1000);       // Wait for 1 second

  myServo.write(180); // Move the servo to 180 degrees
  delay(1000);        // Wait for 1 second
}

Best Practices

  • Use a capacitor (e.g., 1000 µF) across the power supply to stabilize voltage and prevent noise.
  • Avoid sudden changes in position to reduce stress on the servo motor.
  • Test the servo without load before integrating it into your project.

Troubleshooting and FAQs

Common Issues and Solutions

  1. Servo Not Moving:

    • Cause: Insufficient power supply.
    • Solution: Ensure the power source provides 4.8V–7.2V and sufficient current (up to 2.5A).
  2. Servo Jittering:

    • Cause: Noisy or unstable PWM signal.
    • Solution: Use a clean PWM signal and ensure proper grounding.
  3. Overheating:

    • Cause: Prolonged operation under heavy load.
    • Solution: Reduce the load or allow the servo to cool down periodically.
  4. Limited Movement Range:

    • Cause: Incorrect PWM signal range.
    • Solution: Verify that the PWM signal is within the 500 µs to 2500 µs range.

FAQs

  • Q: Can I power the MG996R directly from the Arduino UNO?
    A: No, the Arduino UNO cannot supply enough current for the servo. Use an external power source.

  • Q: What is the maximum angle the MG996R can rotate?
    A: The MG996R can rotate up to 180°.

  • Q: Can I use the MG996R for continuous rotation?
    A: No, the MG996R is designed for positional control, not continuous rotation.

  • Q: How do I prevent the servo from drawing too much current?
    A: Use a current-limiting resistor or a dedicated servo driver circuit.

By following this documentation, you can effectively integrate the MG996R servo motor into your projects and troubleshoot common issues.