Cirkit Designer Logo
Cirkit Designer
Your all-in-one circuit design IDE
Home / 
Component Documentation

How to Use Arduino Voicebox Shield (Stephen Hawking in a box): Examples, Pinouts, and Specs

Image of Arduino Voicebox Shield (Stephen Hawking in a box)
Cirkit Designer LogoDesign with Arduino Voicebox Shield (Stephen Hawking in a box) in Cirkit Designer

Introduction

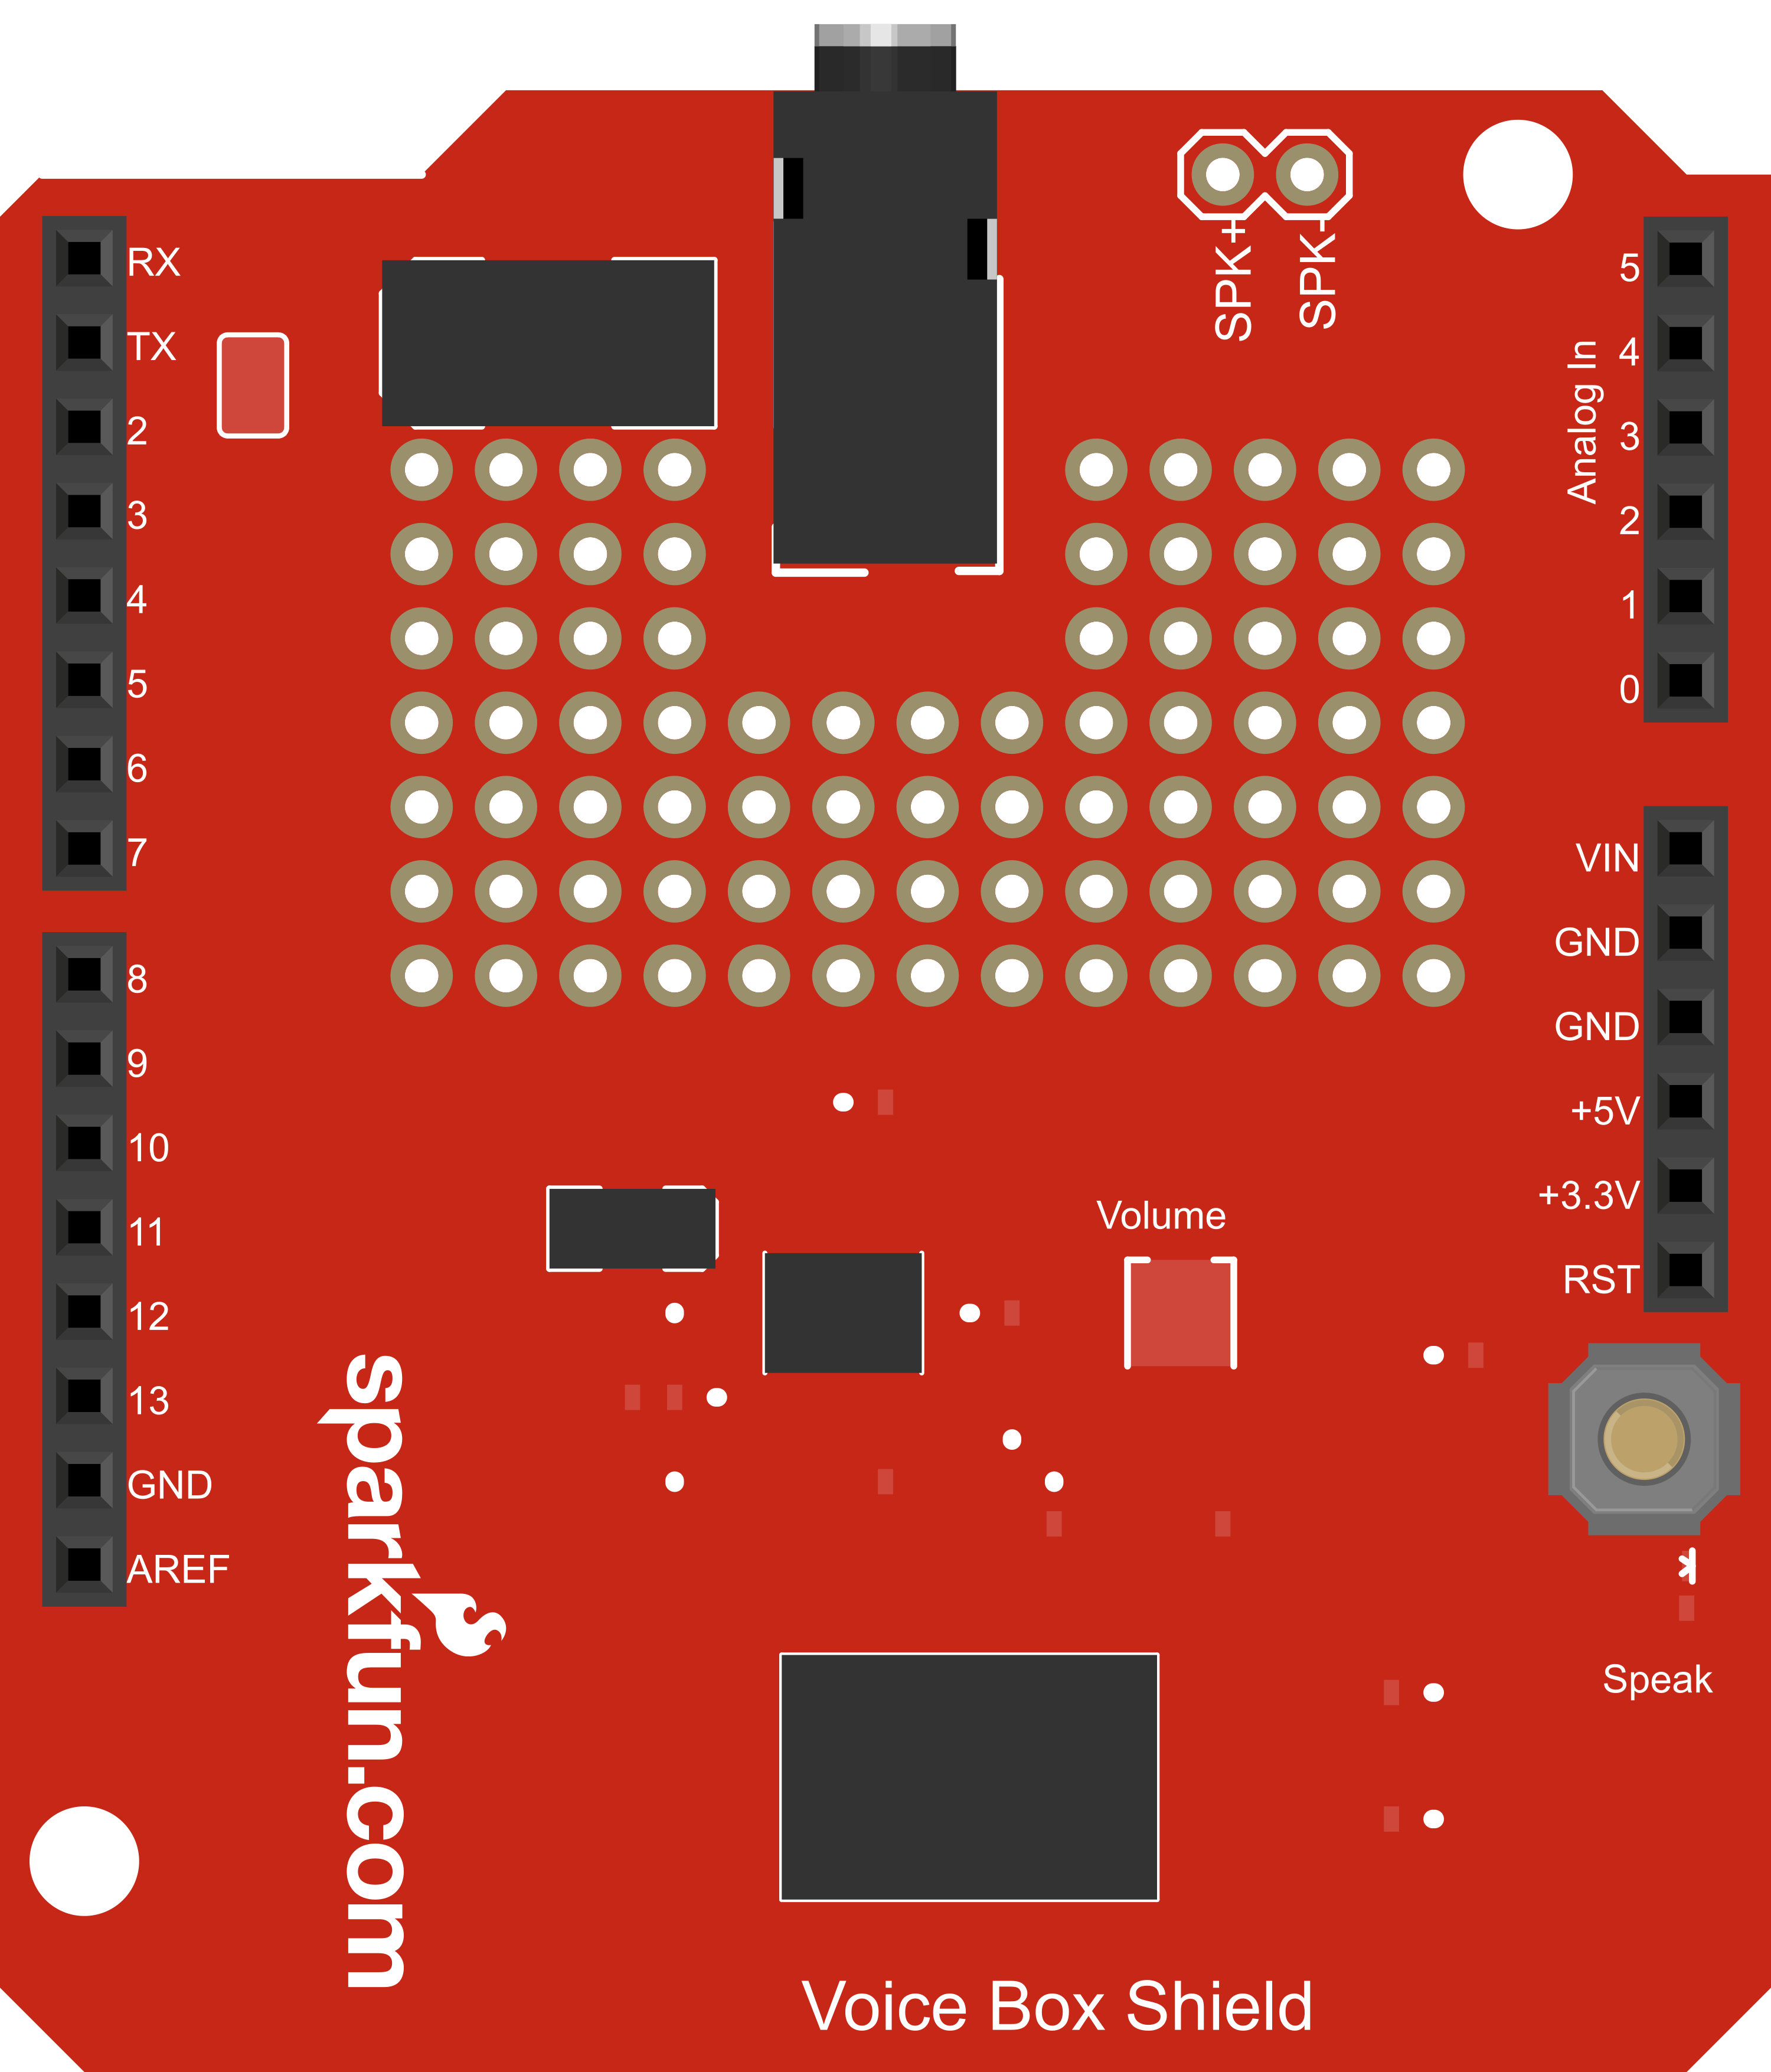
The Arduino Voicebox Shield, colloquially known as "Stephen Hawking in a box," is an innovative electronic component that adds text-to-speech capabilities to Arduino projects. This shield allows users to convert text strings into audible speech, which is output through an external speaker. It is an excellent tool for creating interactive projects, educational tools, accessibility devices, and any application where vocal output can enhance the user experience.

Explore Projects Built with Arduino Voicebox Shield (Stephen Hawking in a box)

Use Cirkit Designer to design, explore, and prototype these projects online. Some projects support real-time simulation. Click "Open Project" to start designing instantly!
Arduino UNO Based Voice-Controlled Bluetooth Interface with OLED Display
Image of skripsi: A project utilizing Arduino Voicebox Shield (Stephen Hawking in a box) in a practical application
This circuit features an Arduino UNO microcontroller interfaced with a voice recognition module for audio input commands, an HC-05 Bluetooth module for wireless communication, and a 0.96" OLED display for visual output. The Arduino is programmed to handle inputs and outputs, with the voice recognition module connected to digital pins for serial communication, and the OLED display connected via I2C to the analog pins A4 (SDA) and A5 (SCL). The Bluetooth module is also connected to the Arduino's serial pins for remote data exchange.
Cirkit Designer LogoOpen Project in Cirkit Designer
Arduino Uno R3-Based Voice-Controlled Robot with Servo Actuation and SD Logging
Image of wheel: A project utilizing Arduino Voicebox Shield (Stephen Hawking in a box) in a practical application
This circuit features an Arduino Uno R3 as the central microcontroller, interfaced with a variety of components. It includes a voice recognition module for audio input commands, an analog thumbstick for manual control, and multiple servos for actuation. Additionally, the circuit integrates an I2C LCD screen for display purposes, an infrared proximity sensor for distance measurement, and a micro SD card module for data storage.
Cirkit Designer LogoOpen Project in Cirkit Designer
Raspberry Pi 4B-Based GPS and GSM Tracking System with Audio Feedback
Image of unlimited range: A project utilizing Arduino Voicebox Shield (Stephen Hawking in a box) in a practical application
This circuit features a Raspberry Pi 4B as the central processing unit, interfaced with a GPS NEO-6M V2 module for location tracking and an Adafruit FONA 808 Shield for cellular communication. It includes a PAM8406 5V Digital Audio Amplifier connected to an Adafruit STEMMA Speaker for audio output, and a Condenser Microphone connected to the FONA 808 for audio input. Power management is handled by a 12V battery connected to a voltage regulator that steps down the voltage to 5V and 3V required by the various components.
Cirkit Designer LogoOpen Project in Cirkit Designer
Arduino UNO Voice Assistant with KY-037 Microphone and Speaker
Image of VOICE PY 2: A project utilizing Arduino Voicebox Shield (Stephen Hawking in a box) in a practical application
This circuit is a voice assistant project that uses an Arduino UNO to interface with a KY-037 microphone and a speaker. The microphone detects voice commands, which are processed by the Arduino, and the speaker provides audio feedback based on the detected commands.
Cirkit Designer LogoOpen Project in Cirkit Designer

Explore Projects Built with Arduino Voicebox Shield (Stephen Hawking in a box)

Use Cirkit Designer to design, explore, and prototype these projects online. Some projects support real-time simulation. Click "Open Project" to start designing instantly!
Image of skripsi: A project utilizing Arduino Voicebox Shield (Stephen Hawking in a box) in a practical application
Arduino UNO Based Voice-Controlled Bluetooth Interface with OLED Display
This circuit features an Arduino UNO microcontroller interfaced with a voice recognition module for audio input commands, an HC-05 Bluetooth module for wireless communication, and a 0.96" OLED display for visual output. The Arduino is programmed to handle inputs and outputs, with the voice recognition module connected to digital pins for serial communication, and the OLED display connected via I2C to the analog pins A4 (SDA) and A5 (SCL). The Bluetooth module is also connected to the Arduino's serial pins for remote data exchange.
Cirkit Designer LogoOpen Project in Cirkit Designer
Image of wheel: A project utilizing Arduino Voicebox Shield (Stephen Hawking in a box) in a practical application
Arduino Uno R3-Based Voice-Controlled Robot with Servo Actuation and SD Logging
This circuit features an Arduino Uno R3 as the central microcontroller, interfaced with a variety of components. It includes a voice recognition module for audio input commands, an analog thumbstick for manual control, and multiple servos for actuation. Additionally, the circuit integrates an I2C LCD screen for display purposes, an infrared proximity sensor for distance measurement, and a micro SD card module for data storage.
Cirkit Designer LogoOpen Project in Cirkit Designer
Image of unlimited range: A project utilizing Arduino Voicebox Shield (Stephen Hawking in a box) in a practical application
Raspberry Pi 4B-Based GPS and GSM Tracking System with Audio Feedback
This circuit features a Raspberry Pi 4B as the central processing unit, interfaced with a GPS NEO-6M V2 module for location tracking and an Adafruit FONA 808 Shield for cellular communication. It includes a PAM8406 5V Digital Audio Amplifier connected to an Adafruit STEMMA Speaker for audio output, and a Condenser Microphone connected to the FONA 808 for audio input. Power management is handled by a 12V battery connected to a voltage regulator that steps down the voltage to 5V and 3V required by the various components.
Cirkit Designer LogoOpen Project in Cirkit Designer
Image of VOICE PY 2: A project utilizing Arduino Voicebox Shield (Stephen Hawking in a box) in a practical application
Arduino UNO Voice Assistant with KY-037 Microphone and Speaker
This circuit is a voice assistant project that uses an Arduino UNO to interface with a KY-037 microphone and a speaker. The microphone detects voice commands, which are processed by the Arduino, and the speaker provides audio feedback based on the detected commands.
Cirkit Designer LogoOpen Project in Cirkit Designer

Common Applications and Use Cases

  • Educational robotics
  • Accessibility devices for the visually impaired
  • Interactive art installations
  • DIY smart home assistants
  • Voice alerts and notifications for various projects

Technical Specifications

Key Technical Details

  • Operating Voltage: 5V (supplied by the Arduino board)
  • Current Consumption: Typically 50mA
  • Output: Mono audio signal
  • Supported Languages: English (default), with the possibility of other languages depending on the TTS engine used
  • Communication: Utilizes Arduino's serial interface for text input

Pin Configuration and Descriptions

Pin Number Function Description
D0 (RX) Serial Receive Receives serial data from the Arduino
D1 (TX) Serial Transmit Transmits serial data to the Arduino
D2-D13 General I/O Available for other uses; not used by the shield
A0-A5 Analog Input Available for other uses; not used by the shield
GND Ground Common ground for power and signal
5V Power Supply Supplies power to the shield
VIN Voltage Input Raw input voltage to the Arduino
AREF Analog Reference Reference voltage for analog inputs

Usage Instructions

How to Use the Component in a Circuit

  1. Mounting the Shield: Carefully align the shield's pins with the corresponding headers on the Arduino board and press down gently to connect.
  2. Connecting a Speaker: Attach an 8-ohm speaker to the audio output terminals on the shield.
  3. Powering the System: Power the Arduino board using a USB connection or an external power supply. The shield will draw power from the board.

Important Considerations and Best Practices

  • Ensure that the text-to-speech engine and language libraries are compatible with the shield.
  • Avoid sending excessively long strings of text to prevent buffer overflow.
  • Use a dedicated external power supply if the project consumes more power than the USB can provide.
  • Keep the speaker's volume at a reasonable level to prevent damage to the speaker or the shield's audio output circuitry.

Example Code for Arduino UNO

#include <SoftwareSerial.h>

SoftwareSerial voicebox(0, 1); // RX, TX

void setup() {
  voicebox.begin(9600); // Initialize serial communication with the shield
  Serial.begin(9600);   // Initialize serial communication with the computer
}

void loop() {
  if (Serial.available()) { // Check if there is data from the computer
    String text = Serial.readString(); // Read the text from the serial monitor
    voicebox.println(text); // Send the text to the Voicebox Shield
  }
}

Troubleshooting and FAQs

Common Issues Users Might Face

  • No Audio Output: Ensure the speaker is properly connected and the volume is turned up. Check the power supply to the Arduino and shield.
  • Garbled Speech: This may occur if the baud rate between the Arduino and the shield is mismatched. Verify that both are set to 9600 bps.
  • Unresponsive Shield: If the shield does not seem to be working, reset the Arduino board and check all connections.

Solutions and Tips for Troubleshooting

  • Audio Quality: If the audio quality is poor, try using a different speaker or check for loose connections.
  • Serial Communication: Use the SoftwareSerial library to communicate with the shield if the default pins (0 and 1) are required for other purposes.
  • Power Issues: If the shield is unresponsive, ensure that the Arduino board is supplied with adequate power, especially if other components are connected.

FAQs

Q: Can I use the Voicebox Shield with other Arduino models? A: Yes, the shield is compatible with most Arduino models, as long as they have the standard Uno form factor.

Q: Is it possible to change the voice or accent of the speech? A: The voice and accent depend on the text-to-speech engine used. Some engines allow customization of voice characteristics.

Q: How do I update the text-to-speech engine or language libraries? A: Updates typically involve downloading new libraries or firmware and uploading them to the Arduino board using the Arduino IDE.

Q: Can the shield produce sound effects or only speech? A: Primarily, the shield is designed for speech. However, some text-to-speech engines may support certain sound effects through specific text commands.

For further assistance, consult the community forums or the manufacturer's support resources.