How to Use KY-039: Examples, Pinouts, and Specs
Introduction
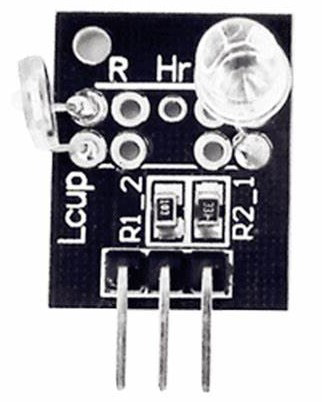
The KY-039 is a heart rate sensor module designed to measure heart rate by detecting blood flow through the skin. It utilizes an infrared LED and a photodetector to sense changes in light intensity caused by blood flow. This module is compact, easy to use, and ideal for health monitoring applications. It is commonly interfaced with microcontrollers, such as Arduino, for data acquisition and processing.
Explore Projects Built with KY-039


Explore Projects Built with KY-039
Common Applications and Use Cases
- Heart rate monitoring in fitness devices
- Health tracking systems
- Biomedical research and experiments
- DIY electronics projects involving biometric data
Technical Specifications
The KY-039 module is a simple yet effective sensor for detecting heart rate. Below are its key technical details:
Key Technical Details
- Operating Voltage: 3.3V to 5V
- Current Consumption: ~20mA
- Output Signal: Analog
- Sensor Components: Infrared LED and photodetector
- Dimensions: 18mm x 15mm x 5mm (approx.)
Pin Configuration and Descriptions
The KY-039 module has three pins for interfacing. The table below describes each pin:
| Pin | Name | Description |
|---|---|---|
| 1 | Signal (S) | Analog output signal representing the heart rate data. |
| 2 | VCC | Power supply pin. Connect to 3.3V or 5V. |
| 3 | GND | Ground pin. Connect to the ground of the power supply or microcontroller. |
Usage Instructions
The KY-039 module is straightforward to use in a circuit. Follow the steps below to integrate it into your project:
Connecting the KY-039 to an Arduino UNO
Wiring:
- Connect the Signal (S) pin of the KY-039 to an analog input pin on the Arduino (e.g., A0).
- Connect the VCC pin to the 5V pin on the Arduino.
- Connect the GND pin to the GND pin on the Arduino.
Code Example: Below is an example Arduino sketch to read data from the KY-039 module and display it on the Serial Monitor:
// KY-039 Heart Rate Sensor Example Code
// Connect Signal (S) to A0, VCC to 5V, and GND to GND on the Arduino.

const int sensorPin = A0; // KY-039 Signal pin connected to A0
int sensorValue = 0;      // Variable to store the sensor reading

void setup() {
  Serial.begin(9600); // Initialize serial communication at 9600 baud
  pinMode(sensorPin, INPUT); // Set the sensor pin as input
}

void loop() {
  sensorValue = analogRead(sensorPin); // Read the analog value from the sensor
  Serial.print("Heart Rate Sensor Value: ");
  Serial.println(sensorValue); // Print the sensor value to the Serial Monitor
  delay(100); // Delay for 100ms to allow for stable readings
}
Interpreting the Output:
- The sensor outputs an analog signal that varies with the blood flow detected by the photodetector.
- Peaks in the signal correspond to heartbeats. You can process this data further to calculate the heart rate in beats per minute (BPM).
Important Considerations and Best Practices
- Ensure the sensor is placed in contact with the skin (e.g., fingertip) for accurate readings.
- Avoid excessive movement during measurement, as it can introduce noise and affect accuracy.
- Use a low-pass filter in software or hardware to smooth out the signal and reduce noise.
- If the readings are unstable, check the connections and ensure the power supply is stable.
Troubleshooting and FAQs
Common Issues and Solutions
No Output or Constant Values:
- Cause: Loose or incorrect wiring.
- Solution: Double-check the connections and ensure the module is powered correctly.
Unstable or Noisy Readings:
- Cause: Excessive movement or poor contact with the skin.
- Solution: Keep the sensor steady and ensure proper contact with the skin.
Low Signal Amplitude:
- Cause: Insufficient blood flow or improper placement.
- Solution: Try placing the sensor on a different part of the body, such as the fingertip or earlobe.
Arduino Serial Monitor Shows No Data:
- Cause: Serial communication not initialized or incorrect baud rate.
- Solution: Ensure
Serial.begin(9600);is included in thesetup()function and matches the Serial Monitor baud rate.
FAQs
Q1: Can the KY-039 measure heart rate directly in BPM?
A1: No, the KY-039 outputs an analog signal that represents blood flow. You need to process the signal in software to calculate BPM.
Q2: Can I use the KY-039 with a 3.3V microcontroller?
A2: Yes, the KY-039 operates at both 3.3V and 5V, making it compatible with most microcontrollers.
Q3: How do I improve the accuracy of the readings?
A3: Use a software filter to smooth the signal and ensure the sensor is placed securely on the skin without movement.
Q4: Is the KY-039 suitable for medical-grade applications?
A4: No, the KY-039 is intended for hobbyist and educational purposes. It is not certified for medical use.