How to Use R307S Fingerprint Scanner: Examples, Pinouts, and Specs
Introduction
The R307S Fingerprint Scanner, manufactured by Adafruit, is a compact biometric sensor designed for capturing and verifying fingerprints. It features a high-resolution optical sensor and an integrated microcontroller for efficient fingerprint processing. This module is widely used in security applications, such as access control systems, time attendance devices, and embedded systems requiring biometric authentication.
Explore Projects Built with R307S Fingerprint Scanner
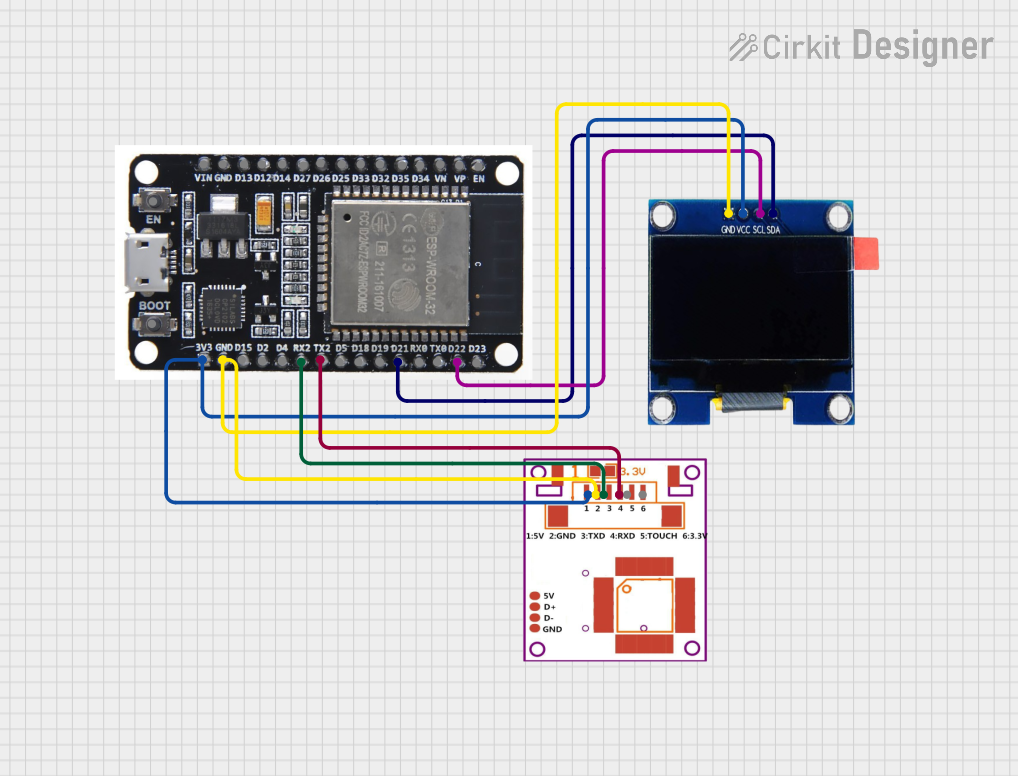
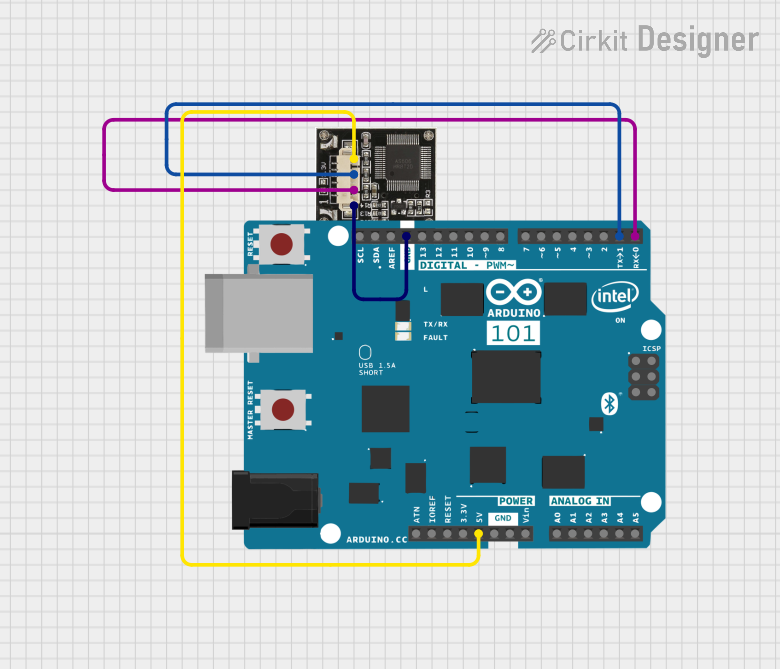

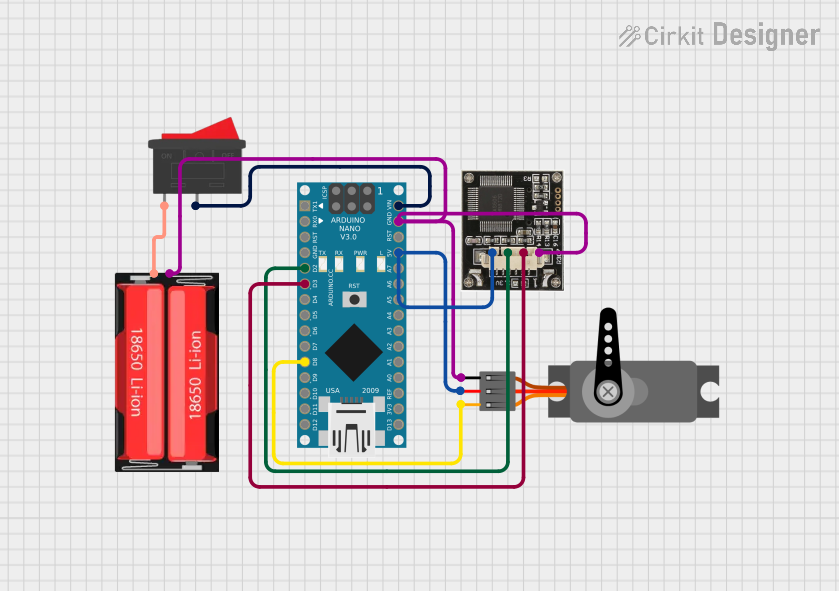
Explore Projects Built with R307S Fingerprint Scanner
Common Applications
- Door lock systems with fingerprint authentication
- Time and attendance tracking devices
- Secure access control for embedded systems
- Personal identification and verification systems
- IoT devices requiring biometric security
Technical Specifications
The R307S Fingerprint Scanner is a robust and reliable module with the following key specifications:
| Parameter | Value |
|---|---|
| Manufacturer | Adafruit |
| Manufacturer Part ID | R307S |
| Operating Voltage | 3.6V to 6.0V |
| Operating Current | 50mA (typical), 80mA (peak) |
| Fingerprint Capacity | 1000 templates |
| Interface Protocol | UART (TTL) |
| Baud Rate | Configurable (default: 57600 bps) |
| Image Resolution | 508 DPI |
| Working Temperature | -20°C to +50°C |
| Dimensions | 55mm x 21mm x 21.5mm |
| Weight | 15g |
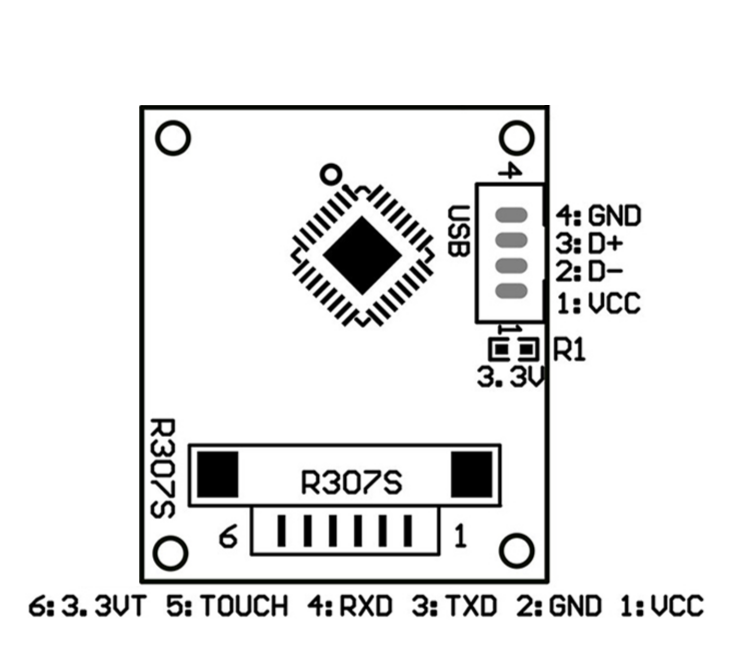
Pin Configuration and Descriptions
The R307S module has a 6-pin interface for power and communication. The pinout is as follows:
| Pin | Name | Description |
|---|---|---|
| 1 | VCC | Power supply input (3.6V to 6.0V) |
| 2 | GND | Ground |
| 3 | TX | UART Transmit (connect to RX of the microcontroller) |
| 4 | RX | UART Receive (connect to TX of the microcontroller) |
| 5 | TOUCH | Touch signal output (active high when touched) |
| 6 | NC | Not connected |
Usage Instructions
How to Use the R307S in a Circuit
- Power the Module: Connect the VCC pin to a 3.6V-6.0V power source and the GND pin to ground.
- Connect UART Pins:
- Connect the TX pin of the R307S to the RX pin of your microcontroller (e.g., Arduino UNO).
- Connect the RX pin of the R307S to the TX pin of your microcontroller.
- Optional Touch Pin: The TOUCH pin can be used to detect when the sensor is touched. This pin outputs a high signal when a finger is placed on the sensor.
- Install Libraries: If using an Arduino, install the Adafruit Fingerprint Sensor library from the Arduino Library Manager.
- Upload Code: Use the example code provided below to enroll and verify fingerprints.
Important Considerations
- Ensure the power supply is stable and within the specified voltage range to avoid damage to the module.
- Avoid exposing the optical sensor to direct sunlight or dust, as this may affect its performance.
- Use a baud rate supported by your microcontroller. The default is 57600 bps, but it can be configured if needed.
- Handle the module carefully to avoid scratching the optical sensor.
Example Code for Arduino UNO
Below is an example code to enroll and verify fingerprints using the R307S with an Arduino UNO:
#include <Adafruit_Fingerprint.h> // Include the Adafruit Fingerprint library
#include <SoftwareSerial.h>       // Include SoftwareSerial for UART communication

// Define the RX and TX pins for SoftwareSerial
SoftwareSerial mySerial(2, 3); // RX, TX

// Create an instance of the fingerprint sensor
Adafruit_Fingerprint finger(&mySerial);

void setup() {
  Serial.begin(9600); // Initialize serial communication with the PC
  while (!Serial);    // Wait for the serial monitor to open
  Serial.println("R307S Fingerprint Scanner Test");

  mySerial.begin(57600); // Initialize UART communication with the sensor
  if (finger.begin()) {
    Serial.println("Fingerprint sensor detected!");
  } else {
    Serial.println("Fingerprint sensor not detected. Check connections.");
    while (1); // Halt execution if the sensor is not found
  }

  // Set the password (default is 0x00000000)
  finger.setPassword(0x00000000);
}

void loop() {
  Serial.println("Place your finger on the sensor...");
  if (finger.getImage() == FINGERPRINT_OK) {
    Serial.println("Fingerprint image captured!");
    if (finger.image2Tz(1) == FINGERPRINT_OK) {
      Serial.println("Fingerprint converted to template!");
      int id = finger.fingerFastSearch();
      if (id >= 0) {
        Serial.print("Fingerprint matched! ID: ");
        Serial.println(id);
      } else {
        Serial.println("No match found.");
      }
    } else {
      Serial.println("Failed to convert image to template.");
    }
  } else {
    Serial.println("Failed to capture fingerprint image.");
  }
  delay(2000); // Wait before the next scan
}
Notes on the Code
- The
Adafruit_Fingerprintlibrary simplifies communication with the R307S module. - The
finger.getImage()function captures the fingerprint image, whilefinger.image2Tz()converts it into a template. - The
finger.fingerFastSearch()function searches for a match in the stored templates.
Troubleshooting and FAQs
Common Issues and Solutions
Fingerprint Sensor Not Detected
- Cause: Incorrect wiring or baud rate mismatch.
- Solution: Double-check the connections and ensure the TX and RX pins are correctly connected. Verify the baud rate in the code matches the sensor's configuration.
Fingerprint Not Recognized
- Cause: Poor-quality fingerprint image or unregistered fingerprint.
- Solution: Ensure the finger is clean and placed firmly on the sensor. Enroll the fingerprint again if necessary.
Touch Pin Not Responding
- Cause: TOUCH pin not connected or misconfigured.
- Solution: Verify the TOUCH pin connection and check for a high signal when the sensor is touched.
Sensor Performance Degraded
- Cause: Dust or scratches on the optical sensor.
- Solution: Clean the sensor gently with a soft, lint-free cloth. Avoid using abrasive materials.
FAQs
Can the R307S store multiple fingerprints?
- Yes, the R307S can store up to 1000 fingerprint templates.
What is the default password for the sensor?
- The default password is
0x00000000.
- The default password is
Can I change the baud rate of the sensor?
- Yes, the baud rate is configurable using the
setBaudRate()function in the Adafruit Fingerprint library.
- Yes, the baud rate is configurable using the
Is the R307S compatible with 5V logic?
- Yes, the R307S is compatible with both 3.3V and 5V logic levels, making it suitable for most microcontrollers.
By following this documentation, you can effectively integrate the R307S Fingerprint Scanner into your projects for reliable biometric authentication.