Cirkit Designer Logo
Cirkit Designer
Your all-in-one circuit design IDE
Home / 
Component Documentation

How to Use Carbon Dioxide Sensor: Examples, Pinouts, and Specs

Image of Carbon Dioxide Sensor
Cirkit Designer LogoDesign with Carbon Dioxide Sensor in Cirkit Designer

Introduction

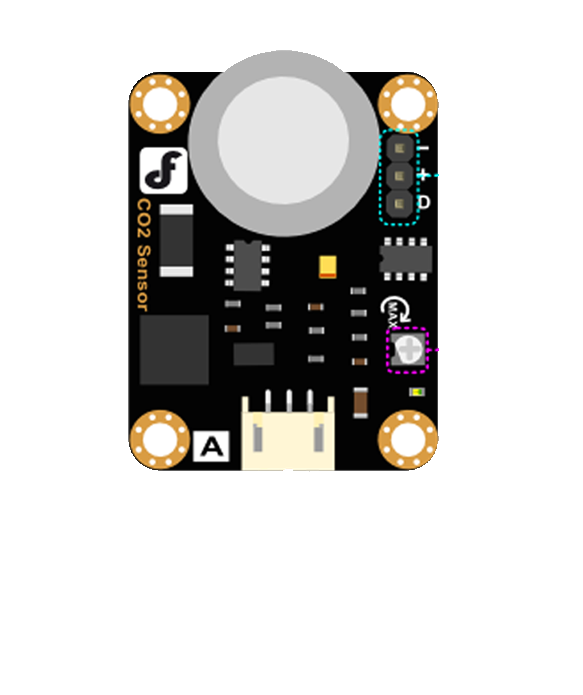
The DFRobot CO2 Sensor is an electronic device designed to measure the concentration of carbon dioxide (CO2) in the surrounding environment. This sensor is widely used in various applications such as indoor air quality monitoring, environmental sensing, and in HVAC systems to control ventilation. It is an essential tool for ensuring safety in areas where CO2 levels may reach harmful concentrations, such as in industrial settings or greenhouses.

Explore Projects Built with Carbon Dioxide Sensor

Use Cirkit Designer to design, explore, and prototype these projects online. Some projects support real-time simulation. Click "Open Project" to start designing instantly!
Arduino Pro Mini Based CO2 Monitoring System with LoRa Wireless Transmission
Image of Caboma : A project utilizing Carbon Dioxide Sensor in a practical application
This circuit is designed for CO2 monitoring and wireless data transmission. It uses an Arduino Pro Mini to read CO2 levels from a SenseAir S8 CO2 sensor and transmit the data via a LoRa Ra-02 SX1278 module. A step-up boost power converter is used to adjust the voltage for the Arduino and sensor, powered by an 18650 battery.
Cirkit Designer LogoOpen Project in Cirkit Designer
Arduino UNO WiFi CO and Temperature Monitoring System with Bluetooth Connectivity
Image of Fire Detector: A project utilizing Carbon Dioxide Sensor in a practical application
This circuit is a CO and environmental monitoring system using an Arduino UNO R4 WiFi, an MQ-7 CO sensor, a DHT22 temperature and humidity sensor, and a Bluetooth HC-06 module. The Arduino reads data from the sensors and transmits it via Bluetooth, while also providing visual alerts through an LED if CO levels exceed a predefined limit.
Cirkit Designer LogoOpen Project in Cirkit Designer
Arduino UNO Based Multi-Gas Detector
Image of AIRMS: A project utilizing Carbon Dioxide Sensor in a practical application
This circuit is designed for environmental monitoring, featuring an Arduino UNO microcontroller interfaced with three different gas sensors: MQ-7 for carbon monoxide (CO) detection, MQ131 for ozone (O3) measurement, and MQ-135 for general air quality assessment. The sensors are powered by the Arduino's 5V output and their analog signals are read through the Arduino's analog input pins A0, A1, and A2 respectively. The embedded code reads the analog values from the sensors and outputs the readings via the serial interface, allowing for real-time monitoring of the gases.
Cirkit Designer LogoOpen Project in Cirkit Designer
Arduino UNO Based Air Quality and Fire Detection System with RGB Indicator and Alarm
Image of GAS SENSOR detector: A project utilizing Carbon Dioxide Sensor in a practical application
This circuit features an Arduino UNO microcontroller interfaced with an MQ135 gas sensor for CO2 detection, a KY-026 flame sensor for fire detection, a buzzer for alarms, and an RGB LED to visually indicate CO2 levels. A 16x2 LCD displays CO2 concentration and fire alerts, while potentiometers control LCD contrast. The embedded code manages sensor readings, activates the buzzer based on predefined thresholds, and adjusts the RGB LED color in response to CO2 levels.
Cirkit Designer LogoOpen Project in Cirkit Designer

Explore Projects Built with Carbon Dioxide Sensor

Use Cirkit Designer to design, explore, and prototype these projects online. Some projects support real-time simulation. Click "Open Project" to start designing instantly!
Image of Caboma : A project utilizing Carbon Dioxide Sensor in a practical application
Arduino Pro Mini Based CO2 Monitoring System with LoRa Wireless Transmission
This circuit is designed for CO2 monitoring and wireless data transmission. It uses an Arduino Pro Mini to read CO2 levels from a SenseAir S8 CO2 sensor and transmit the data via a LoRa Ra-02 SX1278 module. A step-up boost power converter is used to adjust the voltage for the Arduino and sensor, powered by an 18650 battery.
Cirkit Designer LogoOpen Project in Cirkit Designer
Image of Fire Detector: A project utilizing Carbon Dioxide Sensor in a practical application
Arduino UNO WiFi CO and Temperature Monitoring System with Bluetooth Connectivity
This circuit is a CO and environmental monitoring system using an Arduino UNO R4 WiFi, an MQ-7 CO sensor, a DHT22 temperature and humidity sensor, and a Bluetooth HC-06 module. The Arduino reads data from the sensors and transmits it via Bluetooth, while also providing visual alerts through an LED if CO levels exceed a predefined limit.
Cirkit Designer LogoOpen Project in Cirkit Designer
Image of AIRMS: A project utilizing Carbon Dioxide Sensor in a practical application
Arduino UNO Based Multi-Gas Detector
This circuit is designed for environmental monitoring, featuring an Arduino UNO microcontroller interfaced with three different gas sensors: MQ-7 for carbon monoxide (CO) detection, MQ131 for ozone (O3) measurement, and MQ-135 for general air quality assessment. The sensors are powered by the Arduino's 5V output and their analog signals are read through the Arduino's analog input pins A0, A1, and A2 respectively. The embedded code reads the analog values from the sensors and outputs the readings via the serial interface, allowing for real-time monitoring of the gases.
Cirkit Designer LogoOpen Project in Cirkit Designer
Image of GAS SENSOR detector: A project utilizing Carbon Dioxide Sensor in a practical application
Arduino UNO Based Air Quality and Fire Detection System with RGB Indicator and Alarm
This circuit features an Arduino UNO microcontroller interfaced with an MQ135 gas sensor for CO2 detection, a KY-026 flame sensor for fire detection, a buzzer for alarms, and an RGB LED to visually indicate CO2 levels. A 16x2 LCD displays CO2 concentration and fire alerts, while potentiometers control LCD contrast. The embedded code manages sensor readings, activates the buzzer based on predefined thresholds, and adjusts the RGB LED color in response to CO2 levels.
Cirkit Designer LogoOpen Project in Cirkit Designer

Technical Specifications

Key Technical Details

  • Measurement Range: 0 to 5000 ppm
  • Accuracy: ±50 ppm +5% of reading
  • Preheat Time: 3 minutes
  • Response Time: < 2 minutes
  • Working Voltage: 3.3 - 6V DC
  • Output Signal: Analog (0.4 - 2V)
  • Interface: Gravity-3Pin Interface
  • Dimensions: 32mm x 27mm

Pin Configuration and Descriptions

Pin Number Name Description
1 VCC Power supply (3.3 - 6V DC)
2 GND Ground connection
3 AOUT Analog output signal (0.4 - 2V)

Usage Instructions

Connecting to a Circuit

  1. Connect the VCC pin to a power supply within the range of 3.3 - 6V DC.
  2. Connect the GND pin to the ground of the power supply.
  3. Connect the AOUT pin to an analog input on your microcontroller, such as an Arduino UNO.

Important Considerations and Best Practices

  • Ensure that the sensor is preheated for at least 3 minutes before taking measurements.
  • Avoid placing the sensor in environments with high concentrations of volatile organic compounds (VOCs) as they may affect the readings.
  • The sensor should not be exposed to high humidity or condensing environments.
  • For accurate readings, calibrate the sensor periodically according to the manufacturer's instructions.

Example Code for Arduino UNO

// Example code for interfacing the DFRobot CO2 Sensor with an Arduino UNO

const int analogInPin = A0; // Analog input pin that the sensor is attached to

void setup() {
  Serial.begin(9600); // Initialize serial communications at 9600 bps
}

void loop() {
  int sensorValue = analogRead(analogInPin); // Read the analog value from sensor
  float voltage = sensorValue * (5.0 / 1023.0); // Convert the analog value to voltage
  float co2Concentration = map(voltage, 0.4, 2.0, 0, 5000); // Map voltage to CO2 concentration

  // Print the CO2 concentration to the Serial Monitor
  Serial.print("CO2 Concentration: ");
  Serial.print(co2Concentration);
  Serial.println(" ppm");

  delay(2000); // Wait for 2 seconds before the next loop
}

Troubleshooting and FAQs

Common Issues

  • Inaccurate Readings: If the sensor provides inaccurate readings, ensure that it has been properly preheated and calibrated. Also, check for any interference from VOCs or other gases.
  • No Output Signal: Verify that the sensor is correctly powered and that all connections are secure. Check the voltage across the VCC and GND pins.

Solutions and Tips for Troubleshooting

  • Calibration: Follow the manufacturer's instructions for calibration to ensure accurate measurements.
  • Sensor Placement: Place the sensor in a well-ventilated area away from potential contaminants.
  • Regular Maintenance: Clean the sensor's housing and contacts regularly to prevent dust accumulation.

FAQs

Q: Can the sensor measure CO2 levels above 5000 ppm? A: The sensor is designed to measure up to 5000 ppm. Beyond this range, the accuracy is not guaranteed.

Q: How often should the sensor be calibrated? A: Calibration frequency depends on the usage and environment. Refer to the manufacturer's guidelines for specific recommendations.

Q: Is the sensor waterproof? A: No, the sensor is not waterproof and should be protected from moisture and condensation.

For further assistance, please contact DFRobot technical support or refer to the detailed datasheet provided by the manufacturer.