Cirkit Designer Logo
Cirkit Designer
Your all-in-one circuit design IDE
Home / 
Component Documentation

How to Use Adafruit BMP180: Examples, Pinouts, and Specs

Image of Adafruit BMP180
Cirkit Designer LogoDesign with Adafruit BMP180 in Cirkit Designer

Introduction

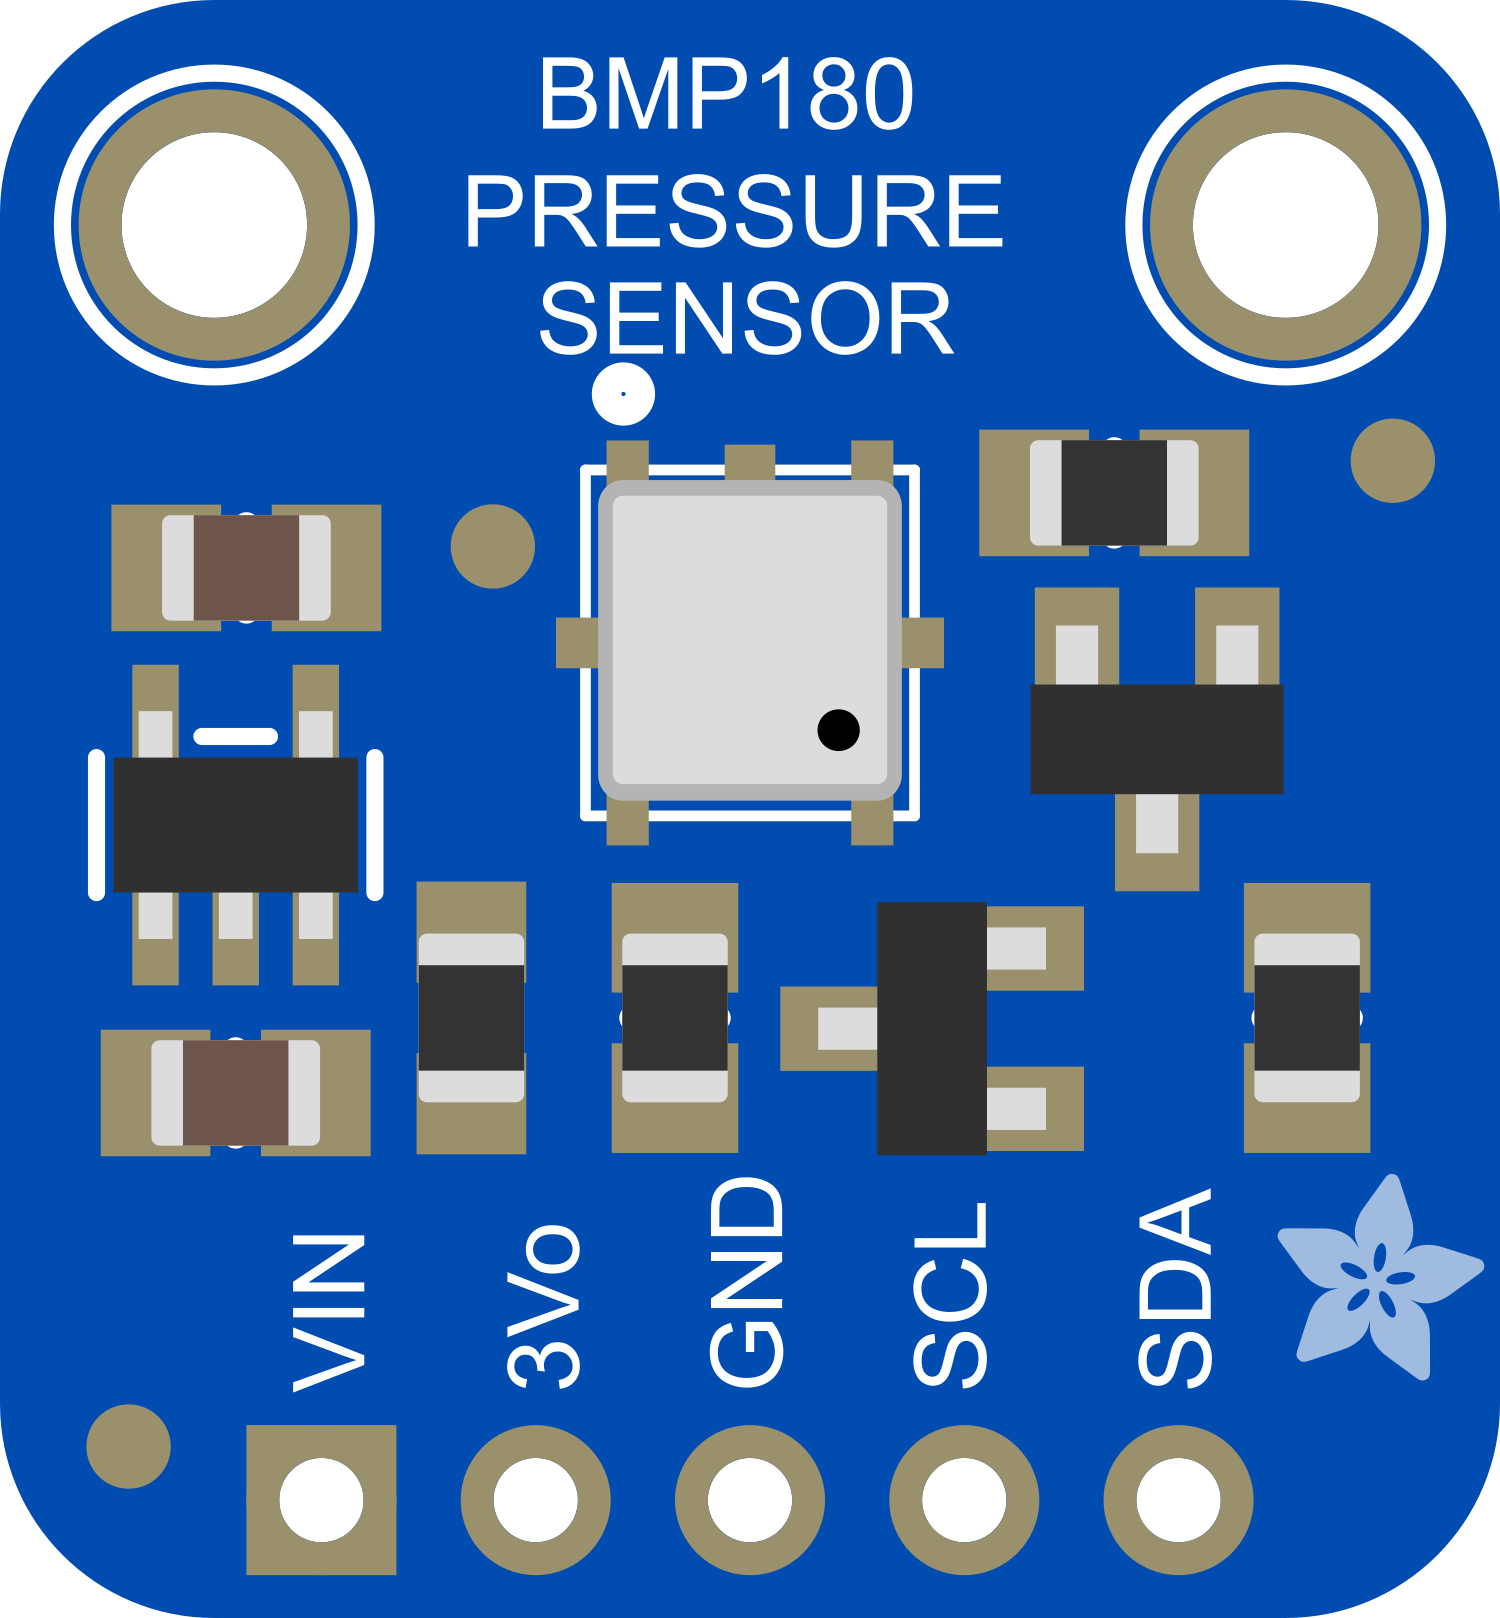
The Adafruit BMP180 is a compact, high-precision sensor designed for measuring atmospheric pressure, temperature, and altitude. Utilizing a piezoresistive MEMS pressure sensor, the BMP180 provides accurate data with minimal power consumption, making it ideal for mobile applications, weather stations, indoor navigation, and altitude sensing for drones and other flying electronics.

Explore Projects Built with Adafruit BMP180

Use Cirkit Designer to design, explore, and prototype these projects online. Some projects support real-time simulation. Click "Open Project" to start designing instantly!
Arduino Nano Weather Station with BMP180 Sensor and MicroSD Data Logging
Image of circuito: A project utilizing Adafruit BMP180 in a practical application
This circuit features an Arduino Nano microcontroller interfaced with an Adafruit BMP180 sensor for measuring atmospheric pressure and a MicroSD card socket for data storage. The BMP180 communicates with the Arduino via I2C, while the MicroSD card uses SPI for data transfer.
Cirkit Designer LogoOpen Project in Cirkit Designer
Arduino Nano and BMP180 Atmospheric Pressure Sensor
Image of INT: A project utilizing Adafruit BMP180 in a practical application
This circuit uses an Arduino Nano to read atmospheric pressure data from a BMP180 sensor. The BMP180 is connected to the Arduino Nano via I2C communication, with the sensor's SDA and SCL pins connected to the Arduino's A4 and A5 pins, respectively. The Arduino Nano processes the data and outputs the pressure readings to the serial monitor.
Cirkit Designer LogoOpen Project in Cirkit Designer
Arduino UNO Weather Station with BME280 Sensor
Image of UNO_MBE280: A project utilizing Adafruit BMP180 in a practical application
This circuit uses an Arduino UNO to read temperature, pressure, and humidity data from a BME/BMP280 sensor via I2C communication. The sensor is powered by the Arduino's 5V and GND pins, and the data is printed to the Serial Monitor.
Cirkit Designer LogoOpen Project in Cirkit Designer
Arduino UNO with Adafruit BME680 Sensor Data Logger
Image of Adafruit BME680 + Arduino UNO: A project utilizing Adafruit BMP180 in a practical application
This circuit connects an Adafruit BME680 sensor to an Arduino UNO for the purpose of measuring environmental data such as temperature, pressure, humidity, gas resistance, and altitude. The BME680 is interfaced with the Arduino over I2C, with power supplied from the Arduino's 5V pin. The embedded code on the Arduino reads the sensor data and outputs it to the serial monitor, allowing for real-time environmental monitoring.
Cirkit Designer LogoOpen Project in Cirkit Designer

Explore Projects Built with Adafruit BMP180

Use Cirkit Designer to design, explore, and prototype these projects online. Some projects support real-time simulation. Click "Open Project" to start designing instantly!
Image of circuito: A project utilizing Adafruit BMP180 in a practical application
Arduino Nano Weather Station with BMP180 Sensor and MicroSD Data Logging
This circuit features an Arduino Nano microcontroller interfaced with an Adafruit BMP180 sensor for measuring atmospheric pressure and a MicroSD card socket for data storage. The BMP180 communicates with the Arduino via I2C, while the MicroSD card uses SPI for data transfer.
Cirkit Designer LogoOpen Project in Cirkit Designer
Image of INT: A project utilizing Adafruit BMP180 in a practical application
Arduino Nano and BMP180 Atmospheric Pressure Sensor
This circuit uses an Arduino Nano to read atmospheric pressure data from a BMP180 sensor. The BMP180 is connected to the Arduino Nano via I2C communication, with the sensor's SDA and SCL pins connected to the Arduino's A4 and A5 pins, respectively. The Arduino Nano processes the data and outputs the pressure readings to the serial monitor.
Cirkit Designer LogoOpen Project in Cirkit Designer
Image of UNO_MBE280: A project utilizing Adafruit BMP180 in a practical application
Arduino UNO Weather Station with BME280 Sensor
This circuit uses an Arduino UNO to read temperature, pressure, and humidity data from a BME/BMP280 sensor via I2C communication. The sensor is powered by the Arduino's 5V and GND pins, and the data is printed to the Serial Monitor.
Cirkit Designer LogoOpen Project in Cirkit Designer
Image of Adafruit BME680 + Arduino UNO: A project utilizing Adafruit BMP180 in a practical application
Arduino UNO with Adafruit BME680 Sensor Data Logger
This circuit connects an Adafruit BME680 sensor to an Arduino UNO for the purpose of measuring environmental data such as temperature, pressure, humidity, gas resistance, and altitude. The BME680 is interfaced with the Arduino over I2C, with power supplied from the Arduino's 5V pin. The embedded code on the Arduino reads the sensor data and outputs it to the serial monitor, allowing for real-time environmental monitoring.
Cirkit Designer LogoOpen Project in Cirkit Designer

Common Applications and Use Cases

  • Weather monitoring systems
  • Indoor and outdoor navigation
  • Altitude sensing for drones and UAVs
  • Fitness and health monitoring (e.g., smartwatches)
  • HVAC systems for environmental control

Technical Specifications

Key Technical Details

  • Pressure Range: 300 to 1100 hPa (equivalent to +9000m to -500m above/below sea level)
  • Supply Voltage: 1.8V to 3.6V (3.3V recommended)
  • Interface: I2C (up to 3.4MHz)
  • Temperature Range: -40 to +85°C
  • Resolution: 0.01 hPa (pressure), 0.1°C (temperature)
  • Accuracy: ±0.02 hPa (pressure), ±1°C (temperature)

Pin Configuration and Descriptions

Pin Number Name Description
1 VCC Power supply (1.8V to 3.6V)
2 GND Ground connection
3 SCL I2C clock line
4 SDA I2C data line
5 XCLR Not connected (used for factory testing)
6 EOC End of conversion output (optional use)

Usage Instructions

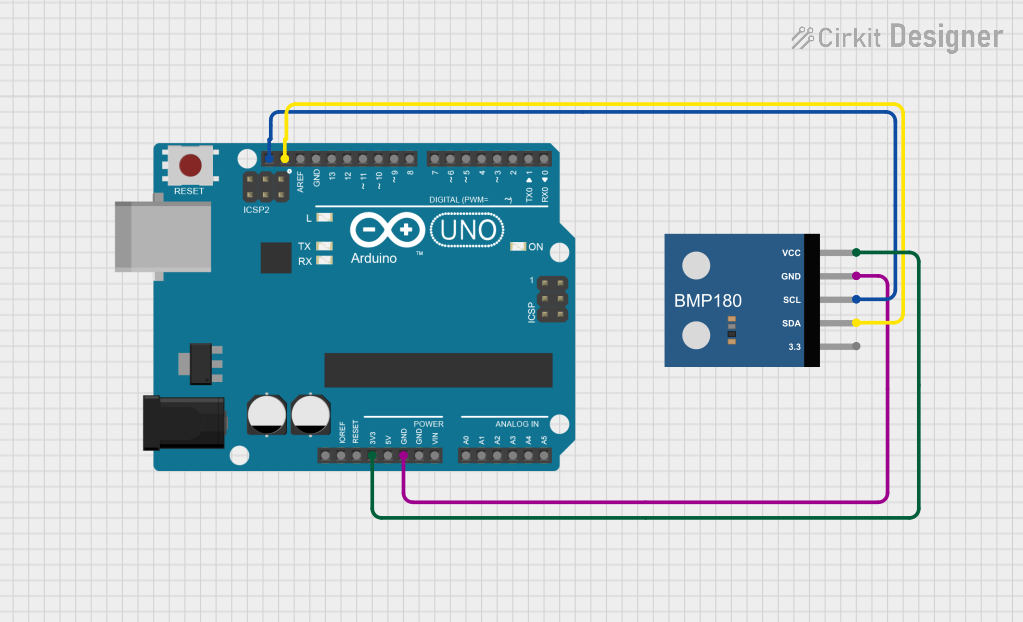
How to Use the Component in a Circuit

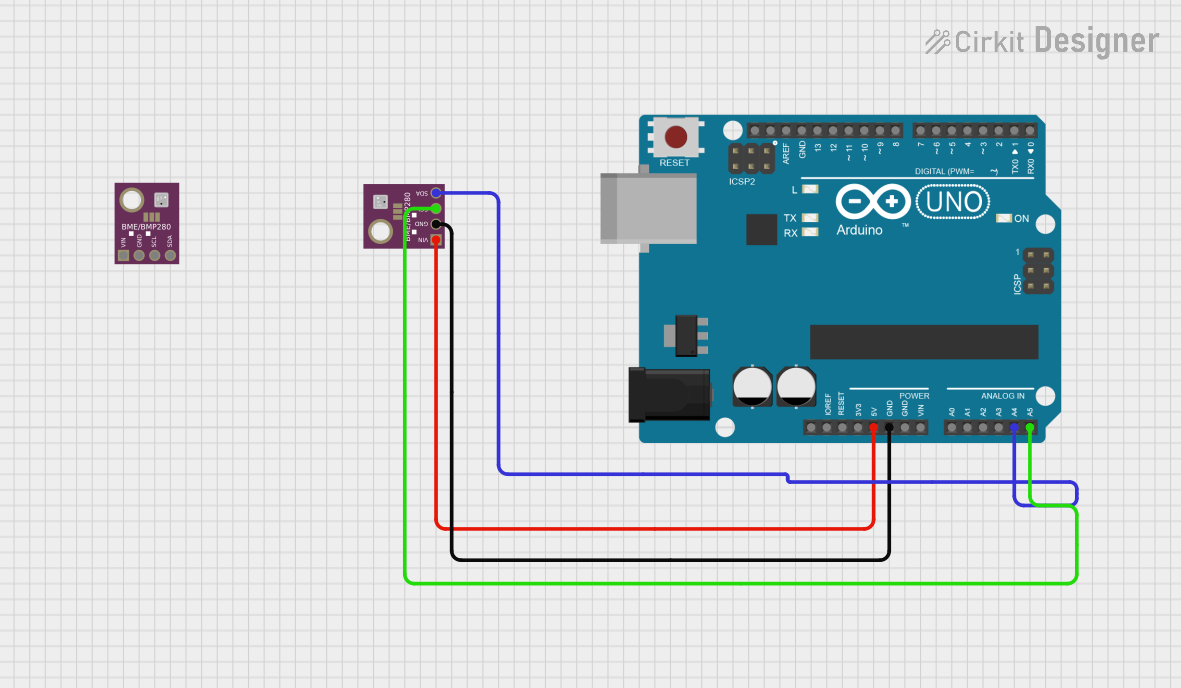
  1. Connect the VCC pin to a 3.3V power supply.
  2. Connect the GND pin to the ground of the power supply.
  3. Connect the SCL and SDA pins to the I2C clock and data lines, respectively.
  4. If using with an Arduino UNO, connect SCL to A5 and SDA to A4.

Important Considerations and Best Practices

  • Ensure that the power supply is stable and within the specified voltage range.
  • Use pull-up resistors on the I2C lines if they are not already present on the breakout board.
  • Avoid physical stress and contamination on the sensor to maintain accuracy.
  • Perform calibration if accurate altitude measurements are required.

Example Code for Arduino UNO

#include <Wire.h>
#include <Adafruit_BMP085.h>

Adafruit_BMP085 bmp;

void setup() {
  Serial.begin(9600);
  if (!bmp.begin()) {
    Serial.println("Could not find a valid BMP180 sensor, check wiring!");
    while (1) {}
  }
}

void loop() {
    Serial.print("Temperature = ");
    Serial.print(bmp.readTemperature());
    Serial.println(" *C");

    Serial.print("Pressure = ");
    Serial.print(bmp.readPressure());
    Serial.println(" Pa");

    // Calculate altitude assuming 'standard' barometric
    // pressure of 1013.25 hPa = 101325 Pa
    Serial.print("Altitude = ");
    Serial.print(bmp.readAltitude());
    Serial.println(" meters");

    Serial.print("Pressure at sea level (calculated) = ");
    Serial.print(bmp.readSealevelPressure());
    Serial.println(" Pa");

    Serial.println();
    delay(5000);
}

Troubleshooting and FAQs

Common Issues Users Might Face

  • Inaccurate Readings: Ensure that the sensor is not exposed to sudden temperature changes and that it's calibrated correctly.
  • No Data on Serial Monitor: Check the wiring and ensure that the correct I2C address is being used in the code.
  • Sensor Not Detected: Make sure the sensor is properly powered and the I2C lines are connected correctly.

Solutions and Tips for Troubleshooting

  • Double-check all connections and ensure they are secure.
  • Use a multimeter to verify the voltage at the VCC pin.
  • Check for soldering issues on the breakout board.
  • Ensure that the Arduino libraries for the BMP180 are correctly installed.

FAQs

Q: Can the BMP180 be used with a 5V system? A: While the BMP180 is a 3.3V device, many breakout boards include a voltage regulator and logic level conversion, allowing it to be interfaced with 5V systems. Always check the specifications of the breakout board.

Q: How can I calibrate the BMP180 for altitude measurements? A: To calibrate the sensor for altitude, you need a reference sea-level pressure value for your location, which can often be obtained from local weather services. Use this value in the readAltitude(seaLevelPressure) function to get accurate altitude readings.

Q: What is the default I2C address of the BMP180? A: The default I2C address of the BMP180 is 0x77.

Q: How often should I read data from the sensor? A: The BMP180 can be read as often as needed, but for most applications, a few readings per minute are sufficient. Reading too frequently can lead to self-heating and slightly less accurate temperature readings.