How to Use Adafruit Proto Shield R3: Examples, Pinouts, and Specs
Introduction
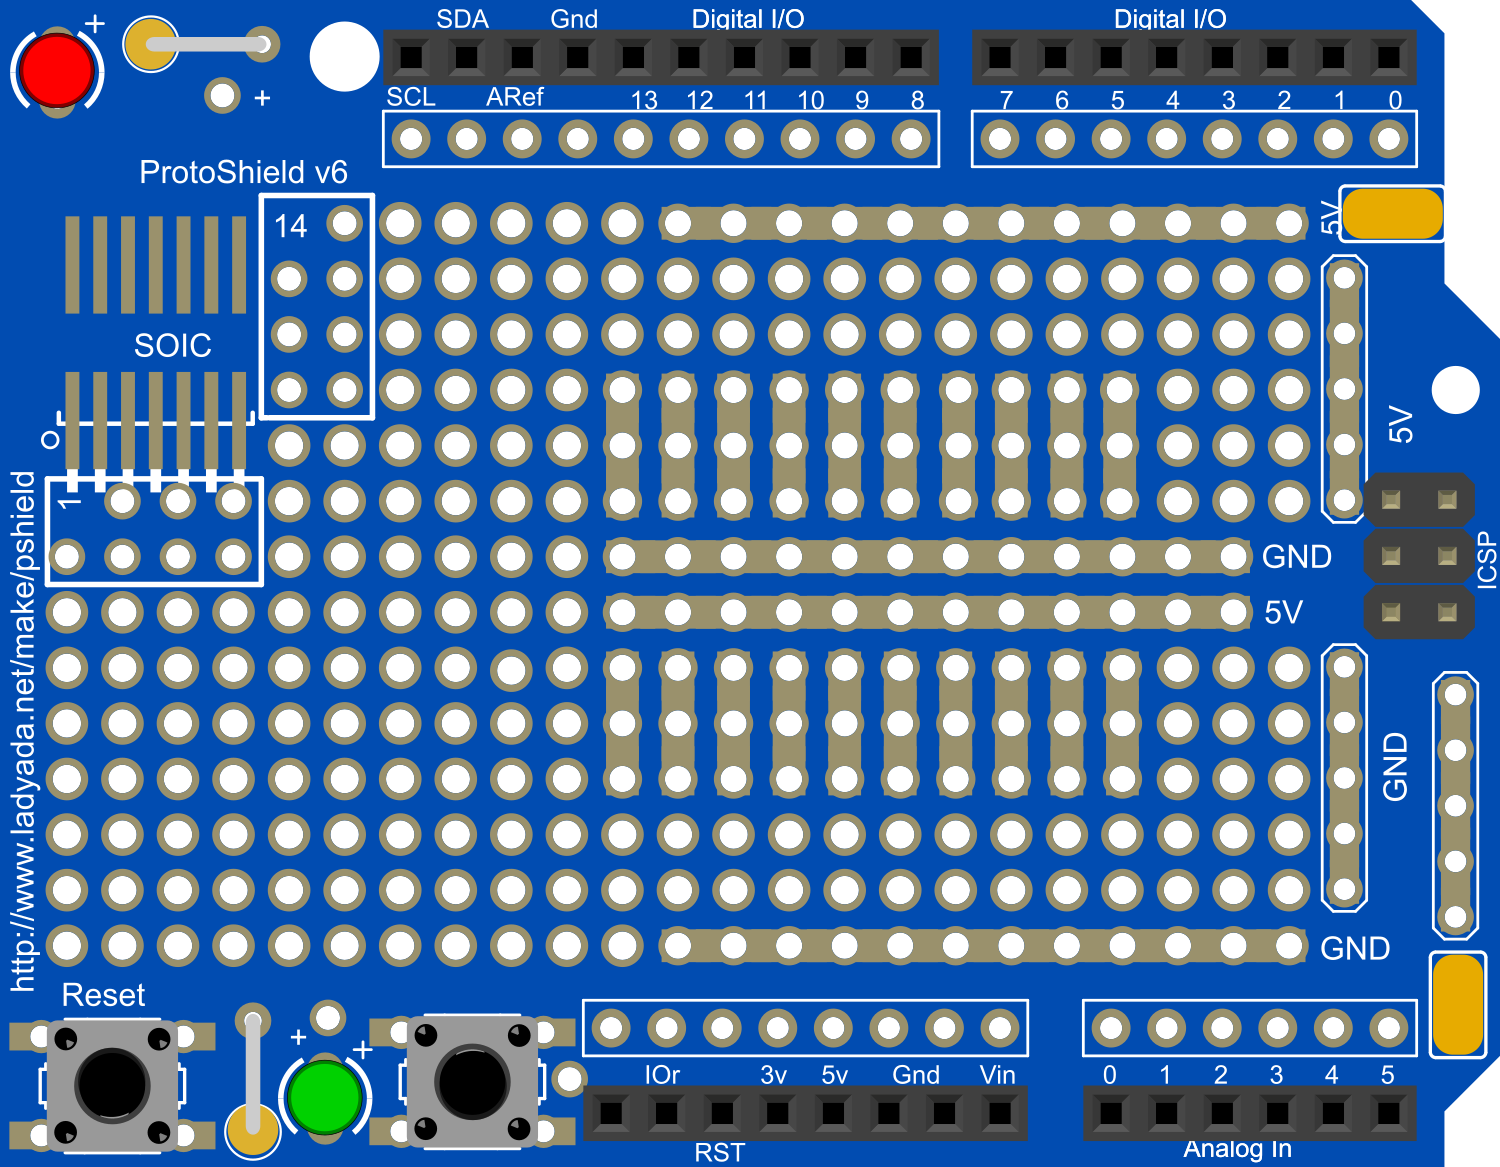
The Adafruit Proto Shield R3 is a versatile and user-friendly prototyping shield that is compatible with Arduino R3 and later boards. It is designed to facilitate the development of custom circuits by providing a large prototyping area equipped with pre-drilled holes and an IC pattern. This shield is ideal for hobbyists, educators, and professionals who require a reliable platform for building and testing electronic circuits.
Explore Projects Built with Adafruit Proto Shield R3


Explore Projects Built with Adafruit Proto Shield R3
Common Applications and Use Cases
- Rapid prototyping of electronic circuits
- Educational projects and learning platforms
- Development of custom Arduino shields
- Testing and debugging of circuit designs
Technical Specifications
Key Technical Details
- Compatibility: Arduino UNO R3 and similar boards
- Operating Voltage: 5V (provided by the Arduino board)
- Prototyping Area: Large breadboard-style with 5V/GND rails
- IC Spacing: Standard 0.1" (2.54mm) spacing with SOIC pattern
- Dimensions: Matches Arduino R3 footprint
Pin Configuration and Descriptions
| Pin Number | Description | Notes |
|---|---|---|
| 1-13 | Digital Pins | Correspond to Arduino digital pins |
| A0-A5 | Analog Pins | Correspond to Arduino analog pins |
| AREF | Analog Reference Pin | For setting an external reference voltage |
| GND | Ground | Multiple ground pins for convenience |
| 5V | 5V Power Supply | Provided by the Arduino board |
| 3V3 | 3.3V Power Supply | Provided by the Arduino board |
| VIN | Voltage Input | Connected to the Arduino VIN pin |
| RESET | Reset | Connected to the Arduino reset pin |
Usage Instructions
How to Use the Component in a Circuit
- Mounting the Shield: Align the Proto Shield R3 pins with the headers on the Arduino board and press down gently to connect.
- Soldering Components: Use the pre-drilled holes and IC pattern to solder your components onto the shield. Ensure that solder joints are clean and secure.
- Connecting to Arduino Pins: Utilize the breakout pins to connect your components to the Arduino's digital and analog pins.
- Powering the Circuit: The shield can be powered directly from the Arduino's 5V and GND pins. Ensure that your circuit does not draw more current than the Arduino can provide.
Important Considerations and Best Practices
- Current Limitations: Do not exceed the current rating of the Arduino board's power supply.
- Short Circuits: Always check for short circuits before powering up the shield to prevent damage to the Arduino and the shield.
- Static Discharge: Handle the shield with care to avoid static discharge that could damage sensitive components.
- Shield Stacking: If stacking multiple shields, ensure that pin conflicts do not occur and that there is adequate clearance for all components.
Troubleshooting and FAQs
Common Issues Users Might Face
- Loose Connections: If the shield is not functioning as expected, check that it is properly seated on the Arduino board.
- Soldering Problems: Poor solder joints can lead to intermittent connections. Inspect and rework any suspect joints.
- Power Issues: Ensure that the circuit does not exceed the power capabilities of the Arduino board.
Solutions and Tips for Troubleshooting
- Visual Inspection: Regularly inspect the board for any signs of damage or wear.
- Multimeter Checks: Use a multimeter to check for continuity and proper voltages across the circuit.
- Isolation: If a complex circuit is not working, isolate sections of the circuit and test each part individually.
FAQs
Q: Can I use the Proto Shield R3 with an Arduino Mega? A: Yes, the shield is compatible with the Arduino Mega and other R3 footprint boards.
Q: How much current can the power rails on the Proto Shield R3 handle? A: The power rails are designed to handle the same amount of current as the Arduino's 5V and 3.3V pins, typically around 200-500mA. Check your Arduino's specific current limits.
Q: Is it possible to stack another shield on top of the Proto Shield R3? A: Yes, the Proto Shield R3 includes stackable headers that allow for multiple shields to be stacked on top of it.
Example Code for Arduino UNO
Here is a simple example of how to blink an LED using the Proto Shield R3 and an Arduino UNO:
// Define the LED pin
const int ledPin = 13; // LED connected to digital pin 13

// The setup function runs once when you press reset or power the board
void setup() {
  // Initialize the digital pin as an output.
  pinMode(ledPin, OUTPUT);
}

// The loop function runs over and over again forever
void loop() {
  digitalWrite(ledPin, HIGH);   // Turn the LED on (HIGH is the voltage level)
  delay(1000);                  // Wait for a second
  digitalWrite(ledPin, LOW);    // Turn the LED off by making the voltage LOW
  delay(1000);                  // Wait for a second
}
Remember to solder an LED and a current-limiting resistor to the appropriate pins on the Proto Shield R3 before uploading this code to the Arduino UNO.