How to Use 3.5 inch TFT touch color SPI serial LCD display module: Examples, Pinouts, and Specs
Introduction
The 3.5 inch TFT Touch Color SPI Serial LCD Display Module (Manufacturer Part ID: ILI9488 480*320 SPI 3.5 Touch) is a versatile and vibrant display module designed for graphical user interfaces in embedded systems. It features a 480x320 resolution, a touch-sensitive interface, and uses the SPI (Serial Peripheral Interface) protocol for communication. This module is ideal for applications requiring a compact, interactive display, such as IoT devices, handheld instruments, and DIY electronics projects.
Explore Projects Built with 3.5 inch TFT touch color SPI serial LCD display module


Explore Projects Built with 3.5 inch TFT touch color SPI serial LCD display module
Common Applications
- Graphical user interfaces for embedded systems
- IoT dashboards and control panels
- Portable devices and handheld instruments
- Educational and hobbyist projects
- Industrial control systems
Technical Specifications
Below are the key technical details of the module:
| Parameter | Value |
|---|---|
| Display Type | TFT LCD |
| Resolution | 480 x 320 pixels |
| Screen Size | 3.5 inches (diagonal) |
| Controller IC | ILI9488 |
| Communication Interface | SPI (Serial Peripheral Interface) |
| Touch Type | Resistive or Capacitive (varies) |
| Operating Voltage | 3.3V (logic) / 5V (power supply) |
| Backlight | LED |
| Color Depth | 16-bit (65,536 colors) |
| Operating Temperature | -20°C to 70°C |
Pin Configuration
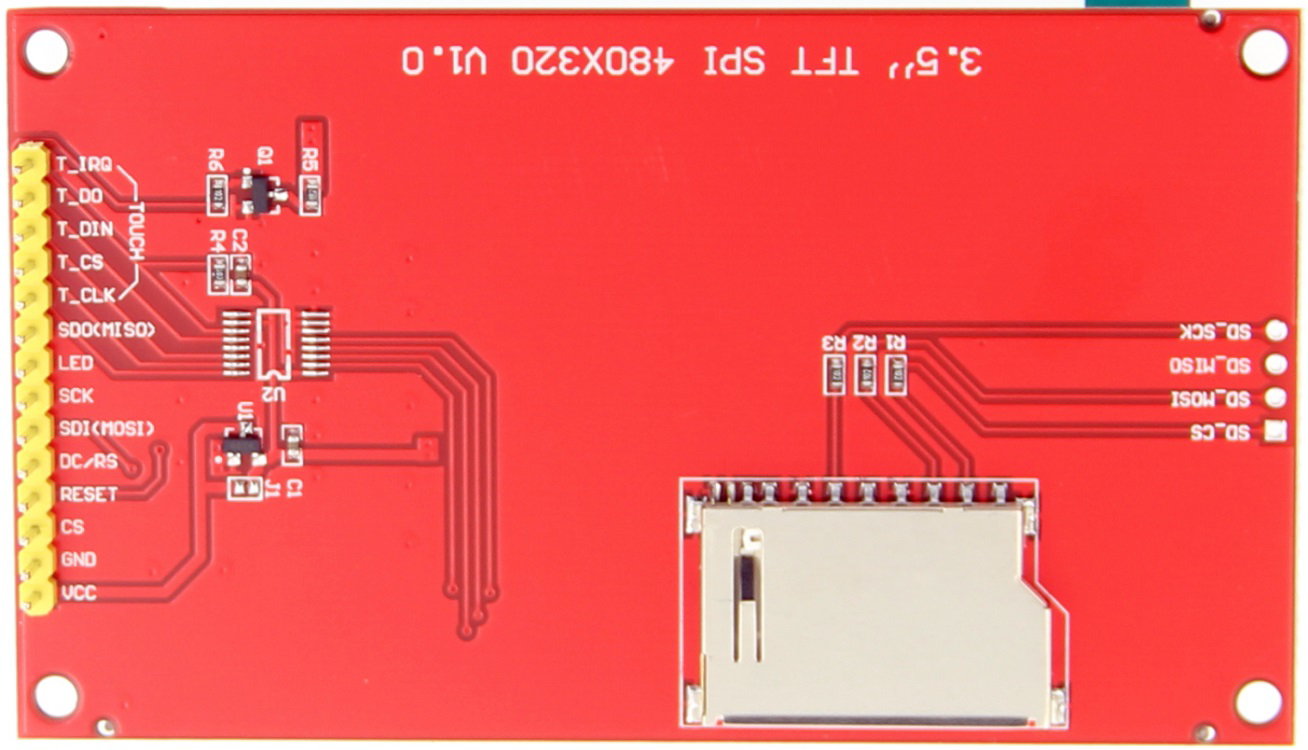
The module typically has an 8-pin interface. Below is the pinout description:
| Pin | Name | Description |
|---|---|---|
| 1 | VCC | Power supply input (5V recommended) |
| 2 | GND | Ground connection |
| 3 | CS | Chip Select (active low) |
| 4 | RESET | Reset pin (active low) |
| 5 | DC/RS | Data/Command control pin (High = Data, Low = Command) |
| 6 | SDI/MOSI | Serial Data Input / Master Out Slave In (SPI data input) |
| 7 | SCK | Serial Clock (SPI clock input) |
| 8 | LED | Backlight control (connect to 3.3V or 5V through a resistor for brightness control) |
Note: Some modules may include additional pins for touch functionality, such as
T_IRQ,T_CS,T_CLK, andT_DIN. Refer to the specific datasheet for details.
Usage Instructions
Connecting the Module to a Microcontroller
To use the 3.5 inch TFT Touch Color SPI Serial LCD Display Module, follow these steps:
- Power Supply: Connect the
VCCpin to a 5V power source and theGNDpin to ground. - SPI Communication: Connect the
CS,RESET,DC/RS,SDI/MOSI, andSCKpins to the corresponding SPI pins on your microcontroller. - Backlight Control: Connect the
LEDpin to a 3.3V or 5V source through a current-limiting resistor (e.g., 220Ω) to control the backlight. - Touch Interface: If the module includes touch functionality, connect the touch-related pins (
T_IRQ,T_CS, etc.) to the microcontroller as specified in the datasheet.
Example: Using with Arduino UNO
Below is an example of how to connect and program the module with an Arduino UNO:
Wiring Diagram
| TFT Pin | Arduino Pin |
|---|---|
| VCC | 5V |
| GND | GND |
| CS | D10 |
| RESET | D9 |
| DC/RS | D8 |
| SDI/MOSI | D11 |
| SCK | D13 |
| LED | 5V (via 220Ω) |
Arduino Code Example
#include <Adafruit_GFX.h>    // Core graphics library
#include <Adafruit_ILI9488.h> // ILI9488 driver library
#include <SPI.h>             // SPI library

// Define pins for the TFT module
#define TFT_CS   10  // Chip Select
#define TFT_RST  9   // Reset
#define TFT_DC   8   // Data/Command

// Create an instance of the display
Adafruit_ILI9488 tft = Adafruit_ILI9488(TFT_CS, TFT_DC, TFT_RST);

void setup() {
  // Initialize the display
  tft.begin();

  // Set rotation (0-3)
  tft.setRotation(1);

  // Fill the screen with a color
  tft.fillScreen(ILI9488_BLUE);

  // Draw a rectangle
  tft.fillRect(50, 50, 100, 50, ILI9488_RED);

  // Display text
  tft.setTextColor(ILI9488_WHITE);
  tft.setTextSize(2);
  tft.setCursor(60, 120);
  tft.print("Hello, World!");
}

void loop() {
  // Nothing to do here
}
Note: Install the
Adafruit_GFXandAdafruit_ILI9488libraries in the Arduino IDE before uploading the code.
Best Practices
- Use a level shifter if your microcontroller operates at 5V logic levels, as the module's logic operates at 3.3V.
- Avoid excessive current draw on the backlight pin by using an appropriate resistor.
- Ensure proper grounding to avoid noise or communication issues.
Troubleshooting and FAQs
Common Issues and Solutions
| Issue | Possible Cause | Solution |
|---|---|---|
| Display does not turn on | Incorrect wiring or insufficient power | Verify connections and ensure a stable 5V power supply. |
| No image or incorrect display output | SPI communication issue | Check SPI connections and ensure correct pin assignments in the code. |
| Touch functionality not working | Touch pins not connected or misconfigured | Verify touch-related connections and configure the library for touch support. |
| Backlight not turning on | LED pin not connected properly | Connect the LED pin to 3.3V/5V through a resistor. |
| Display flickers or shows noise | Poor grounding or unstable power supply | Ensure proper grounding and use a decoupling capacitor near the power pins. |
FAQs
Can this module be used with 5V logic microcontrollers?
- Yes, but a level shifter is recommended to convert 5V signals to 3.3V.
What is the maximum SPI clock speed supported?
- The ILI9488 controller typically supports SPI clock speeds up to 10 MHz.
Does the module support capacitive touch?
- Some variants of this module support capacitive touch. Check the product specifications to confirm.
Can I use this module with platforms other than Arduino?
- Yes, the module can be used with other platforms like Raspberry Pi, ESP32, and STM32, provided the SPI interface is configured correctly.
By following this documentation, you can successfully integrate the 3.5 inch TFT Touch Color SPI Serial LCD Display Module into your projects and create stunning graphical interfaces.