How to Use Portenta mashin control: Examples, Pinouts, and Specs
Introduction
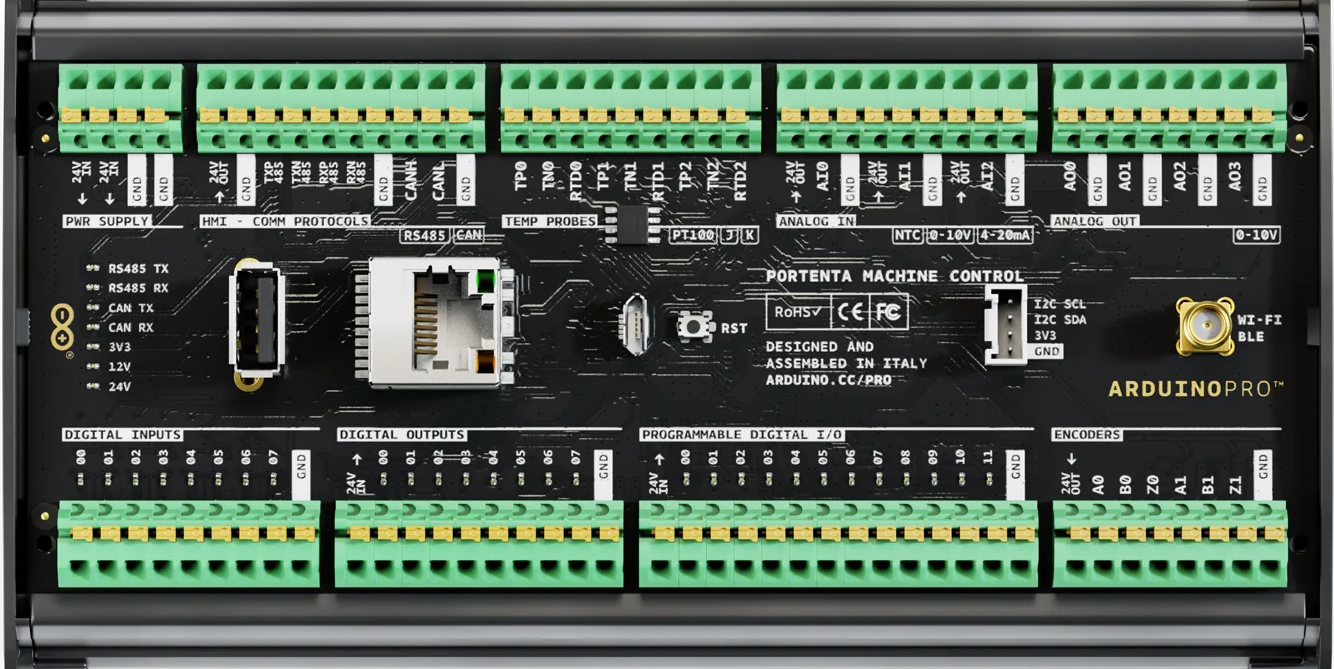
The Portenta Machine Control is a robust and versatile microcontroller board developed by Arduino. It is designed for advanced industrial and IoT applications, offering high processing power, extensive connectivity options, and compatibility with a wide range of sensors and actuators. This board is ideal for robotics, industrial automation, and edge computing projects, providing a reliable platform for real-time control and data processing.
Explore Projects Built with Portenta mashin control

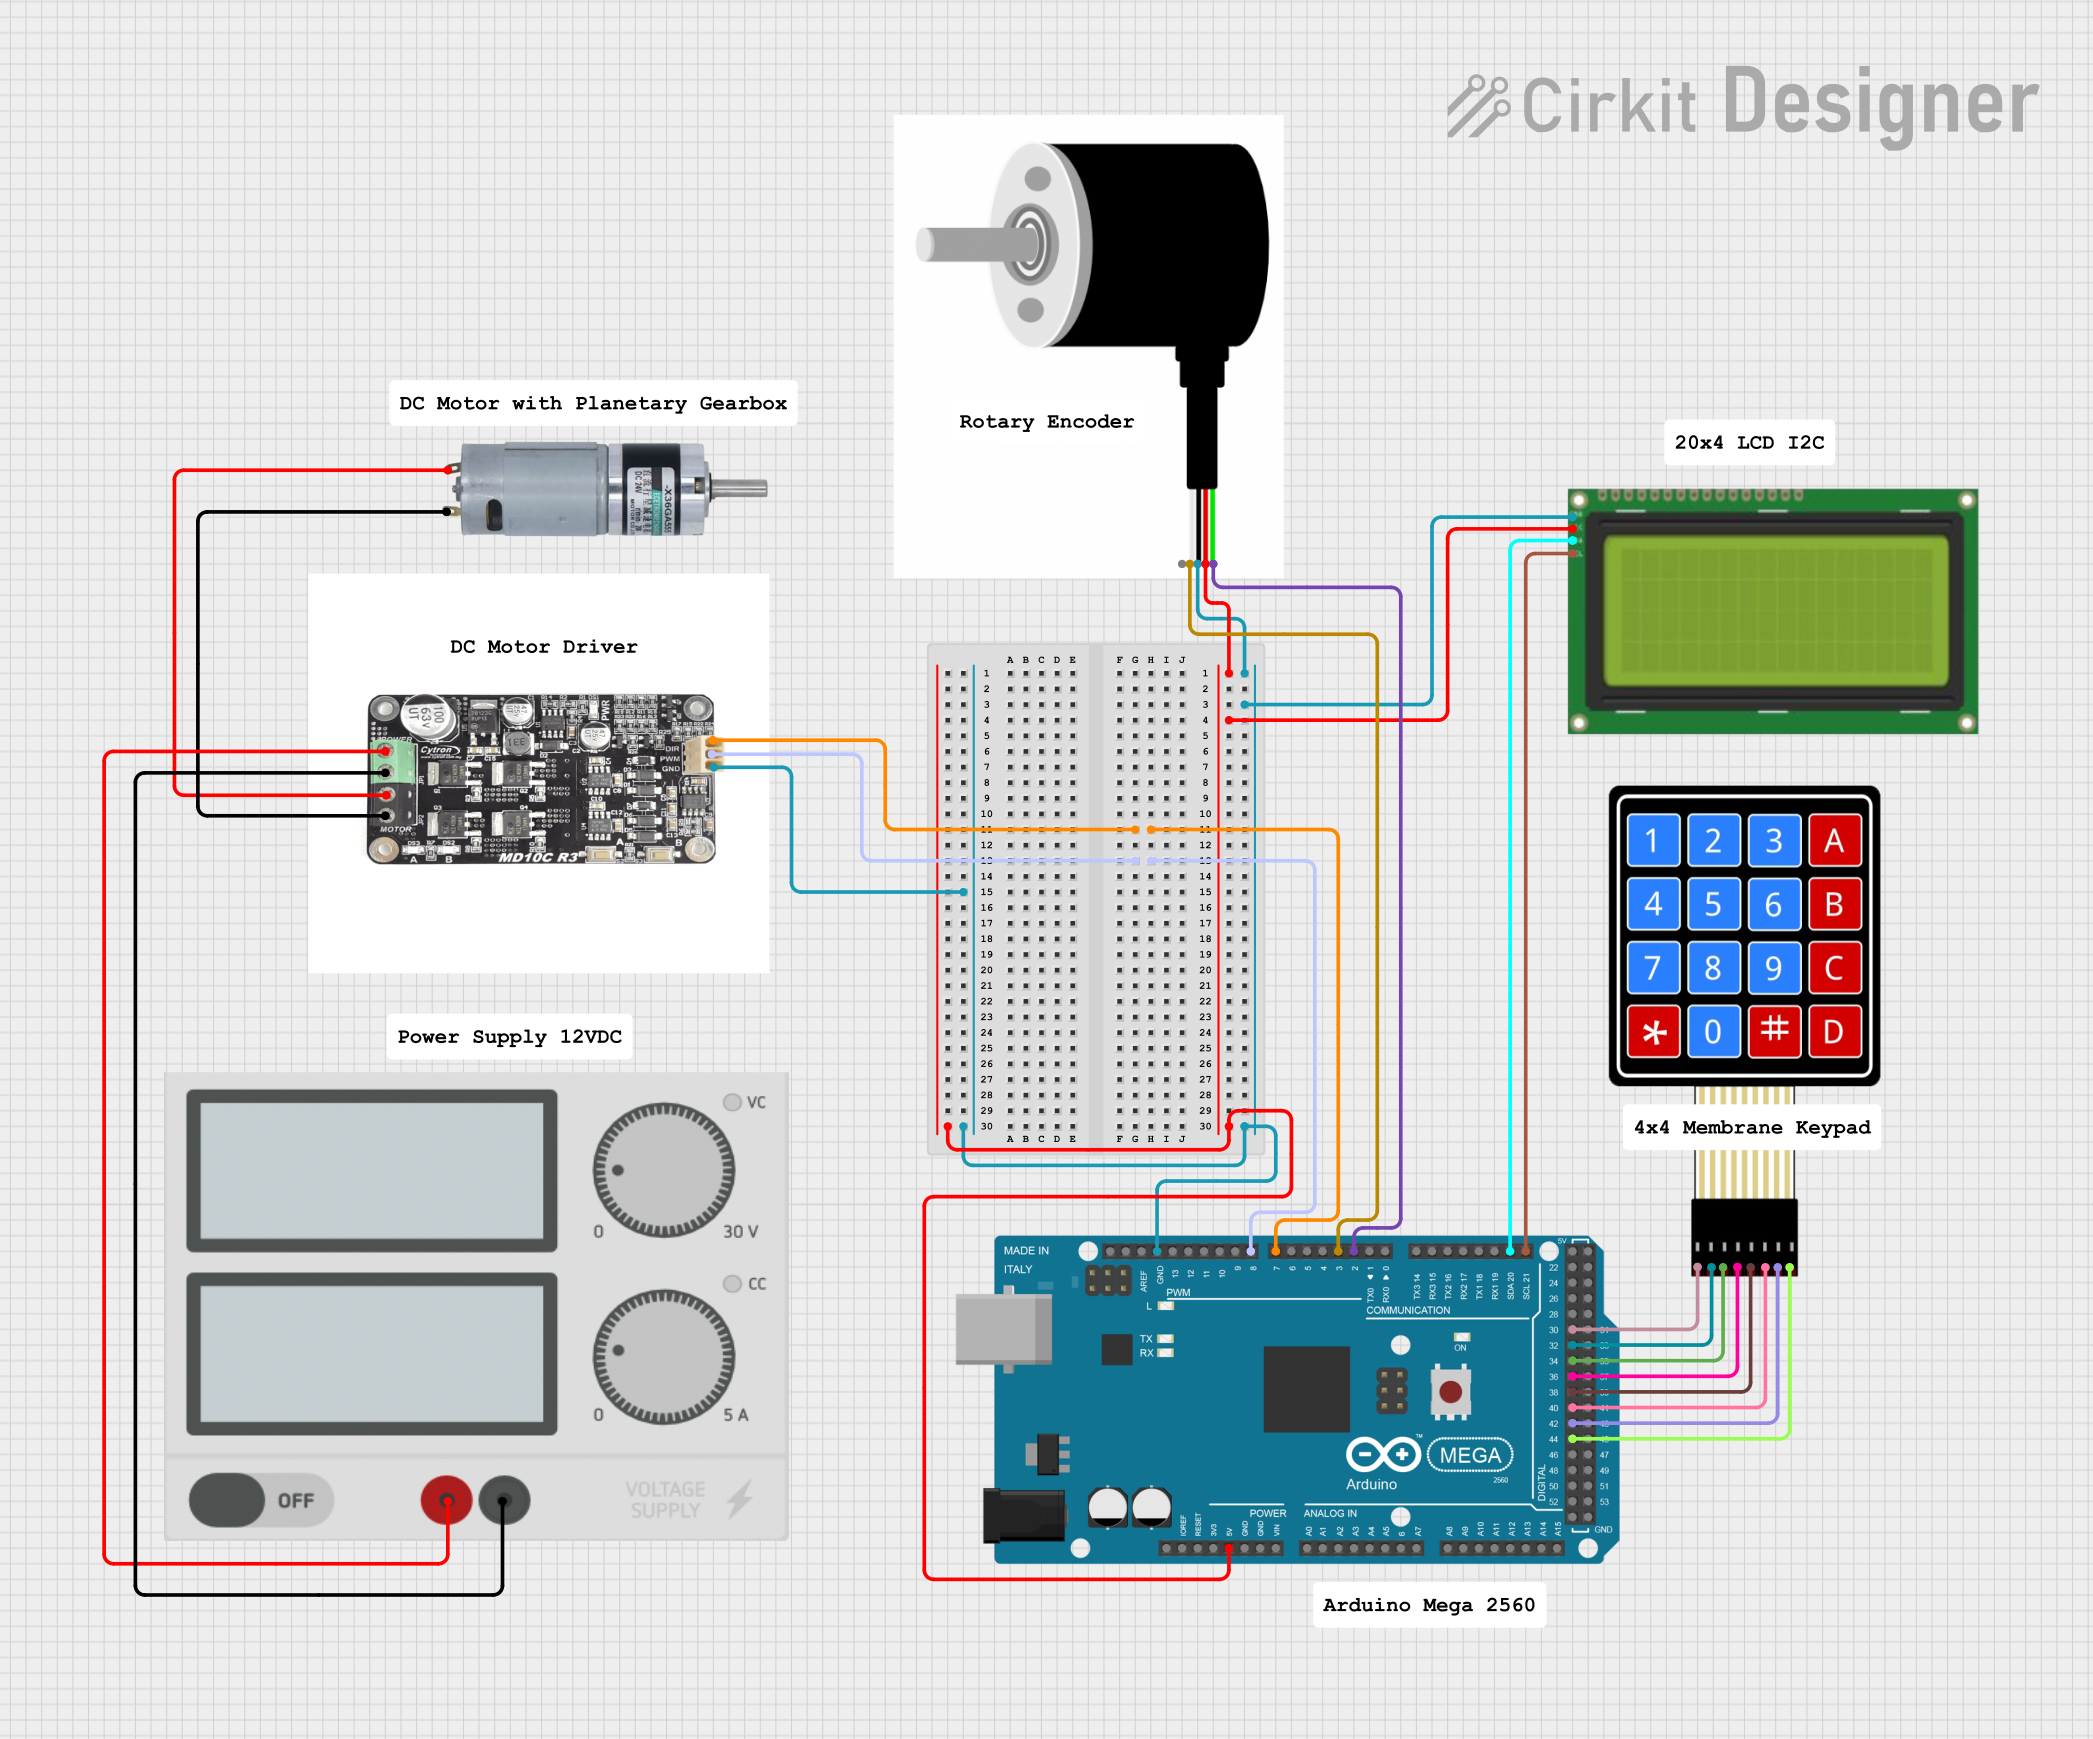

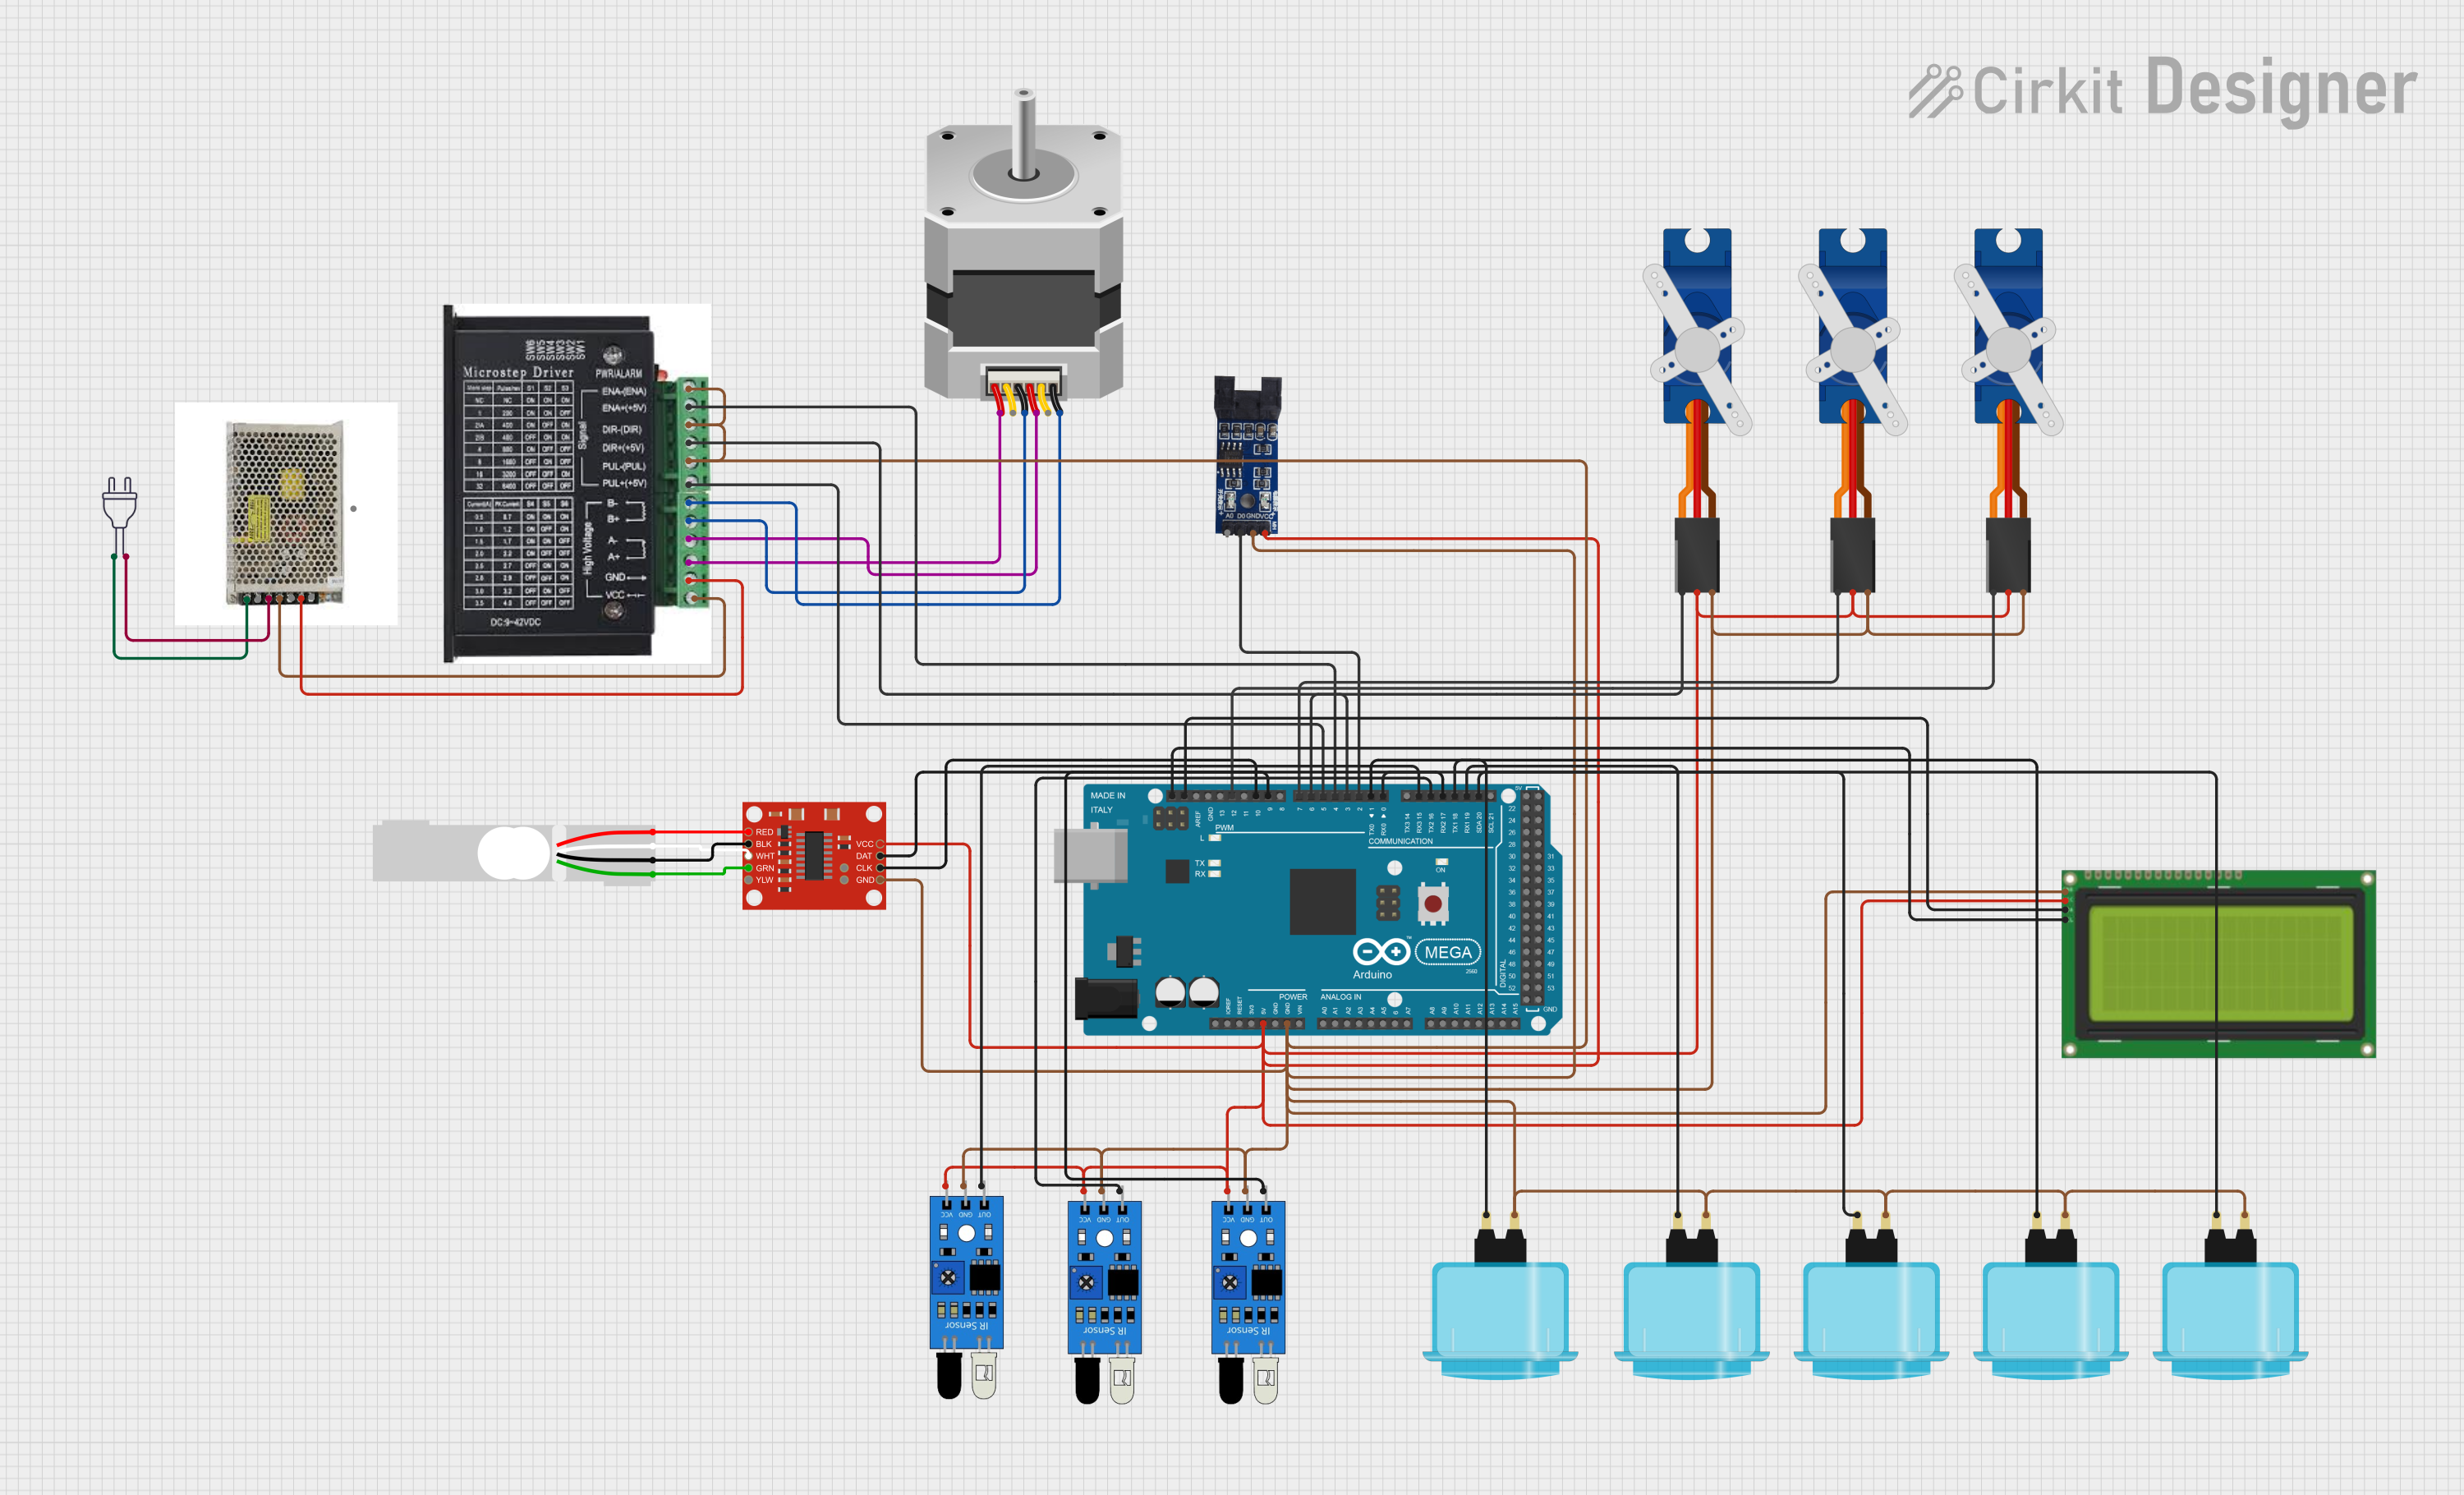
Explore Projects Built with Portenta mashin control
Common Applications and Use Cases
- Industrial automation and control systems
- Robotics and autonomous machines
- IoT edge devices for data acquisition and processing
- Smart agriculture and environmental monitoring
- Predictive maintenance and machine learning at the edge
Technical Specifications
The Portenta Machine Control is packed with features that make it suitable for demanding applications. Below are its key technical specifications:
General Specifications
| Feature | Specification |
|---|---|
| Microcontroller | STM32H747 dual-core processor (Cortex-M7 at 480 MHz and Cortex-M4 at 240 MHz) |
| Memory | 8 MB SDRAM, 16 MB NOR Flash |
| Connectivity | Ethernet, Wi-Fi, Bluetooth Low Energy (BLE) |
| Operating Voltage | 24V DC input |
| Digital I/O Pins | 17 (configurable as input/output) |
| Analog Inputs | 8 (12-bit ADC) |
| Analog Outputs | 2 (12-bit DAC) |
| Communication Interfaces | UART, I2C, SPI, CAN, RS485 |
| Operating Temperature Range | -40°C to 85°C |
| Dimensions | 100 mm x 25 mm x 120 mm |
Pin Configuration and Descriptions
The Portenta Machine Control features a variety of pins for interfacing with external devices. Below is the pin configuration:
Digital and Analog Pins
| Pin Number | Pin Name | Description |
|---|---|---|
| D0-D16 | Digital I/O | Configurable as input or output |
| A0-A7 | Analog Inputs | 12-bit ADC for reading sensor data |
| DAC0-DAC1 | Analog Outputs | 12-bit DAC for generating analog signals |
Communication Pins
| Pin Name | Description |
|---|---|
| UART | Serial communication interface |
| I2C | Inter-Integrated Circuit communication |
| SPI | Serial Peripheral Interface |
| CAN | Controller Area Network for industrial use |
| RS485 | Differential serial communication |
Power and Ground Pins
| Pin Name | Description |
|---|---|
| VIN | 24V DC input |
| GND | Ground |
| 5V | 5V output for powering external devices |
| 3.3V | 3.3V output for powering external devices |
Usage Instructions
The Portenta Machine Control is designed to be user-friendly while offering advanced functionality. Follow the steps below to use the board effectively:
Step 1: Powering the Board
- Connect a 24V DC power supply to the VIN and GND pins.
- Ensure the power supply is stable and within the specified voltage range.
Step 2: Programming the Board
- Use the Arduino IDE or Arduino Pro IDE to program the board.
- Select "Portenta H7" as the board type in the IDE.
- Connect the board to your computer via USB for programming.
Step 3: Connecting Sensors and Actuators
- Use the digital and analog pins to connect sensors and actuators.
- Configure the pins as input or output in your code as needed.
Step 4: Communication Interfaces
- Utilize the UART, I2C, SPI, CAN, or RS485 interfaces for communication with other devices.
- Refer to the pin configuration table for the correct pin assignments.
Example Code: Reading an Analog Sensor
Below is an example of how to read data from an analog sensor connected to pin A0:
// Include necessary libraries
void setup() {
  Serial.begin(9600); // Initialize serial communication at 9600 baud
}

void loop() {
  int sensorValue = analogRead(A0); // Read the analog value from pin A0
  float voltage = sensorValue * (3.3 / 4095.0); // Convert to voltage (12-bit ADC)

  // Print the sensor value and voltage to the Serial Monitor
  Serial.print("Sensor Value: ");
  Serial.print(sensorValue);
  Serial.print(" | Voltage: ");
  Serial.println(voltage);

  delay(1000); // Wait for 1 second before the next reading
}
Best Practices
- Use proper shielding for cables in noisy industrial environments.
- Avoid exceeding the voltage and current ratings of the pins.
- Use external pull-up or pull-down resistors for stable digital input readings.
- Regularly update the firmware to ensure compatibility and security.
Troubleshooting and FAQs
Common Issues and Solutions
The board does not power on:
- Ensure the power supply is providing 24V DC.
- Check the connections to the VIN and GND pins.
Unable to upload code:
- Verify that the correct board type ("Portenta H7") is selected in the Arduino IDE.
- Ensure the USB cable is properly connected and functional.
Sensors are not providing accurate readings:
- Check the wiring and ensure proper grounding.
- Verify that the sensor is compatible with the board's voltage levels.
Communication with external devices fails:
- Double-check the pin connections for the selected communication interface.
- Ensure the baud rate and other communication parameters match between devices.
FAQs
Q: Can the Portenta Machine Control be used in harsh environments?
A: Yes, the board is designed to operate in a wide temperature range (-40°C to 85°C) and is suitable for industrial environments.
Q: Is the board compatible with Arduino libraries?
A: Yes, the Portenta Machine Control supports most Arduino libraries, making it easy to integrate with existing projects.
Q: Can I use the board for machine learning applications?
A: Absolutely! The dual-core STM32H747 processor is powerful enough to run machine learning models at the edge.
Q: How do I update the firmware?
A: Use the Arduino IDE or Arduino Pro IDE to update the firmware via USB or over-the-air (OTA) if supported.
By following this documentation, you can effectively utilize the Portenta Machine Control for your advanced projects.