How to Use Adafruit Precision 9-DoF ISM330DHCX + LIS3MDL FeatherWing: Examples, Pinouts, and Specs
Introduction
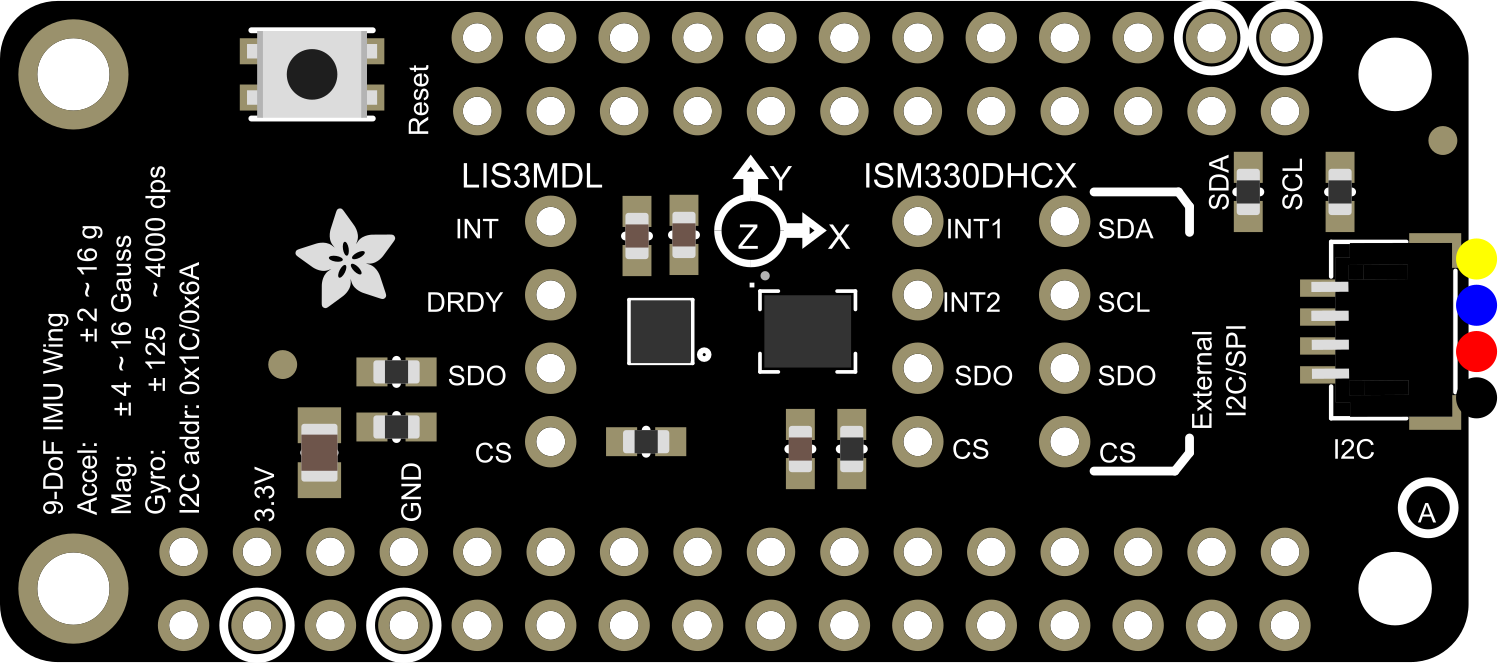
The Adafruit Precision 9-DoF ISM330DHCX + LIS3MDL FeatherWing is a comprehensive sensor board designed for motion tracking and orientation sensing. It integrates a 3-axis accelerometer, a 3-axis gyroscope, and a 3-axis magnetometer, providing nine degrees of freedom (9-DoF) for precise motion and orientation data. This makes it an ideal component for applications in robotics, navigation, gesture recognition, and virtual reality, among others.
Explore Projects Built with Adafruit Precision 9-DoF ISM330DHCX + LIS3MDL FeatherWing
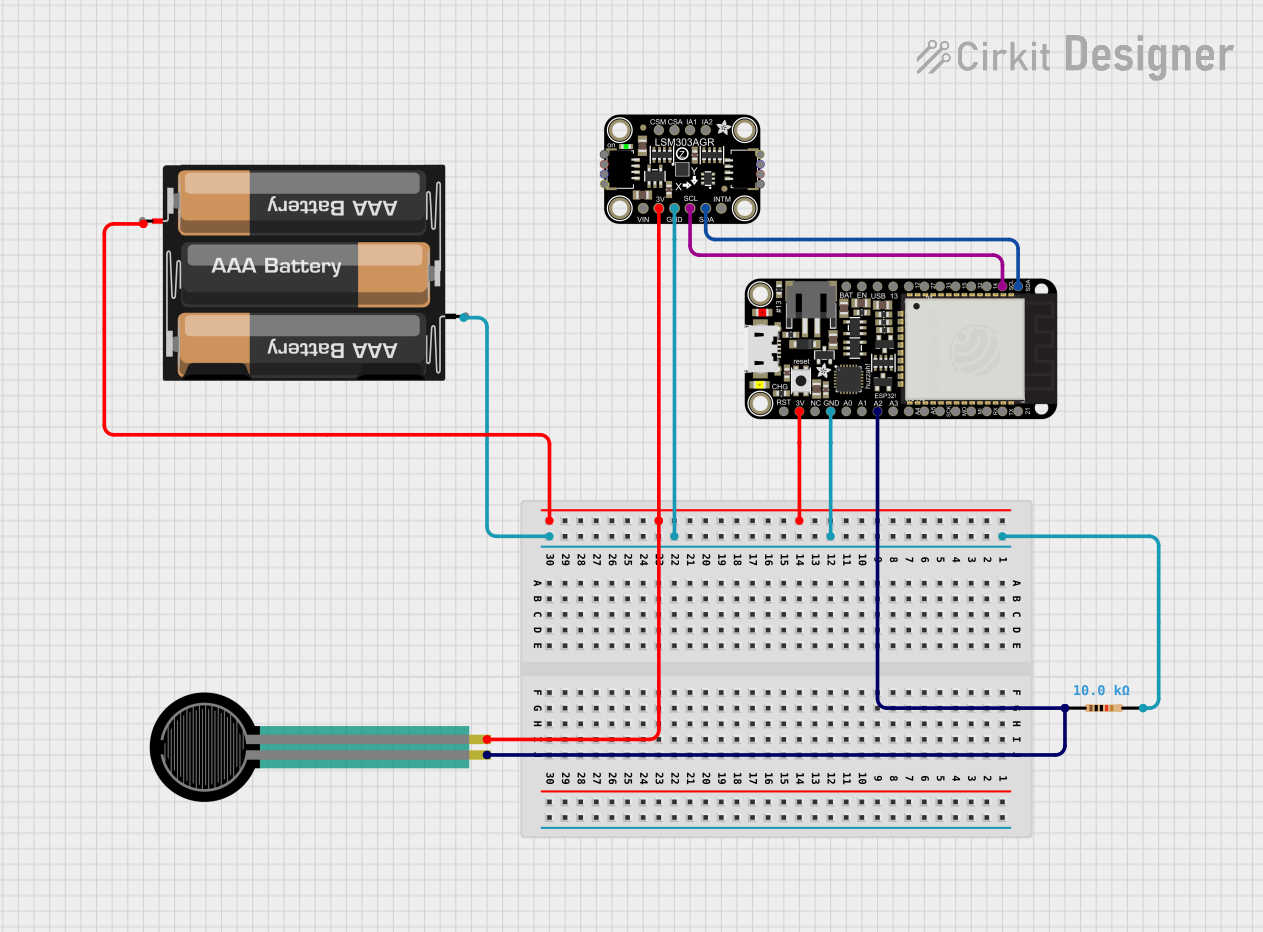


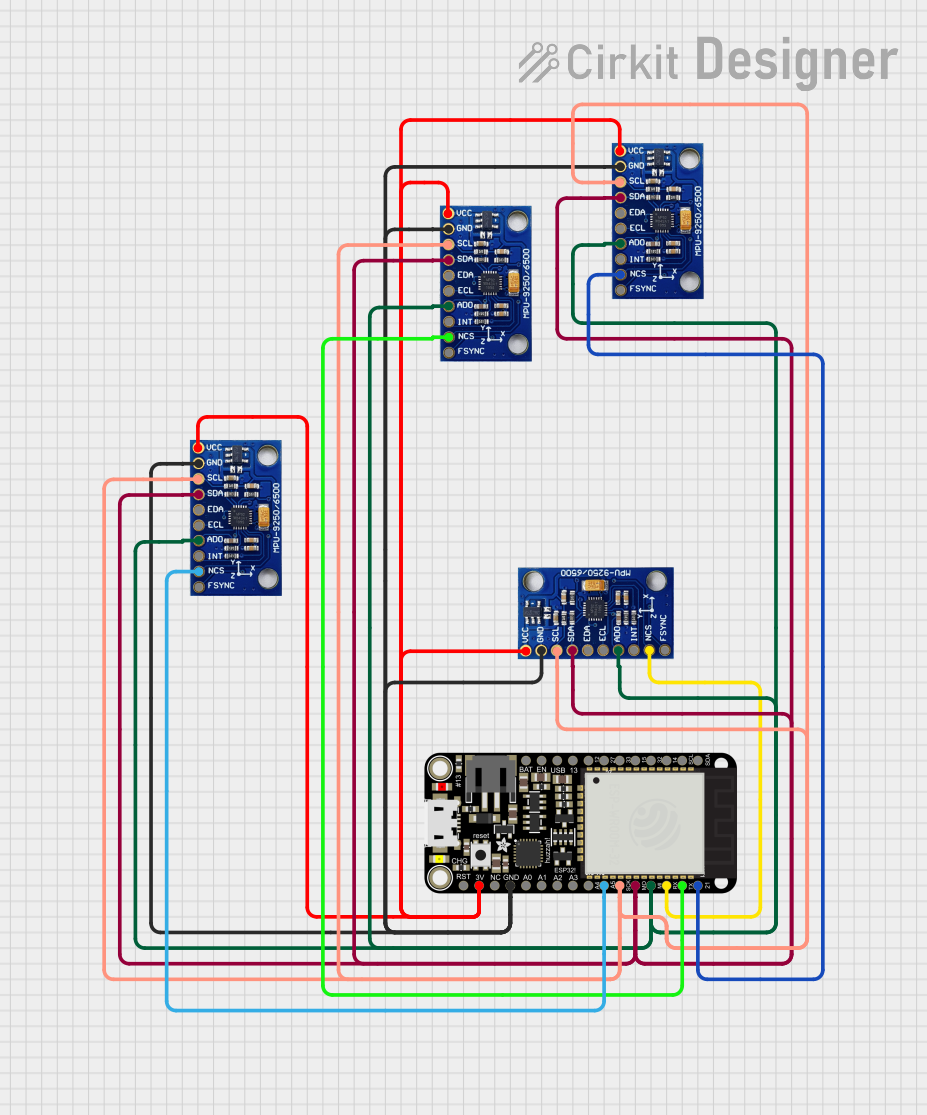
Explore Projects Built with Adafruit Precision 9-DoF ISM330DHCX + LIS3MDL FeatherWing
Technical Specifications
Key Technical Details
Accelerometer/Gyroscope (ISM330DHCX):
- 3-axis angular rate sensor (gyroscope) with a full-scale range of ±125/±250/±500/±1000/±2000 dps
- 3-axis linear acceleration sensor (accelerometer) with a full-scale range of ±2/±4/±8/±16 g
- Output Data Rates (ODR) from 12.5 Hz to 6.66 kHz
Magnetometer (LIS3MDL):
- 3-axis magnetometer with a full-scale range of ±4/±8/±12/±16 gauss
- Output Data Rate (ODR) up to 155 Hz
Operating Voltage: 3.3V
Interface: I2C
Pin Configuration and Descriptions
| Pin Number | Name | Description |
|---|---|---|
| 1 | SCL | I2C clock line for communication with the microcontroller |
| 2 | SDA | I2C data line for communication with the microcontroller |
| 3 | 3Vo | 3.3V output from the regulator |
| 4 | GND | Ground connection |
| 5 | INT1 | Interrupt output from ISM330DHCX |
| 6 | INTM | Interrupt output from LIS3MDL |
| 7 | RST | Reset line for the sensors |
Usage Instructions
Integration with a Circuit
To use the Adafruit Precision 9-DoF FeatherWing, follow these steps:
- Connect the
SCLandSDApins to the corresponding I2C clock and data lines on your microcontroller. - Connect the
3Vopin to the 3.3V power supply if needed. - Connect the
GNDpin to the ground on your microcontroller. - Optionally, connect the
INT1andINTMpins to available digital pins on your microcontroller if you plan to use interrupt features. - If you need to reset the sensors, connect the
RSTpin to a digital pin on your microcontroller.
Important Considerations and Best Practices
- Ensure that the power supply is 3.3V, as higher voltages can damage the sensors.
- Use pull-up resistors on the I2C lines if your microcontroller does not have built-in pull-ups.
- When placing the sensor in your project, avoid close proximity to magnetic fields or metals that can distort the magnetometer readings.
- For accurate readings, calibrate the magnetometer in your final installation environment.
Example Code for Arduino UNO
#include <Wire.h>
#include <Adafruit_Sensor.h>
#include <Adafruit_LSM6DS33.h>
#include <Adafruit_LIS3MDL.h>

// Create sensor instances
Adafruit_LSM6DS33 lsm6ds33;
Adafruit_LIS3MDL lis3mdl;

void setup() {
  Serial.begin(115200);
  // Initialize the sensors
  if (!lsm6ds33.begin_I2C()) {
    Serial.println("Failed to find LSM6DS33 chip");
    while (1) {
      delay(10);
    }
  }
  if (!lis3mdl.begin_I2C()) {
    Serial.println("Failed to find LIS3MDL chip");
    while (1) {
      delay(10);
    }
  }
}

void loop() {
  // Read the accelerometer and gyroscope
  sensors_event_t accel;
  sensors_event_t gyro;
  sensors_event_t mag;
  lsm6ds33.getEvent(&accel, &gyro, NULL);
  lis3mdl.getEvent(&mag);

  // Print the values to the Serial Monitor
  Serial.print("Accel X: "); Serial.print(accel.acceleration.x); Serial.print(" m/s^2 ");
  Serial.print("Gyro X: "); Serial.print(gyro.gyro.x); Serial.print(" rad/s ");
  Serial.print("Mag X: "); Serial.print(mag.magnetic.x); Serial.println(" uT ");

  // Add a delay between reads for stability
  delay(100);
}
Troubleshooting and FAQs
Common Issues
- Sensor not detected: Ensure that the wiring is correct and that the I2C address is not conflicting with other devices on the bus.
- Inaccurate readings: Calibrate the sensors, especially the magnetometer, and ensure there are no magnetic interferences nearby.
- No data from the sensor: Check the power supply and connections. Ensure that the microcontroller's I2C library is properly initialized.
Solutions and Tips for Troubleshooting
- Double-check the wiring and soldering for any loose connections or shorts.
- Use the I2C scanner sketch to confirm the presence of the device on the I2C bus.
- Reset the sensor using the
RSTpin if the sensor is unresponsive. - Consult the Adafruit forums and community for help if you encounter persistent issues.
FAQs
Q: Can I use this FeatherWing with a 5V microcontroller? A: Yes, but ensure that the logic levels are shifted to 3.3V to avoid damaging the sensors.
Q: How do I calibrate the magnetometer? A: Adafruit provides a calibration sketch and guide on their website. Follow the instructions to calibrate the magnetometer for accurate readings.
Q: What is the I2C address of the sensors? A: The ISM330DHCX default I2C address is 0x6B, and the LIS3MDL default I2C address is 0x1E. Make sure these addresses are not used by other I2C devices in your project.