How to Use Cytron SDD-30: Examples, Pinouts, and Specs
Introduction
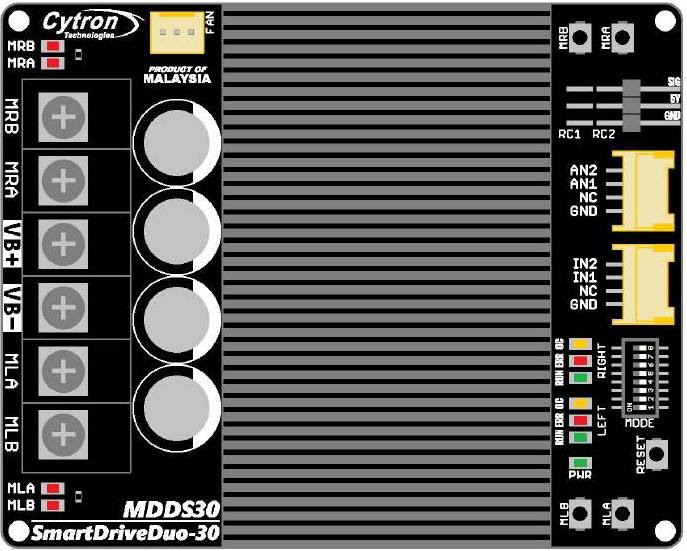
The Cytron SDD-30 (SmartDriveDuo-30) is a high-performance DC motor driver designed by Cytron Technologies. It is capable of controlling two DC motors simultaneously with bidirectional control. The SDD-30 is engineered to handle up to 30A of continuous current per channel, making it ideal for demanding applications such as robotics, automation systems, and electric vehicles. Its compact design and robust features make it a popular choice for hobbyists and professionals alike.
Explore Projects Built with Cytron SDD-30


Explore Projects Built with Cytron SDD-30
Common Applications
- Robotics (e.g., mobile robots, robotic arms)
- Automation systems
- Electric vehicles (e.g., small electric cars, scooters)
- Conveyor belts and industrial machinery
- Remote-controlled vehicles and drones
Technical Specifications
The following table outlines the key technical specifications of the Cytron SDD-30:
| Parameter | Specification |
|---|---|
| Operating Voltage | 7V to 35V DC |
| Continuous Current | 30A per channel |
| Peak Current | 80A per channel (for 1 second) |
| Control Modes | PWM, RC (Radio Control), Analog, UART |
| PWM Frequency | Up to 20 kHz |
| Motor Channels | 2 |
| Protection Features | Overcurrent, Overtemperature, Undervoltage |
| Dimensions | 84mm x 69mm x 17mm |
| Weight | 100g |
Pin Configuration and Descriptions
The Cytron SDD-30 has multiple input and output pins for motor control and power connections. Below is the pin configuration:
Power and Motor Connections
| Pin Name | Description |
|---|---|
| VM | Motor power supply (7V to 35V DC) |
| GND | Ground connection |
| M1A, M1B | Motor 1 output terminals |
| M2A, M2B | Motor 2 output terminals |
Control Input Pins
| Pin Name | Description |
|---|---|
| PWM1 | PWM input for Motor 1 |
| PWM2 | PWM input for Motor 2 |
| DIR1 | Direction control for Motor 1 |
| DIR2 | Direction control for Motor 2 |
| RC1, RC2 | RC signal inputs for Motor 1 and Motor 2 |
| UART_RX | UART receive pin for serial control |
| UART_TX | UART transmit pin for serial control |
Usage Instructions
The Cytron SDD-30 is versatile and can be used in various control modes. Below are the steps to use it in a typical PWM control setup with an Arduino UNO.
Connecting the SDD-30 to an Arduino UNO
- Power Supply: Connect the VM pin to a DC power source (7V to 35V) and GND to the ground of the power source.
- Motor Connections: Connect the DC motors to the M1A/M1B and M2A/M2B terminals.
- Control Pins: Connect the PWM1 and DIR1 pins to the Arduino's PWM-capable pins (e.g., D9 and D8). Similarly, connect PWM2 and DIR2 to other PWM-capable pins (e.g., D10 and D11).
- Common Ground: Ensure the Arduino's GND is connected to the SDD-30's GND.
Sample Arduino Code
The following code demonstrates how to control two DC motors using the Cytron SDD-30 in PWM mode:
// Define motor control pins
const int PWM1 = 9;  // PWM pin for Motor 1
const int DIR1 = 8;  // Direction pin for Motor 1
const int PWM2 = 10; // PWM pin for Motor 2
const int DIR2 = 11; // Direction pin for Motor 2

void setup() {
  // Set motor control pins as outputs
  pinMode(PWM1, OUTPUT);
  pinMode(DIR1, OUTPUT);
  pinMode(PWM2, OUTPUT);
  pinMode(DIR2, OUTPUT);
}

void loop() {
  // Example: Rotate Motor 1 forward at 50% speed
  digitalWrite(DIR1, HIGH); // Set direction forward
  analogWrite(PWM1, 128);   // Set speed (128/255 = 50%)

  // Example: Rotate Motor 2 backward at 75% speed
  digitalWrite(DIR2, LOW);  // Set direction backward
  analogWrite(PWM2, 192);   // Set speed (192/255 = 75%)

  delay(2000); // Run motors for 2 seconds

  // Stop both motors
  analogWrite(PWM1, 0);
  analogWrite(PWM2, 0);

  delay(2000); // Wait for 2 seconds before repeating
}
Important Considerations
- Power Supply: Ensure the power supply can provide sufficient current for the motors and the SDD-30.
- Heat Dissipation: The SDD-30 may heat up during operation. Use a heatsink or active cooling if necessary.
- Protection Features: The SDD-30 includes built-in protections (e.g., overcurrent, overtemperature). If the driver shuts down, check for these conditions.
Troubleshooting and FAQs
Common Issues and Solutions
Motors Not Running
- Cause: Incorrect wiring or insufficient power supply.
- Solution: Double-check all connections and ensure the power supply meets the voltage and current requirements.
Overheating
- Cause: Prolonged operation at high current or inadequate cooling.
- Solution: Add a heatsink or fan to improve heat dissipation.
Erratic Motor Behavior
- Cause: Noise or interference in the control signals.
- Solution: Use shielded cables for control signals and ensure proper grounding.
Driver Shuts Down
- Cause: Overcurrent, overtemperature, or undervoltage protection triggered.
- Solution: Check the motor load, ensure adequate cooling, and verify the power supply voltage.
FAQs
Q: Can the SDD-30 control brushless motors?
A: No, the SDD-30 is designed for brushed DC motors only.
Q: What is the maximum PWM frequency supported?
A: The SDD-30 supports PWM frequencies up to 20 kHz.
Q: Can I use the SDD-30 with a Raspberry Pi?
A: Yes, the SDD-30 can be controlled using GPIO pins on a Raspberry Pi. Ensure proper voltage level shifting if needed.
Q: How do I reset the driver after a fault condition?
A: Remove power from the SDD-30, resolve the fault condition, and then reapply power.
This concludes the documentation for the Cytron SDD-30. For further details, refer to the official Cytron Technologies user manual.