Cirkit Designer Logo
Cirkit Designer
Your all-in-one circuit design IDE
Home / 
Component Documentation

How to Use XKC-Y26-V: Examples, Pinouts, and Specs

Image of XKC-Y26-V
Cirkit Designer LogoDesign with XKC-Y26-V in Cirkit Designer

Introduction

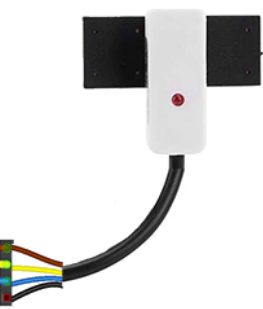
The XKC-Y26-V is a non-contact capacitive liquid level sensor manufactured by DFRobot. This sensor is designed to detect the presence or absence of liquid across a non-metallic container wall. It operates on the principle of capacitive sensing, which allows it to detect liquid levels without direct contact, thus avoiding contamination and corrosion issues associated with traditional contact-based sensors. Common applications include water level monitoring in tanks, aquariums, and industrial equipment.

Explore Projects Built with XKC-Y26-V

Use Cirkit Designer to design, explore, and prototype these projects online. Some projects support real-time simulation. Click "Open Project" to start designing instantly!
Mega2560-Controlled Automation System with Non-Contact Liquid Level Sensing and Motor Control
Image of Project_AutomaticBartender: A project utilizing XKC-Y26-V in a practical application
This circuit appears to be a complex control system centered around an Arduino Mega2560 R3 Pro microcontroller, which interfaces with multiple sensors (XKC-Y26-V non-contact liquid level sensors and an LM35 temperature sensor), servo motors, a touch display, and an IBT-2 H-Bridge motor driver for controlling a planetary gearbox motor. The system also includes a UART TTL to RS485 converter for communication, likely with the touch display, and a power management subsystem with a switching power supply, fuses, and circuit breakers for safety and voltage regulation (XL4016). The absence of embedded code suggests that the functionality of the microcontroller is not defined within the provided data.
Cirkit Designer LogoOpen Project in Cirkit Designer
Wireless Joystick-Controlled Interface with Arduino Nano and NRF24L01
Image of Transmitter 11: A project utilizing XKC-Y26-V in a practical application
This circuit features an Arduino Nano interfaced with a KY-023 Dual Axis Joystick Module for analog input, and an NRF24L01 module for wireless communication. The joystick provides x and y-axis control signals to the Arduino's analog inputs and a switch signal to a digital input, while the NRF24L01 enables the Arduino to communicate with other devices wirelessly. The 2x 18650 batteries supply power to the Arduino, which in turn powers the joystick and the NRF24L01 module.
Cirkit Designer LogoOpen Project in Cirkit Designer
Arduino Nano Controlled Joystick with NRF24L01 Wireless Communication
Image of drone remote: A project utilizing XKC-Y26-V in a practical application
This circuit features an Arduino Nano interfaced with two KY-023 Dual Axis Joystick Modules and an NRF24L01 wireless transceiver module. The joysticks provide X and Y axis inputs to the Arduino, which reads these analog signals and a button state, then transmits a message wirelessly via the NRF24L01. The circuit is likely used for remote control applications, with the Arduino processing joystick inputs and handling wireless communication to send control signals to a receiver.
Cirkit Designer LogoOpen Project in Cirkit Designer
Arduino Nano Joystick-Controlled Bluetooth Module with Battery Power
Image of padelpro transmitter: A project utilizing XKC-Y26-V in a practical application
This circuit is a wireless joystick controller that uses an Arduino Nano to read analog signals from a KY-023 Dual Axis Joystick Module and transmits the data via an HC-05 Bluetooth Module. The system is powered by a 18650 Li-Ion battery with a rocker switch for power control.
Cirkit Designer LogoOpen Project in Cirkit Designer

Explore Projects Built with XKC-Y26-V

Use Cirkit Designer to design, explore, and prototype these projects online. Some projects support real-time simulation. Click "Open Project" to start designing instantly!
Image of Project_AutomaticBartender: A project utilizing XKC-Y26-V in a practical application
Mega2560-Controlled Automation System with Non-Contact Liquid Level Sensing and Motor Control
This circuit appears to be a complex control system centered around an Arduino Mega2560 R3 Pro microcontroller, which interfaces with multiple sensors (XKC-Y26-V non-contact liquid level sensors and an LM35 temperature sensor), servo motors, a touch display, and an IBT-2 H-Bridge motor driver for controlling a planetary gearbox motor. The system also includes a UART TTL to RS485 converter for communication, likely with the touch display, and a power management subsystem with a switching power supply, fuses, and circuit breakers for safety and voltage regulation (XL4016). The absence of embedded code suggests that the functionality of the microcontroller is not defined within the provided data.
Cirkit Designer LogoOpen Project in Cirkit Designer
Image of Transmitter 11: A project utilizing XKC-Y26-V in a practical application
Wireless Joystick-Controlled Interface with Arduino Nano and NRF24L01
This circuit features an Arduino Nano interfaced with a KY-023 Dual Axis Joystick Module for analog input, and an NRF24L01 module for wireless communication. The joystick provides x and y-axis control signals to the Arduino's analog inputs and a switch signal to a digital input, while the NRF24L01 enables the Arduino to communicate with other devices wirelessly. The 2x 18650 batteries supply power to the Arduino, which in turn powers the joystick and the NRF24L01 module.
Cirkit Designer LogoOpen Project in Cirkit Designer
Image of drone remote: A project utilizing XKC-Y26-V in a practical application
Arduino Nano Controlled Joystick with NRF24L01 Wireless Communication
This circuit features an Arduino Nano interfaced with two KY-023 Dual Axis Joystick Modules and an NRF24L01 wireless transceiver module. The joysticks provide X and Y axis inputs to the Arduino, which reads these analog signals and a button state, then transmits a message wirelessly via the NRF24L01. The circuit is likely used for remote control applications, with the Arduino processing joystick inputs and handling wireless communication to send control signals to a receiver.
Cirkit Designer LogoOpen Project in Cirkit Designer
Image of padelpro transmitter: A project utilizing XKC-Y26-V in a practical application
Arduino Nano Joystick-Controlled Bluetooth Module with Battery Power
This circuit is a wireless joystick controller that uses an Arduino Nano to read analog signals from a KY-023 Dual Axis Joystick Module and transmits the data via an HC-05 Bluetooth Module. The system is powered by a 18650 Li-Ion battery with a rocker switch for power control.
Cirkit Designer LogoOpen Project in Cirkit Designer

Technical Specifications

General Specifications:

  • Operating Voltage: 5V to 24V DC
  • Output Voltage (High Level): >4.5V
  • Output Voltage (Low Level): <0.5V
  • Current Consumption: 5mA
  • Detection Thickness (Container Wall): 0 to 13mm
  • Operating Temperature: -20°C to 105°C
  • Output Type: Digital signal (high/low level)
  • Material: ABS
  • Waterproof Grade: IP67

Pin Configuration and Descriptions:

Pin Number Description Notes
1 VCC Connect to 5V to 24V DC
2 GND Connect to ground
3 Signal Output (OUT) Digital output (high/low level)

Usage Instructions

Integration with a Circuit:

  1. Connect the VCC pin to a power supply ranging from 5V to 24V DC.
  2. Connect the GND pin to the ground of the power supply.
  3. Connect the Signal Output pin to a digital input pin on a microcontroller, such as an Arduino UNO.

Best Practices:

  • Ensure that the container wall thickness is within the sensor's detection range (0 to 13mm).
  • Avoid placing the sensor near materials that can affect its capacitance, such as metals or conductive liquids.
  • Keep the sensor away from high-temperature sources to prevent damage.
  • For outdoor applications, ensure that the sensor's IP67 waterproof rating is maintained.

Example Code for Arduino UNO

// Define the pin connected to the sensor's output
const int liquidLevelPin = 2; 

void setup() {
  pinMode(liquidLevelPin, INPUT); // Set the liquid level pin as an input
  Serial.begin(9600);             // Start serial communication at 9600 baud
}

void loop() {
  int sensorState = digitalRead(liquidLevelPin); // Read the sensor output
  if (sensorState == HIGH) {
    Serial.println("Liquid detected!"); // Liquid level is high
  } else {
    Serial.println("No liquid detected."); // Liquid level is low
  }
  delay(1000); // Wait for 1 second before reading again
}

Troubleshooting and FAQs

Common Issues:

  • Sensor not responding: Ensure that the sensor is properly powered and the pins are correctly connected.
  • Inaccurate readings: Verify that the container wall thickness is within the specified range and that there are no conductive materials nearby.
  • Intermittent signals: Check for any water or moisture on the sensor that might be affecting its operation.

FAQs:

Q: Can the sensor detect any type of liquid? A: The sensor is designed to detect most types of liquids, but its performance may vary with different dielectric constants.

Q: Is the sensor safe to use with corrosive liquids? A: Yes, as a non-contact sensor, it does not come into direct contact with the liquid, making it suitable for use with corrosive substances.

Q: Can the sensor detect liquid through any material? A: The sensor can detect liquid through non-metallic materials such as plastic or glass, within the specified thickness range.

For further assistance, please contact DFRobot's technical support.