
How to Use PS2 Controller: Examples, Pinouts, and Specs
 Design with PS2 Controller in Cirkit Designer
Introduction
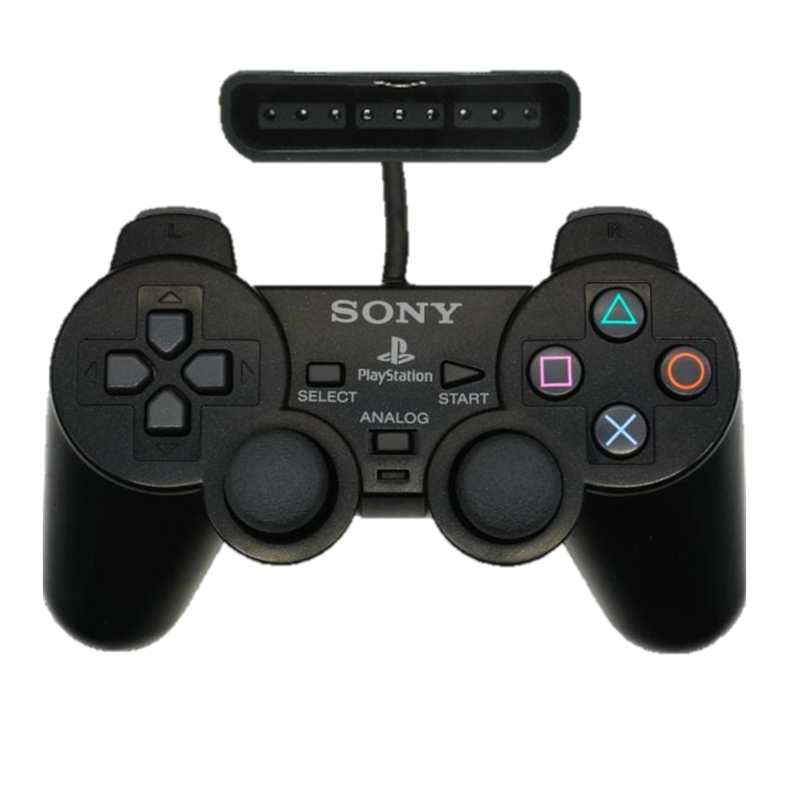
The Analog PS2 Controller by Sony is a versatile game controller designed for the PlayStation 2 console. It features both digital and analog input systems, dual vibration feedback motors, and an ergonomic design for comfortable gaming. The controller is widely used not only for gaming but also in DIY electronics projects, robotics, and other applications where precise input control is required.
Explore Projects Built with PS2 Controller
 Open Project in Cirkit Designer
 Open Project in Cirkit Designer
 Open Project in Cirkit Designer
 Open Project in Cirkit Designer
Explore Projects Built with PS2 Controller
Open Project in Cirkit DesignerOpen Project in Cirkit DesignerOpen Project in Cirkit DesignerOpen Project in Cirkit DesignerCommon Applications and Use Cases
- Gaming on PlayStation 2 consoles
- Robotics and remote-controlled systems
- DIY electronics projects requiring joystick or button inputs
- Simulators and custom control systems
Technical Specifications
Key Technical Details
| Parameter | Specification |
|---|---|
| Manufacturer | Sony |
| Part ID | Analog PS2 Controller |
| Communication Protocol | Serial (SPI-like protocol) |
| Operating Voltage | 3.3V to 5V |
| Current Consumption | ~5mA (idle), ~15mA (with vibration) |
| Number of Buttons | 12 (including D-pad and action buttons) |
| Analog Sticks | 2 (X and Y axes for each stick) |
| Vibration Feedback | Dual motors for haptic feedback |
| Connector Type | Proprietary PS2 connector |
Pin Configuration and Descriptions
The PS2 controller uses a proprietary connector with the following pinout:
| Pin Number | Name | Description |
|---|---|---|
| 1 | DATA | Serial data output from the controller |
| 2 | CMD | Serial command input to the controller |
| 3 | ATT (SEL) | Attention signal (chip select) |
| 4 | CLK | Clock signal for serial communication |
| 5 | VCC | Power supply (3.3V to 5V) |
| 6 | GND | Ground |
| 7 | N/C | Not connected |
| 8 | N/C | Not connected |
Usage Instructions
How to Use the PS2 Controller in a Circuit
- Power Supply: Connect the VCC pin to a 3.3V or 5V power source and the GND pin to ground.
- Communication: Use the DATA, CMD, ATT (SEL), and CLK pins to establish serial communication with a microcontroller or other host device.
- Initialization: The controller requires specific initialization commands to enter analog mode and enable vibration feedback.
- Reading Inputs: Poll the controller to read button states and analog stick positions. Button states are typically represented as binary values, while analog stick positions are represented as 8-bit values (0-255).
Important Considerations and Best Practices
- Voltage Levels: Ensure the voltage levels on the communication pins match the controller's operating voltage (3.3V or 5V).
- Pull-Up Resistors: Use pull-up resistors on the communication lines if necessary to ensure reliable signal transmission.
- Timing: Follow the timing requirements of the serial protocol to avoid communication errors.
- Connector: Use a compatible PS2 connector or adapter to interface with the controller.
Example: Connecting to an Arduino UNO
Below is an example of how to connect and use the PS2 controller with an Arduino UNO:
Wiring Diagram
| PS2 Controller Pin | Arduino UNO Pin |
|---|---|
| DATA | Pin 12 |
| CMD | Pin 11 |
| ATT (SEL) | Pin 10 |
| CLK | Pin 13 |
| VCC | 5V |
| GND | GND |
Arduino Code Example
#include <PS2X_lib.h> // Include the PS2X library for PS2 controller

PS2X ps2x; // Create PS2X object

// Pin definitions for PS2 controller
#define PS2_DAT 12  // DATA pin
#define PS2_CMD 11  // CMD pin
#define PS2_SEL 10  // ATT (SEL) pin
#define PS2_CLK 13  // CLK pin

void setup() {
  Serial.begin(9600); // Initialize serial communication for debugging

  // Initialize PS2 controller
  int error = ps2x.config_gamepad(PS2_CLK, PS2_CMD, PS2_SEL, PS2_DAT, true, true);

  if (error == 0) {
    Serial.println("PS2 Controller successfully connected!");
  } else {
    Serial.print("Error connecting PS2 Controller: ");
    Serial.println(error);
  }
}

void loop() {
  ps2x.read_gamepad(false, 0); // Read controller inputs

  // Example: Check if the X button is pressed
  if (ps2x.Button(PSB_CROSS)) {
    Serial.println("X Button Pressed!");
  }

  // Example: Read left analog stick X-axis value
  int leftStickX = ps2x.Analog(PSS_LX);
  Serial.print("Left Stick X: ");
  Serial.println(leftStickX);

  delay(100); // Small delay for stability
}
Troubleshooting and FAQs
Common Issues and Solutions
Controller Not Responding:
- Ensure the wiring is correct and matches the pinout table.
- Verify that the power supply voltage is within the specified range (3.3V to 5V).
- Check for loose connections or damaged cables.
Incorrect or No Data Received:
- Confirm that the clock signal (CLK) is being generated correctly.
- Ensure the microcontroller's SPI settings match the PS2 controller's protocol.
- Use pull-up resistors on the communication lines if necessary.
Vibration Feedback Not Working:
- Ensure the controller is in analog mode.
- Verify that the initialization commands include enabling vibration feedback.
FAQs
Q: Can the PS2 controller be used with 3.3V microcontrollers?
A: Yes, the PS2 controller operates at both 3.3V and 5V. Ensure the communication lines are at the same voltage level as the microcontroller.
Q: How do I enable analog mode?
A: Analog mode is enabled by sending specific initialization commands to the controller. Libraries like PS2X handle this automatically.
Q: Can I use the PS2 controller for non-gaming applications?
A: Absolutely! The PS2 controller is popular in robotics, DIY projects, and custom control systems due to its precise input capabilities.
Q: What is the maximum cable length for reliable communication?
A: The maximum cable length depends on the quality of the cable and the environment, but it is generally recommended to keep it under 2 meters for reliable operation.