
How to Use Battery 7.4V: Examples, Pinouts, and Specs
 Design with Battery 7.4V in Cirkit Designer
Introduction
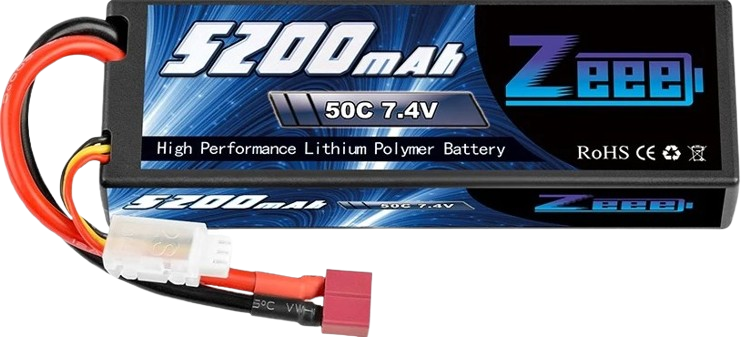
The Battery 7.4V by Zeee (Manufacturer Part ID: Battery) is a rechargeable lithium-ion battery designed to deliver a nominal voltage of 7.4 volts. Known for its high energy density, lightweight design, and reliable performance, this battery is widely used in portable electronics, remote-controlled (RC) vehicles, drones, and other applications requiring a compact and efficient power source. Its rechargeable nature makes it an environmentally friendly and cost-effective choice for long-term use.
Explore Projects Built with Battery 7.4V
 Open Project in Cirkit Designer
 Open Project in Cirkit Designer
 Open Project in Cirkit Designer
 Open Project in Cirkit Designer
Explore Projects Built with Battery 7.4V
Open Project in Cirkit DesignerOpen Project in Cirkit DesignerOpen Project in Cirkit DesignerOpen Project in Cirkit DesignerCommon Applications
- Remote-controlled (RC) vehicles, drones, and airplanes
- Portable electronic devices (e.g., cameras, handheld tools)
- Robotics and DIY electronics projects
- Backup power supplies for small systems
Technical Specifications
The following table outlines the key technical details of the Battery 7.4V:
| Parameter | Specification |
|---|---|
| Nominal Voltage | 7.4V |
| Battery Type | Lithium-ion (Li-ion) |
| Capacity (Typical) | 2000mAh to 5000mAh (varies by model) |
| Maximum Discharge Rate | 25C to 50C (depending on model) |
| Charging Voltage | 8.4V (maximum) |
| Charging Current | 1C (recommended) |
| Operating Temperature | -20°C to 60°C |
| Weight | ~100g to 200g (varies by capacity) |
| Dimensions | Varies by model (e.g., 100mm x 35mm x 20mm) |
Pin Configuration and Descriptions
The Battery 7.4V typically comes with two main connectors: a power connector and a balance connector. The pin configuration is as follows:
Power Connector (e.g., XT60, T-Plug, or JST)
| Pin | Description |
|---|---|
| + | Positive terminal (+) |
| - | Negative terminal (-) |
Balance Connector (e.g., JST-XH)
| Pin | Description |
|---|---|
| 1 | Negative terminal of Cell 1 |
| 2 | Connection between Cell 1 and Cell 2 |
| 3 | Positive terminal of Cell 2 |
Note: The exact connector type and pin configuration may vary depending on the specific model of the battery. Always refer to the product datasheet for precise details.
Usage Instructions
How to Use the Battery in a Circuit
- Connect the Power Connector: Use the main power connector (e.g., XT60 or JST) to supply power to your circuit or device. Ensure proper polarity to avoid damage.
- Balance Charging: When charging the battery, connect the balance connector to a compatible Li-ion balance charger. This ensures that all cells are charged evenly, prolonging battery life.
- Voltage Monitoring: Use a voltage monitor or battery management system (BMS) to prevent over-discharge (below 6.0V) or overcharge (above 8.4V).
Important Considerations and Best Practices
- Charging: Always use a charger specifically designed for 7.4V Li-ion batteries. Set the charging current to 1C (e.g., 2A for a 2000mAh battery).
- Storage: Store the battery at a voltage of approximately 7.6V (50% charge) in a cool, dry place to maximize lifespan.
- Safety: Avoid puncturing, short-circuiting, or exposing the battery to fire or water. Use a fireproof bag when charging.
- Polarity: Double-check the polarity of the connectors before connecting the battery to a circuit or charger.
Example: Using the Battery with an Arduino UNO
The Battery 7.4V can be used to power an Arduino UNO via the VIN pin. Below is an example circuit and code:
Circuit Connection
- Connect the positive terminal of the battery to the VIN pin of the Arduino UNO.
- Connect the negative terminal of the battery to the GND pin of the Arduino UNO.
- Optionally, use a voltage monitor to ensure the battery voltage does not drop below 6.0V.
Sample Code
// Example code to blink an LED using Arduino UNO powered by a 7.4V battery

const int ledPin = 13; // Pin connected to the onboard LED

void setup() {
  pinMode(ledPin, OUTPUT); // Set the LED pin as an output
}

void loop() {
  digitalWrite(ledPin, HIGH); // Turn the LED on
  delay(1000);                // Wait for 1 second
  digitalWrite(ledPin, LOW);  // Turn the LED off
  delay(1000);                // Wait for 1 second
}
Warning: Ensure the Arduino's onboard voltage regulator can handle the input voltage from the battery. The VIN pin accepts 7-12V, so the 7.4V battery is within the safe range.
Troubleshooting and FAQs
Common Issues
Battery Not Charging
- Cause: Incorrect charger or damaged balance connector.
- Solution: Verify that the charger is compatible with 7.4V Li-ion batteries. Inspect the connectors for damage.
Device Not Powering On
- Cause: Battery voltage too low or incorrect polarity.
- Solution: Check the battery voltage with a multimeter. Recharge if below 6.0V. Ensure correct polarity when connecting.
Battery Overheating
- Cause: Overcharging, excessive discharge rate, or short circuit.
- Solution: Use a charger with overcharge protection. Ensure the load does not exceed the battery's discharge rating.
Reduced Battery Life
- Cause: Frequent deep discharges or improper storage.
- Solution: Avoid discharging below 6.0V. Store the battery at 50% charge in a cool, dry place.
FAQs
Q: Can I use this battery for a 12V device?
A: No, the nominal voltage of this battery is 7.4V, which is insufficient for most 12V devices. Consider using a step-up converter if necessary.
Q: How long does it take to charge the battery?
A: Charging time depends on the battery capacity and charging current. For example, a 2000mAh battery charged at 2A (1C) will take approximately 1 hour.
Q: Is it safe to leave the battery connected to the charger?
A: No, always disconnect the battery once fully charged to prevent overcharging and potential damage.
Q: Can I use this battery in parallel or series configurations?
A: Yes, but ensure proper balancing and use a battery management system (BMS) to prevent overcharging or over-discharging in multi-cell setups.
By following these guidelines, you can safely and effectively use the Battery 7.4V in your projects and devices.