How to Use Adafruit BQ24074 Solar-DC-USB Lipo Charger: Examples, Pinouts, and Specs
Introduction
The Adafruit BQ24074 Solar-DC-USB Lipo Charger is a versatile charging module designed for lithium polymer (LiPo) batteries. It supports charging via solar panels, DC power sources, or USB connections, making it ideal for portable and renewable energy projects. This module features built-in battery management, overcharge protection, and status indicators, ensuring safe and efficient power management.
Explore Projects Built with Adafruit BQ24074 Solar-DC-USB Lipo Charger
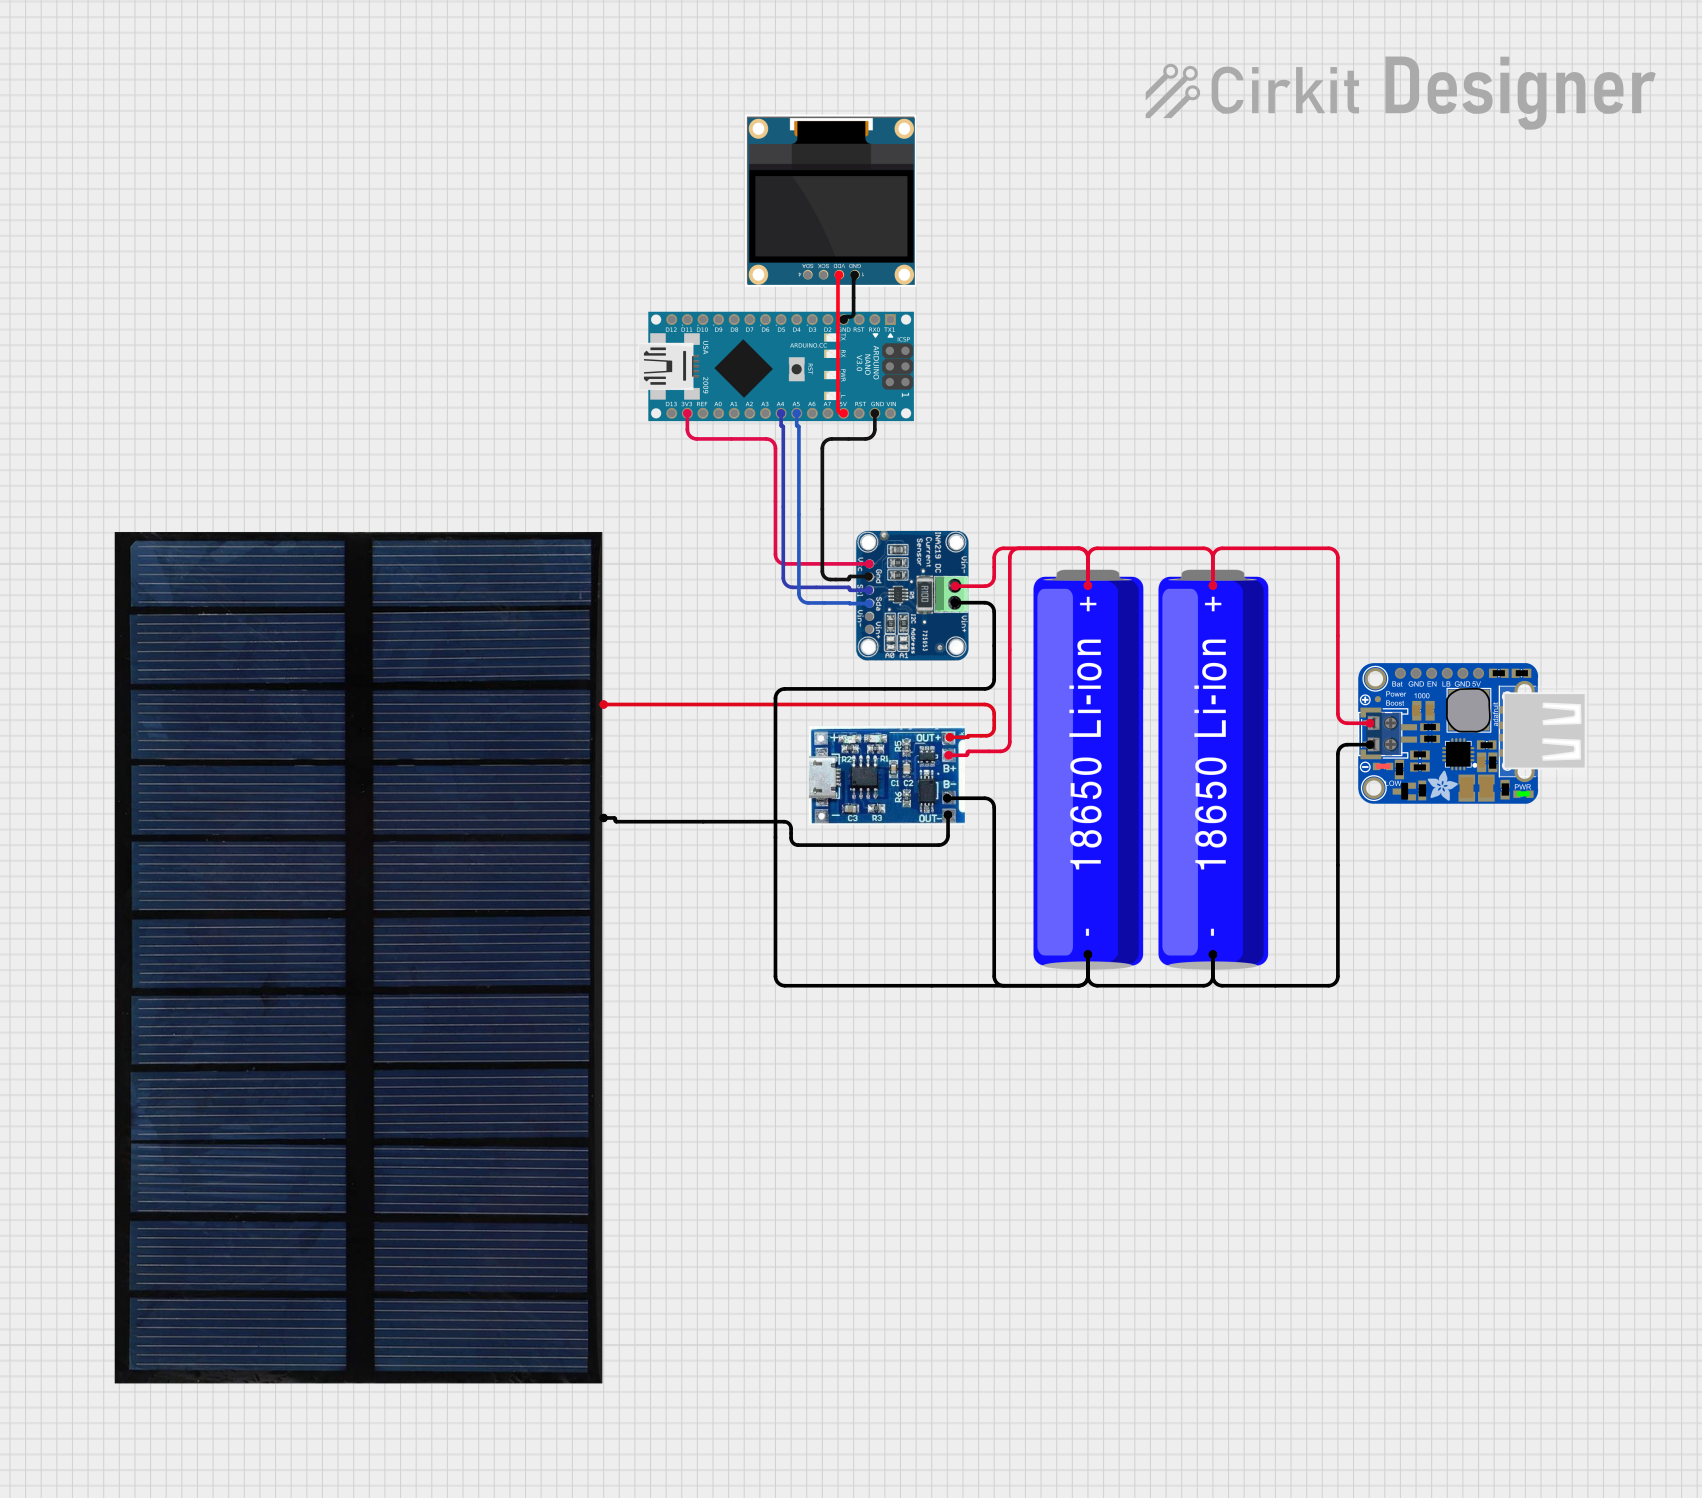
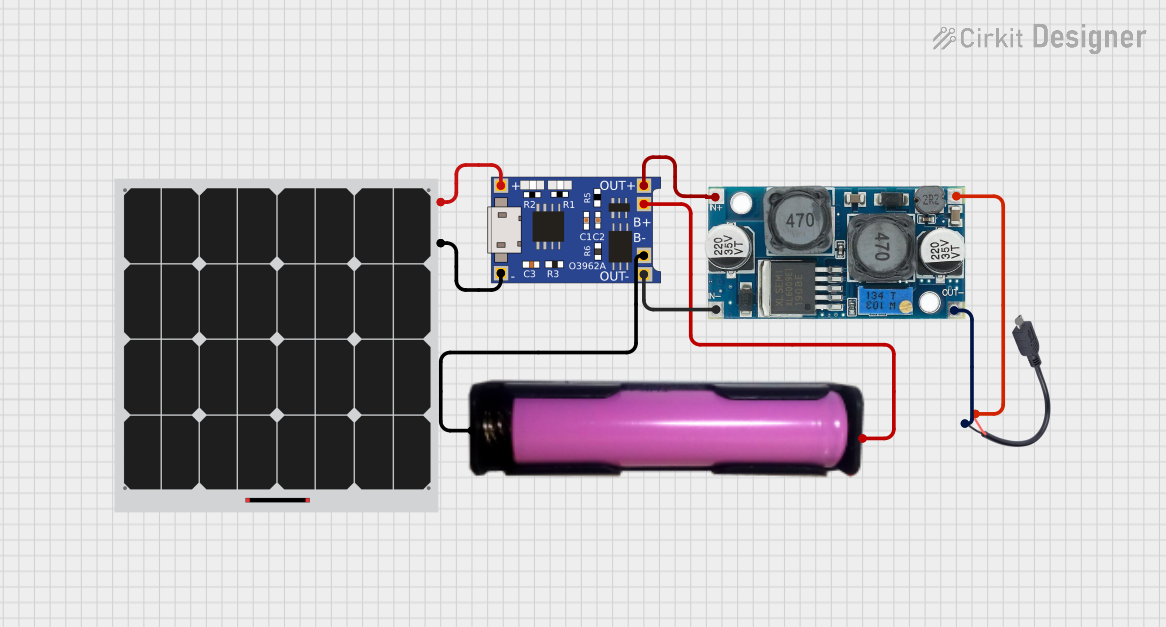

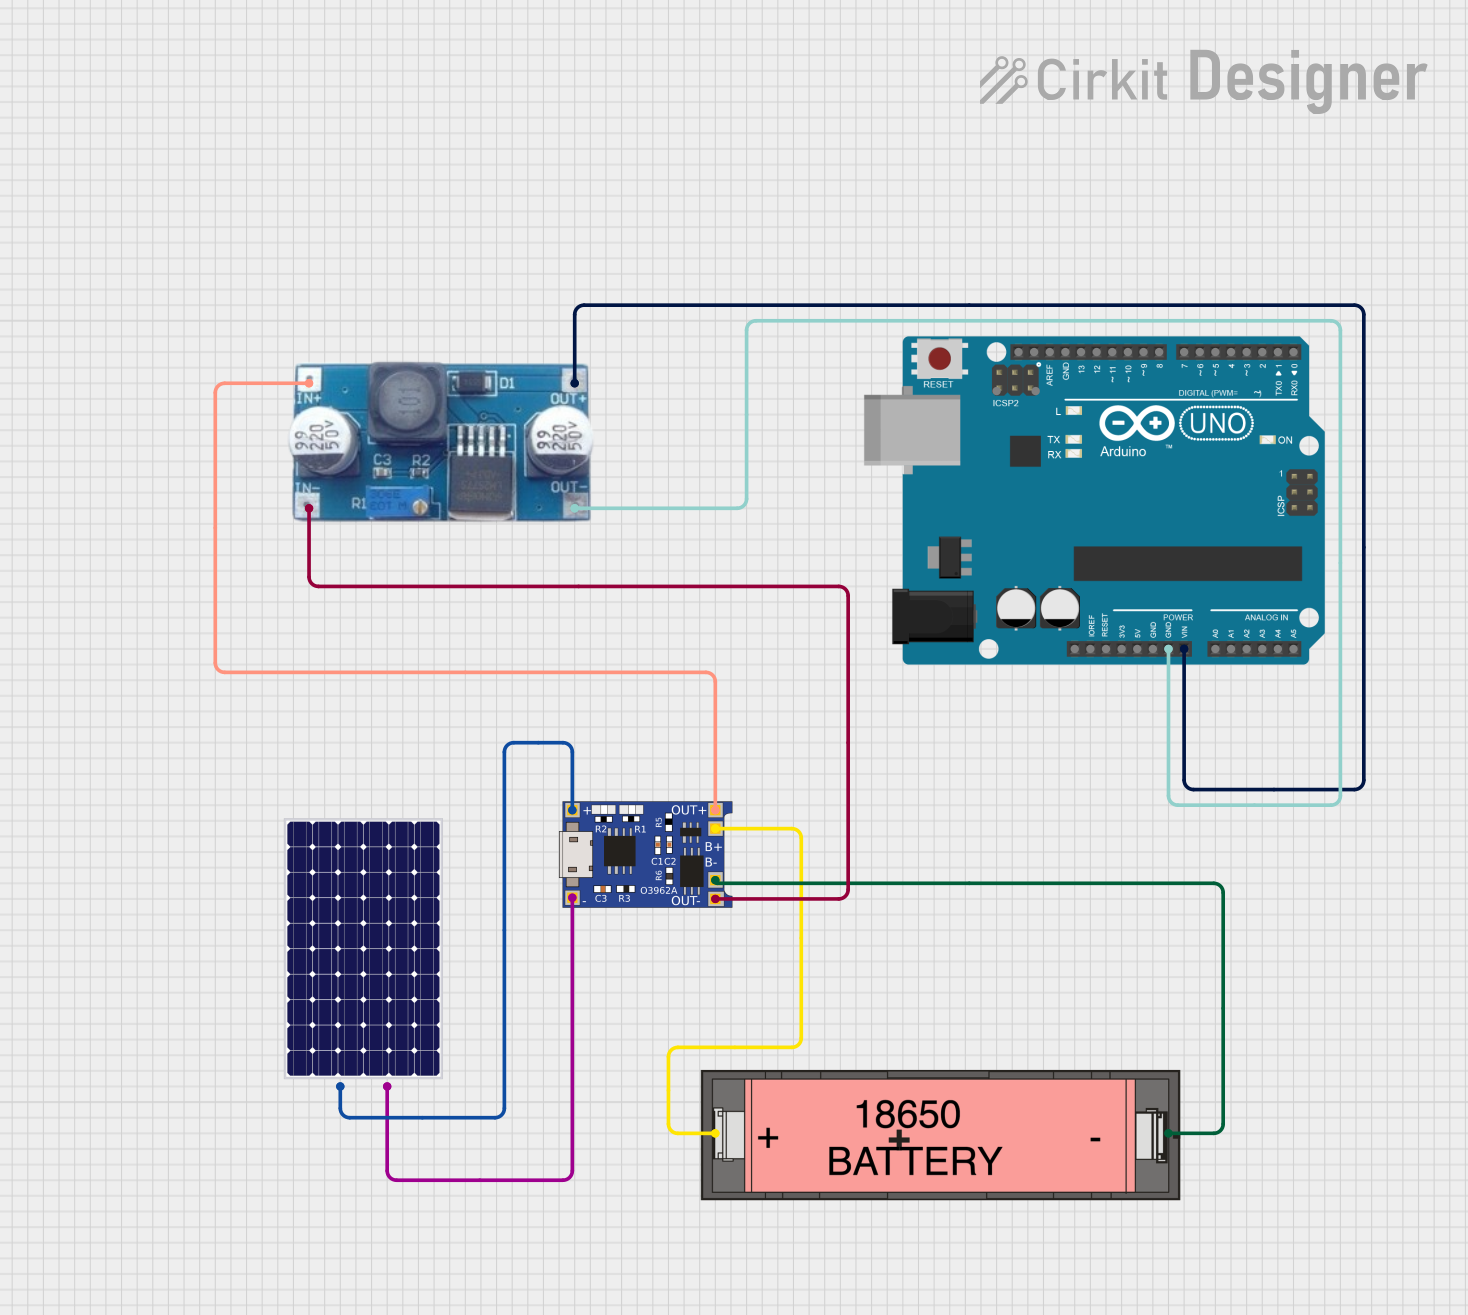
Explore Projects Built with Adafruit BQ24074 Solar-DC-USB Lipo Charger
Common Applications and Use Cases
- Solar-powered IoT devices
- Portable battery-powered projects
- Wearable electronics
- Backup power systems
- Renewable energy experiments
Technical Specifications
Below are the key technical details of the Adafruit BQ24074 Solar-DC-USB Lipo Charger:
| Parameter | Value |
|---|---|
| Input Voltage Range | 4.4V to 6.2V |
| Recommended Solar Panel | 6V, 1W to 2W |
| Battery Charging Voltage | 4.2V (LiPo standard) |
| Maximum Charge Current | 1.5A |
| Input Current Limit | 1.5A (adjustable via resistor) |
| Operating Temperature Range | -40°C to +85°C |
| Status Indicators | LEDs for Power, Charging, and Done |
| Dimensions | 25mm x 25mm x 4mm |
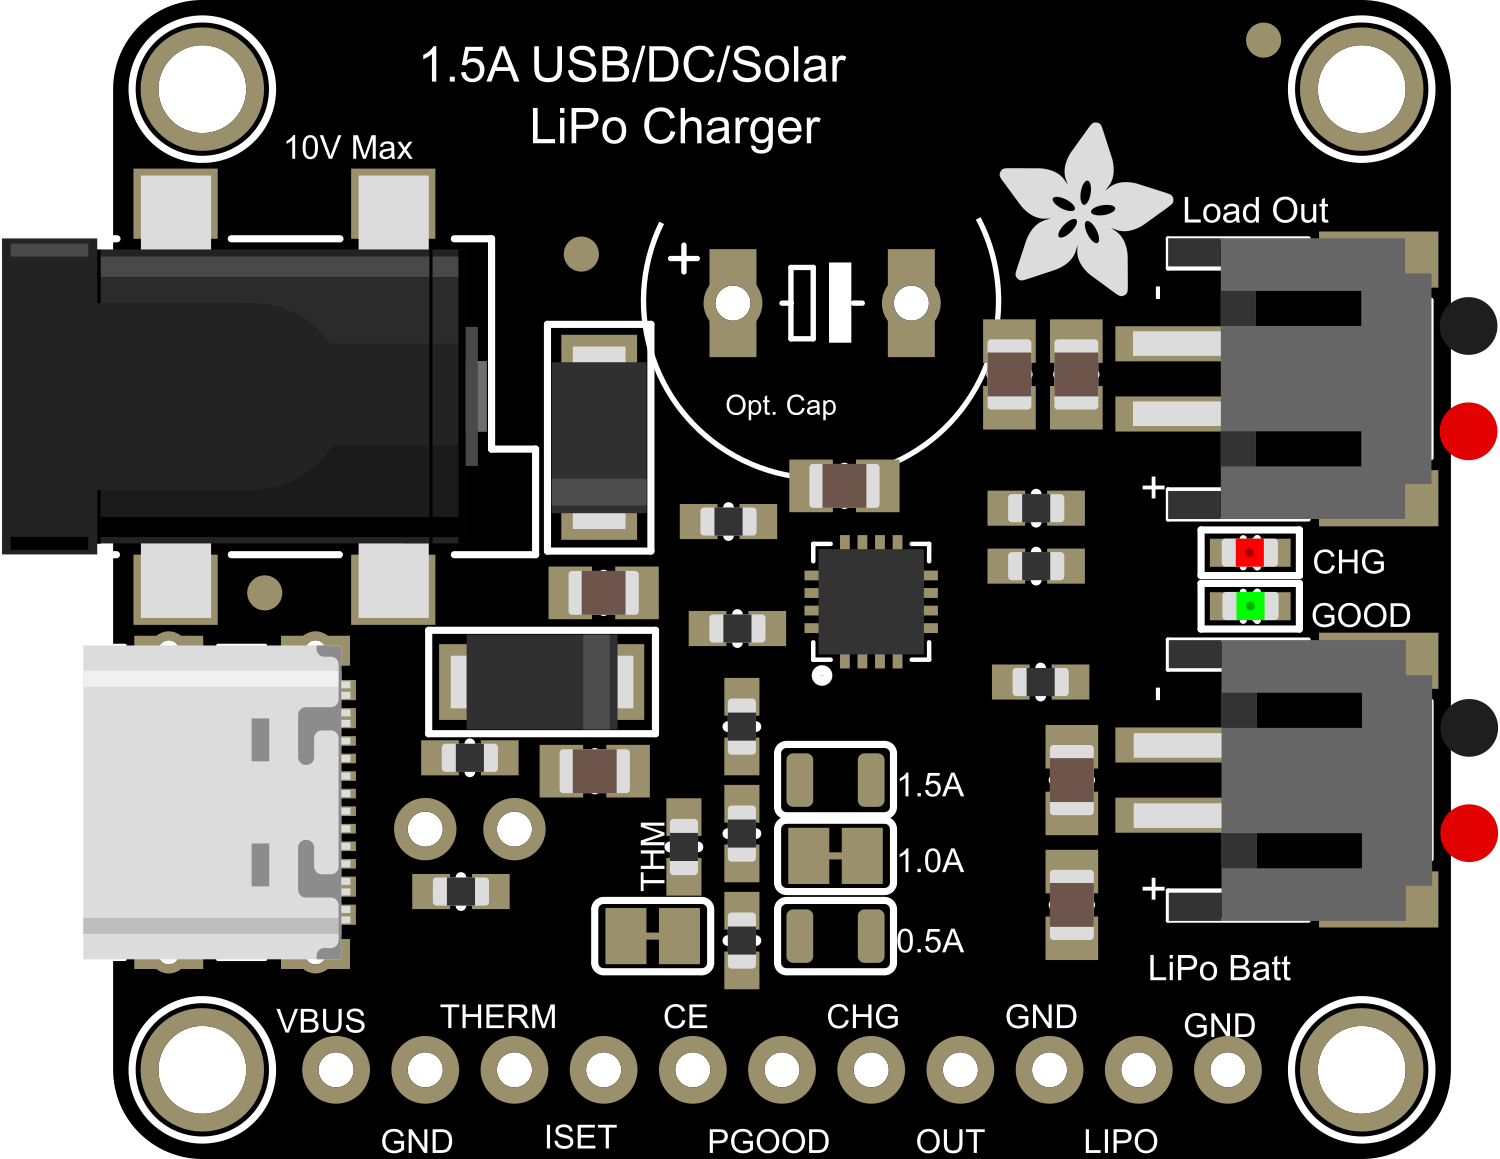
Pin Configuration and Descriptions
The Adafruit BQ24074 module has the following pinout:
| Pin Name | Type | Description |
|---|---|---|
| VIN | Input | Main power input (4.4V to 6.2V). Connect to a solar panel, USB, or DC power. |
| GND | Ground | Ground connection for the circuit. |
| BAT | Input/Output | Battery connection. Connect to a single-cell LiPo battery. |
| LOAD | Output | Regulated output for powering your circuit. |
| EN | Input | Enable pin. Pull low to disable the LOAD output. |
| PG (Power Good) | Output | Open-drain output. Low when power is good at VIN. |
| CHG (Charging) | Output | Open-drain output. Low when the battery is charging. |
| DONE | Output | Open-drain output. Low when charging is complete. |
Usage Instructions
How to Use the Component in a Circuit
Connect the Power Source:
- Attach a 6V solar panel, USB power source, or DC power supply to the
VINpin. - Ensure the input voltage is within the range of 4.4V to 6.2V.
- Attach a 6V solar panel, USB power source, or DC power supply to the
Connect the Battery:
- Attach a single-cell LiPo battery to the
BATpin. - Ensure the battery is compatible with a 4.2V charging voltage.
- Attach a single-cell LiPo battery to the
Connect the Load:
- Connect your circuit or device to the
LOADpin. - The module will regulate the output voltage to power your device.
- Connect your circuit or device to the
Monitor Status Indicators:
- Use the
CHGandDONEpins or onboard LEDs to monitor the charging status. - The
PGpin can be used to check if the input power is good.
- Use the
Optional Configuration:
- Adjust the input current limit by changing the resistor on the module (refer to the datasheet for details).
- Use the
ENpin to enable or disable theLOADoutput as needed.
Important Considerations and Best Practices
- Solar Panel Selection: Use a 6V solar panel with a power rating between 1W and 2W for optimal performance.
- Heat Dissipation: Ensure proper ventilation or heat sinking if the module operates at high currents.
- Battery Safety: Only use single-cell LiPo batteries with built-in protection circuits to prevent over-discharge.
- Input Voltage: Avoid exceeding the maximum input voltage of 6.2V to prevent damage to the module.
- Load Current: Ensure the load current does not exceed the module's maximum output capability.
Example: Using with an Arduino UNO
The Adafruit BQ24074 can be used to power an Arduino UNO via the LOAD pin. Below is an example of how to monitor the charging status using the Arduino:
// Pin definitions for the BQ24074 status outputs
const int CHG_PIN = 2;  // CHG pin connected to Arduino digital pin 2
const int DONE_PIN = 3; // DONE pin connected to Arduino digital pin 3

void setup() {
  pinMode(CHG_PIN, INPUT);  // Set CHG pin as input
  pinMode(DONE_PIN, INPUT); // Set DONE pin as input
  Serial.begin(9600);       // Initialize serial communication
}

void loop() {
  int chargingStatus = digitalRead(CHG_PIN); // Read CHG pin status
  int doneStatus = digitalRead(DONE_PIN);   // Read DONE pin status

  if (chargingStatus == LOW) {
    Serial.println("Battery is charging...");
  } else if (doneStatus == LOW) {
    Serial.println("Battery charging is complete.");
  } else {
    Serial.println("No charging activity detected.");
  }

  delay(1000); // Wait for 1 second before checking again
}
Troubleshooting and FAQs
Common Issues and Solutions
Module Overheating:
- Cause: High input current or insufficient ventilation.
- Solution: Reduce the input current limit or improve airflow around the module.
Battery Not Charging:
- Cause: Incorrect battery connection or incompatible battery.
- Solution: Verify the battery polarity and ensure it is a single-cell LiPo battery.
No Output on LOAD Pin:
- Cause:
ENpin is pulled low or no input power. - Solution: Check the
ENpin state and ensure a valid power source is connected.
- Cause:
Status LEDs Not Working:
- Cause: Faulty connections or damaged module.
- Solution: Inspect solder joints and verify connections. Replace the module if necessary.
FAQs
Can I use a higher voltage solar panel?
No, the input voltage must not exceed 6.2V to avoid damaging the module.What happens if the battery is fully charged?
The module will stop charging and theDONELED will light up, indicating the battery is full.Can I power my circuit without a battery connected?
Yes, the module can power your circuit directly from the input source via theLOADpin.How do I adjust the charging current?
The charging current can be adjusted by changing the onboard resistor. Refer to the datasheet for resistor values and corresponding current limits.