Cirkit Designer Logo
Cirkit Designer
Your all-in-one circuit design IDE
Home / 
Component Documentation

How to Use AC/DC Voeding 12v: Examples, Pinouts, and Specs

Image of AC/DC Voeding 12v
Cirkit Designer LogoDesign with AC/DC Voeding 12v in Cirkit Designer

Introduction

The Selec RPS60-12-CE is a reliable AC/DC power supply designed to convert alternating current (AC) from the mains into a stable 12-volt direct current (DC) output. This component is widely used in powering electronic devices, industrial control systems, LED lighting, and other low-voltage applications. Its compact design and robust performance make it suitable for both professional and hobbyist projects.

Explore Projects Built with AC/DC Voeding 12v

Use Cirkit Designer to design, explore, and prototype these projects online. Some projects support real-time simulation. Click "Open Project" to start designing instantly!
240V to 12V Power Conversion Circuit with Stopkontak
Image of daya PLN: A project utilizing AC/DC Voeding 12v in a practical application
This circuit converts a 240V AC power source to a 12V DC output using a 12V adapter. The 240V AC power source is connected to a stopkontak, which then supplies the 12V adapter with the necessary AC voltage to produce a 12V DC output.
Cirkit Designer LogoOpen Project in Cirkit Designer
12V UPS System with Dual 18650 Li-ion Battery Backup and Voltage Regulation
Image of Power supply: A project utilizing AC/DC Voeding 12v in a practical application
This circuit is designed to provide an uninterruptible power supply (UPS) system with a 12V DC output. It includes a 12V 5A power supply connected to an AC source through a toggle switch, which charges a pair of 18650 Li-ion batteries via a voltage regulator (XL4016). The UPS module ensures a continuous power supply to the load by switching between the power supply and the battery bank.
Cirkit Designer LogoOpen Project in Cirkit Designer
AC to DC Power Supply with Transformer and Bridge Rectifier
Image of BRIDGE RECTIFIER: A project utilizing AC/DC Voeding 12v in a practical application
This circuit is a basic AC to DC power supply that steps down 220V AC to a lower voltage using a transformer, rectifies it to DC using a bridge rectifier made of diodes, and smooths the output with an electrolytic capacitor. A rocker switch is used to turn the power supply on and off.
Cirkit Designer LogoOpen Project in Cirkit Designer
220V to 12V LED Strip Lighting System
Image of Effect of light on plant growth: A project utilizing AC/DC Voeding 12v in a practical application
This circuit consists of a 220V AC power source connected to an AC-to-DC converter, which steps down the voltage to 12V DC to power a series of three 12V white LED strips. The LED strips are connected in parallel to the output of the converter, sharing a common ground. The circuit is designed to convert household AC voltage to a lower DC voltage suitable for powering LED lighting.
Cirkit Designer LogoOpen Project in Cirkit Designer

Explore Projects Built with AC/DC Voeding 12v

Use Cirkit Designer to design, explore, and prototype these projects online. Some projects support real-time simulation. Click "Open Project" to start designing instantly!
Image of daya PLN: A project utilizing AC/DC Voeding 12v in a practical application
240V to 12V Power Conversion Circuit with Stopkontak
This circuit converts a 240V AC power source to a 12V DC output using a 12V adapter. The 240V AC power source is connected to a stopkontak, which then supplies the 12V adapter with the necessary AC voltage to produce a 12V DC output.
Cirkit Designer LogoOpen Project in Cirkit Designer
Image of Power supply: A project utilizing AC/DC Voeding 12v in a practical application
12V UPS System with Dual 18650 Li-ion Battery Backup and Voltage Regulation
This circuit is designed to provide an uninterruptible power supply (UPS) system with a 12V DC output. It includes a 12V 5A power supply connected to an AC source through a toggle switch, which charges a pair of 18650 Li-ion batteries via a voltage regulator (XL4016). The UPS module ensures a continuous power supply to the load by switching between the power supply and the battery bank.
Cirkit Designer LogoOpen Project in Cirkit Designer
Image of BRIDGE RECTIFIER: A project utilizing AC/DC Voeding 12v in a practical application
AC to DC Power Supply with Transformer and Bridge Rectifier
This circuit is a basic AC to DC power supply that steps down 220V AC to a lower voltage using a transformer, rectifies it to DC using a bridge rectifier made of diodes, and smooths the output with an electrolytic capacitor. A rocker switch is used to turn the power supply on and off.
Cirkit Designer LogoOpen Project in Cirkit Designer
Image of Effect of light on plant growth: A project utilizing AC/DC Voeding 12v in a practical application
220V to 12V LED Strip Lighting System
This circuit consists of a 220V AC power source connected to an AC-to-DC converter, which steps down the voltage to 12V DC to power a series of three 12V white LED strips. The LED strips are connected in parallel to the output of the converter, sharing a common ground. The circuit is designed to convert household AC voltage to a lower DC voltage suitable for powering LED lighting.
Cirkit Designer LogoOpen Project in Cirkit Designer

Common Applications

  • Powering microcontrollers, sensors, and other electronic modules
  • Industrial automation and control systems
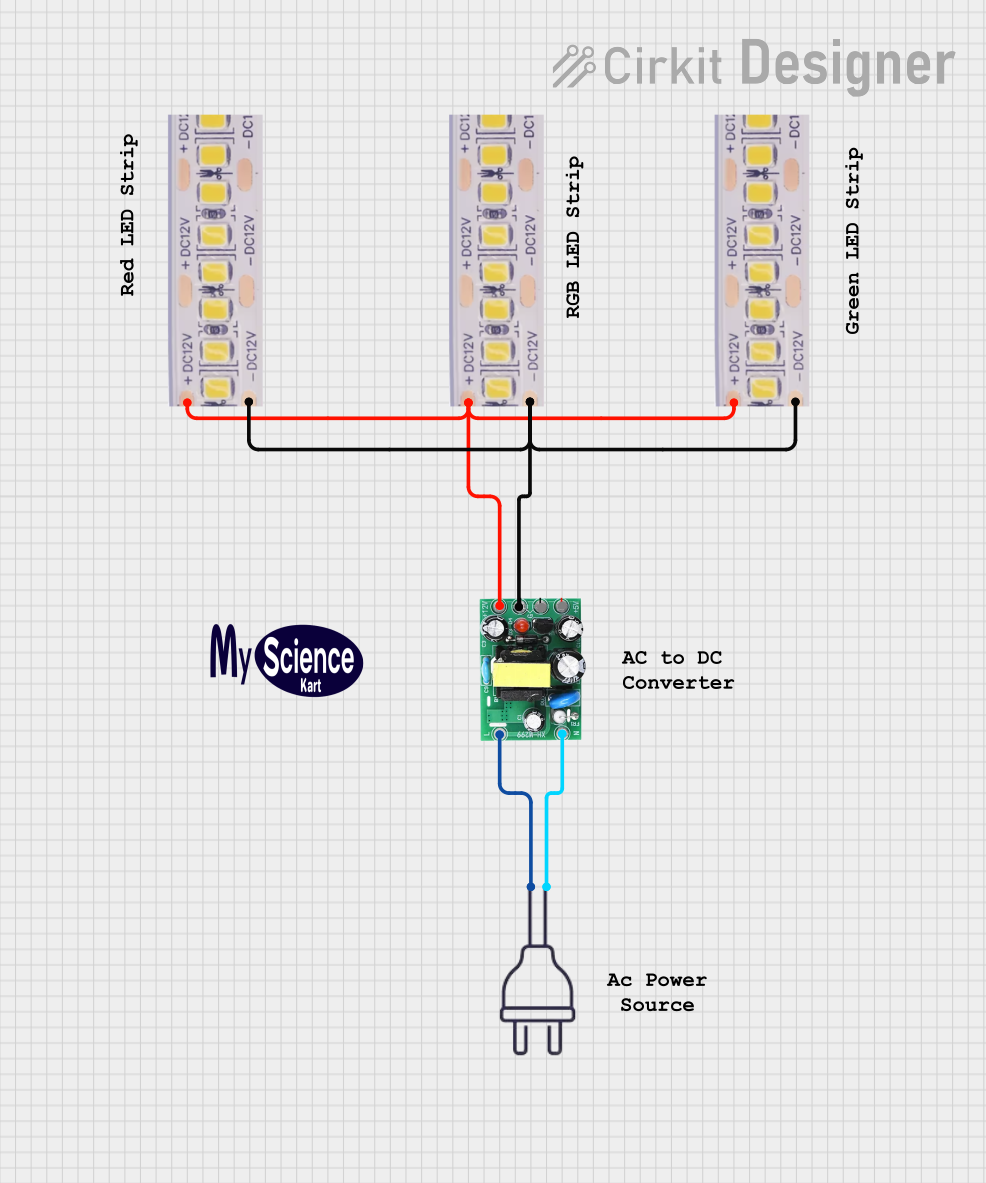
  • LED lighting systems
  • Security and surveillance equipment
  • DIY electronics projects

Technical Specifications

Below are the key technical details of the Selec RPS60-12-CE:

Parameter Value
Input Voltage Range 85-264V AC / 120-370V DC
Output Voltage 12V DC
Output Current 5A
Output Power 60W
Efficiency Up to 88%
Operating Temperature -20°C to +70°C
Dimensions 99mm x 82mm x 30mm
Weight 200g
Safety Standards CE Certified

Pin Configuration and Descriptions

The Selec RPS60-12-CE features screw terminals for easy wiring. Below is the pin configuration:

Pin Label Description
L Live AC input (85-264V AC)
N Neutral AC input
+V Positive DC output (12V)
-V Negative DC output (Ground)

Usage Instructions

How to Use the Component in a Circuit

  1. Wiring the Input:

    • Connect the L terminal to the live wire of the AC mains.
    • Connect the N terminal to the neutral wire of the AC mains.
    • Ensure proper insulation and secure connections to avoid electrical hazards.
  2. Wiring the Output:

    • Connect the +V terminal to the positive input of your load (e.g., a microcontroller or LED strip).
    • Connect the -V terminal to the ground of your load.
  3. Powering On:

    • After verifying all connections, plug the power supply into the mains and switch it on.
    • Measure the output voltage using a multimeter to ensure it is 12V DC before connecting sensitive devices.

Important Considerations and Best Practices

  • Safety First: Always disconnect the power supply from the mains before making any wiring changes.
  • Load Requirements: Ensure the total current draw of connected devices does not exceed 5A.
  • Ventilation: Install the power supply in a well-ventilated area to prevent overheating.
  • Polarity: Double-check the polarity of the output connections to avoid damaging your devices.
  • Fusing: Consider adding a fuse on the input side for additional protection.

Example: Connecting to an Arduino UNO

The Selec RPS60-12-CE can be used to power an Arduino UNO. Below is an example setup:

  1. Connect the +V terminal to the Arduino's VIN pin.
  2. Connect the -V terminal to the Arduino's GND pin.

Here is a simple Arduino sketch to blink an LED when powered by the Selec RPS60-12-CE:

// Blink an LED connected to pin 13
// Ensure the Arduino is powered via the VIN and GND pins

void setup() {
  pinMode(13, OUTPUT); // Set pin 13 as an output
}

void loop() {
  digitalWrite(13, HIGH); // Turn the LED on
  delay(1000);            // Wait for 1 second
  digitalWrite(13, LOW);  // Turn the LED off
  delay(1000);            // Wait for 1 second
}

Troubleshooting and FAQs

Common Issues and Solutions

  1. No Output Voltage:

    • Cause: Incorrect wiring or no AC input.
    • Solution: Verify the AC input connections and ensure the mains power is on.
  2. Overheating:

    • Cause: Insufficient ventilation or excessive load.
    • Solution: Ensure proper airflow around the power supply and reduce the load to within the 5A limit.
  3. Voltage Fluctuations:

    • Cause: Unstable AC input or faulty power supply.
    • Solution: Check the AC input for stability. If the issue persists, replace the power supply.
  4. Device Not Powering On:

    • Cause: Incorrect polarity or loose connections.
    • Solution: Double-check the output connections and ensure correct polarity.

FAQs

Q: Can I use this power supply for a 24V device?
A: No, the Selec RPS60-12-CE provides a fixed 12V output and is not suitable for 24V devices.

Q: Is this power supply suitable for outdoor use?
A: No, this power supply is not weatherproof and should only be used in indoor environments.

Q: Can I connect multiple devices to the output?
A: Yes, as long as the total current draw does not exceed 5A.

Q: Does it have short-circuit protection?
A: Yes, the Selec RPS60-12-CE includes built-in short-circuit and overload protection.

By following this documentation, you can safely and effectively use the Selec RPS60-12-CE in your projects.