Cirkit Designer Logo
Cirkit Designer
Your all-in-one circuit design IDE
Home / 
Component Documentation

How to Use Adafruit Warm White 15x7 CharliePlex FeatherWing: Examples, Pinouts, and Specs

Image of Adafruit Warm White 15x7 CharliePlex FeatherWing
Cirkit Designer LogoDesign with Adafruit Warm White 15x7 CharliePlex FeatherWing in Cirkit Designer

Introduction

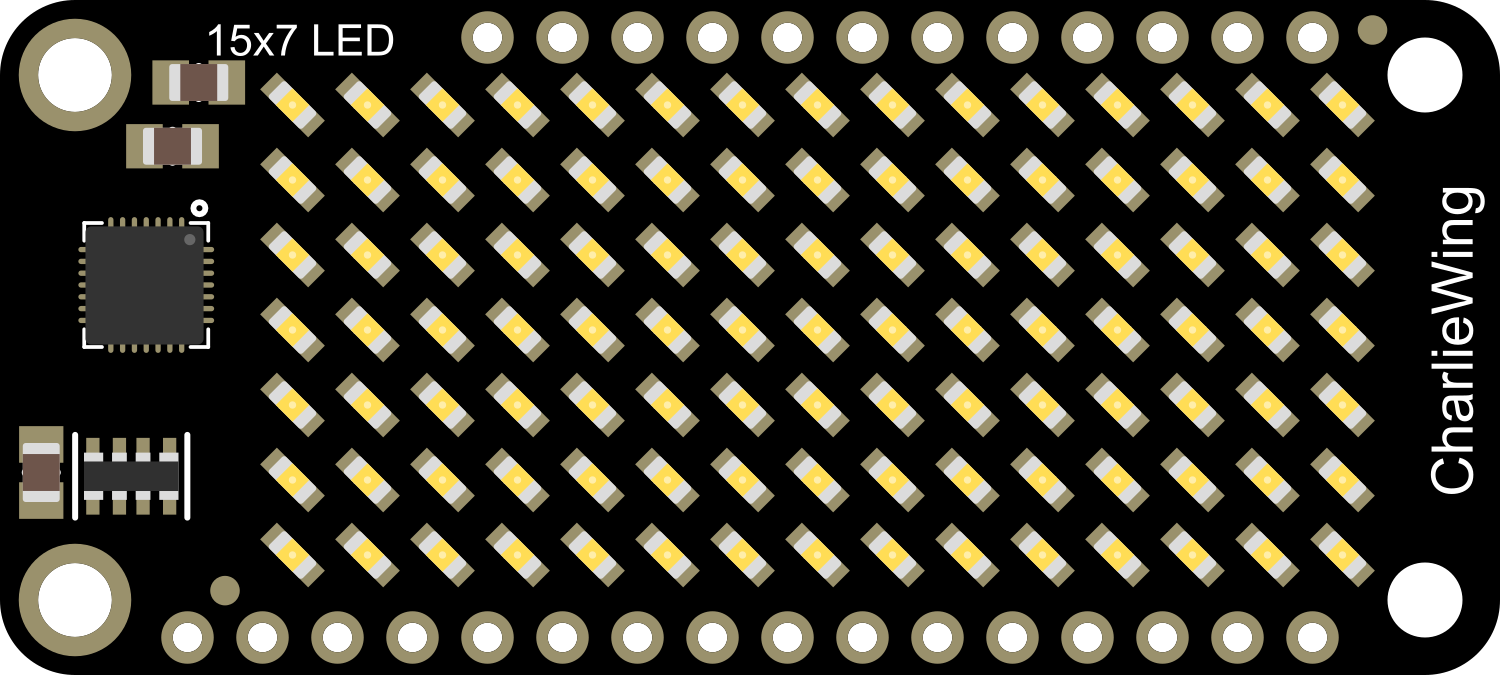
The Adafruit Warm White 15x7 CharliePlex FeatherWing is an add-on board designed for use with the Feather ecosystem of development boards. This LED matrix features a grid of 105 warm white LEDs in a 15x7 configuration, allowing for the display of text, images, and animations in a pleasing warm white hue. It utilizes Charlieplexing to minimize pin usage and simplify wiring. This component is ideal for creating wearable electronics, custom indicators, or adding a visual output to your projects.

Explore Projects Built with Adafruit Warm White 15x7 CharliePlex FeatherWing

Use Cirkit Designer to design, explore, and prototype these projects online. Some projects support real-time simulation. Click "Open Project" to start designing instantly!
Arduino UNO and OLED FeatherWing Display: Battery-Powered Hello World Project
Image of ARDUINO_SSD1306: A project utilizing Adafruit Warm White 15x7 CharliePlex FeatherWing in a practical application
This circuit consists of an Arduino UNO connected to an Adafruit OLED FeatherWing display via I2C communication (SDA and SCL lines). The Arduino is powered through a Vcc source and provides 3.3V and GND connections to the OLED display. The Arduino runs a program to display 'Hello, World!' on the OLED screen.
Cirkit Designer LogoOpen Project in Cirkit Designer
Arduino Mega 2560 and Raspberry Pi 4B Controlled WS2812 RGB LED Strip
Image of circuit_image: A project utilizing Adafruit Warm White 15x7 CharliePlex FeatherWing in a practical application
This circuit features an Arduino Mega 2560 microcontroller programmed to control a WS2812 RGB LED strip and a white LED, indicating status or providing user feedback. The Arduino and the LED strip are powered by a common 5V supply, and the circuit includes interfacing with a Raspberry Pi 4B for potential communication or coordination between the two boards.
Cirkit Designer LogoOpen Project in Cirkit Designer
ESP32-Based Vibration Feedback System with Quad Alphanumeric Display and ADXL343 Accelerometer
Image of EC444 - Quest 3: A project utilizing Adafruit Warm White 15x7 CharliePlex FeatherWing in a practical application
This circuit features an Adafruit HUZZAH32 ESP32 Feather board as the central microcontroller, which is connected to an Adafruit Quad AlphaNumeric Featherwing display and an Adafruit ADXL343 accelerometer via I2C communication (SCL and SDA lines). The ESP32 controls a vibration motor connected to one of its GPIO pins (A5_IO4) and shares a common power supply (3.3V) and ground (GND) with the other components. The purpose of this circuit is likely to read acceleration data, display information on the alphanumeric display, and provide haptic feedback through the vibration motor.
Cirkit Designer LogoOpen Project in Cirkit Designer
Adafruit Circuit Playground Bluefruit and Crickit-Based Smart RGB LED and Temperature Monitoring System
Image of Example: A project utilizing Adafruit Warm White 15x7 CharliePlex FeatherWing in a practical application
This circuit integrates an Adafruit Circuit Playground Bluefruit with an Adafruit Crickit for Circuit Playground Express to control a temperature sensor, a loudspeaker, and a series of WS2812 RGB LED strips. The Crickit board reads temperature data, drives the loudspeaker, and controls the LED strips to create visual effects based on the sensor input.
Cirkit Designer LogoOpen Project in Cirkit Designer

Explore Projects Built with Adafruit Warm White 15x7 CharliePlex FeatherWing

Use Cirkit Designer to design, explore, and prototype these projects online. Some projects support real-time simulation. Click "Open Project" to start designing instantly!
Image of ARDUINO_SSD1306: A project utilizing Adafruit Warm White 15x7 CharliePlex FeatherWing in a practical application
Arduino UNO and OLED FeatherWing Display: Battery-Powered Hello World Project
This circuit consists of an Arduino UNO connected to an Adafruit OLED FeatherWing display via I2C communication (SDA and SCL lines). The Arduino is powered through a Vcc source and provides 3.3V and GND connections to the OLED display. The Arduino runs a program to display 'Hello, World!' on the OLED screen.
Cirkit Designer LogoOpen Project in Cirkit Designer
Image of circuit_image: A project utilizing Adafruit Warm White 15x7 CharliePlex FeatherWing in a practical application
Arduino Mega 2560 and Raspberry Pi 4B Controlled WS2812 RGB LED Strip
This circuit features an Arduino Mega 2560 microcontroller programmed to control a WS2812 RGB LED strip and a white LED, indicating status or providing user feedback. The Arduino and the LED strip are powered by a common 5V supply, and the circuit includes interfacing with a Raspberry Pi 4B for potential communication or coordination between the two boards.
Cirkit Designer LogoOpen Project in Cirkit Designer
Image of EC444 - Quest 3: A project utilizing Adafruit Warm White 15x7 CharliePlex FeatherWing in a practical application
ESP32-Based Vibration Feedback System with Quad Alphanumeric Display and ADXL343 Accelerometer
This circuit features an Adafruit HUZZAH32 ESP32 Feather board as the central microcontroller, which is connected to an Adafruit Quad AlphaNumeric Featherwing display and an Adafruit ADXL343 accelerometer via I2C communication (SCL and SDA lines). The ESP32 controls a vibration motor connected to one of its GPIO pins (A5_IO4) and shares a common power supply (3.3V) and ground (GND) with the other components. The purpose of this circuit is likely to read acceleration data, display information on the alphanumeric display, and provide haptic feedback through the vibration motor.
Cirkit Designer LogoOpen Project in Cirkit Designer
Image of Example: A project utilizing Adafruit Warm White 15x7 CharliePlex FeatherWing in a practical application
Adafruit Circuit Playground Bluefruit and Crickit-Based Smart RGB LED and Temperature Monitoring System
This circuit integrates an Adafruit Circuit Playground Bluefruit with an Adafruit Crickit for Circuit Playground Express to control a temperature sensor, a loudspeaker, and a series of WS2812 RGB LED strips. The Crickit board reads temperature data, drives the loudspeaker, and controls the LED strips to create visual effects based on the sensor input.
Cirkit Designer LogoOpen Project in Cirkit Designer

Common Applications and Use Cases

  • Wearable devices
  • Custom indicators and displays
  • Portable message boards
  • Interactive art installations
  • Educational projects teaching LED matrix control

Technical Specifications

Key Technical Details

  • Operating Voltage: 3.3V to 5V
  • Current Draw: ~40mA (all LEDs on)
  • LED Color: Warm White
  • Matrix Configuration: 15 columns x 7 rows
  • Communication: I2C interface
  • I2C Addresses: 0x70 (default), selectable with solder jumpers

Pin Configuration and Descriptions

Pin Description
GND Ground connection
VIN Power supply input (3.3V to 5V)
SDA I2C data line
SCL I2C clock line
RST Reset pin (optional use)

Usage Instructions

How to Use the Component in a Circuit

  1. Powering the FeatherWing: Connect the VIN pin to a 3.3V or 5V power supply, and the GND pin to the ground.

  2. Connecting to a Feather Board: Align the headers on the FeatherWing with the corresponding sockets on the Feather board and press gently to connect.

  3. I2C Communication: Connect the SDA and SCL pins to your Feather board's I2C data and clock lines.

  4. Software Setup: Install the necessary libraries and upload the example code to your Feather board to start controlling the LED matrix.

Important Considerations and Best Practices

  • Ensure that the power supply is within the specified voltage range to prevent damage.
  • When using multiple I2C devices, make sure each device has a unique I2C address.
  • To avoid flickering, refresh the LED matrix display at a consistent interval.
  • Consider the current draw when all LEDs are on and ensure your power supply can handle the load.

Example Code for Arduino UNO

#include <Wire.h>
#include <Adafruit_IS31FL3731.h>

// Create the LED driver object
Adafruit_IS31FL3731 ledDriver;

void setup() {
  Wire.begin(); // Start I2C
  if (!ledDriver.begin()) {
    Serial.println("IS31FL3731 not found");
    while (1);
  }
  Serial.println("IS31FL3731 found!");
}

void loop() {
  // Clear the frame buffer
  ledDriver.clear();
  
  // Draw a simple pattern
  for (int i = 0; i < 15; i++) {
    for (int j = 0; j < 7; j++) {
      ledDriver.drawPixel(i, j, (i + j) % 2 ? 255 : 0);
    }
  }
  
  // Display the frame buffer on the LEDs
  ledDriver.displayFrame();
  
  delay(1000); // Wait for a second
}

Troubleshooting and FAQs

Common Issues Users Might Face

  • LEDs Not Lighting Up: Ensure that the FeatherWing is properly seated on the Feather board and that the power supply is correctly connected.
  • Flickering LEDs: This may be due to an insufficient refresh rate. Increase the frequency at which you update the display.
  • Dim LEDs: Check if the power supply is providing the correct voltage and that the current draw does not exceed the power supply's capability.

Solutions and Tips for Troubleshooting

  • Double-check all connections and solder joints for any loose or cold solder points.
  • Verify that the I2C address is correctly set and that there are no address conflicts with other I2C devices.
  • Use the Serial.println() function to output debug information to the serial monitor and help isolate issues.

FAQs

Q: Can I use multiple CharliePlex FeatherWings together? A: Yes, you can connect multiple boards using different I2C addresses by adjusting the solder jumpers on the back of the boards.

Q: How do I change the brightness of the LEDs? A: The brightness can be controlled via software using the LED driver library functions.

Q: What is the maximum number of LEDs that can be lit at once? A: All 105 LEDs can be lit simultaneously, but ensure that the power supply can handle the total current draw.

Q: Can I use this FeatherWing with other microcontrollers besides Feather boards? A: Yes, as long as the microcontroller supports I2C communication and operates within the voltage range, you can use it with appropriate wiring.