How to Use solar charge: Examples, Pinouts, and Specs
Introduction
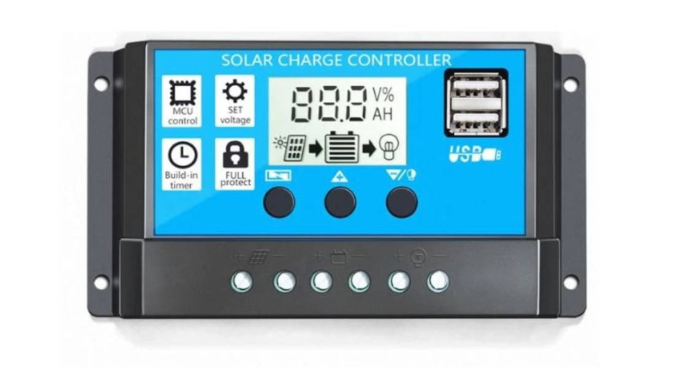
A solar charge controller is a device that converts solar energy into electrical energy to charge batteries or power electronic devices. It is an essential component in solar power systems, ensuring that batteries are charged efficiently and safely. Solar charge controllers regulate the voltage and current coming from the solar panels to the batteries, preventing overcharging and extending battery life.
Explore Projects Built with solar charge
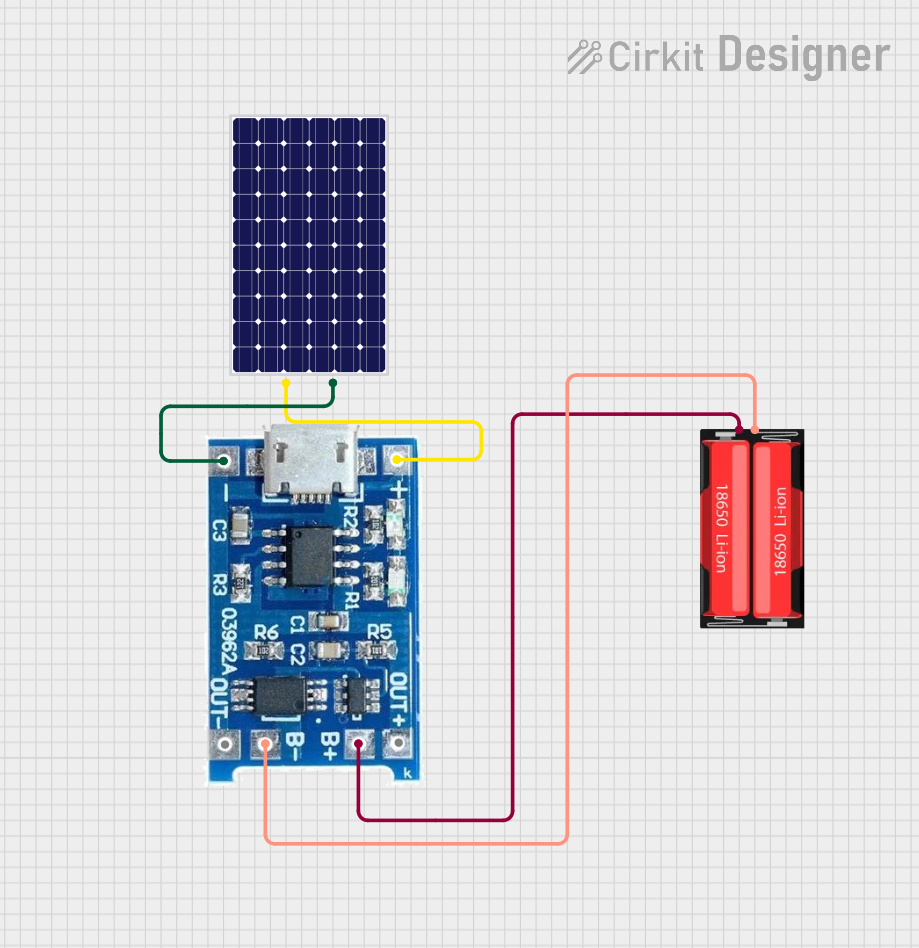
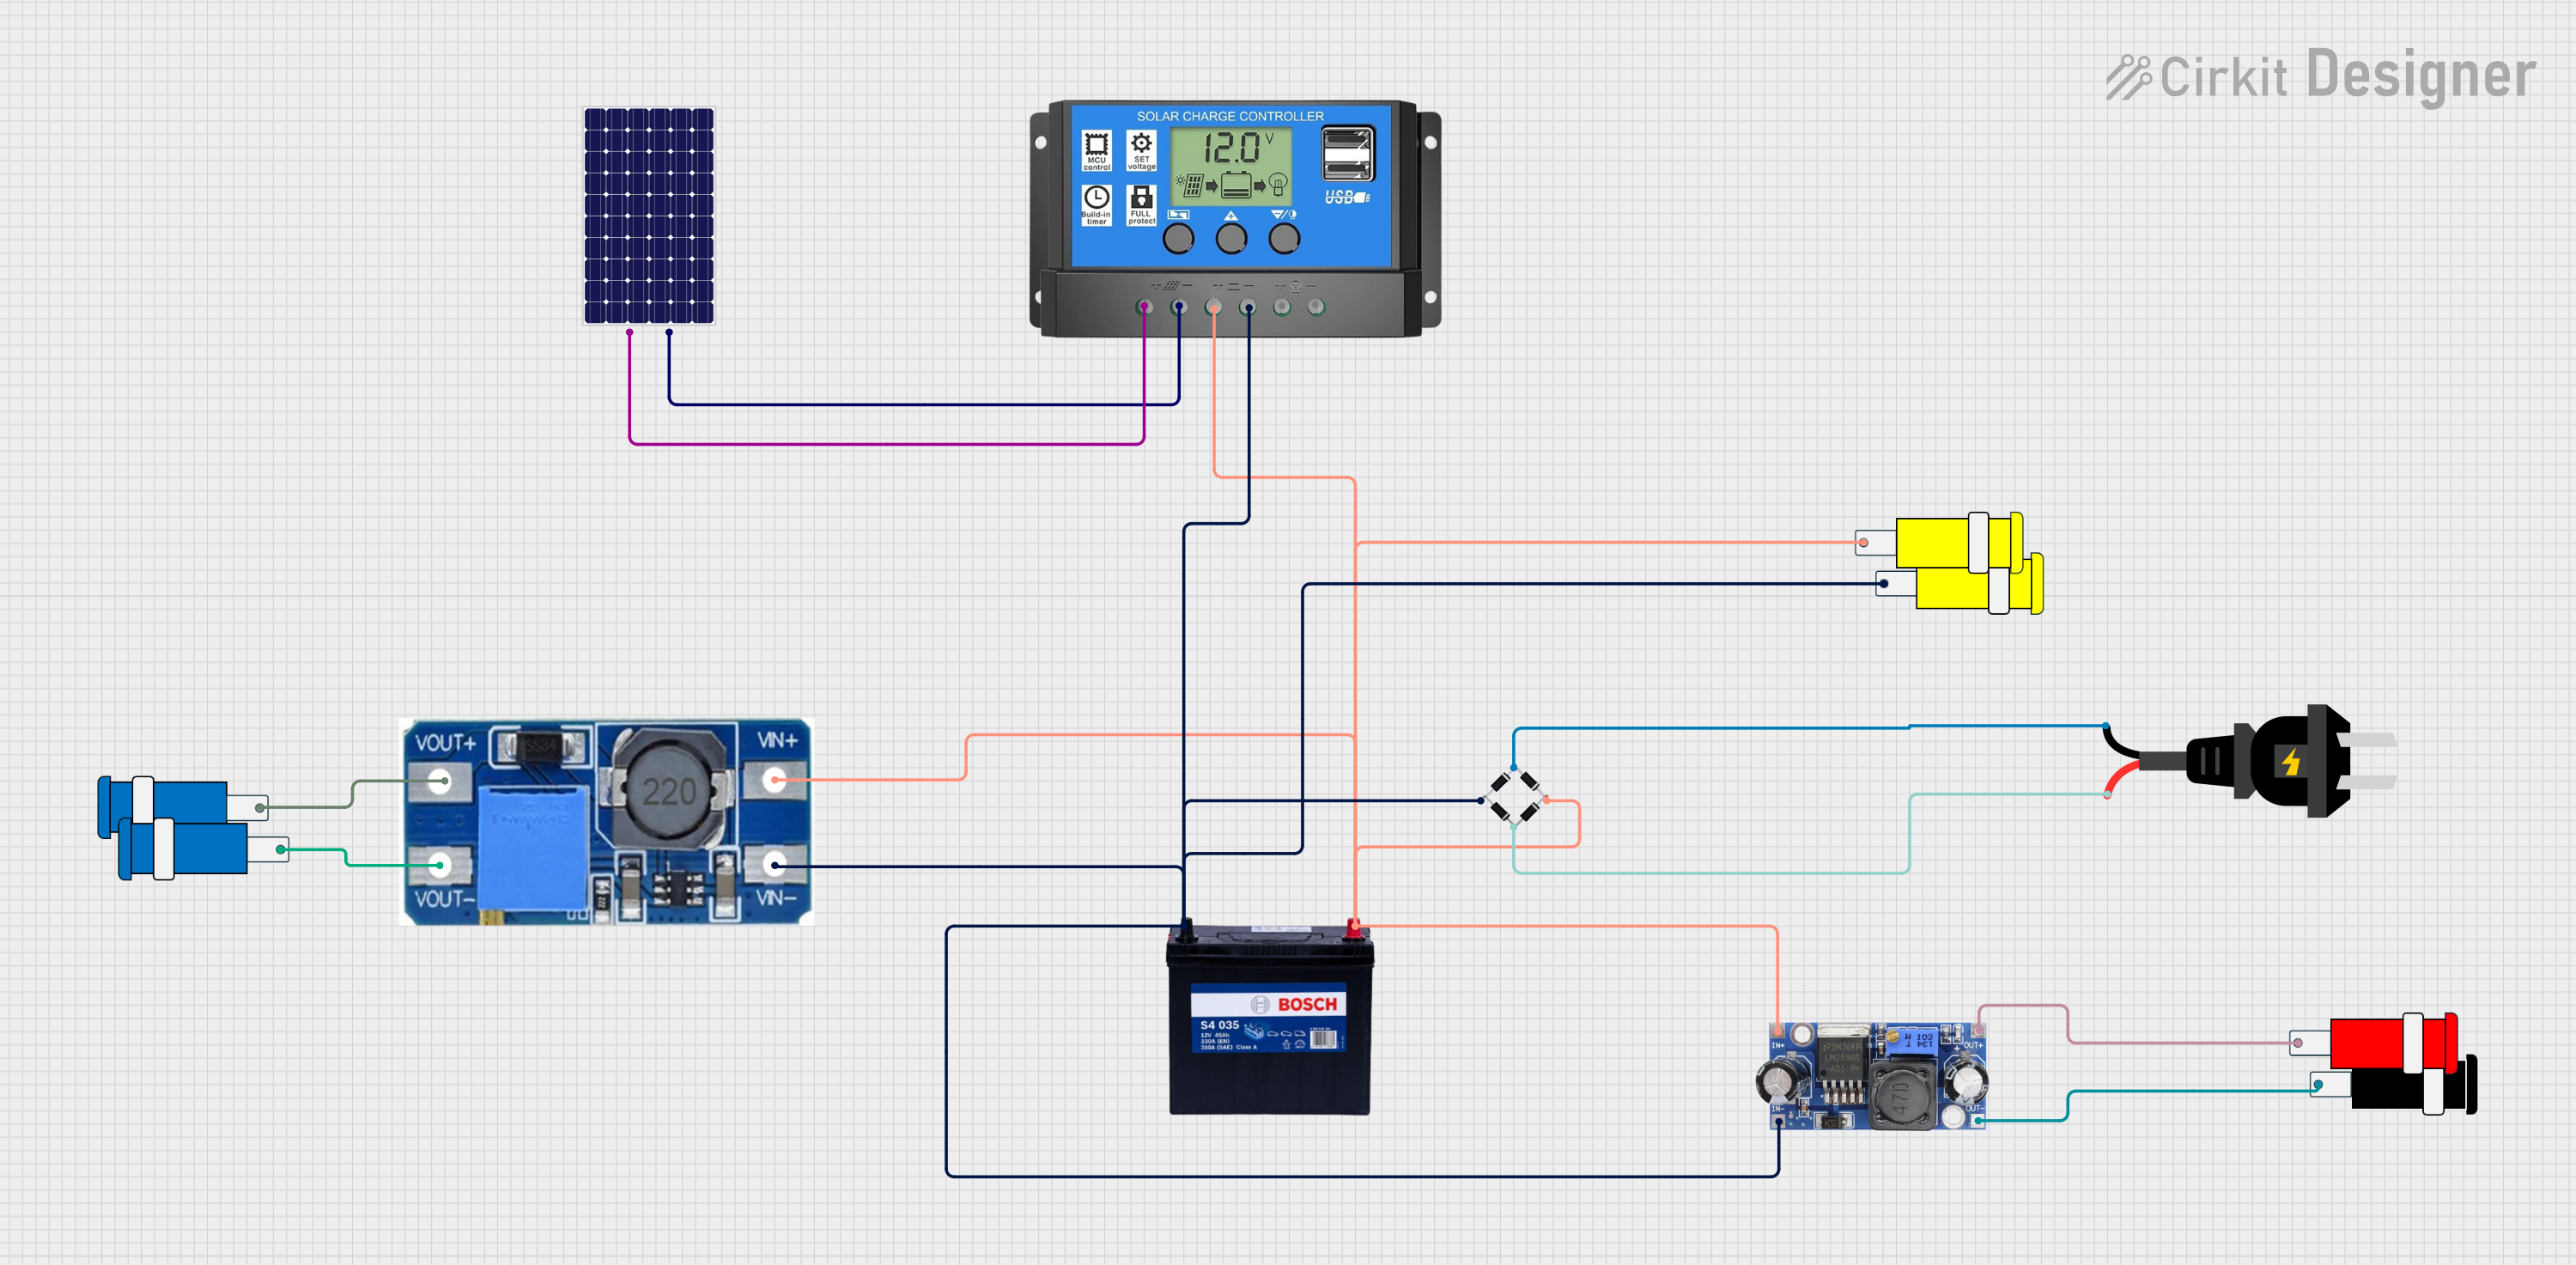
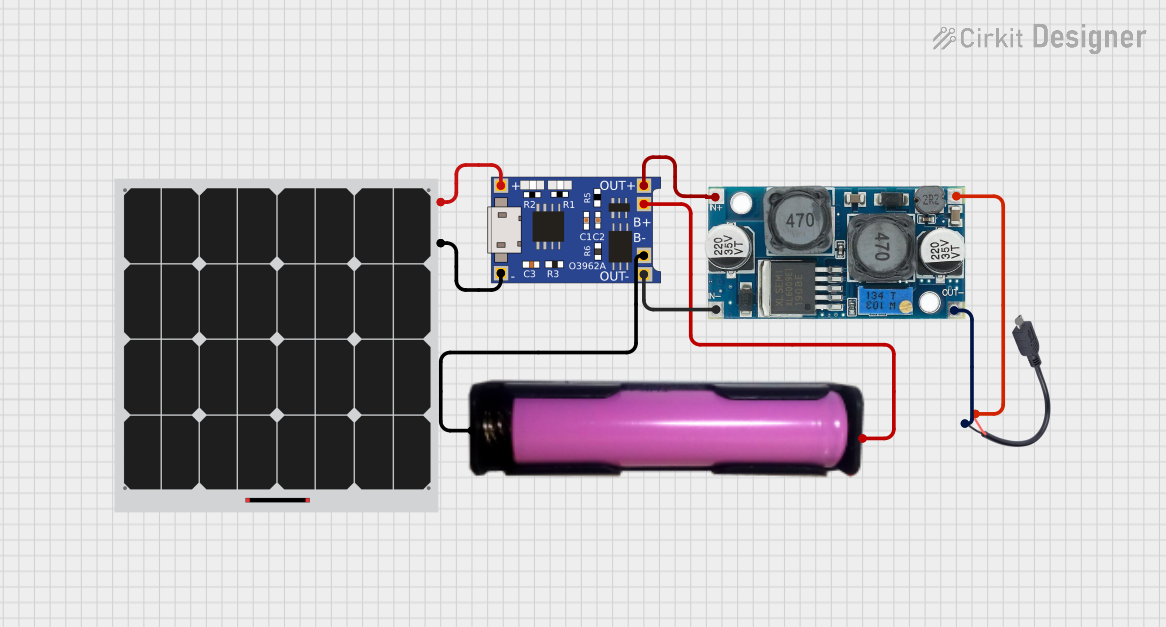
Explore Projects Built with solar charge
Common Applications and Use Cases
- Solar Home Systems: Used to charge batteries that power home appliances and lighting.
- Portable Solar Chargers: Ideal for charging mobile devices, laptops, and other portable electronics.
- Off-Grid Solar Systems: Essential for remote locations where grid power is unavailable.
- Solar Street Lighting: Powers street lights using solar energy, reducing reliance on grid power.
- RV and Marine Applications: Charges batteries in recreational vehicles and boats.
Technical Specifications
Key Technical Details
| Parameter | Value |
|---|---|
| Input Voltage | 12V/24V Auto Recognition |
| Max Input Current | 10A/20A/30A |
| Output Voltage | 12V/24V |
| Max Output Current | 10A/20A/30A |
| Efficiency | ≥ 95% |
| Operating Temp | -20°C to 60°C |
| Dimensions | 150mm x 78mm x 35mm |
| Weight | 200g |
Pin Configuration and Descriptions
| Pin Number | Pin Name | Description |
|---|---|---|
| 1 | Solar Panel + | Positive terminal for solar panel input |
| 2 | Solar Panel - | Negative terminal for solar panel input |
| 3 | Battery + | Positive terminal for battery connection |
| 4 | Battery - | Negative terminal for battery connection |
| 5 | Load + | Positive terminal for load connection |
| 6 | Load - | Negative terminal for load connection |
| 7 | Temp Sensor | Temperature sensor input for battery monitoring |
| 8 | RS485 | Communication interface for monitoring and control |
Usage Instructions
How to Use the Component in a Circuit
Connect the Solar Panel:
- Connect the positive terminal of the solar panel to the
Solar Panel +pin. - Connect the negative terminal of the solar panel to the
Solar Panel -pin.
- Connect the positive terminal of the solar panel to the
Connect the Battery:
- Connect the positive terminal of the battery to the
Battery +pin. - Connect the negative terminal of the battery to the
Battery -pin.
- Connect the positive terminal of the battery to the
Connect the Load:
- Connect the positive terminal of the load (e.g., LED lights, small appliances) to the
Load +pin. - Connect the negative terminal of the load to the
Load -pin.
- Connect the positive terminal of the load (e.g., LED lights, small appliances) to the
Optional Connections:
- Connect the temperature sensor to the
Temp Sensorpin for battery temperature monitoring. - Use the
RS485interface for advanced monitoring and control if required.
- Connect the temperature sensor to the
Important Considerations and Best Practices
- Ensure Proper Polarity: Always double-check the polarity of connections to avoid damage to the controller or connected devices.
- Use Appropriate Wire Gauge: Use wires of appropriate gauge to handle the current without significant voltage drop or overheating.
- Install in a Ventilated Area: Place the charge controller in a well-ventilated area to prevent overheating.
- Regular Maintenance: Periodically check connections and clean the solar panels to ensure optimal performance.
Troubleshooting and FAQs
Common Issues Users Might Face
No Charging:
- Cause: Incorrect wiring or loose connections.
- Solution: Verify all connections and ensure proper polarity.
Overheating:
- Cause: Poor ventilation or excessive current.
- Solution: Ensure the controller is in a well-ventilated area and check the current rating.
Battery Not Charging Fully:
- Cause: Insufficient sunlight or faulty battery.
- Solution: Ensure the solar panel is receiving adequate sunlight and check the battery health.
Load Not Powering On:
- Cause: Load exceeds the controller's capacity or incorrect wiring.
- Solution: Verify the load specifications and check the wiring.
Solutions and Tips for Troubleshooting
- Check LED Indicators: Most solar charge controllers have LED indicators that provide status information. Refer to the user manual for LED indicator meanings.
- Use a Multimeter: Measure the voltage and current at various points in the circuit to diagnose issues.
- Consult the Manual: Refer to the manufacturer's manual for specific troubleshooting steps and FAQs.
Arduino UNO Integration Example
If you are using the solar charge controller with an Arduino UNO for monitoring purposes, you can use the following example code to read the battery voltage:
// Example code to read battery voltage using Arduino UNO
const int batteryPin = A0; // Analog pin connected to Battery + terminal

void setup() {
  Serial.begin(9600); // Initialize serial communication
}

void loop() {
  int sensorValue = analogRead(batteryPin); // Read the analog value
  float voltage = sensorValue * (5.0 / 1023.0) * 2; // Convert to voltage
  // Multiply by 2 because of voltage divider (if used)

  Serial.print("Battery Voltage: ");
  Serial.print(voltage);
  Serial.println(" V");

  delay(1000); // Wait for 1 second before next reading
}
Note: If you are using a voltage divider to step down the battery voltage to a safe level for the Arduino, adjust the calculation accordingly.
This documentation provides a comprehensive guide to understanding, using, and troubleshooting a solar charge controller. Whether you are a beginner or an experienced user, this guide aims to help you make the most of your solar power system.