Cirkit Designer Logo
Cirkit Designer
Your all-in-one circuit design IDE
Home / 
Component Documentation

How to Use Adafruit Precision 9-DoF LSM6DSOX + LIS3MDL FeatherWing: Examples, Pinouts, and Specs

Image of Adafruit Precision 9-DoF LSM6DSOX + LIS3MDL FeatherWing
Cirkit Designer LogoDesign with Adafruit Precision 9-DoF LSM6DSOX + LIS3MDL FeatherWing in Cirkit Designer

Introduction

The Adafruit Precision 9-DoF LSM6DSOX + LIS3MDL FeatherWing is a comprehensive motion sensing solution that combines a 3-axis accelerometer, a 3-axis gyroscope, and a 3-axis magnetometer into a single module. This FeatherWing is designed to interface seamlessly with Adafruit's Feather development boards, providing a powerful tool for creating projects that require orientation tracking, motion sensing, and navigational functionalities. Common applications include drones, robotics, gesture control, and augmented reality devices.

Explore Projects Built with Adafruit Precision 9-DoF LSM6DSOX + LIS3MDL FeatherWing

Use Cirkit Designer to design, explore, and prototype these projects online. Some projects support real-time simulation. Click "Open Project" to start designing instantly!
ESP32-Based Force Measurement System with LSM303AGR Sensor
Image of final circuit diagram: A project utilizing Adafruit Precision 9-DoF LSM6DSOX + LIS3MDL FeatherWing in a practical application
This circuit features an Adafruit HUZZAH32 ESP32 Feather microcontroller connected to an Adafruit LSM303AGR sensor via I2C communication lines (SCL and SDA), a force sensing resistor (FSR) interfaced through an analog input with a pull-up resistor, and powered by a 3xAA battery pack. The LSM303AGR sensor provides acceleration and magnetic field measurements, while the FSR detects applied force. The ESP32 processes these inputs and can be programmed to respond to sensor data for applications such as motion tracking and force measurement.
Cirkit Designer LogoOpen Project in Cirkit Designer
Multi-Sensor Health Monitoring System with Adafruit Feather M0 Adalogger
Image of health tracker: A project utilizing Adafruit Precision 9-DoF LSM6DSOX + LIS3MDL FeatherWing in a practical application
This circuit is designed to interface multiple sensors with an Adafruit Feather M0 Adalogger microcontroller for data logging purposes. The sensors include a MAX30205 temperature sensor, a body dehydration sensor, a MAX30102 pulse oximeter, an Adafruit LSM6DSOX 6-axis accelerometer and gyroscope, and an Adafruit BME680 environmental sensor. All sensors are connected to the microcontroller via an I2C bus, sharing the SDA and SCL lines for communication.
Cirkit Designer LogoOpen Project in Cirkit Designer
ESP32-Based Vibration Feedback System with Quad Alphanumeric Display and ADXL343 Accelerometer
Image of EC444 - Quest 3: A project utilizing Adafruit Precision 9-DoF LSM6DSOX + LIS3MDL FeatherWing in a practical application
This circuit features an Adafruit HUZZAH32 ESP32 Feather board as the central microcontroller, which is connected to an Adafruit Quad AlphaNumeric Featherwing display and an Adafruit ADXL343 accelerometer via I2C communication (SCL and SDA lines). The ESP32 controls a vibration motor connected to one of its GPIO pins (A5_IO4) and shares a common power supply (3.3V) and ground (GND) with the other components. The purpose of this circuit is likely to read acceleration data, display information on the alphanumeric display, and provide haptic feedback through the vibration motor.
Cirkit Designer LogoOpen Project in Cirkit Designer
Arduino UNO-Based Motion Sensor with OLED Display
Image of Acelerometer(1): A project utilizing Adafruit Precision 9-DoF LSM6DSOX + LIS3MDL FeatherWing in a practical application
This circuit uses an Arduino UNO to read data from an MPU-6050 accelerometer and gyroscope sensor and display the readings on an Adafruit 128x64 OLED FeatherWing. The Arduino communicates with both the sensor and the display via the I2C protocol, and the code initializes the devices, reads sensor data, and updates the display every 500 milliseconds.
Cirkit Designer LogoOpen Project in Cirkit Designer

Explore Projects Built with Adafruit Precision 9-DoF LSM6DSOX + LIS3MDL FeatherWing

Use Cirkit Designer to design, explore, and prototype these projects online. Some projects support real-time simulation. Click "Open Project" to start designing instantly!
Image of final circuit diagram: A project utilizing Adafruit Precision 9-DoF LSM6DSOX + LIS3MDL FeatherWing in a practical application
ESP32-Based Force Measurement System with LSM303AGR Sensor
This circuit features an Adafruit HUZZAH32 ESP32 Feather microcontroller connected to an Adafruit LSM303AGR sensor via I2C communication lines (SCL and SDA), a force sensing resistor (FSR) interfaced through an analog input with a pull-up resistor, and powered by a 3xAA battery pack. The LSM303AGR sensor provides acceleration and magnetic field measurements, while the FSR detects applied force. The ESP32 processes these inputs and can be programmed to respond to sensor data for applications such as motion tracking and force measurement.
Cirkit Designer LogoOpen Project in Cirkit Designer
Image of health tracker: A project utilizing Adafruit Precision 9-DoF LSM6DSOX + LIS3MDL FeatherWing in a practical application
Multi-Sensor Health Monitoring System with Adafruit Feather M0 Adalogger
This circuit is designed to interface multiple sensors with an Adafruit Feather M0 Adalogger microcontroller for data logging purposes. The sensors include a MAX30205 temperature sensor, a body dehydration sensor, a MAX30102 pulse oximeter, an Adafruit LSM6DSOX 6-axis accelerometer and gyroscope, and an Adafruit BME680 environmental sensor. All sensors are connected to the microcontroller via an I2C bus, sharing the SDA and SCL lines for communication.
Cirkit Designer LogoOpen Project in Cirkit Designer
Image of EC444 - Quest 3: A project utilizing Adafruit Precision 9-DoF LSM6DSOX + LIS3MDL FeatherWing in a practical application
ESP32-Based Vibration Feedback System with Quad Alphanumeric Display and ADXL343 Accelerometer
This circuit features an Adafruit HUZZAH32 ESP32 Feather board as the central microcontroller, which is connected to an Adafruit Quad AlphaNumeric Featherwing display and an Adafruit ADXL343 accelerometer via I2C communication (SCL and SDA lines). The ESP32 controls a vibration motor connected to one of its GPIO pins (A5_IO4) and shares a common power supply (3.3V) and ground (GND) with the other components. The purpose of this circuit is likely to read acceleration data, display information on the alphanumeric display, and provide haptic feedback through the vibration motor.
Cirkit Designer LogoOpen Project in Cirkit Designer
Image of Acelerometer(1): A project utilizing Adafruit Precision 9-DoF LSM6DSOX + LIS3MDL FeatherWing in a practical application
Arduino UNO-Based Motion Sensor with OLED Display
This circuit uses an Arduino UNO to read data from an MPU-6050 accelerometer and gyroscope sensor and display the readings on an Adafruit 128x64 OLED FeatherWing. The Arduino communicates with both the sensor and the display via the I2C protocol, and the code initializes the devices, reads sensor data, and updates the display every 500 milliseconds.
Cirkit Designer LogoOpen Project in Cirkit Designer

Technical Specifications

Key Technical Details

  • Accelerometer/Gyroscope (LSM6DSOX):

    • 3D digital linear acceleration sensor
    • 3D digital angular rate sensor
    • ±2/±4/±8/±16 g full scale
    • ±125/±250/±500/±1000/±2000 dps full scale
  • Magnetometer (LIS3MDL):

    • 3D digital magnetic sensor
    • ±4/±8/±12/±16 gauss full scale
  • Operating Voltage: 3.3V

  • Interface: I2C

  • I2C Addresses:

    • LSM6DSOX: 0x6A (default) / 0x6B (alternative)
    • LIS3MDL: 0x1E

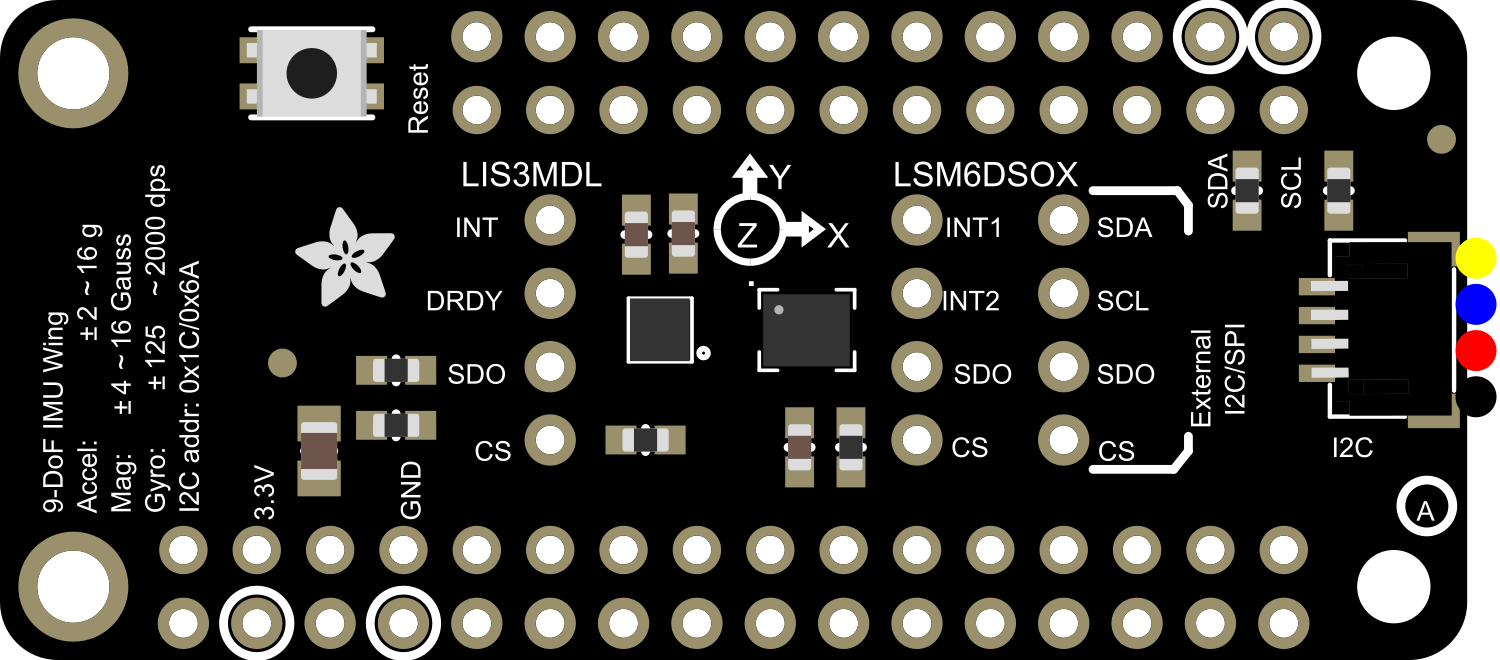
Pin Configuration and Descriptions

Pin Function Description
GND Ground Common ground for power and logic
3V Power 3.3V power supply input
SCL I2C Clock Serial Clock for I2C communication
SDA I2C Data Serial Data for I2C communication
INT1 Interrupt 1 Configurable interrupt for LSM6DSOX
INT2 Interrupt 2 Configurable interrupt for LIS3MDL

Usage Instructions

Integration with a Circuit

To use the Adafruit Precision 9-DoF LSM6DSOX + LIS3MDL FeatherWing with a Feather board:

  1. Attach the FeatherWing to the Feather board using the provided headers.
  2. Ensure that the 3V and GND pins are connected to provide power to the module.
  3. Connect the SCL and SDA pins to the corresponding I2C pins on the Feather board.

Best Practices

  • Always use a logic level converter if you are interfacing with a 5V system.
  • Avoid placing the sensor near strong magnetic fields to prevent interference with the magnetometer.
  • Secure the sensor in place to minimize noise from vibrations when measuring motion.

Example Code for Arduino UNO

Below is an example code snippet for interfacing the Adafruit Precision 9-DoF LSM6DSOX + LIS3MDL FeatherWing with an Arduino UNO. This code initializes the sensor and reads the accelerometer, gyroscope, and magnetometer data.

#include <Wire.h>
#include <Adafruit_Sensor.h>
#include <Adafruit_LSM6DSOX.h>
#include <Adafruit_LIS3MDL.h>

// Create sensor instances
Adafruit_LSM6DSOX sox = Adafruit_LSM6DSOX();
Adafruit_LIS3MDL mdl = Adafruit_LIS3MDL();

void setup() {
  Serial.begin(115200);
  // Wait for serial monitor to open
  while (!Serial) { delay(10); }

  // Initialize LSM6DSOX
  if (!sox.begin_I2C()) {
    Serial.println("Failed to find LSM6DSOX chip");
    while (1) { delay(10); }
  }

  // Initialize LIS3MDL
  if (!mdl.begin_I2C()) {
    Serial.println("Failed to find LIS3MDL chip");
    while (1) { delay(10); }
  }

  Serial.println("LSM6DSOX + LIS3MDL FeatherWing started!");
}

void loop() {
  // Read accelerometer and gyroscope
  sensors_event_t accel;
  sensors_event_t gyro;
  sensors_event_t mag;
  sox.getEvent(&accel, &gyro, NULL);

  // Read magnetometer
  mdl.getEvent(&mag);

  // Print values to serial monitor
  Serial.print("Accel X: "); Serial.print(accel.acceleration.x); Serial.print(" m/s^2 ");
  Serial.print("Y: "); Serial.print(accel.acceleration.y); Serial.print(" m/s^2 ");
  Serial.print("Z: "); Serial.print(accel.acceleration.z); Serial.println(" m/s^2 ");

  Serial.print("Gyro X: "); Serial.print(gyro.gyro.x); Serial.print(" dps ");
  Serial.print("Y: "); Serial.print(gyro.gyro.y); Serial.print(" dps ");
  Serial.print("Z: "); Serial.print(gyro.gyro.z); Serial.println(" dps ");

  Serial.print("Mag X: "); Serial.print(mag.magnetic.x); Serial.print(" uT ");
  Serial.print("Y: "); Serial.print(mag.magnetic.y); Serial.print(" uT ");
  Serial.print("Z: "); Serial.print(mag.magnetic.z); Serial.println(" uT ");

  delay(100);
}

Troubleshooting and FAQs

Common Issues

  • Sensor not detected: Ensure that the I2C connections are correct and that the FeatherWing is properly seated on the Feather board.
  • Inaccurate readings: Calibrate the sensors following the manufacturer's guidelines and ensure there are no strong magnetic fields nearby.
  • Intermittent readings: Check for loose connections and ensure that the power supply is stable.

FAQs

Q: Can I use this FeatherWing with a 5V microcontroller? A: Yes, but you must use a logic level converter to step down the 5V signals to 3.3V to avoid damaging the sensors.

Q: How do I calibrate the magnetometer? A: Adafruit provides a calibration sketch and instructions on their website. Follow the guide to perform the calibration.

Q: What is the maximum sampling rate for the sensors? A: The LSM6DSOX can sample up to 6.66 kHz for the gyroscope and 1.66 kHz for the accelerometer. The LIS3MDL can sample up to 155 Hz.

For further assistance, consult the Adafruit forums or the detailed datasheets for the LSM6DSOX and LIS3MDL sensors.