Cirkit Designer Logo
Cirkit Designer
Your all-in-one circuit design IDE
Home / 
Component Documentation

How to Use Arduino Esplora (Rev4): Examples, Pinouts, and Specs

Image of Arduino Esplora (Rev4)
Cirkit Designer LogoDesign with Arduino Esplora (Rev4) in Cirkit Designer

Introduction

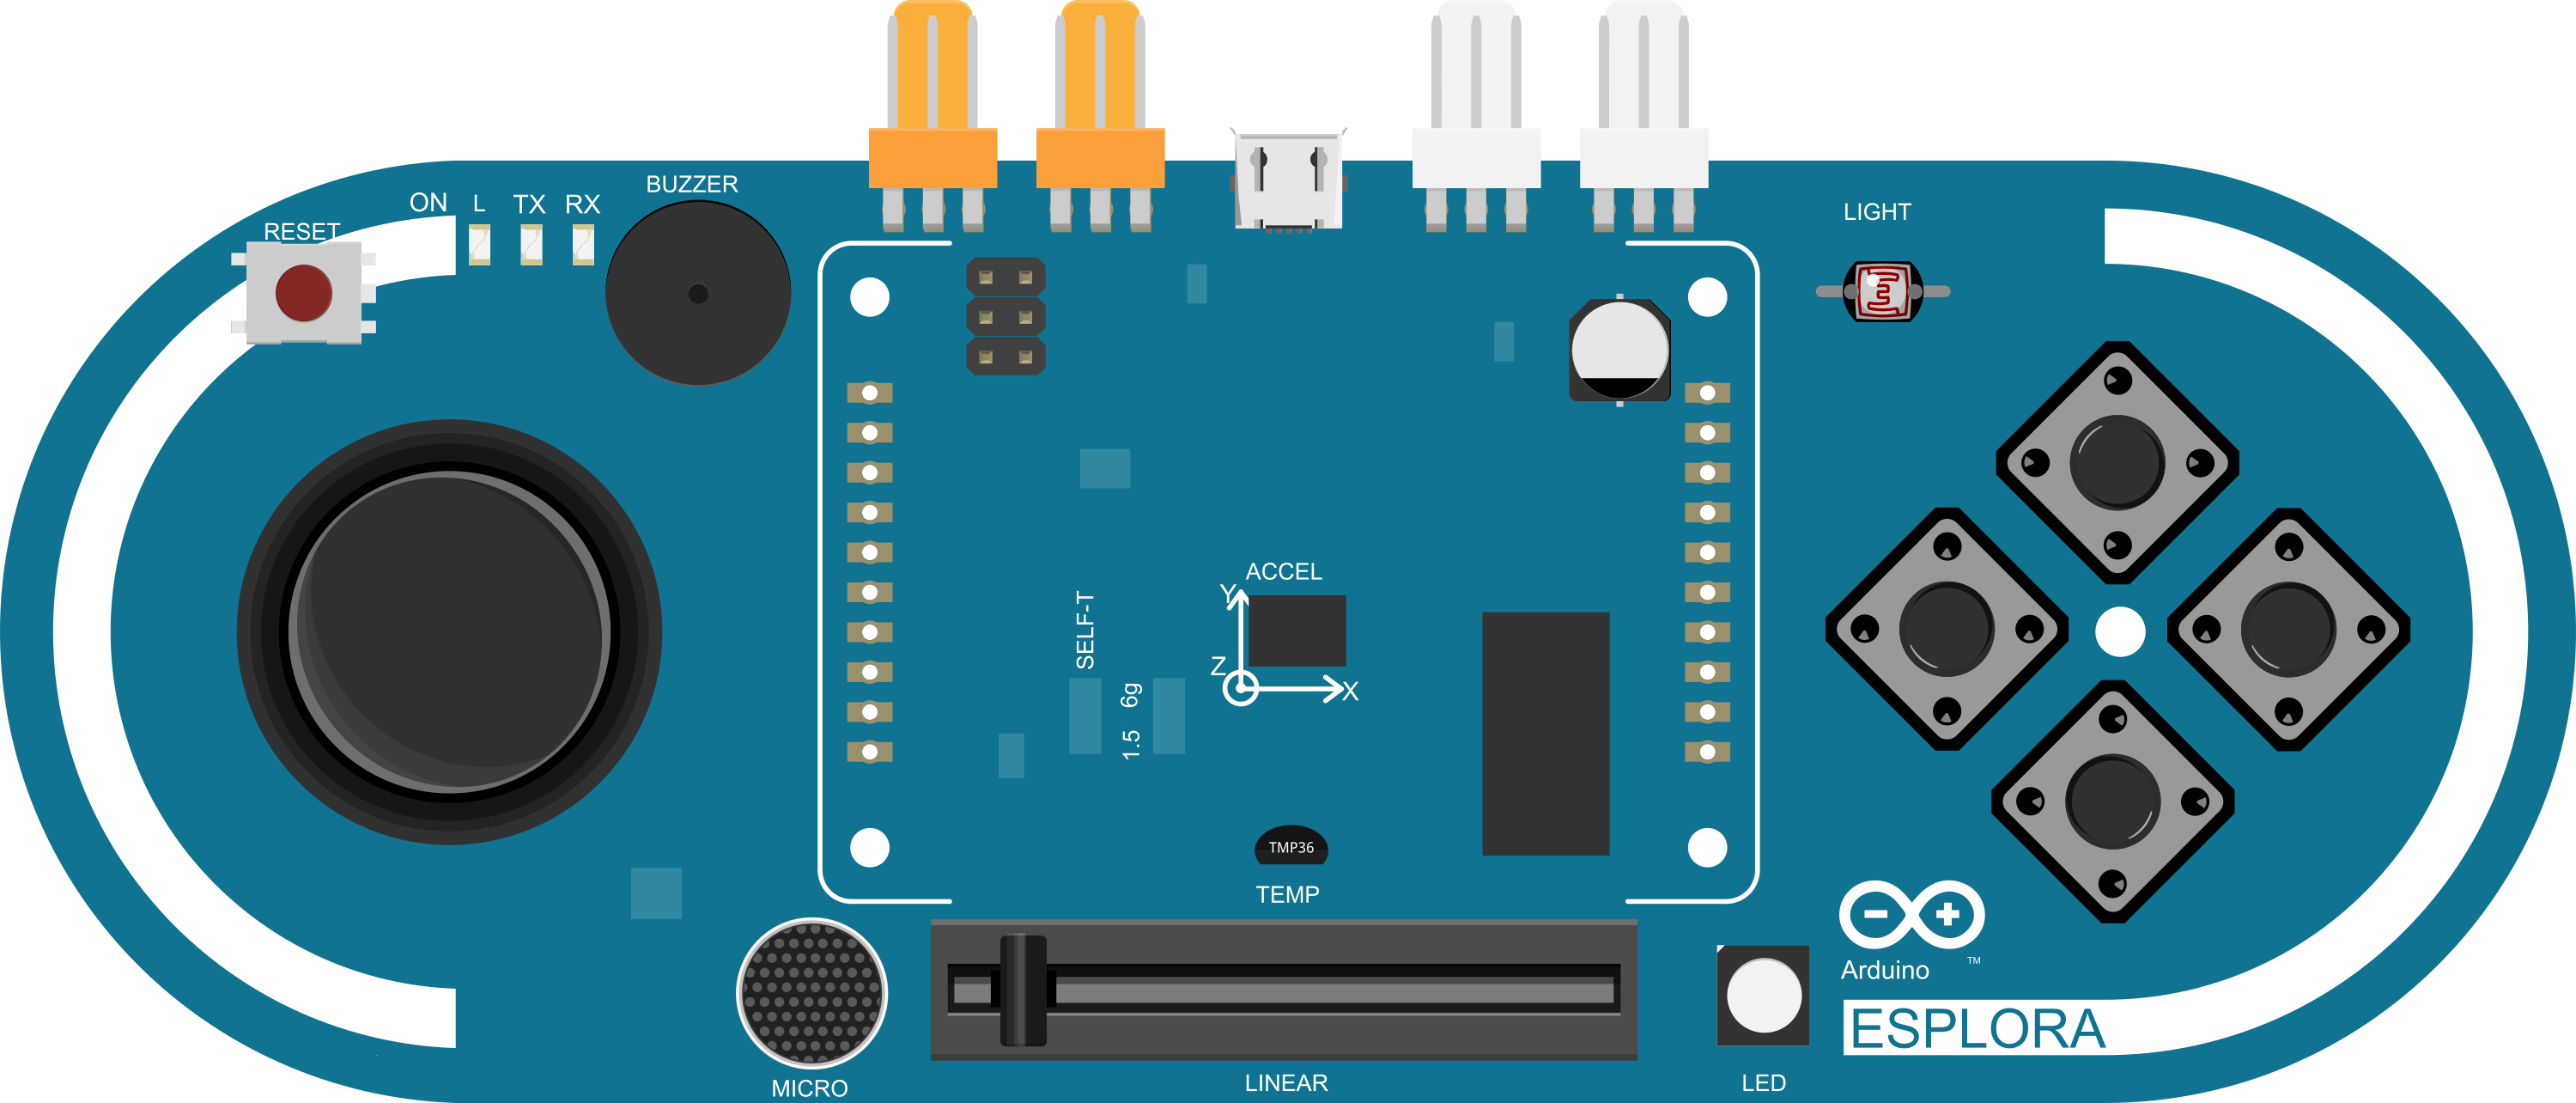
The Arduino Esplora (Rev4) is a unique microcontroller board derived from the Arduino Leonardo. The Esplora is designed with an emphasis on providing a no-fuss platform for beginners to explore the capabilities of Arduino without the need for breadboards or soldering. It is equipped with a multitude of onboard sensors and actuators, making it an ideal choice for educational purposes, prototyping, and creating interactive projects.

Explore Projects Built with Arduino Esplora (Rev4)

Use Cirkit Designer to design, explore, and prototype these projects online. Some projects support real-time simulation. Click "Open Project" to start designing instantly!
Arduino Uno Wi-Fi Controlled Rover with Ultrasonic and PIR Sensors
Image of Copy of surveillance rover: A project utilizing Arduino Esplora (Rev4) in a practical application
This circuit is a Wi-Fi controlled rover with obstacle detection and motion sensing capabilities. It uses an Arduino Uno to interface with an HC-SR04 ultrasonic sensor for distance measurement, a PIR sensor for motion detection, a micro servo for camera panning, and an L298N motor driver for controlling the rover's motors. The ESP8266 Wi-Fi module allows remote control via a web interface.
Cirkit Designer LogoOpen Project in Cirkit Designer
Arduino and ESP-8266 Based Flame Detection and Climate Monitoring System
Image of WI-FI based Homeautomation: A project utilizing Arduino Esplora (Rev4) in a practical application
This circuit features an Arduino Leonardo as the central controller, interfaced with an ESP-8266 for wireless communication capabilities. The Arduino controls a 4-channel relay module to switch various loads, including a bulb, an LED, a water pump, and an exhaust fan. It also reads data from a flame sensor and a DHT11 humidity and temperature sensor, drives a buzzer, and displays information on a 16x2 LCD. The system is powered by a 9V battery, and the LCD's backlight is controlled through a resistor.
Cirkit Designer LogoOpen Project in Cirkit Designer
Arduino UNO and ESP8266 Wi-Fi Controlled Battery-Powered Robot Car
Image of Robot_L298N_WiFi: A project utilizing Arduino Esplora (Rev4) in a practical application
This circuit is a WiFi-controlled robot that uses an Arduino UNO to manage motor movements via an H-bridge and two DC motors. The ESP8266 ESP-01 module provides WiFi connectivity, allowing remote control commands to be sent to the Arduino, which then drives the motors to move the robot forward, backward, left, right, or stop.
Cirkit Designer LogoOpen Project in Cirkit Designer
Arduino and ESP8266 Nodemcu Controlled Robotic Vehicle with RFID and Ultrasonic Sensing
Image of Warehouse Management robot: A project utilizing Arduino Esplora (Rev4) in a practical application
This circuit features an Arduino UNO as the main controller, interfaced with IR sensors, an HC-SR04 ultrasonic sensor, an RFID-RC522 reader, and an ESP8266 NodeMCU for WiFi connectivity. The Arduino controls multiple DC motors through an L298N motor driver, enabling the robot to navigate and respond to sensor inputs. The ESP8266 allows for remote manual control via the Blynk app, while the Arduino manages automatic navigation and RFID tag detection for object interaction.
Cirkit Designer LogoOpen Project in Cirkit Designer

Explore Projects Built with Arduino Esplora (Rev4)

Use Cirkit Designer to design, explore, and prototype these projects online. Some projects support real-time simulation. Click "Open Project" to start designing instantly!
Image of Copy of surveillance rover: A project utilizing Arduino Esplora (Rev4) in a practical application
Arduino Uno Wi-Fi Controlled Rover with Ultrasonic and PIR Sensors
This circuit is a Wi-Fi controlled rover with obstacle detection and motion sensing capabilities. It uses an Arduino Uno to interface with an HC-SR04 ultrasonic sensor for distance measurement, a PIR sensor for motion detection, a micro servo for camera panning, and an L298N motor driver for controlling the rover's motors. The ESP8266 Wi-Fi module allows remote control via a web interface.
Cirkit Designer LogoOpen Project in Cirkit Designer
Image of WI-FI based Homeautomation: A project utilizing Arduino Esplora (Rev4) in a practical application
Arduino and ESP-8266 Based Flame Detection and Climate Monitoring System
This circuit features an Arduino Leonardo as the central controller, interfaced with an ESP-8266 for wireless communication capabilities. The Arduino controls a 4-channel relay module to switch various loads, including a bulb, an LED, a water pump, and an exhaust fan. It also reads data from a flame sensor and a DHT11 humidity and temperature sensor, drives a buzzer, and displays information on a 16x2 LCD. The system is powered by a 9V battery, and the LCD's backlight is controlled through a resistor.
Cirkit Designer LogoOpen Project in Cirkit Designer
Image of Robot_L298N_WiFi: A project utilizing Arduino Esplora (Rev4) in a practical application
Arduino UNO and ESP8266 Wi-Fi Controlled Battery-Powered Robot Car
This circuit is a WiFi-controlled robot that uses an Arduino UNO to manage motor movements via an H-bridge and two DC motors. The ESP8266 ESP-01 module provides WiFi connectivity, allowing remote control commands to be sent to the Arduino, which then drives the motors to move the robot forward, backward, left, right, or stop.
Cirkit Designer LogoOpen Project in Cirkit Designer
Image of Warehouse Management robot: A project utilizing Arduino Esplora (Rev4) in a practical application
Arduino and ESP8266 Nodemcu Controlled Robotic Vehicle with RFID and Ultrasonic Sensing
This circuit features an Arduino UNO as the main controller, interfaced with IR sensors, an HC-SR04 ultrasonic sensor, an RFID-RC522 reader, and an ESP8266 NodeMCU for WiFi connectivity. The Arduino controls multiple DC motors through an L298N motor driver, enabling the robot to navigate and respond to sensor inputs. The ESP8266 allows for remote manual control via the Blynk app, while the Arduino manages automatic navigation and RFID tag detection for object interaction.
Cirkit Designer LogoOpen Project in Cirkit Designer

Common Applications and Use Cases

  • Educational tools for schools and workshops
  • Rapid prototyping of interactive applications
  • Game controllers
  • Sensor data collection
  • Robotics

Technical Specifications

Key Technical Details

  • Microcontroller: ATmega32U4
  • Operating Voltage: 5V
  • Input Voltage (recommended): USB 5V
  • Digital I/O Pins: 12 (of which 4 provide PWM output)
  • Analog Input Pins: 6
  • DC Current per I/O Pin: 40 mA
  • Flash Memory: 32 KB (ATmega32U4) of which 4 KB used by bootloader
  • SRAM: 2.5 KB (ATmega32U4)
  • EEPROM: 1 KB (ATmega32U4)
  • Clock Speed: 16 MHz
  • LED_BUILTIN: 13

Pin Configuration and Descriptions

Pin Number Function Description
1 Ground Ground pin, 0V reference point
2-5 Button Inputs Digital pins connected to onboard buttons
6-9 RGB LED Digital pins connected to onboard RGB LED
10 Light Sensor Analog pin connected to onboard light sensor
11 Temperature Analog pin for onboard temperature sensor
12 Microphone Analog pin connected to onboard microphone
13 LED_BUILTIN Digital pin connected to the onboard LED
A0-A5 Analog Inputs Analog pins for additional sensors
ICSP In-Circuit Serial Programming Header for bootloader programming

Usage Instructions

How to Use the Component in a Circuit

The Arduino Esplora is designed to be used without external components for basic applications. However, it can be expanded with TinkerKit modules and sensors.

  1. Connect the Esplora to your computer using a USB cable.
  2. Launch the Arduino IDE on your computer.
  3. Select "Arduino Esplora" from the Tools > Board menu.
  4. Choose the correct serial port from Tools > Port.
  5. Write or upload your sketch to the board.

Important Considerations and Best Practices

  • Ensure that the USB drivers for the Esplora are correctly installed.
  • When using external power sources, do not exceed the recommended input voltage.
  • Avoid exposing the board to moisture or placing it on conductive surfaces.
  • Always disconnect the Esplora from power sources before making any hardware changes.

Example Code for Arduino UNO

// Example sketch for the Arduino Esplora
// This sketch will read the onboard light sensor and control the brightness of the LED.

#include <Esplora.h>

void setup() {
  // There is no need to set up the pins for the onboard sensors and actuators.
}

void loop() {
  // Read the light sensor value (ranging from 0 to 1023)
  int sensorValue = Esplora.readLightSensor();

  // Map the sensor value to a range suitable for LED brightness (0 to 255)
  int ledBrightness = map(sensorValue, 0, 1023, 0, 255);

  // Set the brightness of the LED
  Esplora.writeRed(ledBrightness); // Control the red channel of the RGB LED

  // A short delay before the next reading
  delay(100);
}

Troubleshooting and FAQs

Common Issues Users Might Face

  • Esplora not recognized by the computer: Ensure that the USB cable is properly connected and the drivers are installed.
  • Sketch not uploading: Check the selected board and port in the Arduino IDE. Reset the board if necessary.
  • Inaccurate sensor readings: Verify that there is no obstruction or interference affecting the sensors.

Solutions and Tips for Troubleshooting

  • If the Esplora is not recognized, try a different USB port or cable.
  • Ensure that no other program is using the selected serial port.
  • Calibrate sensors if readings are consistently inaccurate.

FAQs

Q: Can I use the Arduino Esplora as a game controller? A: Yes, the Esplora can emulate a mouse or keyboard and be used as a custom game controller.

Q: How do I extend the capabilities of the Esplora? A: You can connect TinkerKit modules and additional sensors to the TinkerKit I/O connectors.

Q: Is the Esplora compatible with all Arduino IDE versions? A: The Esplora is compatible with Arduino IDE versions that support the ATmega32U4 microcontroller. Always use the latest version for the best experience.

This documentation provides a comprehensive guide to the Arduino Esplora (Rev4), enabling users to get started quickly and troubleshoot common issues. Whether you're a beginner or an experienced user, the Esplora offers a versatile platform for exploring the world of electronics and programming.