Cirkit Designer Logo
Cirkit Designer
Your all-in-one circuit design IDE
Home / 
Component Documentation

How to Use Caddx Ant FPV Camera 1200TVL Global WDR OSD Ultra Light Nano 16:9 for RC FPV: Examples, Pinouts, and Specs

Image of Caddx Ant FPV Camera 1200TVL Global WDR OSD Ultra Light Nano 16:9 for RC FPV
Cirkit Designer LogoDesign with Caddx Ant FPV Camera 1200TVL Global WDR OSD Ultra Light Nano 16:9 for RC FPV in Cirkit Designer

Introduction

The Caddx Ant FPV Camera is a lightweight, high-performance camera designed for use in remote-controlled (RC) vehicles, such as drones and FPV (First Person View) racing quads. With its 1200TVL resolution, global wide dynamic range (WDR), and on-screen display (OSD) capabilities, this camera delivers exceptional image quality and real-time telemetry data, even in challenging lighting conditions. Its ultra-lightweight design makes it ideal for applications where weight is a critical factor.

Explore Projects Built with Caddx Ant FPV Camera 1200TVL Global WDR OSD Ultra Light Nano 16:9 for RC FPV

Use Cirkit Designer to design, explore, and prototype these projects online. Some projects support real-time simulation. Click "Open Project" to start designing instantly!
GPS-Enabled Telemetry Drone with Speedybee F405 WING and Brushless Motor
Image of Pharmadrone Wiring: A project utilizing Caddx Ant FPV Camera 1200TVL Global WDR OSD Ultra Light Nano 16:9 for RC FPV in a practical application
This circuit is designed for a remote-controlled vehicle or drone, featuring a flight controller that manages a brushless motor, servomotors for actuation, telemetry for data communication, and a GPS module for positioning. It is powered by a lipo battery and includes a receiver for remote control inputs.
Cirkit Designer LogoOpen Project in Cirkit Designer
Arduino UNO Bluetooth Controlled Drone with GPS and Camera
Image of Arduino drone: A project utilizing Caddx Ant FPV Camera 1200TVL Global WDR OSD Ultra Light Nano 16:9 for RC FPV in a practical application
This circuit is an Arduino-based drone control system that uses Bluetooth for communication, a GPS module for location tracking, and a camera module for capturing images. The Arduino controls four DC motors to maneuver the drone based on commands received via Bluetooth, while also processing data from the GPS and camera modules.
Cirkit Designer LogoOpen Project in Cirkit Designer
Battery-Powered BLDC Motor Control System with KK2.1.5 Flight Controller
Image of broncsDrone: A project utilizing Caddx Ant FPV Camera 1200TVL Global WDR OSD Ultra Light Nano 16:9 for RC FPV in a practical application
This circuit is a quadcopter control system that includes a LiPo battery, four BLDC motors, four ESCs, a KK2.1.5 flight controller, and an FS-R6B receiver. The KK2.1.5 flight controller manages the ESCs and motors based on input signals from the receiver, which is powered by the LiPo battery.
Cirkit Designer LogoOpen Project in Cirkit Designer
Arduino-Controlled Quadcopter with GPS and NRF24L01 Wireless Communication
Image of Octocopter Drone Circuit1: A project utilizing Caddx Ant FPV Camera 1200TVL Global WDR OSD Ultra Light Nano 16:9 for RC FPV in a practical application
This circuit is designed for a quadcopter control system. It features an Arduino Pro Mini as the central microcontroller, interfacing with a GPS module for positioning, an NRF24L01 module for wireless communication, and an MPU-6050 for motion sensing. Power regulation is managed by an MP1584EN board, and four electronic speed controllers (ESCs) are connected to brushless motors for propeller control.
Cirkit Designer LogoOpen Project in Cirkit Designer

Explore Projects Built with Caddx Ant FPV Camera 1200TVL Global WDR OSD Ultra Light Nano 16:9 for RC FPV

Use Cirkit Designer to design, explore, and prototype these projects online. Some projects support real-time simulation. Click "Open Project" to start designing instantly!
Image of Pharmadrone Wiring: A project utilizing Caddx Ant FPV Camera 1200TVL Global WDR OSD Ultra Light Nano 16:9 for RC FPV in a practical application
GPS-Enabled Telemetry Drone with Speedybee F405 WING and Brushless Motor
This circuit is designed for a remote-controlled vehicle or drone, featuring a flight controller that manages a brushless motor, servomotors for actuation, telemetry for data communication, and a GPS module for positioning. It is powered by a lipo battery and includes a receiver for remote control inputs.
Cirkit Designer LogoOpen Project in Cirkit Designer
Image of Arduino drone: A project utilizing Caddx Ant FPV Camera 1200TVL Global WDR OSD Ultra Light Nano 16:9 for RC FPV in a practical application
Arduino UNO Bluetooth Controlled Drone with GPS and Camera
This circuit is an Arduino-based drone control system that uses Bluetooth for communication, a GPS module for location tracking, and a camera module for capturing images. The Arduino controls four DC motors to maneuver the drone based on commands received via Bluetooth, while also processing data from the GPS and camera modules.
Cirkit Designer LogoOpen Project in Cirkit Designer
Image of broncsDrone: A project utilizing Caddx Ant FPV Camera 1200TVL Global WDR OSD Ultra Light Nano 16:9 for RC FPV in a practical application
Battery-Powered BLDC Motor Control System with KK2.1.5 Flight Controller
This circuit is a quadcopter control system that includes a LiPo battery, four BLDC motors, four ESCs, a KK2.1.5 flight controller, and an FS-R6B receiver. The KK2.1.5 flight controller manages the ESCs and motors based on input signals from the receiver, which is powered by the LiPo battery.
Cirkit Designer LogoOpen Project in Cirkit Designer
Image of Octocopter Drone Circuit1: A project utilizing Caddx Ant FPV Camera 1200TVL Global WDR OSD Ultra Light Nano 16:9 for RC FPV in a practical application
Arduino-Controlled Quadcopter with GPS and NRF24L01 Wireless Communication
This circuit is designed for a quadcopter control system. It features an Arduino Pro Mini as the central microcontroller, interfacing with a GPS module for positioning, an NRF24L01 module for wireless communication, and an MPU-6050 for motion sensing. Power regulation is managed by an MP1584EN board, and four electronic speed controllers (ESCs) are connected to brushless motors for propeller control.
Cirkit Designer LogoOpen Project in Cirkit Designer

Common Applications and Use Cases

  • FPV racing drones for high-speed, low-latency video feeds.
  • RC vehicles requiring real-time video transmission.
  • Aerial photography and videography in dynamic lighting environments.
  • Hobbyist and professional FPV setups for immersive experiences.

Technical Specifications

Below are the key technical details of the Caddx Ant FPV Camera:

Specification Details
Resolution 1200TVL
Aspect Ratio 16:9
Lens 2.1mm
Field of View (FOV) 165°
Image Sensor 1/3" CMOS
Wide Dynamic Range (WDR) Global WDR
Signal System PAL/NTSC (switchable)
Input Voltage 3.7V - 18V
Power Consumption ≤200mA @ 5V
Dimensions 14mm x 14mm x 16mm
Weight 2g
On-Screen Display (OSD) Supported
Operating Temperature -20°C to 60°C

Pin Configuration and Descriptions

The Caddx Ant FPV Camera features a 4-pin connector for power, video, and control. Below is the pinout:

Pin Name Description
1 GND Ground connection for power and signal.
2 VCC Power input (3.7V - 18V).
3 VIDEO Analog video output for FPV transmission.
4 OSD/Control UART connection for OSD configuration and control.

Usage Instructions

How to Use the Component in a Circuit

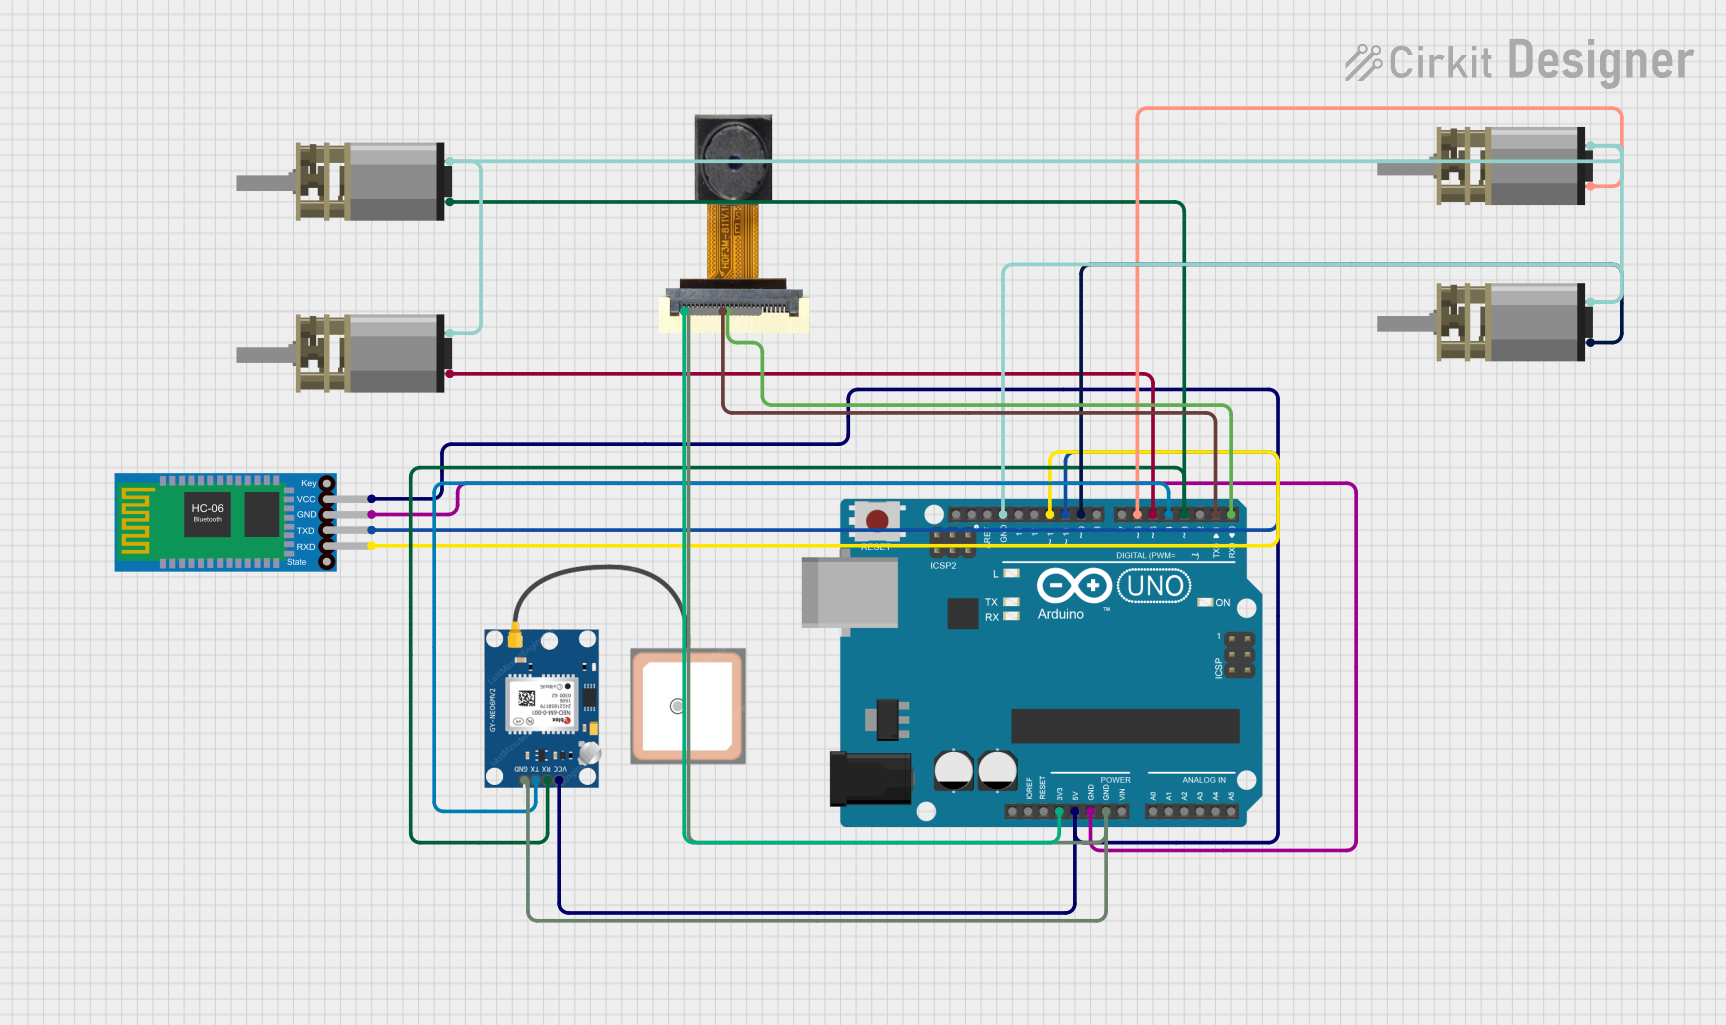
  1. Power Connection: Connect the VCC pin to a power source within the range of 3.7V to 18V. Ensure the GND pin is connected to the ground of the power source.
  2. Video Output: Connect the VIDEO pin to the video input of your FPV transmitter or display device.
  3. OSD Configuration: Use the OSD/Control pin to configure the on-screen display settings via a UART interface. This allows you to customize telemetry data displayed on the screen.

Important Considerations and Best Practices

  • Voltage Range: Ensure the input voltage is within the specified range (3.7V - 18V) to avoid damaging the camera.
  • Mounting: Use a secure mounting solution to prevent vibrations from affecting image quality.
  • Lighting Conditions: Take advantage of the global WDR feature to maintain image clarity in environments with high contrast lighting.
  • OSD Configuration: Use the provided UART interface to adjust OSD settings, such as enabling or disabling telemetry data.

Example: Connecting to an Arduino UNO

The Caddx Ant FPV Camera can be connected to an Arduino UNO for basic UART-based OSD configuration. Below is an example code snippet:

#include <SoftwareSerial.h>

// Define RX and TX pins for UART communication
#define RX_PIN 10
#define TX_PIN 11

// Initialize SoftwareSerial for communication with the camera
SoftwareSerial cameraSerial(RX_PIN, TX_PIN);

void setup() {
  // Start serial communication with the camera
  cameraSerial.begin(9600); // Default baud rate for the camera
  Serial.begin(9600);       // Serial monitor for debugging

  // Send a sample command to the camera (e.g., change OSD settings)
  cameraSerial.println("OSD:ENABLE"); // Enable OSD telemetry display
  Serial.println("Sent command to enable OSD.");
}

void loop() {
  // Check for incoming data from the camera
  if (cameraSerial.available()) {
    String response = cameraSerial.readString();
    Serial.println("Camera Response: " + response);
  }
}

Note: Refer to the camera's user manual for specific UART commands and baud rate settings.

Troubleshooting and FAQs

Common Issues and Solutions

  1. No Video Output:

    • Cause: Incorrect wiring or power supply issues.
    • Solution: Verify the connections to the VCC, GND, and VIDEO pins. Ensure the power supply voltage is within the specified range.
  2. Blurry or Distorted Image:

    • Cause: Improper focus or lens contamination.
    • Solution: Adjust the lens focus and clean the lens with a microfiber cloth.
  3. OSD Not Displaying:

    • Cause: OSD is disabled or UART connection is incorrect.
    • Solution: Check the UART connection and send the appropriate command to enable OSD.
  4. Overheating:

    • Cause: Prolonged use in high-temperature environments.
    • Solution: Ensure proper ventilation and avoid operating the camera beyond its temperature range (-20°C to 60°C).

FAQs

  • Q: Can I use this camera with a 2S or 4S LiPo battery?

    • A: Yes, the camera supports input voltages from 3.7V to 18V, making it compatible with 2S (7.4V) and 4S (14.8V) LiPo batteries.
  • Q: How do I switch between PAL and NTSC modes?

    • A: Use the OSD/Control pin to send the appropriate UART command to toggle between PAL and NTSC modes.
  • Q: Is the camera waterproof?

    • A: No, the camera is not waterproof. Avoid exposing it to water or moisture.
  • Q: Can I use this camera for night vision?

    • A: The camera does not have infrared (IR) capabilities, so it is not suitable for complete darkness. However, it performs well in low-light conditions due to its WDR feature.