How to Use Ramps 1.6: Examples, Pinouts, and Specs
Introduction
Ramps 1.6 is a popular open-source electronics platform designed for controlling 3D printers and CNC machines. Manufactured by ARDUINO (Part ID: 1), it combines an Arduino Mega with stepper motor drivers and provides multiple connections for heaters, fans, sensors, and other peripherals. This board is an upgraded version of the Ramps 1.4, offering improved heat dissipation, better component layout, and enhanced durability.
Explore Projects Built with Ramps 1.6


Explore Projects Built with Ramps 1.6
Common Applications and Use Cases
- 3D printers (e.g., RepRap-based systems)
- CNC machines
- Laser engravers
- Robotics projects requiring stepper motor control
- Prototyping and educational purposes
Technical Specifications
Below are the key technical details of the Ramps 1.6 board:
| Specification | Details |
|---|---|
| Microcontroller | Compatible with Arduino Mega 2560 |
| Input Voltage | 12V-24V DC |
| Stepper Motor Drivers | Supports A4988, DRV8825, TMC2208, and other compatible stepper drivers |
| Heater Outputs | 3 (Hotend, Heated Bed, and Auxiliary Heater) |
| Fan Outputs | 2 (PWM-controlled) |
| Thermistor Inputs | 3 (for temperature sensors) |
| Endstop Inputs | 6 (X, Y, Z axes - Min and Max) |
| Expansion Ports | LCD, SD card, and additional I/O pins |
| Dimensions | 110mm x 60mm |
| Weight | ~50g |
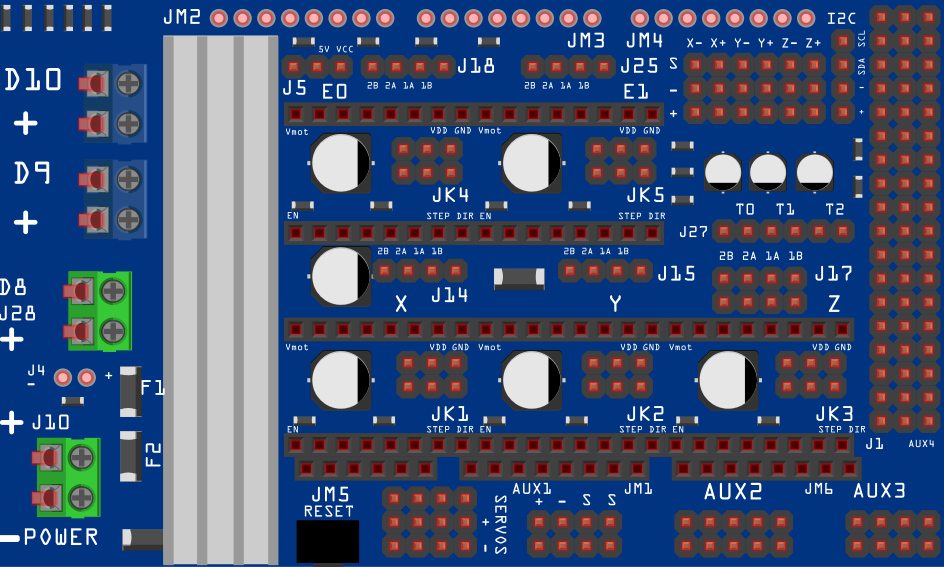
Pin Configuration and Descriptions
The Ramps 1.6 board features a variety of connectors and pins. Below is a table summarizing the key pin configurations:
| Pin/Port | Description |
|---|---|
| X, Y, Z Motor | Connectors for stepper motors controlling the X, Y, and Z axes |
| E Motor | Connector for the extruder stepper motor |
| Endstops | Inputs for X, Y, Z axis endstops (Min and Max) |
| Heater 1, 2, 3 | Outputs for hotend, heated bed, and auxiliary heater |
| Fan 1, 2 | Outputs for cooling fans (PWM-controlled) |
| Thermistors | Inputs for temperature sensors (T0, T1, T2) |
| Power Input | Screw terminals for 12V-24V DC power supply |
| LCD/SD Ports | Connectors for LCD display and SD card module |
| Stepper Drivers | Sockets for stepper motor drivers (A4988, DRV8825, etc.) |
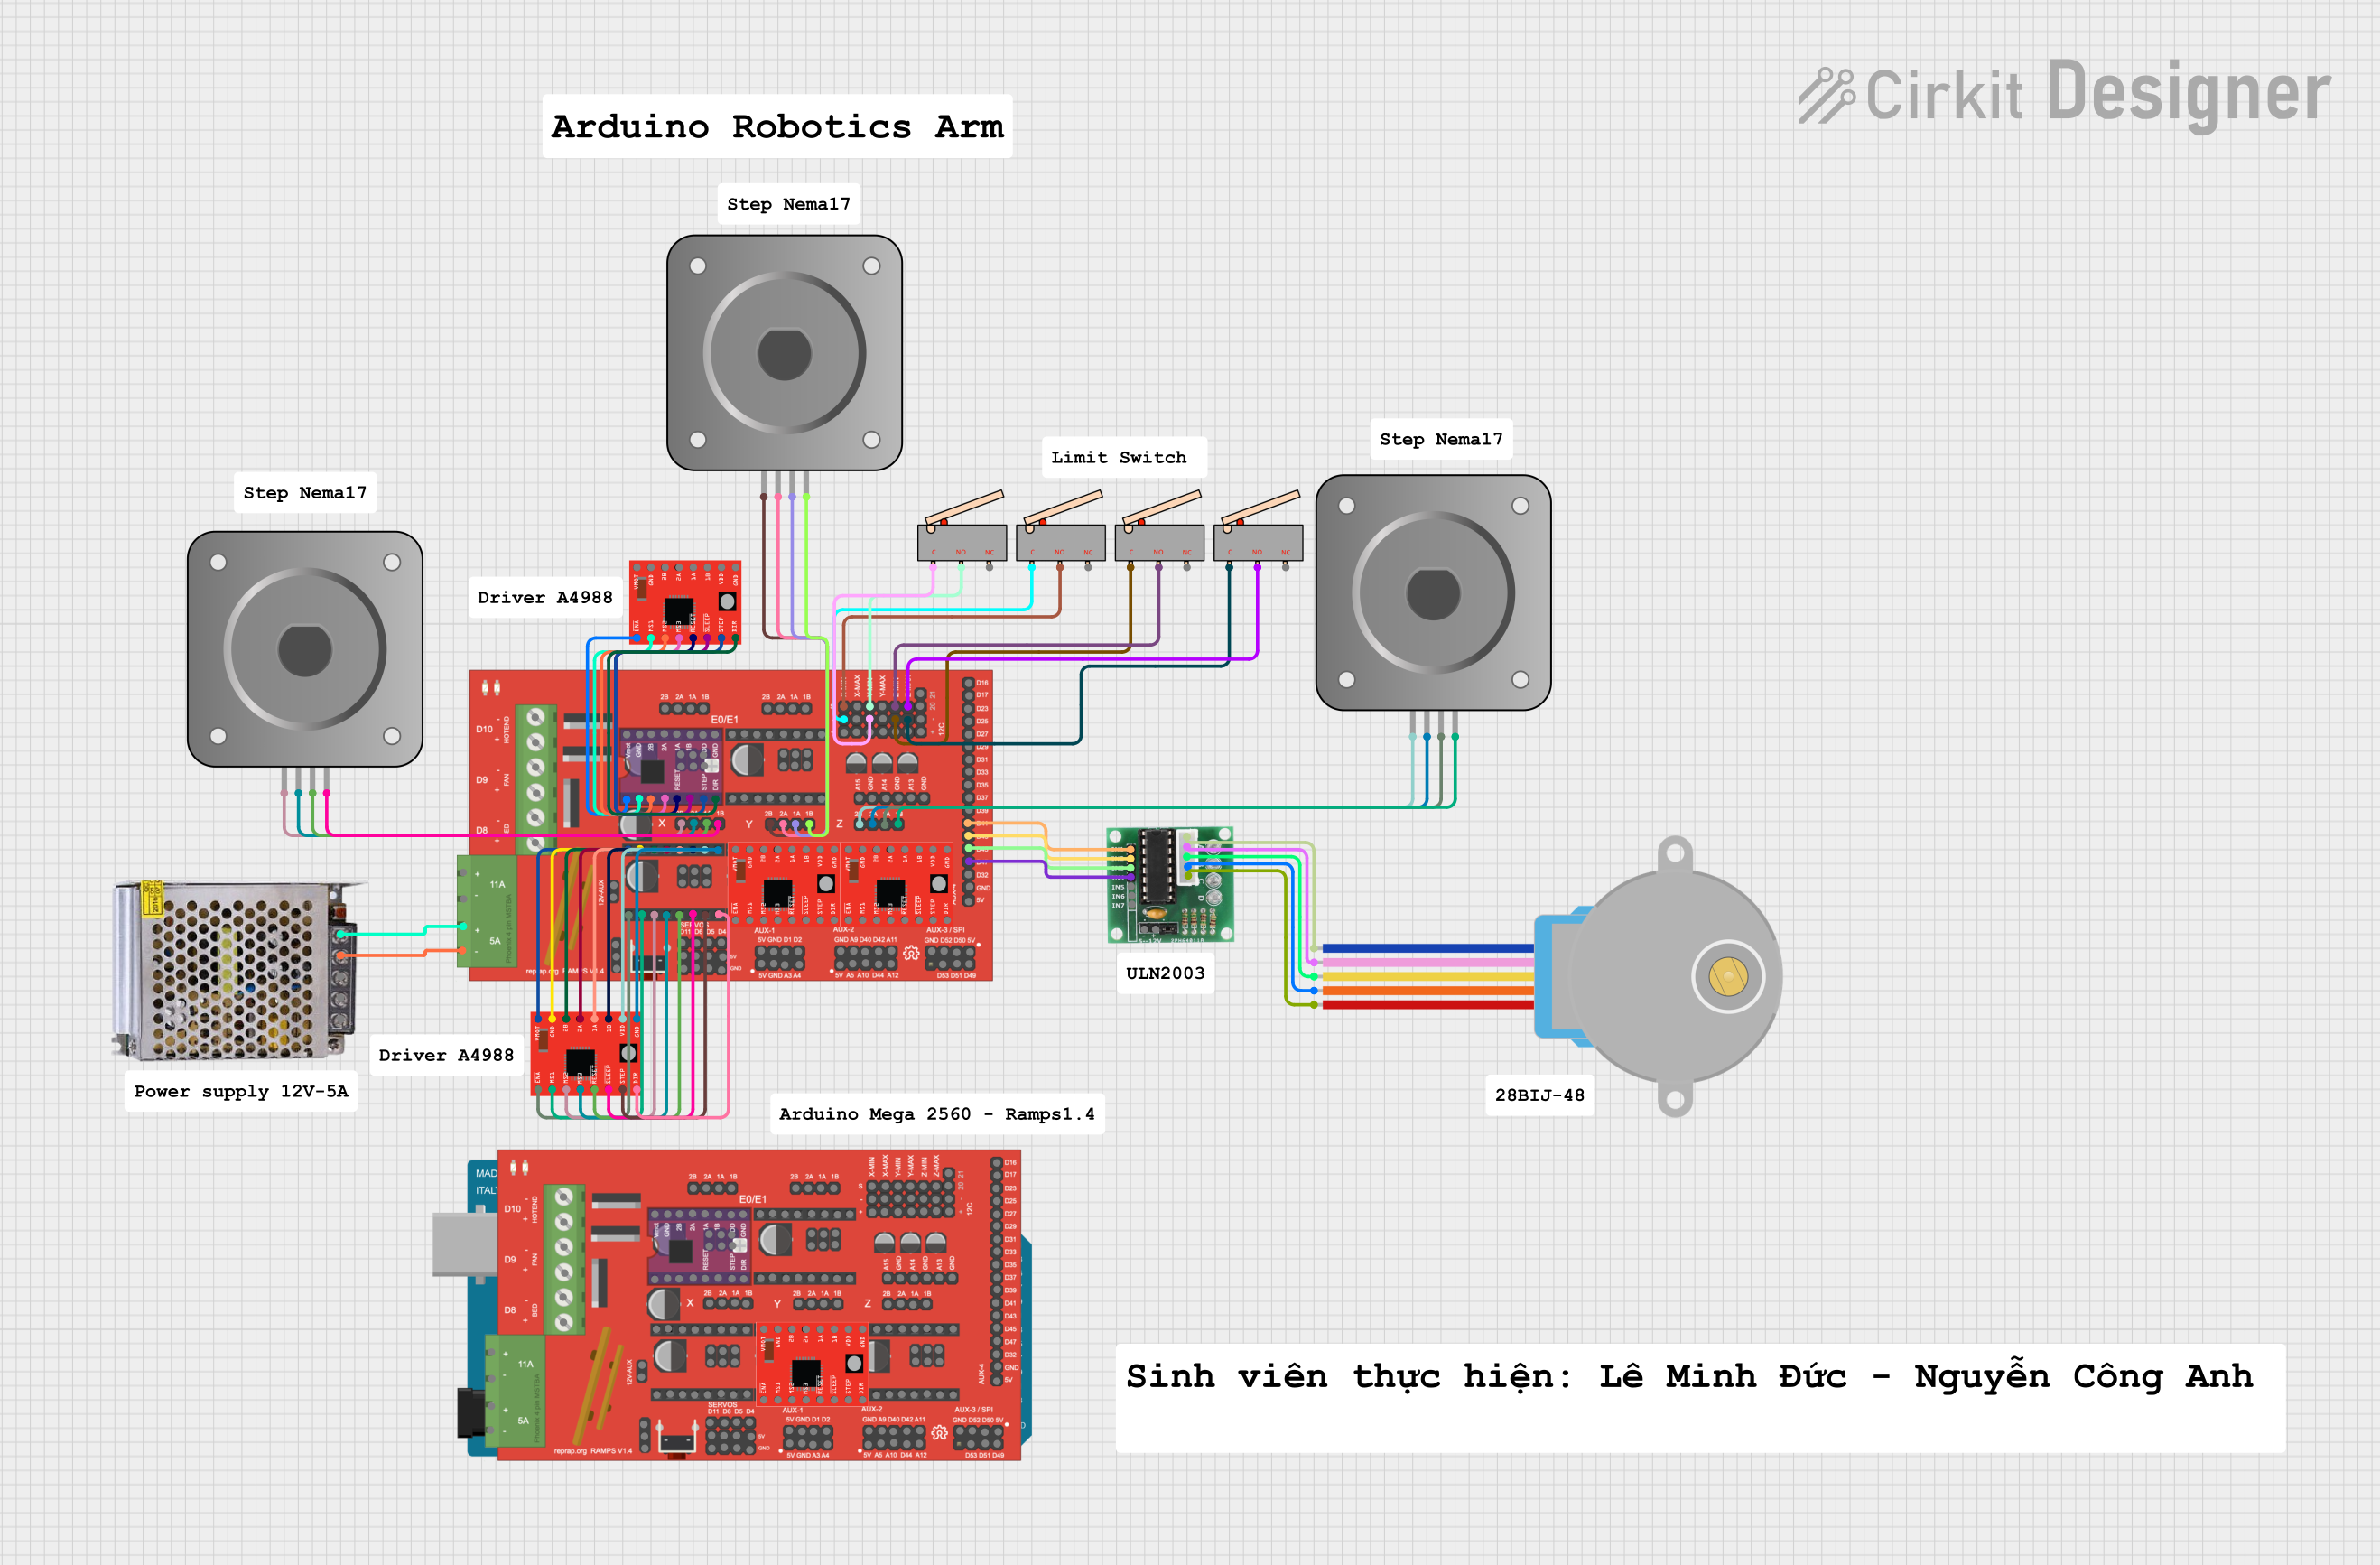
Usage Instructions
How to Use the Ramps 1.6 in a Circuit
Connect the Ramps 1.6 to an Arduino Mega 2560:
- Align the Ramps 1.6 board with the Arduino Mega 2560 and carefully plug it in.
- Ensure all pins are properly seated to avoid connection issues.
Install Stepper Motor Drivers:
- Insert compatible stepper motor drivers (e.g., A4988 or DRV8825) into the designated sockets.
- Adjust the current limit on the drivers as per your stepper motor specifications.
Connect Power Supply:
- Use a 12V-24V DC power supply and connect it to the power input terminals.
- Ensure proper polarity to avoid damaging the board.
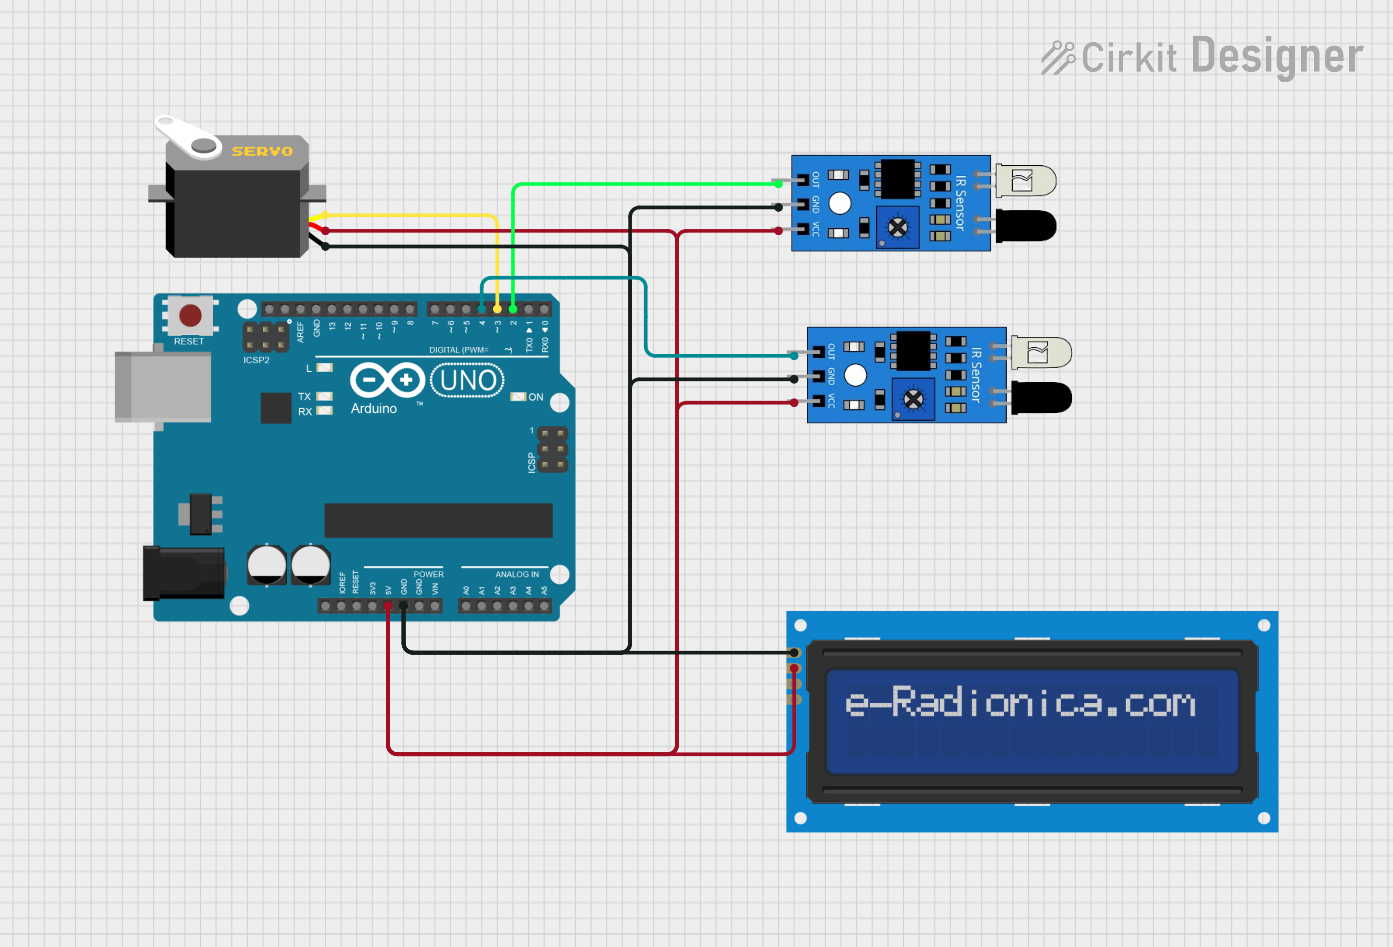
Connect Peripherals:
- Attach stepper motors, endstops, thermistors, heaters, and fans to their respective connectors.
- If using an LCD or SD card module, connect them to the expansion ports.
Upload Firmware:
- Install and configure firmware such as Marlin or Repetier on the Arduino Mega.
- Use the Arduino IDE to upload the firmware via USB.
Test the Setup:
- Power on the system and verify that all components function correctly.
- Use the firmware's control interface to test motor movement, temperature readings, and fan operation.
Important Considerations and Best Practices
- Cooling: Ensure proper cooling for the stepper motor drivers to prevent overheating. Use heatsinks and a cooling fan if necessary.
- Polarity: Double-check the polarity of all connections, especially the power supply and heaters.
- Firmware Configuration: Customize the firmware settings (e.g., steps per mm, thermistor type) to match your hardware setup.
- Driver Orientation: Insert stepper motor drivers in the correct orientation to avoid damage.
- Secure Connections: Tighten all screw terminals and connectors to ensure reliable operation.
Example Code for Arduino Mega
Below is an example of configuring the Ramps 1.6 with an Arduino Mega for basic stepper motor control:
// Example code to control a stepper motor using Ramps 1.6 and Arduino Mega
// Ensure the stepper motor driver is properly installed on the Ramps 1.6 board

#define STEP_PIN 54  // X-axis step pin
#define DIR_PIN 55   // X-axis direction pin
#define ENABLE_PIN 38 // Enable pin for the stepper driver

void setup() {
  pinMode(STEP_PIN, OUTPUT);  // Set step pin as output
  pinMode(DIR_PIN, OUTPUT);   // Set direction pin as output
  pinMode(ENABLE_PIN, OUTPUT); // Set enable pin as output

  digitalWrite(ENABLE_PIN, LOW); // Enable the stepper driver
}

void loop() {
  digitalWrite(DIR_PIN, HIGH); // Set direction to forward
  for (int i = 0; i < 200; i++) { // Move 200 steps
    digitalWrite(STEP_PIN, HIGH); // Step pulse
    delayMicroseconds(500);       // Pulse duration
    digitalWrite(STEP_PIN, LOW);  // End of step pulse
    delayMicroseconds(500);       // Delay between steps
  }
  delay(1000); // Wait for 1 second

  digitalWrite(DIR_PIN, LOW); // Set direction to reverse
  for (int i = 0; i < 200; i++) { // Move 200 steps in reverse
    digitalWrite(STEP_PIN, HIGH);
    delayMicroseconds(500);
    digitalWrite(STEP_PIN, LOW);
    delayMicroseconds(500);
  }
  delay(1000); // Wait for 1 second
}
Troubleshooting and FAQs
Common Issues and Solutions
Stepper Motors Not Moving:
- Cause: Incorrect wiring or driver installation.
- Solution: Verify motor connections and ensure drivers are properly seated.
Overheating Drivers:
- Cause: Insufficient cooling or excessive current.
- Solution: Install heatsinks and a cooling fan. Adjust the current limit on the drivers.
No Power to the Board:
- Cause: Incorrect power supply connection or blown fuse.
- Solution: Check the power supply polarity and replace the fuse if necessary.
Temperature Sensor Errors:
- Cause: Faulty thermistor or incorrect firmware configuration.
- Solution: Verify thermistor connections and update the firmware settings.
LCD Not Displaying:
- Cause: Loose connection or incompatible firmware.
- Solution: Reconnect the LCD and ensure the firmware supports the display.
FAQs
Can I use Ramps 1.6 with other microcontrollers?
- No, Ramps 1.6 is specifically designed for the Arduino Mega 2560.
What is the maximum current supported by the stepper motor drivers?
- This depends on the driver used (e.g., A4988 supports up to 2A with proper cooling).
Is Ramps 1.6 backward compatible with Ramps 1.4?
- Yes, most components and configurations are compatible between the two versions.
Can I use 24V power with Ramps 1.6?
- Yes, Ramps 1.6 supports 12V-24V DC input. Ensure all components are rated for 24V.