The DS3231 is a highly accurate real-time clock (RTC) module with an I2C interface. It is designed to keep track of time (hours, minutes, seconds) and date (day, month, year) even during power outages, thanks to its onboard battery backup. The module features a temperature-compensated crystal oscillator (TCXO), ensuring exceptional accuracy with a drift of only ±2 minutes per year.
Explore Projects Built with RTC DS3231
Use Cirkit Designer to design, explore, and prototype these projects online. Some projects support real-time simulation. Click "Open Project" to start designing instantly!
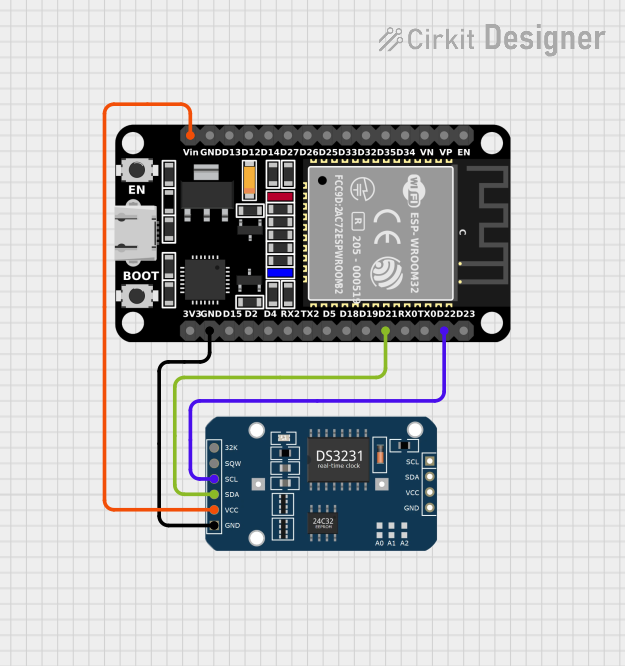
This circuit connects an ESP32 Devkit V1 microcontroller with an RTC DS3231 real-time clock module. The ESP32 provides power to the RTC and communicates with it via I2C, with D21 and D22 serving as the data (SDA) and clock (SCL) lines, respectively. The common ground (GND) ensures a reference point for the voltages, and the 3V3 pin from the ESP32 powers the RTC module.
This circuit connects an ESP32 microcontroller to a DS3231 Real Time Clock (RTC) module. The ESP32's Vin and GND pins are connected to the VCC and GND pins of the DS3231, providing power to the RTC. The SCL and SDA pins of the DS3231 are connected to the D22 and D21 pins of the ESP32, respectively, enabling I2C communication between the microcontroller and the RTC module.
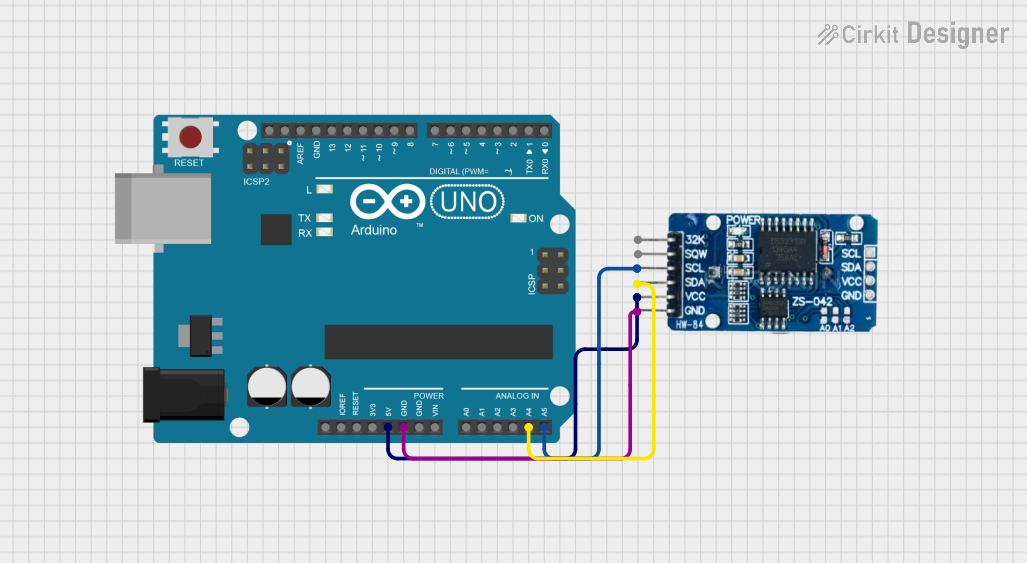
This circuit connects an Arduino UNO microcontroller with a DS3231 Real Time Clock (RTC) module. The Arduino provides 5V power and ground to the RTC and communicates with it via the I2C protocol using the A4 (SDA) and A5 (SCL) pins. The embedded code on the Arduino is used to initialize the RTC, check for power loss, set the current time if needed, and periodically read and print the current time to the serial monitor.
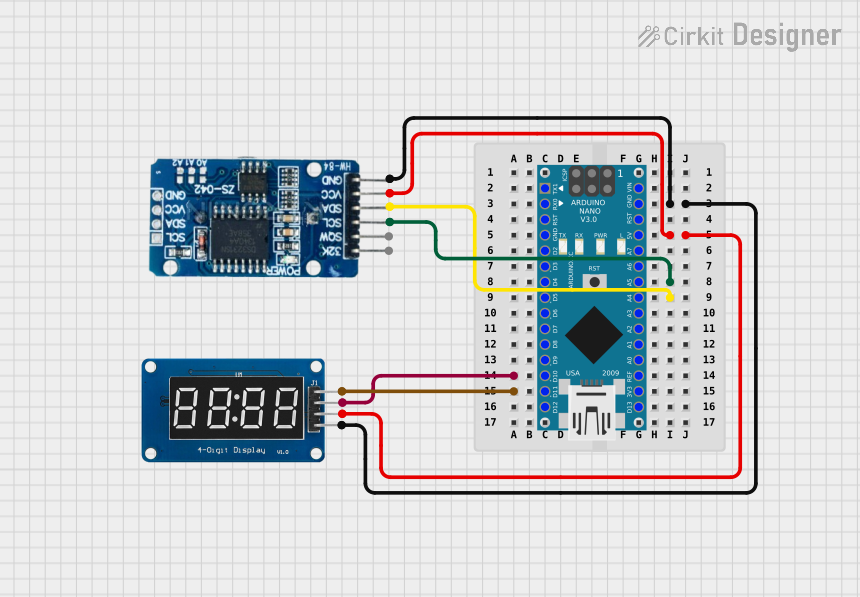
This circuit features an Arduino Nano interfacing with a DS3231 Real-Time Clock for timekeeping and a TM1637 display module for visual output. The Arduino facilitates I2C communication with the RTC and controls the display using digital IO, serving as the central processing unit for a digital clock or timer application.
The DS3231 module typically has 6 pins. Below is the pinout and description:
Pin
Name
Description
1
GND
Ground connection
2
VCC
Power supply (2.3V to 5.5V)
3
SDA
Serial Data Line for I2C communication
4
SCL
Serial Clock Line for I2C communication
5
32K
Optional 32kHz output (can be used for external clocking)
6
SQW
Square Wave/Interrupt output (programmable frequency or alarm interrupt signal)
Usage Instructions
How to Use the DS3231 in a Circuit
Power the Module: Connect the VCC pin to a 3.3V or 5V power source and the GND pin to ground.
I2C Communication: Connect the SDA and SCL pins to the corresponding I2C pins on your microcontroller. For an Arduino UNO:
SDA connects to A4
SCL connects to A5
Optional Connections:
Use the SQW pin for alarms or square wave output.
Use the 32K pin if you need a 32kHz clock signal.
Battery Backup: Insert a CR2032 coin cell battery into the holder to maintain timekeeping during power loss.
Important Considerations
Ensure pull-up resistors (typically 4.7kΩ) are connected to the SDA and SCL lines if not already present on the module.
Avoid shorting the battery holder terminals to prevent damage.
The DS3231 operates on I2C address 0x68 by default.
Example Code for Arduino UNO
Below is an example of how to interface the DS3231 with an Arduino UNO to read the current time and date:
#include <Wire.h>
#include "RTClib.h" // Include the Adafruit RTC library

RTC_DS3231 rtc; // Create an RTC object

void setup() {
  Serial.begin(9600); // Initialize serial communication
  Wire.begin();       // Initialize I2C communication

  if (!rtc.begin()) {
    Serial.println("Couldn't find RTC. Check connections!");
    while (1); // Halt execution if RTC is not found
  }

  if (rtc.lostPower()) {
    Serial.println("RTC lost power, setting the time!");
    // Set the RTC to the current date and time
    rtc.adjust(DateTime(F(__DATE__), F(__TIME__)));
  }
}

void loop() {
  DateTime now = rtc.now(); // Get the current time and date

  // Print the current time and date to the Serial Monitor
  Serial.print(now.year(), DEC);
  Serial.print('/');
  Serial.print(now.month(), DEC);
  Serial.print('/');
  Serial.print(now.day(), DEC);
  Serial.print(" ");
  Serial.print(now.hour(), DEC);
  Serial.print(':');
  Serial.print(now.minute(), DEC);
  Serial.print(':');
  Serial.print(now.second(), DEC);
  Serial.println();

  delay(1000); // Wait for 1 second before updating
}
Best Practices
Use a fresh CR2032 battery to ensure reliable timekeeping during power outages.
Avoid exposing the module to extreme temperatures to maintain accuracy.
Regularly check the battery voltage and replace it when necessary.
Troubleshooting and FAQs
Common Issues and Solutions
RTC Not Detected:
Cause: Incorrect wiring or I2C address mismatch.
Solution: Verify the SDA and SCL connections. Ensure the I2C address is set to 0x68.
Incorrect Time/Date:
Cause: RTC lost power or was not initialized properly.
Solution: Use the rtc.adjust() function to set the correct time and date.
No Output on Serial Monitor:
Cause: Serial communication not initialized or incorrect baud rate.
Solution: Ensure Serial.begin(9600) is called in setup() and the Serial Monitor is set to 9600 baud.
Drifting Time:
Cause: Faulty crystal oscillator or extreme temperature variations.
Solution: Replace the module if the drift exceeds specifications.
FAQs
Q: Can the DS3231 operate without a battery? A: Yes, but it will lose timekeeping during power outages.
Q: How long does the battery last? A: A typical CR2032 battery can last several years, depending on usage.
Q: Can I use the DS3231 with 3.3V systems? A: Yes, the DS3231 is compatible with both 3.3V and 5V systems.
Q: What is the purpose of the SQW pin? A: The SQW pin can output a programmable square wave or serve as an alarm interrupt signal.
By following this documentation, you can effectively integrate the DS3231 RTC module into your projects for precise and reliable timekeeping.



 Open Project in Cirkit Designer