Cirkit Designer
Your all-in-one circuit design IDE
Home /
Component Documentation
How to Use 5/2 way 24v dc single selenoid valve: Examples, Pinouts, and Specs
Introduction
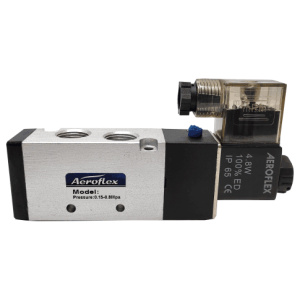
The Aeroflex 5/2 Way 24V DC Single Solenoid Valve (Part ID: VALVE) is a versatile component used to control the flow of air or fluid in pneumatic or hydraulic systems. This valve features five ports and two positions, allowing for efficient and precise control of fluid dynamics. It operates on a 24V DC power supply and is commonly used in industrial automation, robotics, and various fluid control applications.
Explore Projects Built with 5/2 way 24v dc single selenoid valve
ESP32-Controlled Water Pump and Solenoid Valve System

This circuit is designed to control multiple Mini Diaphragm Water Pumps and a Plastic Solenoid Valve using an ESP32 microcontroller and a 4-channel relay module. The ESP32 is powered by a 12V power supply, and it can switch the relays to turn the pumps and the valve on or off. The power supply also provides 220V AC to 12V DC conversion for the system.
Wi-Fi Controlled Irrigation and Well Pump System

This circuit is designed to automate irrigation and well pump control using a Wemos D1 Mini microcontroller. It includes a 4-channel 5V relay module for controlling 24V irrigation valves and a separate relay for a 220V well pump, with power supplied by a 5V power supply and a 220V to 24V transformer.
Arduino-Controlled Sequential Solenoid Valve System with Local Override
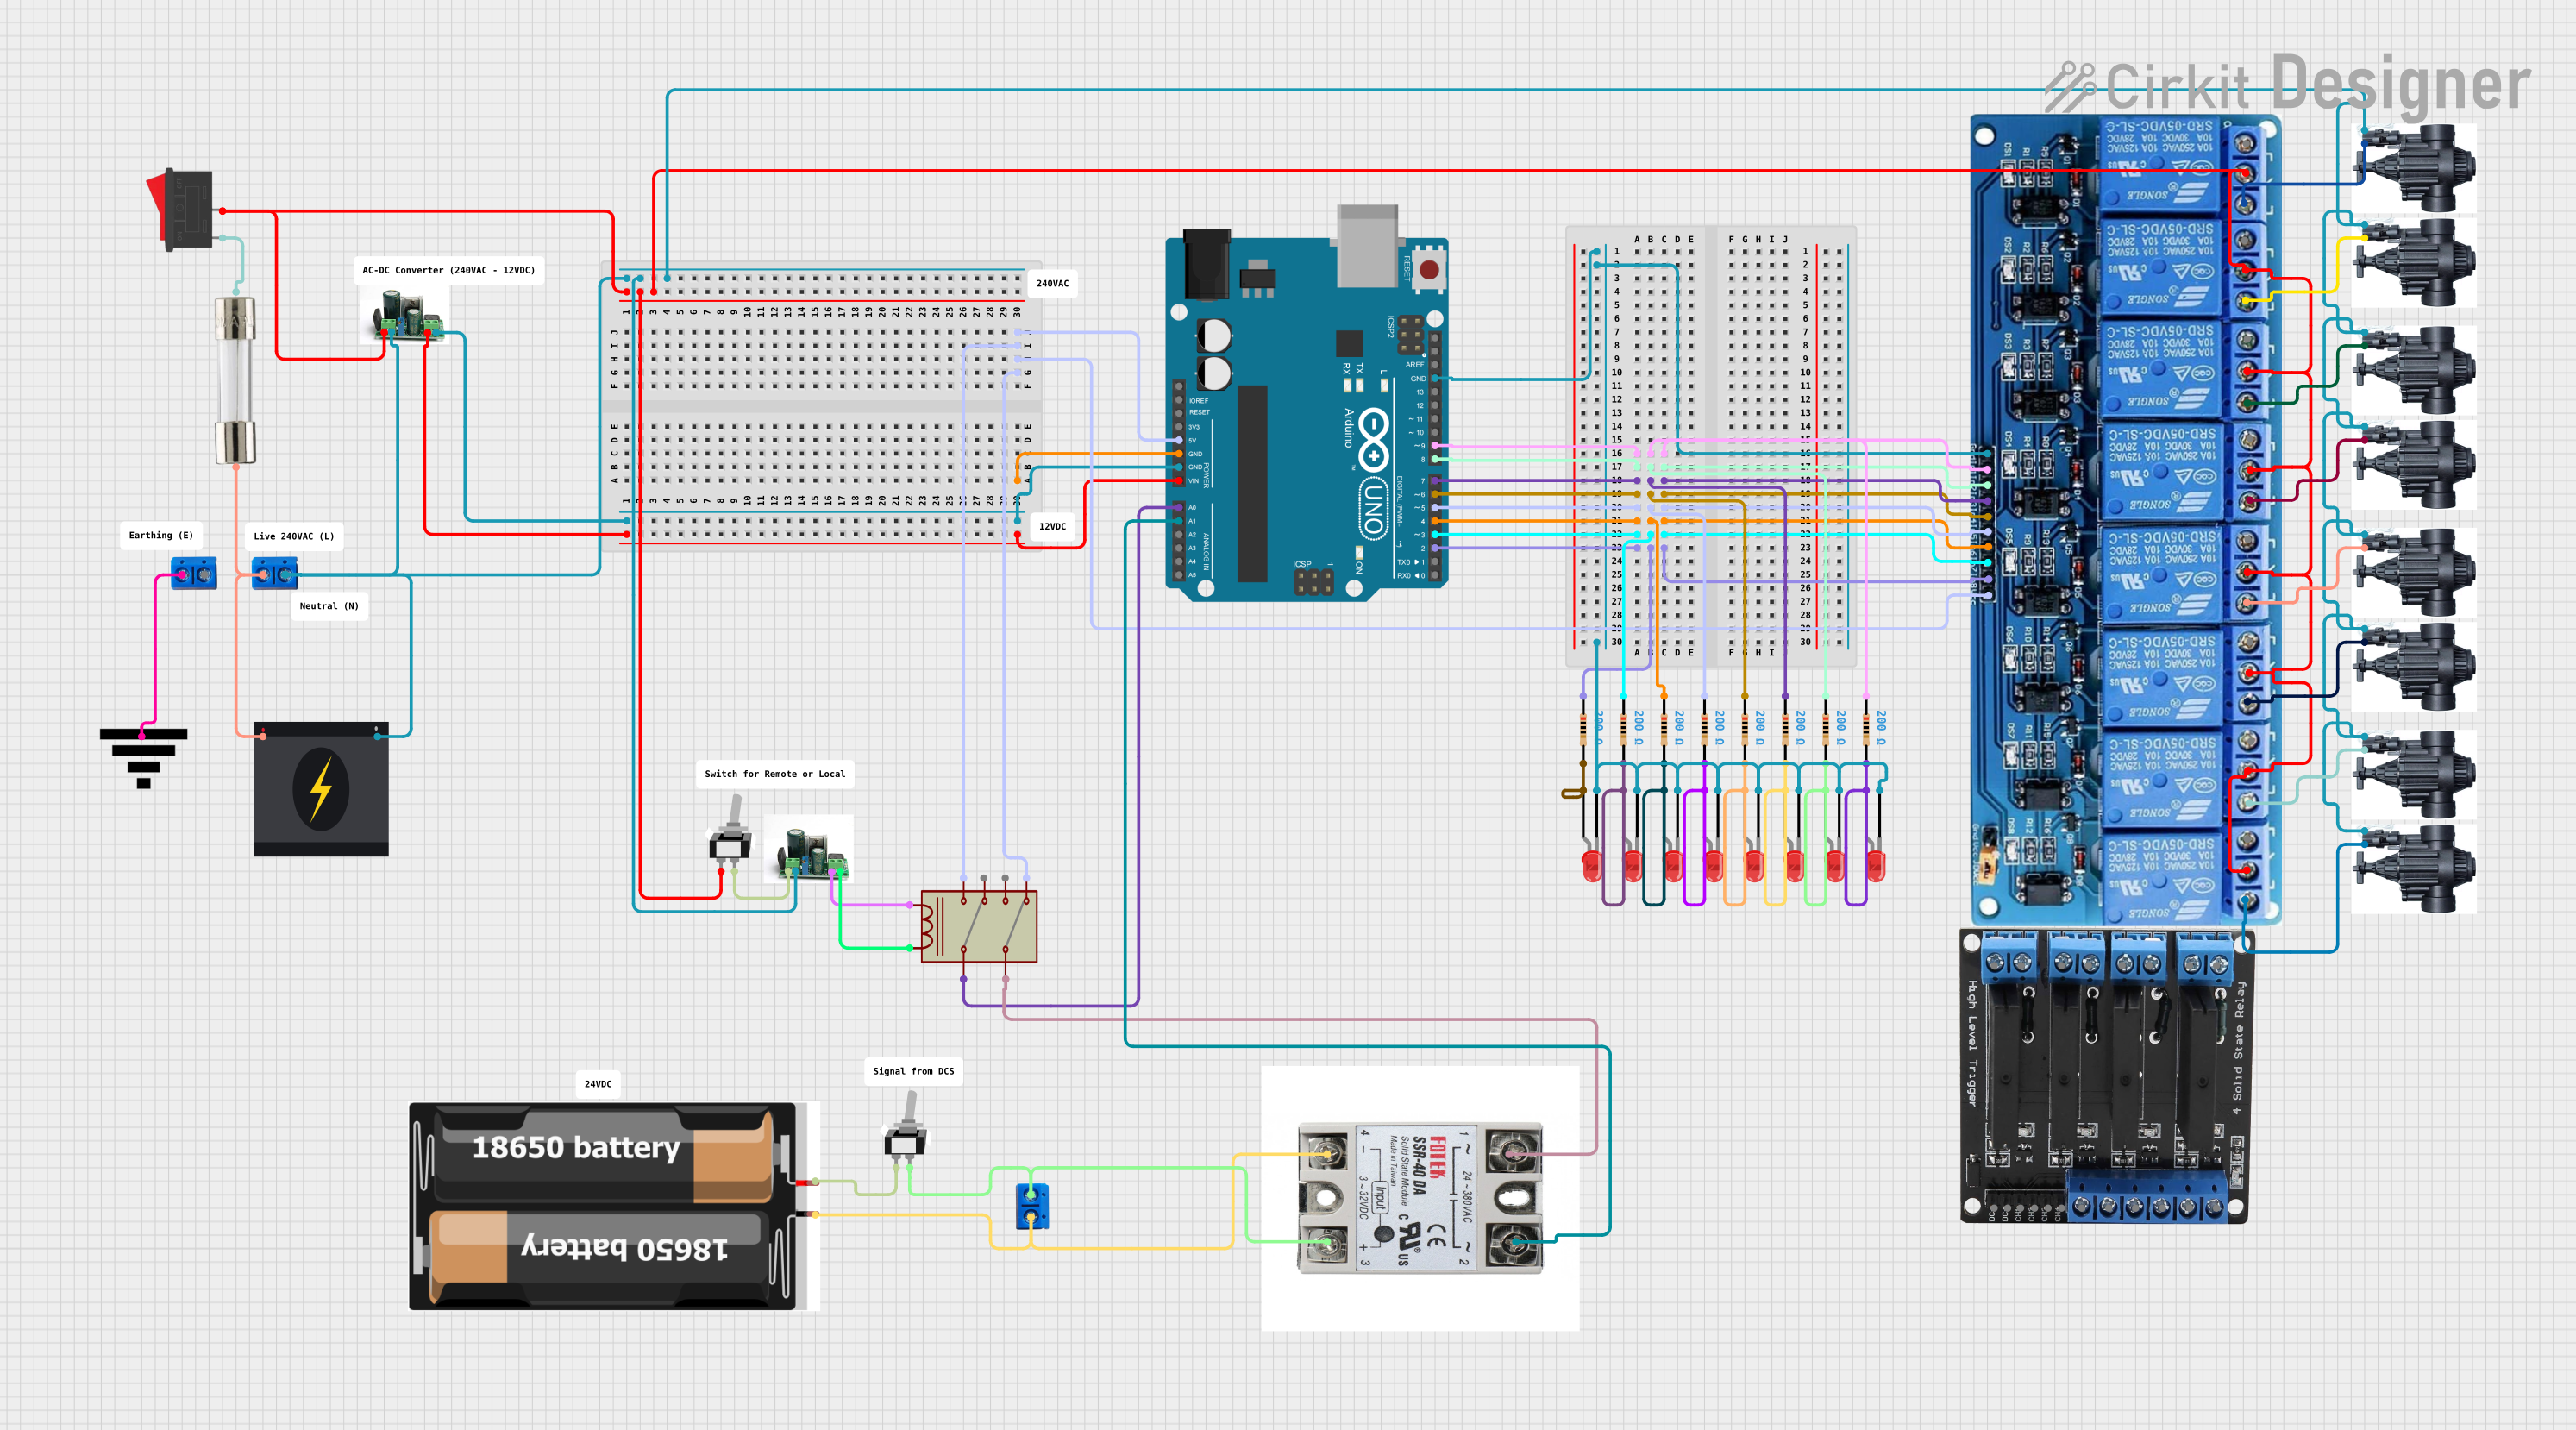
This circuit is designed to control a series of solenoid valves using an Arduino UNO microcontroller, which can operate the valves either in a local control mode or remotely via serial commands. The circuit includes a 240V power source stepped down by a voltage converter to power the Arduino and the relay modules, with safety features such as a fuse and switches. The Arduino controls the 5V 8-channel relay module to activate the solenoid valves, with LEDs indicating the status of each valve.
Arduino UNO Controlled Interactive Display with Keypad Input and Motor Feedback
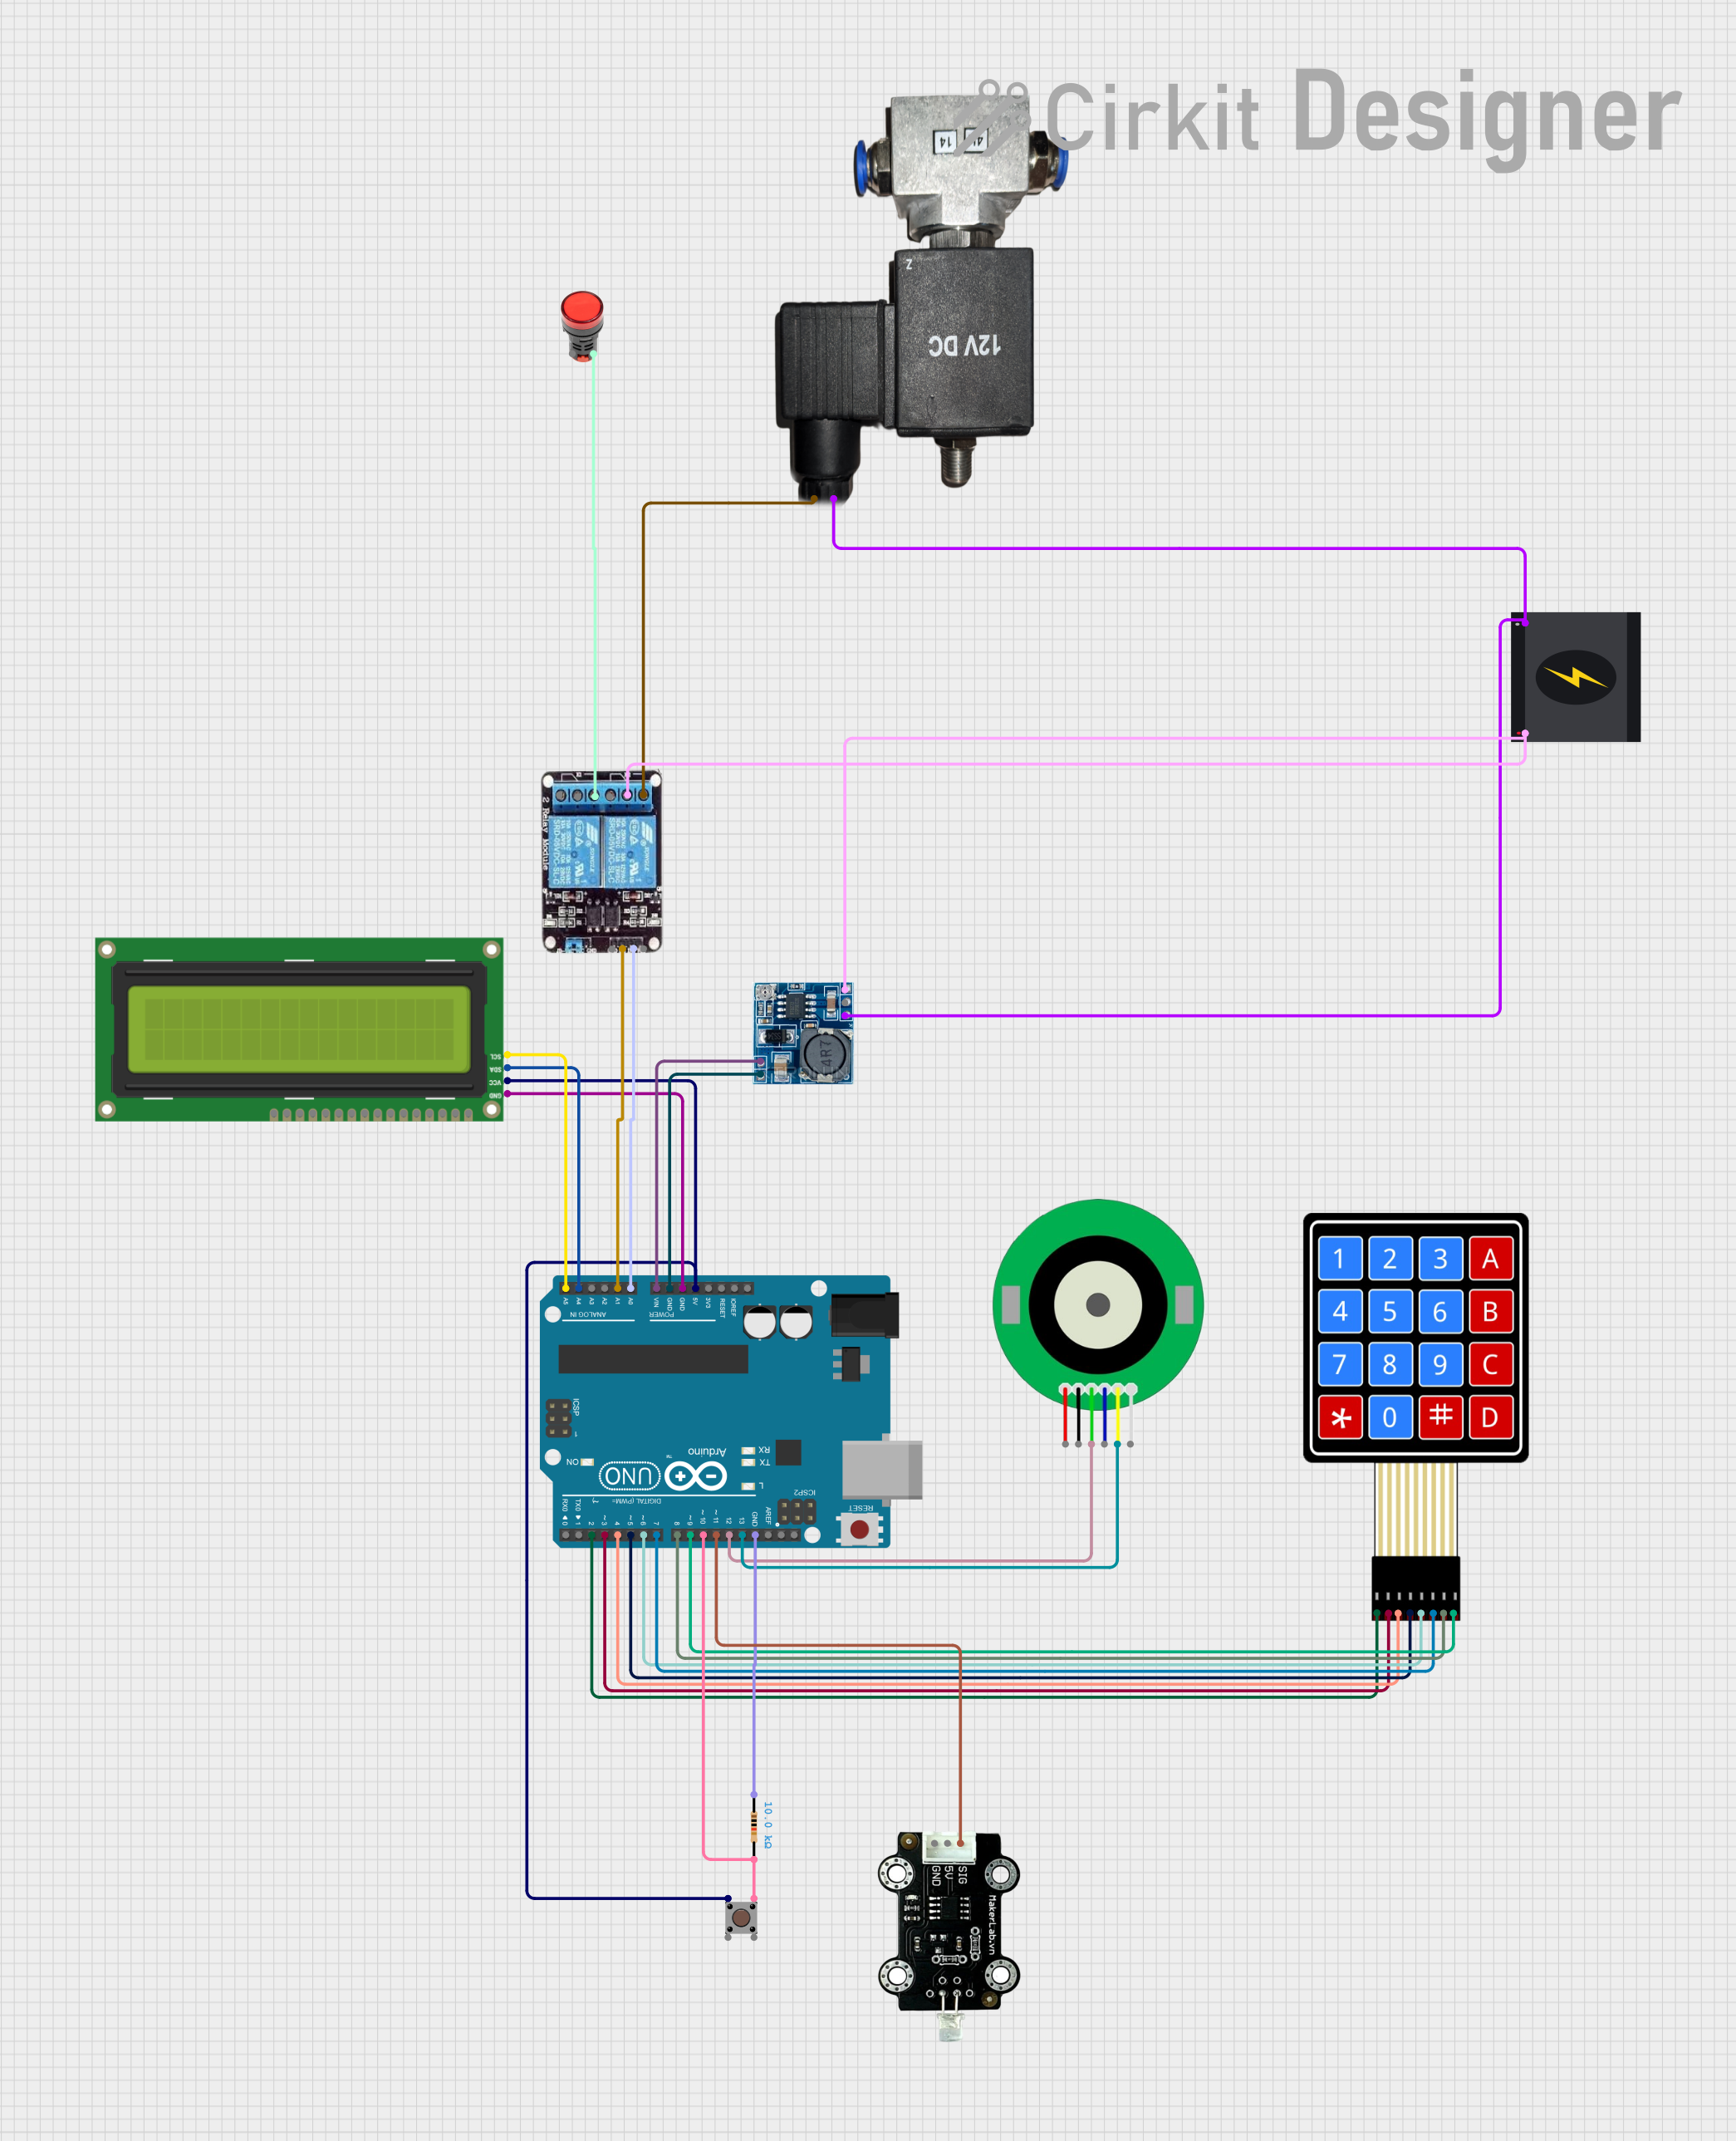
This circuit features an Arduino UNO as the central controller, interfaced with an I2C LCD screen for display, a 4x4 membrane matrix keypad for user input, and an encoder attached to a DC motor for position feedback. The Arduino controls a 2-channel relay module to switch a pneumatic solenoid valve and a red lamp, with inputs from a pushbutton and a photo diode light sensor. The system is powered by a step-down module that converts 24V to 5V for the Arduino and 12V for the solenoid valve, with a 240V power source connected to the relay for the lamp.
Explore Projects Built with 5/2 way 24v dc single selenoid valve
ESP32-Controlled Water Pump and Solenoid Valve System
This circuit is designed to control multiple Mini Diaphragm Water Pumps and a Plastic Solenoid Valve using an ESP32 microcontroller and a 4-channel relay module. The ESP32 is powered by a 12V power supply, and it can switch the relays to turn the pumps and the valve on or off. The power supply also provides 220V AC to 12V DC conversion for the system.
Wi-Fi Controlled Irrigation and Well Pump System
This circuit is designed to automate irrigation and well pump control using a Wemos D1 Mini microcontroller. It includes a 4-channel 5V relay module for controlling 24V irrigation valves and a separate relay for a 220V well pump, with power supplied by a 5V power supply and a 220V to 24V transformer.
Arduino-Controlled Sequential Solenoid Valve System with Local Override
This circuit is designed to control a series of solenoid valves using an Arduino UNO microcontroller, which can operate the valves either in a local control mode or remotely via serial commands. The circuit includes a 240V power source stepped down by a voltage converter to power the Arduino and the relay modules, with safety features such as a fuse and switches. The Arduino controls the 5V 8-channel relay module to activate the solenoid valves, with LEDs indicating the status of each valve.
Arduino UNO Controlled Interactive Display with Keypad Input and Motor Feedback
This circuit features an Arduino UNO as the central controller, interfaced with an I2C LCD screen for display, a 4x4 membrane matrix keypad for user input, and an encoder attached to a DC motor for position feedback. The Arduino controls a 2-channel relay module to switch a pneumatic solenoid valve and a red lamp, with inputs from a pushbutton and a photo diode light sensor. The system is powered by a step-down module that converts 24V to 5V for the Arduino and 12V for the solenoid valve, with a 240V power source connected to the relay for the lamp.
Technical Specifications
Key Technical Details
| Parameter | Specification |
|---|---|
| Operating Voltage | 24V DC |
| Power Consumption | 3W |
| Operating Pressure | 0.15 to 0.8 MPa |
| Response Time | ≤ 50 ms |
| Port Size | 1/4" |
| Operating Temperature | -10 to 50°C |
| Insulation Class | Class F |
| Weight | 0.3 kg |
Pin Configuration and Descriptions
| Pin Number | Description |
|---|---|
| 1 | Solenoid Positive (24V DC) |
| 2 | Solenoid Negative (GND) |
| 3 | Port 1 (P) - Pressure |
| 4 | Port 2 (A) - Output 1 |
| 5 | Port 3 (R) - Exhaust 1 |
| 6 | Port 4 (B) - Output 2 |
| 7 | Port 5 (S) - Exhaust 2 |
Usage Instructions
How to Use the Component in a Circuit
- Power Supply Connection: Connect the solenoid positive pin (Pin 1) to a 24V DC power supply and the solenoid negative pin (Pin 2) to the ground (GND).
- Port Connections:
- Connect Port 1 (P) to the pressure source.
- Connect Port 2 (A) to the first output line.
- Connect Port 4 (B) to the second output line.
- Connect Port 3 (R) and Port 5 (S) to the exhaust lines.
- Control Signal: Use a microcontroller or a relay to control the solenoid valve. When the solenoid is energized, the valve switches positions, directing the flow from Port 1 to either Port 2 or Port 4.
Important Considerations and Best Practices
- Voltage Rating: Ensure that the power supply voltage is strictly 24V DC to avoid damaging the solenoid.
- Pressure Range: Operate within the specified pressure range (0.15 to 0.8 MPa) to ensure optimal performance.
- Temperature Range: Use the valve within the operating temperature range (-10 to 50°C) to prevent malfunction.
- Regular Maintenance: Periodically check for any blockages or wear in the ports and clean them as necessary.
Example Arduino UNO Code
Below is an example code to control the Aeroflex 5/2 Way 24V DC Single Solenoid Valve using an Arduino UNO.
// Define the pin connected to the relay module
const int relayPin = 7;

void setup() {
  // Initialize the relay pin as an output
  pinMode(relayPin, OUTPUT);
  // Start with the relay off
  digitalWrite(relayPin, LOW);
}

void loop() {
  // Turn the relay on (energize the solenoid)
  digitalWrite(relayPin, HIGH);
  delay(1000); // Keep the solenoid energized for 1 second

  // Turn the relay off (de-energize the solenoid)
  digitalWrite(relayPin, LOW);
  delay(1000); // Keep the solenoid de-energized for 1 second
}
Troubleshooting and FAQs
Common Issues Users Might Face
- Valve Not Switching Positions:
- Solution: Check the power supply voltage and ensure it is 24V DC. Verify the connections to the solenoid.
- Slow Response Time:
- Solution: Ensure the operating pressure is within the specified range. Check for any blockages in the ports.
- Leakage from Exhaust Ports:
- Solution: Inspect the exhaust ports for any debris or damage. Clean or replace the exhaust filters if necessary.
Solutions and Tips for Troubleshooting
- Check Connections: Ensure all electrical and pneumatic connections are secure and correctly configured.
- Verify Power Supply: Use a multimeter to check the voltage at the solenoid terminals.
- Inspect for Blockages: Regularly inspect the ports and lines for any blockages or debris that could impede flow.
- Consult Manufacturer: If issues persist, refer to the Aeroflex technical support for further assistance.
By following this documentation, users can effectively utilize the Aeroflex 5/2 Way 24V DC Single Solenoid Valve in their applications, ensuring reliable and efficient fluid control.