How to Use Shelly Pro 3: Examples, Pinouts, and Specs
Introduction
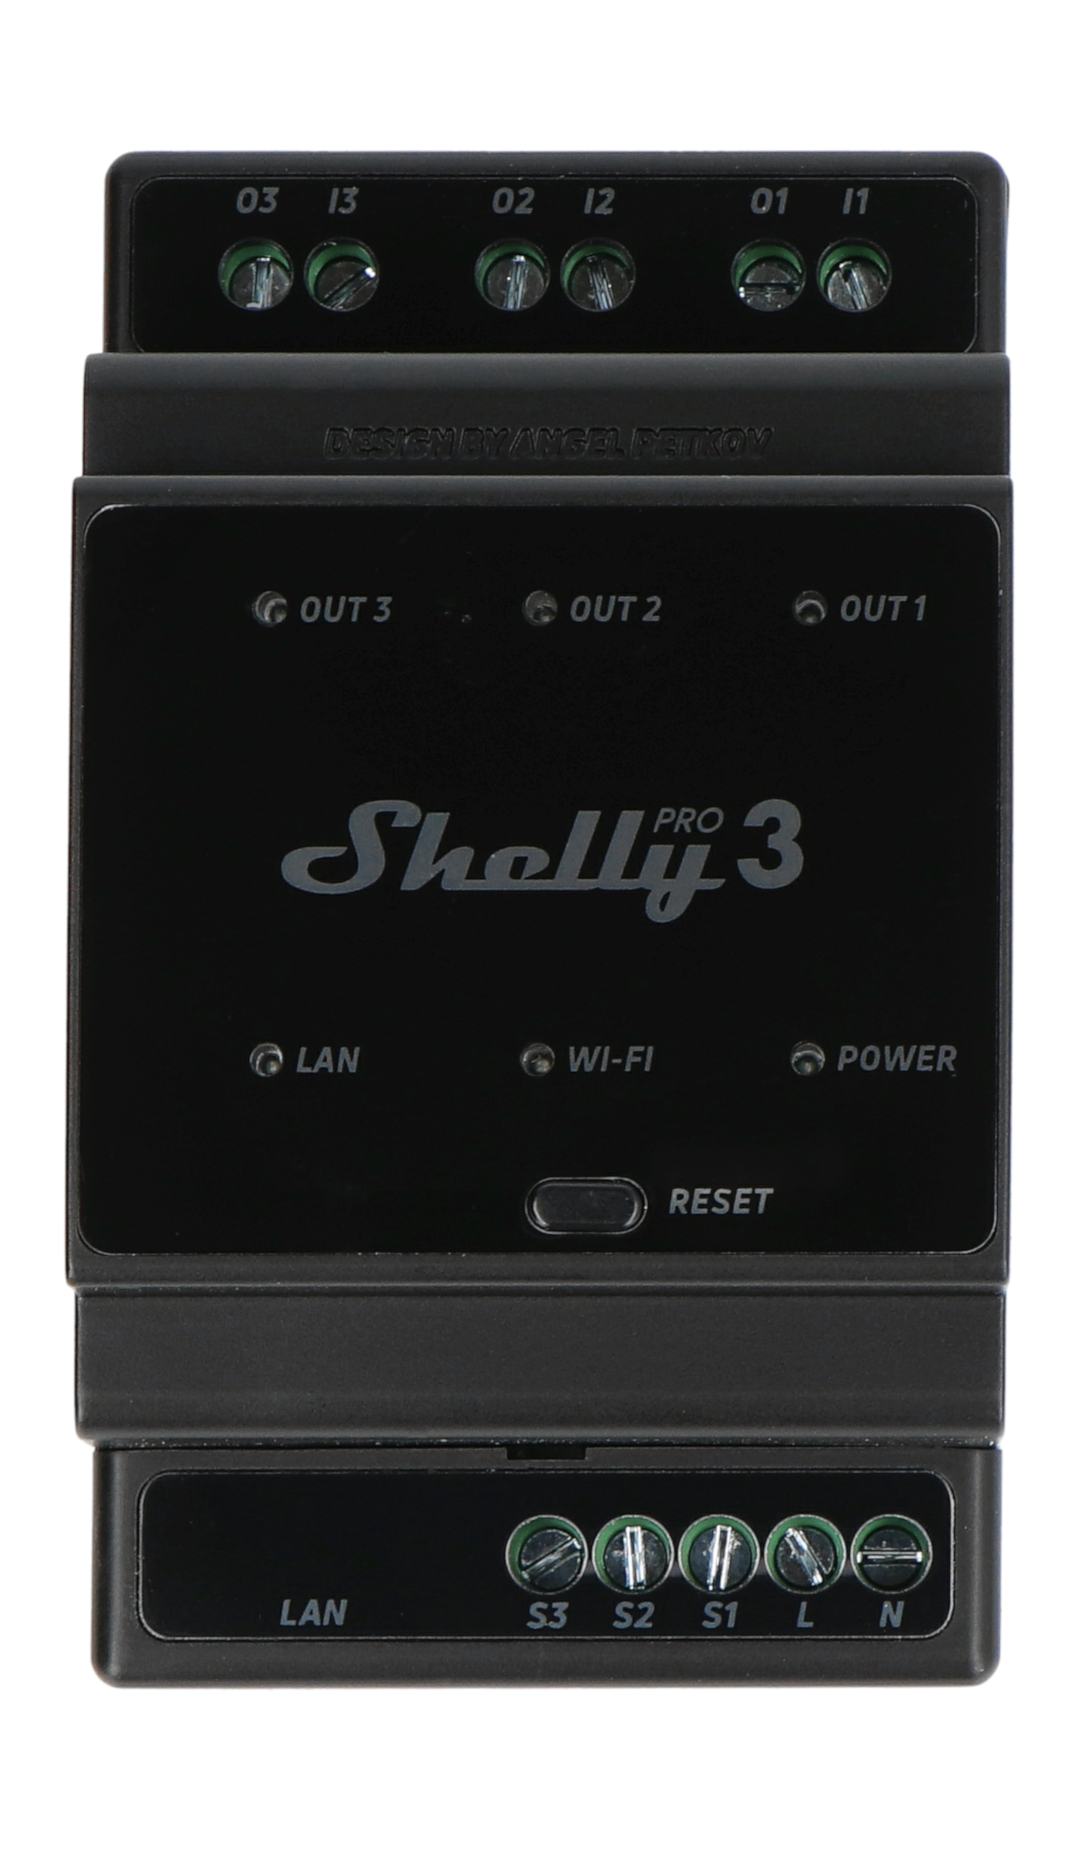
The Shelly Pro 3 is a versatile smart relay designed for remote control and automation of electrical devices. Manufactured by Shelly, this device features three independent relay channels, enabling users to control multiple devices simultaneously. It supports Wi-Fi and other communication protocols, making it an excellent choice for integration into modern home automation systems. The Shelly Pro 3 is ideal for applications such as lighting control, appliance automation, and energy management.
Explore Projects Built with Shelly Pro 3


Explore Projects Built with Shelly Pro 3
Common Applications and Use Cases
- Home Automation: Control lights, fans, and other appliances remotely.
- Industrial Automation: Manage machinery or equipment in industrial settings.
- Energy Management: Monitor and optimize energy usage in residential or commercial spaces.
- Smart Building Systems: Integrate with building management systems for centralized control.
Technical Specifications
Key Technical Details
| Parameter | Specification |
|---|---|
| Manufacturer | Shelly |
| Part ID | Pro 3 |
| Number of Relay Channels | 3 |
| Communication Protocols | Wi-Fi, LAN, MQTT, REST API |
| Power Supply | 110-240V AC, 50/60Hz |
| Maximum Load per Channel | 16A |
| Total Device Load | 48A |
| Operating Temperature | -20°C to +40°C |
| Dimensions | 90mm x 52mm x 57mm |
| Certifications | CE, RoHS |
Pin Configuration and Descriptions
The Shelly Pro 3 features a terminal block for connecting input power, load outputs, and communication interfaces. Below is the pin configuration:
| Pin Label | Description |
|---|---|
| L | Live input for AC power |
| N | Neutral input for AC power |
| O1 | Output for Relay Channel 1 |
| O2 | Output for Relay Channel 2 |
| O3 | Output for Relay Channel 3 |
| I1 | Input for manual control of Relay Channel 1 |
| I2 | Input for manual control of Relay Channel 2 |
| I3 | Input for manual control of Relay Channel 3 |
| LAN | Ethernet port for wired network connection |
Usage Instructions
How to Use the Shelly Pro 3 in a Circuit
- Power Connection: Connect the live (L) and neutral (N) wires from your AC power source to the corresponding terminals on the Shelly Pro 3.
- Load Connection: Connect the devices you want to control (e.g., lights, appliances) to the output terminals (O1, O2, O3).
- Manual Control: Optionally, connect switches to the input terminals (I1, I2, I3) for manual control of each relay channel.
- Network Setup:
- For Wi-Fi: Use the Shelly app to connect the device to your Wi-Fi network.
- For LAN: Connect an Ethernet cable to the LAN port for a wired connection.
- Configuration: Use the Shelly app or web interface to configure the relay channels, set schedules, and integrate with home automation platforms like MQTT or REST API.
Important Considerations and Best Practices
- Ensure the total load does not exceed the maximum device load of 48A.
- Use proper insulation and secure connections to prevent electrical hazards.
- Place the device in a well-ventilated area to avoid overheating.
- For advanced automation, integrate the Shelly Pro 3 with platforms like Home Assistant or OpenHAB.
Example: Connecting to an Arduino UNO
The Shelly Pro 3 can be controlled via its REST API. Below is an example of how to toggle a relay channel using an Arduino UNO and HTTP requests:
#include <WiFi.h>
#include <HTTPClient.h>

// Wi-Fi credentials
const char* ssid = "YourWiFiSSID";
const char* password = "YourWiFiPassword";

// Shelly Pro 3 IP address
const char* shellyIP = "192.168.1.100"; // Replace with your device's IP

void setup() {
  Serial.begin(115200);
  WiFi.begin(ssid, password);

  // Wait for Wi-Fi connection
  while (WiFi.status() != WL_CONNECTED) {
    delay(1000);
    Serial.println("Connecting to Wi-Fi...");
  }
  Serial.println("Connected to Wi-Fi");
}

void loop() {
  // Toggle Relay Channel 1
  HTTPClient http;
  String url = String("http://") + shellyIP + "/relay/0?turn=toggle";
  http.begin(url);

  int httpResponseCode = http.GET(); // Send GET request
  if (httpResponseCode > 0) {
    Serial.print("Response: ");
    Serial.println(http.getString());
  } else {
    Serial.print("Error: ");
    Serial.println(httpResponseCode);
  }
  http.end();

  delay(5000); // Wait 5 seconds before toggling again
}
Troubleshooting and FAQs
Common Issues and Solutions
Device Not Connecting to Wi-Fi:
- Ensure the Wi-Fi credentials are correct.
- Check that the router is within range and supports 2.4GHz Wi-Fi (Shelly Pro 3 does not support 5GHz).
- Reset the device and try reconnecting.
Relay Channels Not Responding:
- Verify that the load connections are secure and within the rated limits.
- Check the device configuration in the Shelly app or web interface.
Overheating:
- Ensure the device is installed in a well-ventilated area.
- Reduce the load if it exceeds the maximum rated capacity.
LAN Connection Issues:
- Confirm that the Ethernet cable is securely connected.
- Check the network settings in the Shelly app or web interface.
FAQs
Can the Shelly Pro 3 be used outdoors?
- No, the Shelly Pro 3 is designed for indoor use only. Use a weatherproof enclosure if outdoor installation is required.
Does the Shelly Pro 3 support voice assistants?
- Yes, it can be integrated with Amazon Alexa and Google Assistant via the Shelly app.
Can I control the Shelly Pro 3 without the internet?
- Yes, the device can be controlled locally via LAN or its REST API without requiring an internet connection.
What is the maximum cable length for manual control inputs?
- The recommended maximum cable length is 20 meters to ensure reliable operation.