Cirkit Designer Logo
Cirkit Designer
Your all-in-one circuit design IDE
Home / 
Component Documentation

How to Use SparkFun LilyPad USB Plus: Examples, Pinouts, and Specs

Image of SparkFun LilyPad USB Plus
Cirkit Designer LogoDesign with SparkFun LilyPad USB Plus in Cirkit Designer

Introduction

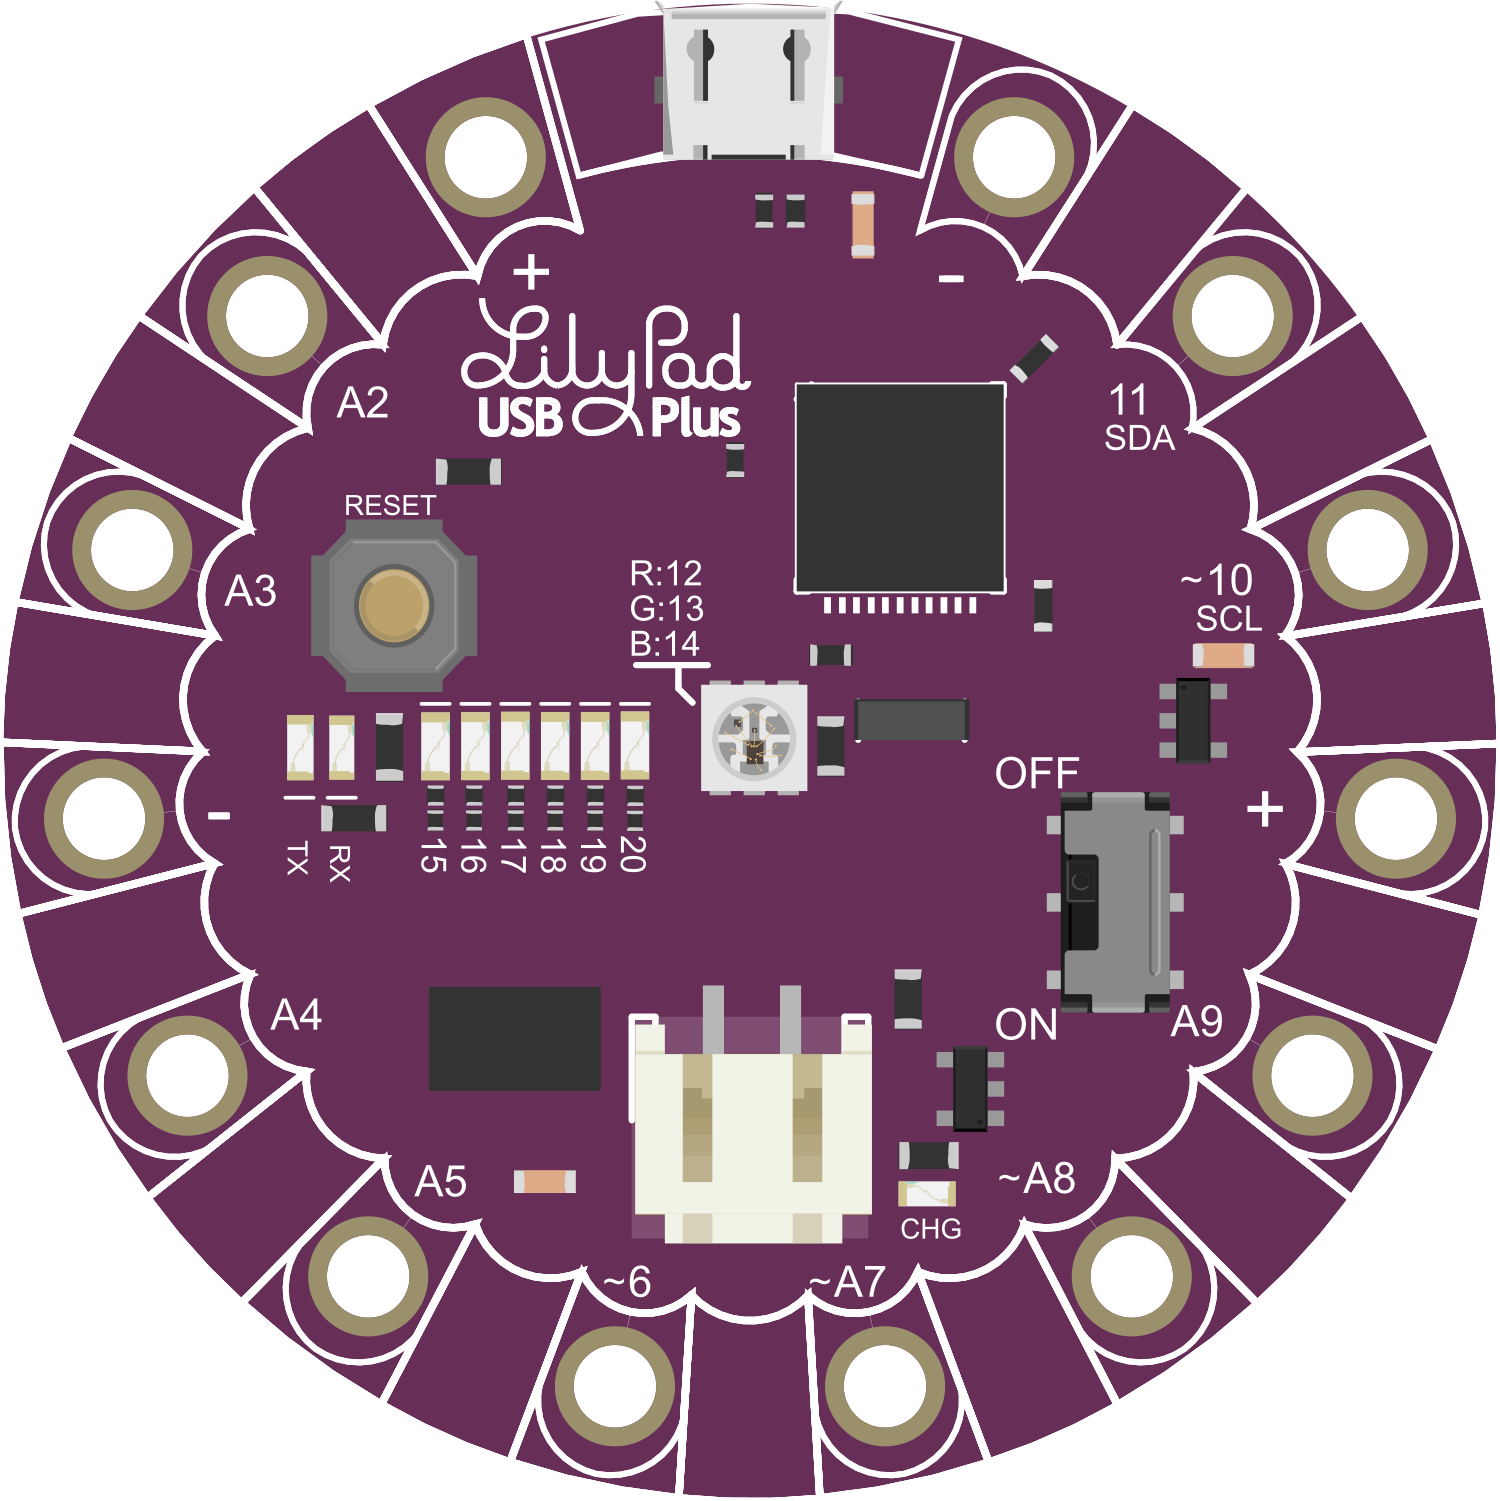
The SparkFun LilyPad USB Plus is a versatile, sewable microcontroller board designed for wearables and e-textiles projects. It is built around the ATmega32U4 microcontroller and features built-in USB connectivity, allowing it to be programmed directly through the Arduino Integrated Development Environment (IDE) without the need for an external programmer. The LilyPad USB Plus is part of the larger LilyPad ecosystem, which includes a variety of sensors, LEDs, and other components that can be sewn together with conductive thread to create interactive textiles.

Explore Projects Built with SparkFun LilyPad USB Plus

Use Cirkit Designer to design, explore, and prototype these projects online. Some projects support real-time simulation. Click "Open Project" to start designing instantly!
LilyPad Arduino and Accelerometer-Based Wearable Fitness Tracker with Heart Rate Monitoring
Image of proj2: A project utilizing SparkFun LilyPad USB Plus in a practical application
This circuit is designed for wearable applications, featuring a LilyPad Arduino USB microcontroller that controls a chain of LED Pixel Boards and reads data from a Heart Pulse Sensor and a three-axis Accelerometer. It is capable of interactive LED displays synchronized with motion and heart rate data, suitable for dynamic wearable projects.
Cirkit Designer LogoOpen Project in Cirkit Designer
ATmega328P-Based Sensor Hub with OLED Display and LIDAR
Image of TILTPCB: A project utilizing SparkFun LilyPad USB Plus in a practical application
This circuit features an Mtiny Uno ATmega328P microcontroller as its central processing unit, interfacing with a variety of sensors and peripherals. It includes a 0.96" OLED display and an MPU6050 accelerometer/gyroscope for user interface and motion sensing, respectively. The circuit also integrates a TF LUNA LIDAR for distance measurement, a DHT11 sensor for temperature and humidity readings, and uses a 9V battery with a 7805 voltage regulator for power management. Communication with a computer for programming and data exchange is facilitated by an Adafruit FTDI Friend module.
Cirkit Designer LogoOpen Project in Cirkit Designer
Bluetooth-Controlled Multi-Function Arduino Nano Gadget
Image of Copy of Smarttt: A project utilizing SparkFun LilyPad USB Plus in a practical application
This is a portable, microcontroller-driven interactive device featuring Bluetooth connectivity, visual (RGB LED), auditory (loudspeaker), and haptic (vibration motor) feedback, user input (pushbutton), and a rechargeable power system (TP4056 with Li-ion battery).
Cirkit Designer LogoOpen Project in Cirkit Designer
I2C-Controlled OLED Display with External EEPROM and Interactive Pushbuttons
Image of godmode: A project utilizing SparkFun LilyPad USB Plus in a practical application
This is a microcontroller-based interactive device featuring a Wemos D1 Mini, an OLED display, external EEPROM, and an I/O expander. It includes user input buttons and status LEDs, with potential MIDI interface capabilities.
Cirkit Designer LogoOpen Project in Cirkit Designer

Explore Projects Built with SparkFun LilyPad USB Plus

Use Cirkit Designer to design, explore, and prototype these projects online. Some projects support real-time simulation. Click "Open Project" to start designing instantly!
Image of proj2: A project utilizing SparkFun LilyPad USB Plus in a practical application
LilyPad Arduino and Accelerometer-Based Wearable Fitness Tracker with Heart Rate Monitoring
This circuit is designed for wearable applications, featuring a LilyPad Arduino USB microcontroller that controls a chain of LED Pixel Boards and reads data from a Heart Pulse Sensor and a three-axis Accelerometer. It is capable of interactive LED displays synchronized with motion and heart rate data, suitable for dynamic wearable projects.
Cirkit Designer LogoOpen Project in Cirkit Designer
Image of TILTPCB: A project utilizing SparkFun LilyPad USB Plus in a practical application
ATmega328P-Based Sensor Hub with OLED Display and LIDAR
This circuit features an Mtiny Uno ATmega328P microcontroller as its central processing unit, interfacing with a variety of sensors and peripherals. It includes a 0.96" OLED display and an MPU6050 accelerometer/gyroscope for user interface and motion sensing, respectively. The circuit also integrates a TF LUNA LIDAR for distance measurement, a DHT11 sensor for temperature and humidity readings, and uses a 9V battery with a 7805 voltage regulator for power management. Communication with a computer for programming and data exchange is facilitated by an Adafruit FTDI Friend module.
Cirkit Designer LogoOpen Project in Cirkit Designer
Image of Copy of Smarttt: A project utilizing SparkFun LilyPad USB Plus in a practical application
Bluetooth-Controlled Multi-Function Arduino Nano Gadget
This is a portable, microcontroller-driven interactive device featuring Bluetooth connectivity, visual (RGB LED), auditory (loudspeaker), and haptic (vibration motor) feedback, user input (pushbutton), and a rechargeable power system (TP4056 with Li-ion battery).
Cirkit Designer LogoOpen Project in Cirkit Designer
Image of godmode: A project utilizing SparkFun LilyPad USB Plus in a practical application
I2C-Controlled OLED Display with External EEPROM and Interactive Pushbuttons
This is a microcontroller-based interactive device featuring a Wemos D1 Mini, an OLED display, external EEPROM, and an I/O expander. It includes user input buttons and status LEDs, with potential MIDI interface capabilities.
Cirkit Designer LogoOpen Project in Cirkit Designer

Common Applications and Use Cases

  • Wearable electronics
  • E-textile projects
  • Educational purposes for teaching electronics and programming
  • Prototyping interactive garments
  • DIY crafts with embedded electronics

Technical Specifications

Key Technical Details

  • Microcontroller: ATmega32U4
  • Operating Voltage: 3.3V
  • Input Voltage (recommended): 4-5V via USB
  • Digital I/O Pins: 9 (of which 4 provide PWM output)
  • Analog Input Pins: 4
  • DC Current per I/O Pin: 40 mA
  • Flash Memory: 32 KB (ATmega32U4) of which 4 KB used by bootloader
  • SRAM: 2.5 KB (ATmega32U4)
  • EEPROM: 1 KB (ATmega32U4)
  • Clock Speed: 8 MHz
  • LED_BUILTIN: Pin 13

Pin Configuration and Descriptions

Pin Number Function Description
1-9 Digital I/O Digital pins which can be used for input/output.
A2-A5 Analog Input Analog pins which can be used for analog input.
+ Vcc Positive supply voltage (3.3V).
- Ground Ground connection.
A Analog Additional analog reference pin.
R Reset Reset pin, active low.

Usage Instructions

How to Use the Component in a Circuit

  1. Connecting to a Computer:

    • Connect the LilyPad USB Plus to a computer using a micro USB cable.
    • Ensure that the board is recognized by the computer and the appropriate drivers are installed.
  2. Programming:

    • Open the Arduino IDE on your computer.
    • Select the correct board from the Tools > Board menu (LilyPad Arduino USB).
    • Choose the correct port from Tools > Port.
    • Write or load your sketch (program) into the IDE.
    • Click the upload button to program the LilyPad USB Plus.
  3. Sewing into Fabric:

    • Use conductive thread to sew the LilyPad USB Plus onto fabric.
    • Ensure that connections are secure and that there are no short circuits between conductive traces.

Important Considerations and Best Practices

  • Always disconnect the LilyPad USB Plus from power when sewing or making changes to your circuit.
  • Avoid placing knots or sewing over traces, as this can cause short circuits.
  • Insulate exposed conductive thread traces with clear nail polish or heat-shrink tubing to prevent shorts.
  • Test each connection with a multimeter before powering up the entire project.

Troubleshooting and FAQs

Common Issues

  • Board Not Recognized: Ensure that the micro USB cable is properly connected and that the drivers are installed.
  • Upload Fails: Check the board and port settings in the Arduino IDE. Make sure the LilyPad USB Plus is selected.
  • Short Circuits: If the board is not functioning, check for shorts in your sewn connections.

Solutions and Tips for Troubleshooting

  • Driver Installation: If the board is not recognized, reinstall the drivers or try a different USB cable.
  • Connection Issues: Double-check your conductive thread connections for continuity and ensure there are no shorts.
  • Power Problems: Verify that the board is receiving power through the USB connection.

FAQs

Q: Can I wash my LilyPad USB Plus project? A: Yes, but you should remove the battery and ensure the project is completely dry before powering it up again.

Q: How do I connect additional components to the LilyPad USB Plus? A: Additional components can be sewn to the board using conductive thread, connecting to the appropriate pins.

Q: What is the maximum number of LEDs I can connect? A: This depends on the current draw of the LEDs and the total current limit of the board. Each I/O pin can supply up to 40 mA.

Example Code for Arduino UNO

// Blink the onboard LED
void setup() {
  pinMode(13, OUTPUT); // Initialize the LED_BUILTIN pin as an output
}

void loop() {
  digitalWrite(13, HIGH); // Turn the LED on
  delay(1000);            // Wait for a second
  digitalWrite(13, LOW);  // Turn the LED off
  delay(1000);            // Wait for a second
}

Note: The above code is for demonstration purposes and is written for the Arduino UNO, which shares the same LED_BUILTIN pin as the LilyPad USB Plus. When using the LilyPad USB Plus, ensure you select the correct board in the Arduino IDE.