
How to Use AC Adapter Plug: Examples, Pinouts, and Specs
 Design with AC Adapter Plug in Cirkit Designer
Introduction
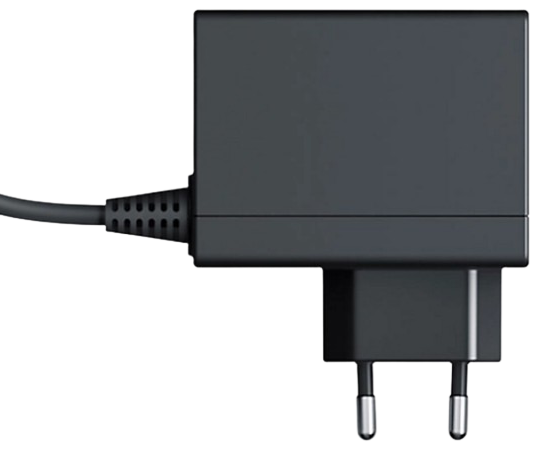
An AC adapter plug is a device that converts alternating current (AC) from a wall outlet into direct current (DC) to power electronic devices. It is commonly used to supply power to laptops, routers, small appliances, and other electronic devices that require a stable DC voltage. AC adapter plugs are available in various voltage and current ratings to suit different applications.
Explore Projects Built with AC Adapter Plug
 Open Project in Cirkit Designer
 Open Project in Cirkit Designer
 Open Project in Cirkit Designer
 Open Project in Cirkit Designer
Explore Projects Built with AC Adapter Plug
Open Project in Cirkit DesignerOpen Project in Cirkit DesignerOpen Project in Cirkit DesignerOpen Project in Cirkit DesignerCommon Applications and Use Cases
- Powering laptops, tablets, and smartphones
- Supplying power to routers, modems, and network devices
- Charging batteries for portable devices
- Operating small household appliances
- Providing power to DIY electronics projects
Technical Specifications
The technical specifications of an AC adapter plug vary depending on the model and intended application. Below is a general overview of the key parameters:
General Specifications
| Parameter | Description |
|---|---|
| Input Voltage | 100-240V AC, 50/60 Hz |
| Output Voltage | Typically 5V, 9V, 12V, 19V, or 24V DC |
| Output Current | Ranges from 0.5A to 5A (depending on the model) |
| Power Rating | Typically 5W to 120W |
| Connector Type | Barrel plug, USB, or proprietary connectors |
| Efficiency | 80% or higher (varies by model) |
| Protection Features | Overvoltage, overcurrent, and short-circuit protection |
Pin Configuration and Descriptions
For AC adapter plugs with a barrel connector, the pin configuration is as follows:
| Pin Name | Description |
|---|---|
| Outer Sleeve | Ground (negative terminal) |
| Inner Pin | Positive terminal (DC voltage output) |
For USB-based AC adapters, the pin configuration is as follows:
| Pin Name | Description |
|---|---|
| VBUS | Positive terminal (DC voltage output) |
| GND | Ground (negative terminal) |
| D+ | Data line for USB communication (optional) |
| D- | Data line for USB communication (optional) |
Usage Instructions
How to Use the AC Adapter Plug in a Circuit
- Check the Voltage and Current Requirements: Ensure that the output voltage and current rating of the AC adapter match the requirements of your device.
- Connect the Adapter to the Device: Plug the barrel connector or USB connector into the corresponding port on your device.
- Plug into a Wall Outlet: Insert the AC adapter into a standard wall outlet (100-240V AC).
- Verify Operation: Check that the device powers on and operates correctly.
Important Considerations and Best Practices
- Match Voltage and Polarity: Always verify that the output voltage and polarity of the AC adapter match the specifications of your device. Incorrect voltage or polarity can damage the device.
- Avoid Overloading: Do not exceed the current rating of the AC adapter. Overloading can cause overheating and potential failure.
- Use the Correct Connector: Ensure that the connector type and size are compatible with your device.
- Ventilation: Place the AC adapter in a well-ventilated area to prevent overheating.
- Inspect for Damage: Regularly check the adapter and cables for signs of wear or damage. Replace if necessary.
Example: Using an AC Adapter with an Arduino UNO
If you are powering an Arduino UNO with an AC adapter, follow these steps:
- Use an AC adapter with a 9V DC output and at least 500mA current rating.
- Connect the barrel plug to the Arduino UNO's power jack.
- Plug the AC adapter into a wall outlet.
- Verify that the Arduino UNO powers on (the power LED should light up).
Here is an example Arduino sketch to test the setup:
// Simple LED Blink Test for Arduino UNO
// Ensure the AC adapter is properly connected to power the Arduino

const int ledPin = 13; // Built-in LED pin on Arduino UNO

void setup() {
  pinMode(ledPin, OUTPUT); // Set the LED pin as an output
}

void loop() {
  digitalWrite(ledPin, HIGH); // Turn the LED on
  delay(1000);               // Wait for 1 second
  digitalWrite(ledPin, LOW);  // Turn the LED off
  delay(1000);               // Wait for 1 second
}
Troubleshooting and FAQs
Common Issues and Solutions
Device Does Not Power On
- Cause: Incorrect voltage or polarity.
- Solution: Verify that the AC adapter's output voltage and polarity match the device's requirements.
Overheating of the AC Adapter
- Cause: Overloading or poor ventilation.
- Solution: Ensure the connected device does not exceed the adapter's current rating. Place the adapter in a well-ventilated area.
Intermittent Power Supply
- Cause: Loose connection or damaged cable.
- Solution: Check the connector and cable for damage. Replace if necessary.
Adapter Emits a Buzzing Noise
- Cause: Internal component failure or high load.
- Solution: Replace the adapter with a new one.
FAQs
Q: Can I use an AC adapter with a higher current rating than my device requires?
A: Yes, as long as the voltage and polarity match. The device will only draw the current it needs.
Q: Can I use a universal AC adapter?
A: Yes, but ensure that the voltage, current, and polarity settings are correctly configured for your device.
Q: What happens if I use an adapter with the wrong polarity?
A: Using the wrong polarity can damage your device. Always double-check the polarity before connecting.
Q: How do I know if my AC adapter is compatible with my device?
A: Check the device's specifications for voltage, current, and connector type. Match these with the AC adapter's specifications.
Q: Can I repair a damaged AC adapter?
A: It is not recommended to repair an AC adapter due to safety concerns. Replace it with a new one instead.