Cirkit Designer Logo
Cirkit Designer
Your all-in-one circuit design IDE
Home / 
Component Documentation

How to Use Adafruit TFP401 to 40 pin TFT no Touch: Examples, Pinouts, and Specs

Image of Adafruit TFP401 to 40 pin TFT no Touch
Cirkit Designer LogoDesign with Adafruit TFP401 to 40 pin TFT no Touch in Cirkit Designer

Introduction

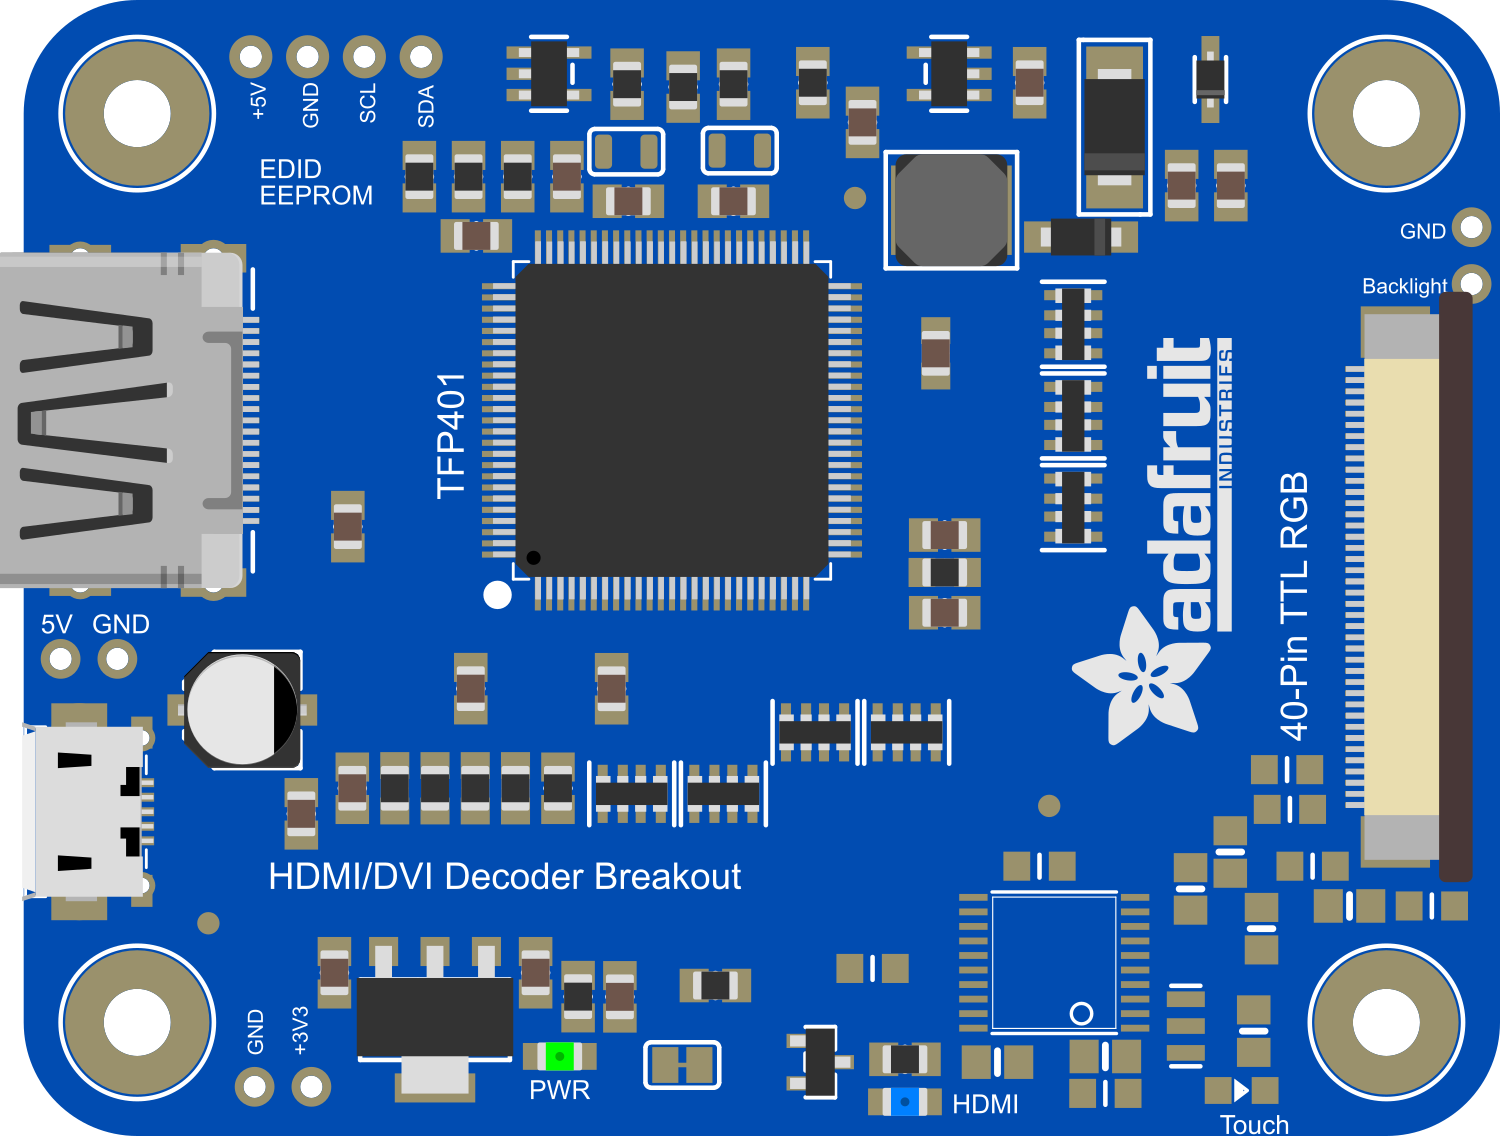
The Adafruit TFP401 to 40 pin TFT no Touch is an HDMI/DVI decoder to a 40-pin TFT display. It is designed to make it easier to use a TFT panel in your projects, especially when you want to display HDMI or DVI video content. The TFP401 is a DVI/HDMI decoder from Texas Instruments that can handle up to a 165MHz pixel clock, which means it can support 1080p and 720p video without compression or processor overhead. This component is ideal for use in digital signage, portable monitors, or any application that requires high-quality video output on a TFT display.

Common applications include:

  • DIY monitors
  • Digital signage
  • Embedded systems with graphical interfaces
  • Portable video systems

Explore Projects Built with Adafruit TFP401 to 40 pin TFT no Touch

Use Cirkit Designer to design, explore, and prototype these projects online. Some projects support real-time simulation. Click "Open Project" to start designing instantly!
ESP32-Powered 1.3 inch TFT Display Module for Visual Data Output
Image of ESP32+ST7789: A project utilizing Adafruit TFP401 to 40 pin TFT no Touch in a practical application
This circuit connects an ESP32 microcontroller to a 1.3 inch TFT display module (ST7789). The ESP32 provides power and control signals to the display, enabling it to show graphical data.
Cirkit Designer LogoOpen Project in Cirkit Designer
ESP32-Controlled Multi-Display Interface with Pushbutton Interaction
Image of Info-Orbs: A project utilizing Adafruit TFP401 to 40 pin TFT no Touch in a practical application
This circuit features an ESP32 microcontroller interfaced with multiple round TFT displays, controlled via shared serial communication lines, and several pushbuttons connected to individual GPIOs for input. The ESP32 coordinates the display of information and responds to user inputs from the pushbuttons.
Cirkit Designer LogoOpen Project in Cirkit Designer
Arduino Mega 2560 Controlled TFT Touchscreen Interface
Image of Tablero Moto: A project utilizing Adafruit TFP401 to 40 pin TFT no Touch in a practical application
This circuit connects an Arduino Mega 2560 microcontroller to a 3.5-inch 480x320 TFT LCD display. The Arduino provides power, ground, and digital signals to control the display, including data lines for pixel information and control lines for reset, write, and command/data selection. The embedded code initializes the display and configures the Arduino's pins for communication, likely to create a user interface or visual output for a project.
Cirkit Designer LogoOpen Project in Cirkit Designer
Arduino Mega 2560 Controlled TFT Touchscreen Interface with 4-Channel Relay Automation
Image of Display relay: A project utilizing Adafruit TFP401 to 40 pin TFT no Touch in a practical application
This circuit features an Arduino Mega 2560 microcontroller connected to an ILI9488 HD TFT LCD screen and a 4-channel relay module, powered by a 5V battery. The Arduino controls the LCD to display interactive buttons and uses digital output pins to toggle the state of the relays based on touch input. The code provided facilitates a user interface on the LCD for controlling devices connected to the relays, making it suitable for home automation or similar applications.
Cirkit Designer LogoOpen Project in Cirkit Designer

Explore Projects Built with Adafruit TFP401 to 40 pin TFT no Touch

Use Cirkit Designer to design, explore, and prototype these projects online. Some projects support real-time simulation. Click "Open Project" to start designing instantly!
Image of ESP32+ST7789: A project utilizing Adafruit TFP401 to 40 pin TFT no Touch in a practical application
ESP32-Powered 1.3 inch TFT Display Module for Visual Data Output
This circuit connects an ESP32 microcontroller to a 1.3 inch TFT display module (ST7789). The ESP32 provides power and control signals to the display, enabling it to show graphical data.
Cirkit Designer LogoOpen Project in Cirkit Designer
Image of Info-Orbs: A project utilizing Adafruit TFP401 to 40 pin TFT no Touch in a practical application
ESP32-Controlled Multi-Display Interface with Pushbutton Interaction
This circuit features an ESP32 microcontroller interfaced with multiple round TFT displays, controlled via shared serial communication lines, and several pushbuttons connected to individual GPIOs for input. The ESP32 coordinates the display of information and responds to user inputs from the pushbuttons.
Cirkit Designer LogoOpen Project in Cirkit Designer
Image of Tablero Moto: A project utilizing Adafruit TFP401 to 40 pin TFT no Touch in a practical application
Arduino Mega 2560 Controlled TFT Touchscreen Interface
This circuit connects an Arduino Mega 2560 microcontroller to a 3.5-inch 480x320 TFT LCD display. The Arduino provides power, ground, and digital signals to control the display, including data lines for pixel information and control lines for reset, write, and command/data selection. The embedded code initializes the display and configures the Arduino's pins for communication, likely to create a user interface or visual output for a project.
Cirkit Designer LogoOpen Project in Cirkit Designer
Image of Display relay: A project utilizing Adafruit TFP401 to 40 pin TFT no Touch in a practical application
Arduino Mega 2560 Controlled TFT Touchscreen Interface with 4-Channel Relay Automation
This circuit features an Arduino Mega 2560 microcontroller connected to an ILI9488 HD TFT LCD screen and a 4-channel relay module, powered by a 5V battery. The Arduino controls the LCD to display interactive buttons and uses digital output pins to toggle the state of the relays based on touch input. The code provided facilitates a user interface on the LCD for controlling devices connected to the relays, making it suitable for home automation or similar applications.
Cirkit Designer LogoOpen Project in Cirkit Designer

Technical Specifications

Key Technical Details

  • Power Supply: 5V (from HDMI)
  • Resolution: Up to 165MHz pixel clock for 1080p
  • Interface: 40-pin TFT
  • Control Interface: I2C (for EDID and HDCP)
  • Dimensions: 60mm x 30mm x 4mm

Pin Configuration and Descriptions

Pin Number Name Description
1 GND Ground
2 5V 5V Power
... ... ...
40 GND Ground

Note: The full pinout will be detailed in the product datasheet.

Usage Instructions

Connecting the Component in a Circuit

  1. Power Connections: Connect the 5V and GND pins to a stable 5V power supply.
  2. TFT Display Connection: Connect the 40-pin connector to the TFT display according to the display's datasheet.
  3. HDMI/DVI Input: Connect your HDMI or DVI source to the TFP401 HDMI port.

Important Considerations and Best Practices

  • Ensure that the power supply is capable of providing sufficient current for both the TFP401 and the TFT display.
  • Use short, high-quality HDMI cables to minimize signal degradation.
  • Avoid placing the component in environments with extreme temperatures or high humidity.
  • Always refer to the TFT display's datasheet for the correct pin mapping and electrical characteristics.

Troubleshooting and FAQs

Common Issues

  • No Display Output: Check the power supply and connections. Ensure that the HDMI source is outputting a compatible video signal.
  • Flickering or Unstable Image: This could be due to a poor-quality HDMI cable or too long of a cable run. Try a shorter or higher-quality cable.

Solutions and Tips for Troubleshooting

  • Verify that the TFT display is correctly connected and powered.
  • Check the solder joints on the 40-pin connector for cold solder or bridged pins.
  • Ensure that the HDMI source is set to output a resolution that is within the capabilities of both the TFP401 and the TFT display.

FAQs

Q: Can the TFP401 decode audio as well? A: No, the TFP401 is designed for video signals only.

Q: What is the maximum resolution supported by the TFP401? A: The TFP401 can support up to 1080p resolution.

Q: Is this component compatible with all TFT displays? A: Compatibility depends on the specific TFT display's pinout and electrical specifications. Always check the display's datasheet.

Example Code for Arduino UNO

Below is an example code snippet for initializing the TFP401 with an Arduino UNO. This example assumes that the Arduino is used to control the power and basic functions of the TFP401, not to process the video signal.

#include <Wire.h>

// Define the I2C address for the TFP401 (if applicable)
#define TFP401_I2C_ADDR 0x1F

void setup() {
  // Initialize the I2C communication
  Wire.begin();

  // Set up the TFP401 (pseudo-code, replace with actual initialization code)
  initializeTFP401();
}

void loop() {
  // Main loop code
  // For example, you could check for the presence of a video signal
  bool videoPresent = checkVideoSignal();
  if (videoPresent) {
    // Handle the video signal being present
  } else {
    // Handle the absence of a video signal
  }
}

// Function to initialize the TFP401 (replace with actual initialization code)
void initializeTFP401() {
  // Send initialization commands to the TFP401 over I2C
  Wire.beginTransmission(TFP401_I2C_ADDR);
  // ... (send data)
  Wire.endTransmission();
}

// Function to check for video signal (replace with actual signal check code)
bool checkVideoSignal() {
  // Check for video signal presence
  // This is pseudo-code and would need to be replaced with actual checking logic
  return true; // or false, depending on the signal status
}

Note: The above code is for illustrative purposes only and does not represent actual initialization or signal checking code for the TFP401. The TFP401 is typically used with a microcontroller that has HDMI capabilities, and the Arduino UNO does not have the necessary hardware to process HDMI video signals.

This documentation provides an overview of the Adafruit TFP401 to 40 pin TFT no Touch component, its technical specifications, usage instructions, troubleshooting tips, and FAQs. For more detailed information, please refer to the official datasheet and technical resources provided by Adafruit.