How to Use 3.7V Rechargeable Li-ion Nokia Battery: Examples, Pinouts, and Specs
Introduction
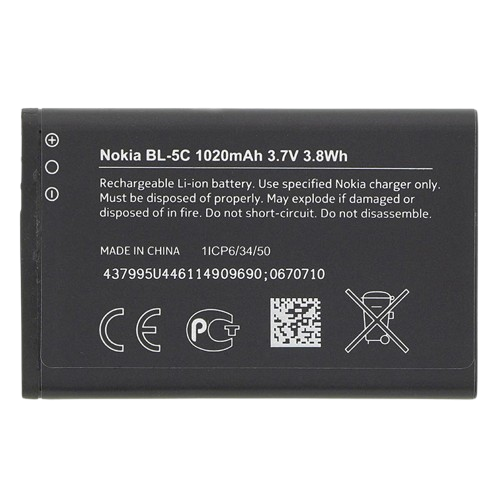
The Nokia BL-5C 1020mAh 3.7V 3.8Wh is a compact, rechargeable lithium-ion battery designed for use in mobile devices and other portable electronics. Manufactured by Nokia, this battery is known for its high energy density, long cycle life, and reliable performance. It provides a nominal voltage of 3.7V and a capacity of 1020mAh, making it suitable for applications requiring lightweight and efficient power sources.
Explore Projects Built with 3.7V Rechargeable Li-ion Nokia Battery
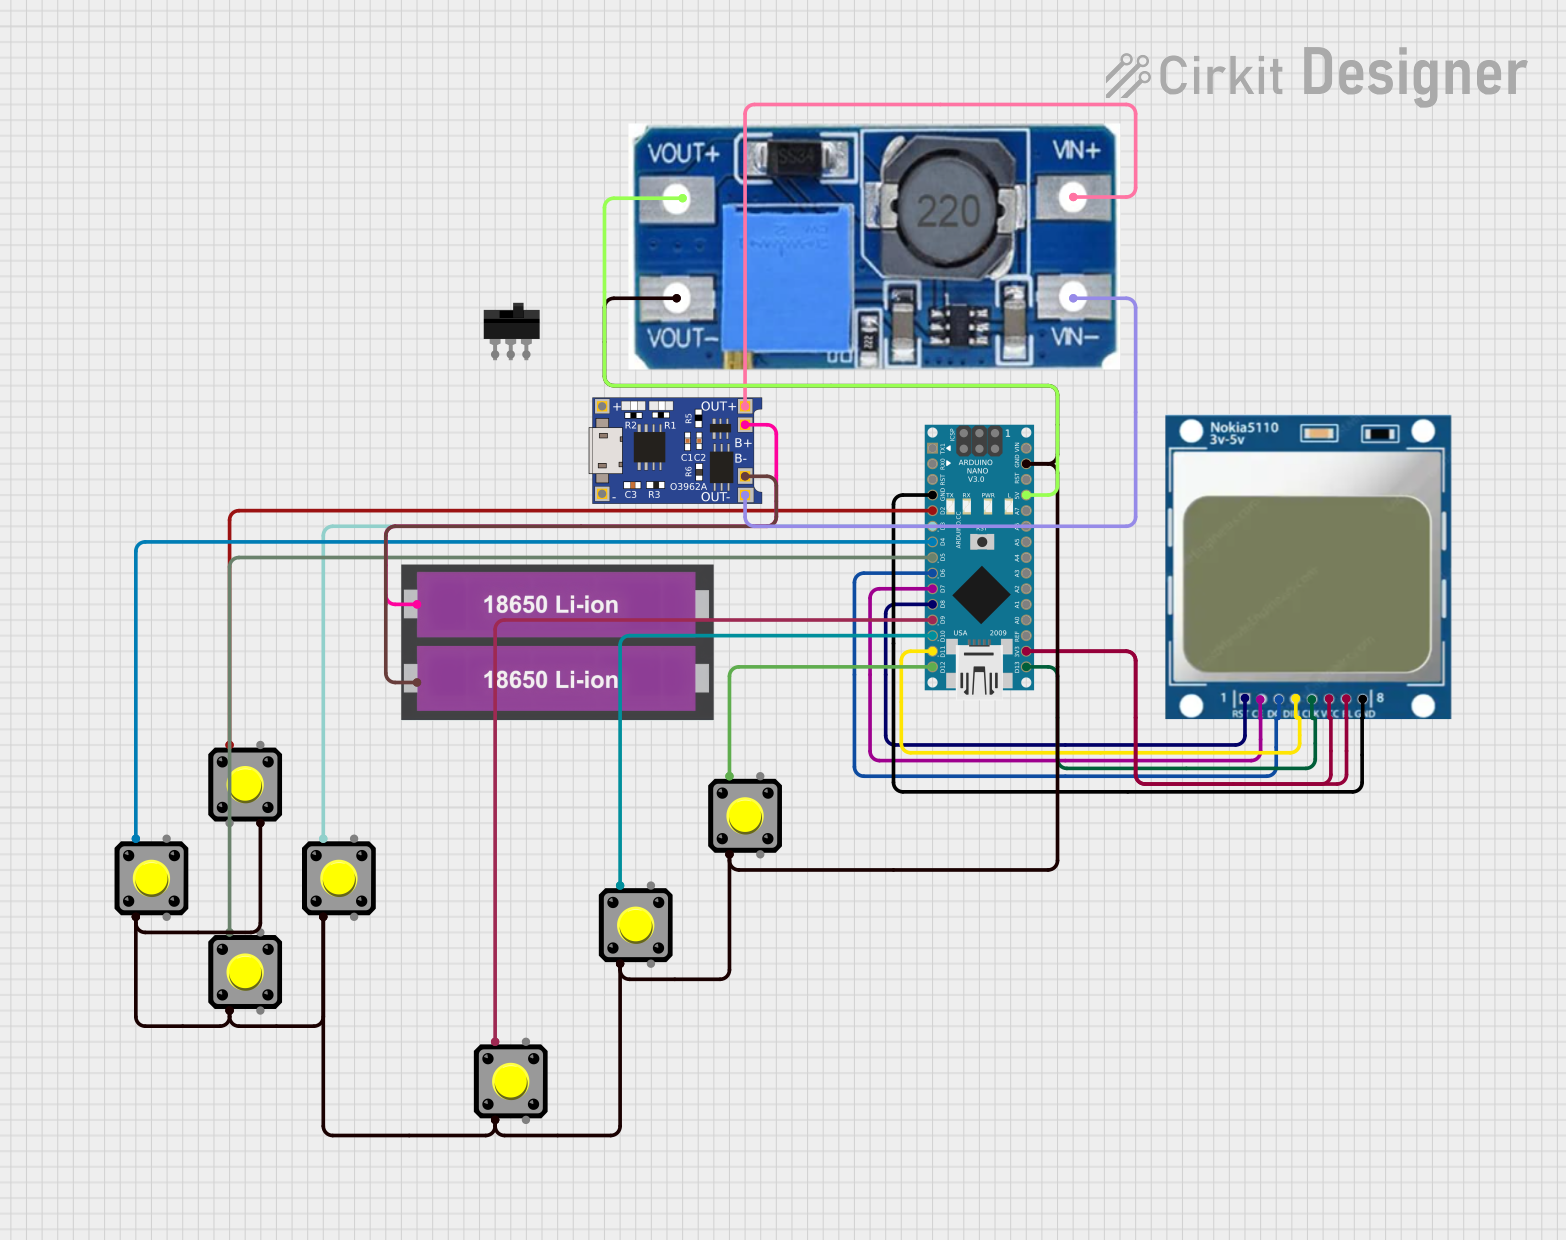


Explore Projects Built with 3.7V Rechargeable Li-ion Nokia Battery
Common Applications and Use Cases
- Mobile phones and smartphones
- Portable audio devices (e.g., MP3 players)
- DIY electronics projects
- Backup power for small embedded systems
- Robotics and IoT devices
Technical Specifications
Below are the key technical details of the Nokia BL-5C battery:
| Parameter | Specification |
|---|---|
| Manufacturer | Nokia |
| Part ID | BL-5C |
| Nominal Voltage | 3.7V |
| Capacity | 1020mAh |
| Energy | 3.8Wh |
| Chemistry | Lithium-Ion |
| Charging Voltage | 4.2V (maximum) |
| Discharge Cutoff Voltage | 3.0V (minimum) |
| Maximum Discharge Current | 1C (1.02A) |
| Dimensions | 53mm x 34mm x 5.5mm |
| Weight | ~22g |
| Operating Temperature | 0°C to 45°C (charging) |
| -20°C to 60°C (discharging) |
Pin Configuration and Descriptions
The BL-5C battery has three terminals, as shown below:
| Pin | Label | Description |
|---|---|---|
| 1 | B+ | Positive terminal (3.7V nominal output) |
| 2 | B- | Negative terminal (ground) |
| 3 | T | Temperature sensing (optional) |
- B+ (Positive Terminal): Supplies the positive voltage to the circuit.
- B- (Negative Terminal): Acts as the ground connection.
- T (Temperature Sensing): Used for monitoring the battery temperature during charging and discharging. This pin may not be required in all applications.
Usage Instructions
How to Use the Battery in a Circuit
Connection:
- Connect the B+ terminal to the positive input of your circuit.
- Connect the B- terminal to the ground of your circuit.
- If temperature monitoring is required, connect the T pin to a compatible temperature sensing circuit or microcontroller ADC pin.
Charging:
- Use a dedicated Li-ion battery charger with a constant current/constant voltage (CC/CV) charging profile.
- Ensure the charging voltage does not exceed 4.2V and the charging current is within the recommended range (typically 0.5C or 510mA for this battery).
Discharging:
- Avoid discharging the battery below 3.0V to prevent damage and capacity loss.
- Use a low-voltage cutoff circuit or battery management system (BMS) to protect the battery.
Mounting:
- Secure the battery in a holder or enclosure to prevent physical damage.
- Avoid exposing the battery to excessive heat, moisture, or mechanical stress.
Important Considerations and Best Practices
- Safety First: Never short-circuit the terminals or puncture the battery.
- Temperature Monitoring: Use the temperature sensing pin (T) to monitor the battery's temperature during charging and discharging to prevent overheating.
- Storage: Store the battery in a cool, dry place at a charge level of around 40-60% for long-term storage.
- Recycling: Dispose of the battery responsibly at an authorized recycling facility.
Example: Using the BL-5C with an Arduino UNO
The BL-5C can be used to power an Arduino UNO. Below is an example of connecting the battery to the Arduino and monitoring its voltage using an analog pin.
Circuit Diagram
- Connect the B+ terminal to the Arduino's Vin pin.
- Connect the B- terminal to the Arduino's GND pin.
- Optionally, connect the T pin to an analog input pin (e.g., A0) for temperature monitoring.
Sample Code
// Arduino code to monitor BL-5C battery voltage and temperature
const int voltagePin = A1; // Pin connected to battery voltage divider
const int tempPin = A0;    // Pin connected to temperature sensing (optional)
const float voltageDividerRatio = 2.0; // Adjust based on your resistor values

void setup() {
  Serial.begin(9600); // Initialize serial communication
}

void loop() {
  // Read battery voltage
  int voltageRaw = analogRead(voltagePin);
  float batteryVoltage = (voltageRaw * 5.0 / 1023.0) * voltageDividerRatio;

  // Read temperature (if connected)
  int tempRaw = analogRead(tempPin);
  float temperature = (tempRaw * 5.0 / 1023.0) * 100.0; // Example conversion

  // Print results
  Serial.print("Battery Voltage: ");
  Serial.print(batteryVoltage);
  Serial.println(" V");

  Serial.print("Battery Temperature: ");
  Serial.print(temperature);
  Serial.println(" °C");

  delay(1000); // Wait 1 second before next reading
}
Note: Use a voltage divider circuit to scale the battery voltage to within the Arduino's ADC range (0-5V). Choose resistor values appropriately.
Troubleshooting and FAQs
Common Issues and Solutions
Battery Not Charging:
- Ensure the charger is compatible with Li-ion batteries and provides a maximum of 4.2V.
- Check the connections to the B+ and B- terminals.
Battery Drains Quickly:
- Verify the load current is within the battery's capacity (1C or 1.02A maximum).
- Check for any short circuits or excessive power consumption in the circuit.
Overheating During Use:
- Ensure the battery is not exposed to high ambient temperatures.
- Use the temperature sensing pin (T) to monitor and manage overheating.
Battery Voltage Drops Below 3.0V:
- Stop using the battery immediately to prevent damage.
- Recharge the battery using a compatible charger.
FAQs
Q: Can I use the BL-5C battery for high-current applications?
A: The BL-5C supports a maximum discharge current of 1C (1.02A). For higher currents, consider using a battery with a higher capacity or discharge rating.
Q: How do I safely dispose of the battery?
A: Take the battery to an authorized recycling facility. Do not dispose of it in regular trash.
Q: Can I connect multiple BL-5C batteries in series or parallel?
A: Yes, but ensure proper balancing and use a battery management system (BMS) to prevent overcharging or over-discharging.
Q: What happens if I overcharge the battery?
A: Overcharging can cause overheating, swelling, or even fire. Always use a charger with a maximum voltage of 4.2V.