Cirkit Designer
Your all-in-one circuit design IDE
Home /
Component Documentation
How to Use 1.5V Battery: Examples, Pinouts, and Specs

Introduction
A 1.5V battery is a small, portable power source commonly used in a variety of electronic devices. These batteries are designed to provide a stable voltage of 1.5 volts and are essential for powering low-voltage electronics. They come in various sizes and chemistries, such as alkaline, zinc-carbon, and lithium, each with its own advantages and use cases.
Explore Projects Built with 1.5V Battery
Battery-Powered Raspberry Pi Zero W with MPU-6050 and LCD Display
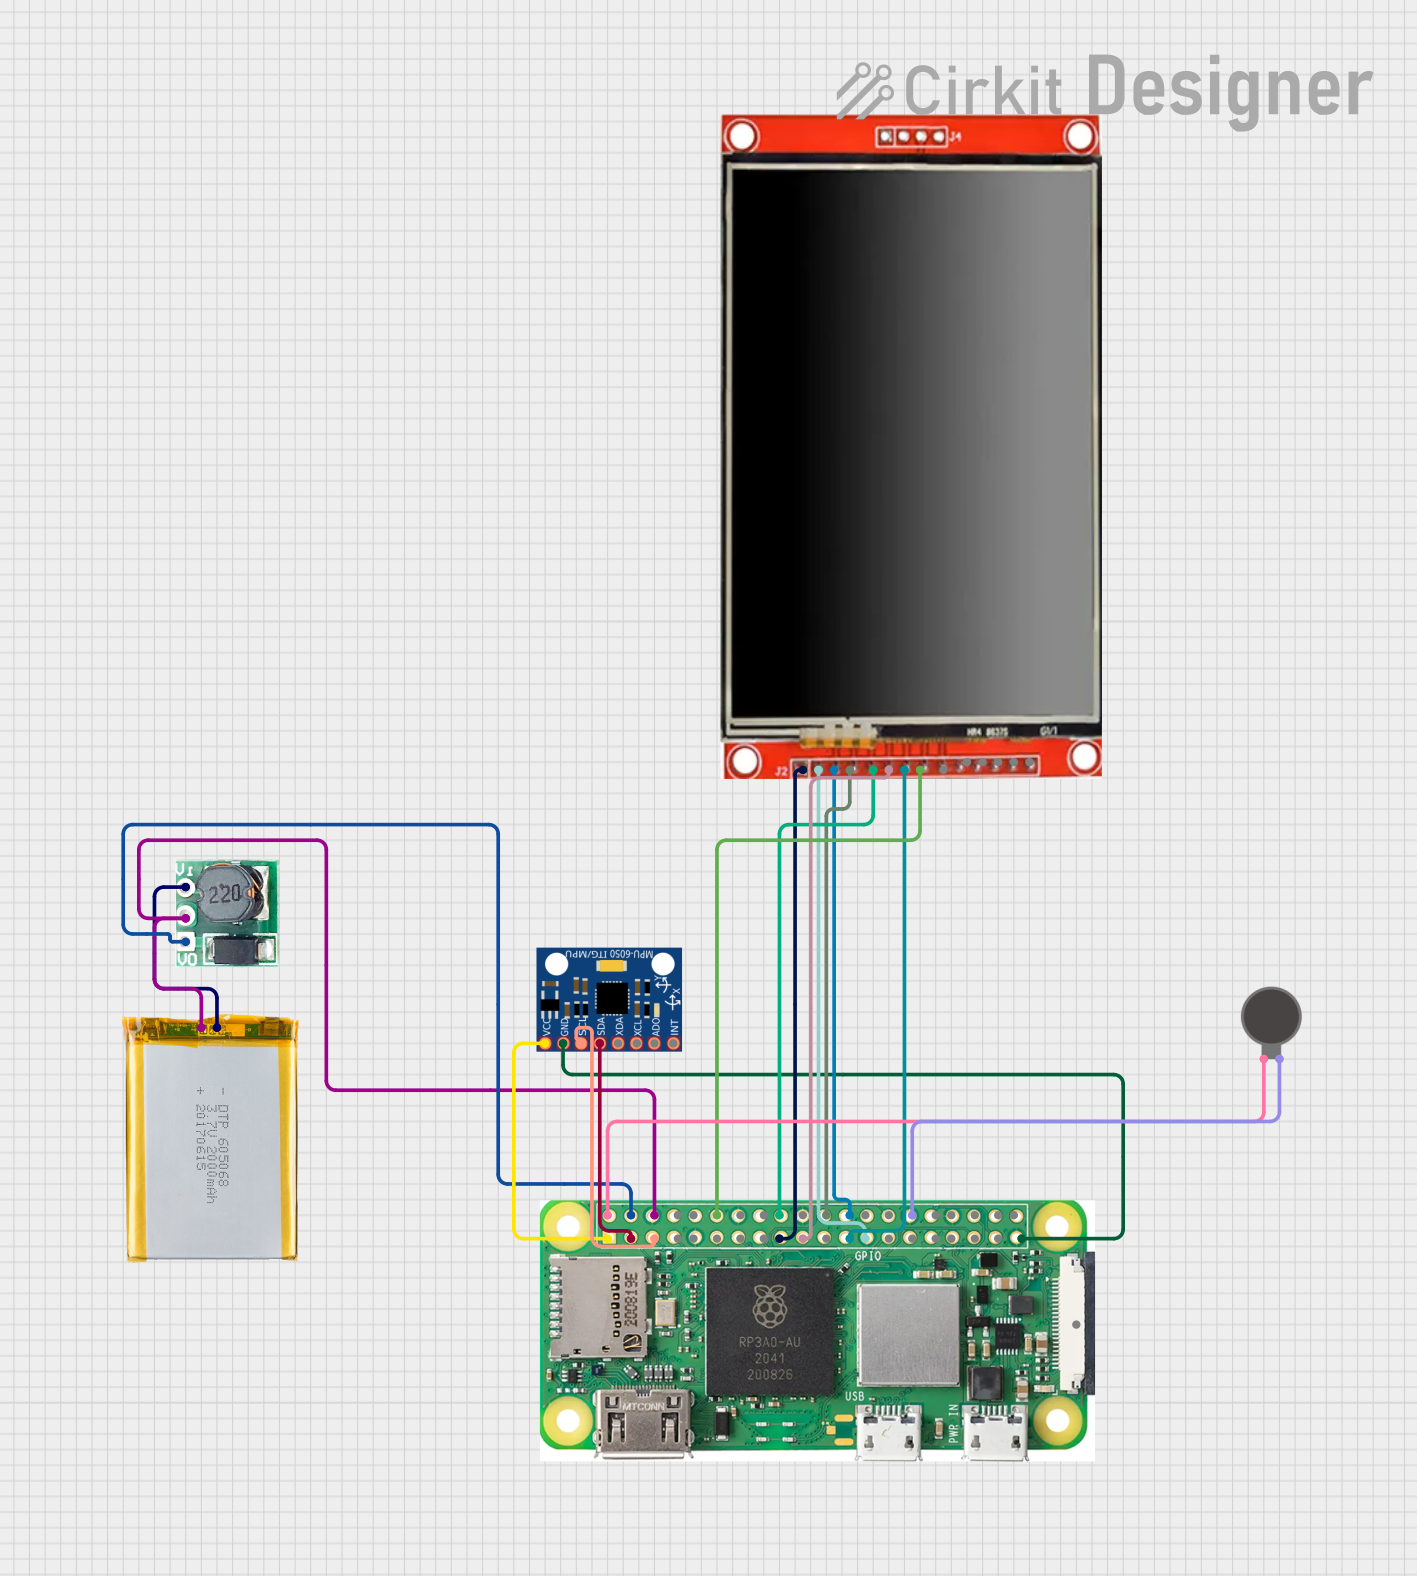
This circuit is a portable system powered by a 2000mAh battery, which is stepped up to 5V using a boost converter to power a Raspberry Pi Zero W. The Raspberry Pi interfaces with an MPU-6050 sensor for motion detection, an LCD TFT screen for display, and a vibration motor for haptic feedback.
ESP32 Battery Voltage Monitor with OLED Display and Touch Sensor

This circuit is a battery-powered system that monitors and displays the battery voltage on a 0.96" OLED screen using an ESP32 microcontroller. It includes a TP4056 for battery charging, an MT3608 for voltage boosting, and a touch sensor for user interaction.
Battery-Powered Arduino Nano with Nokia 5110 LCD and Pushbutton Interface
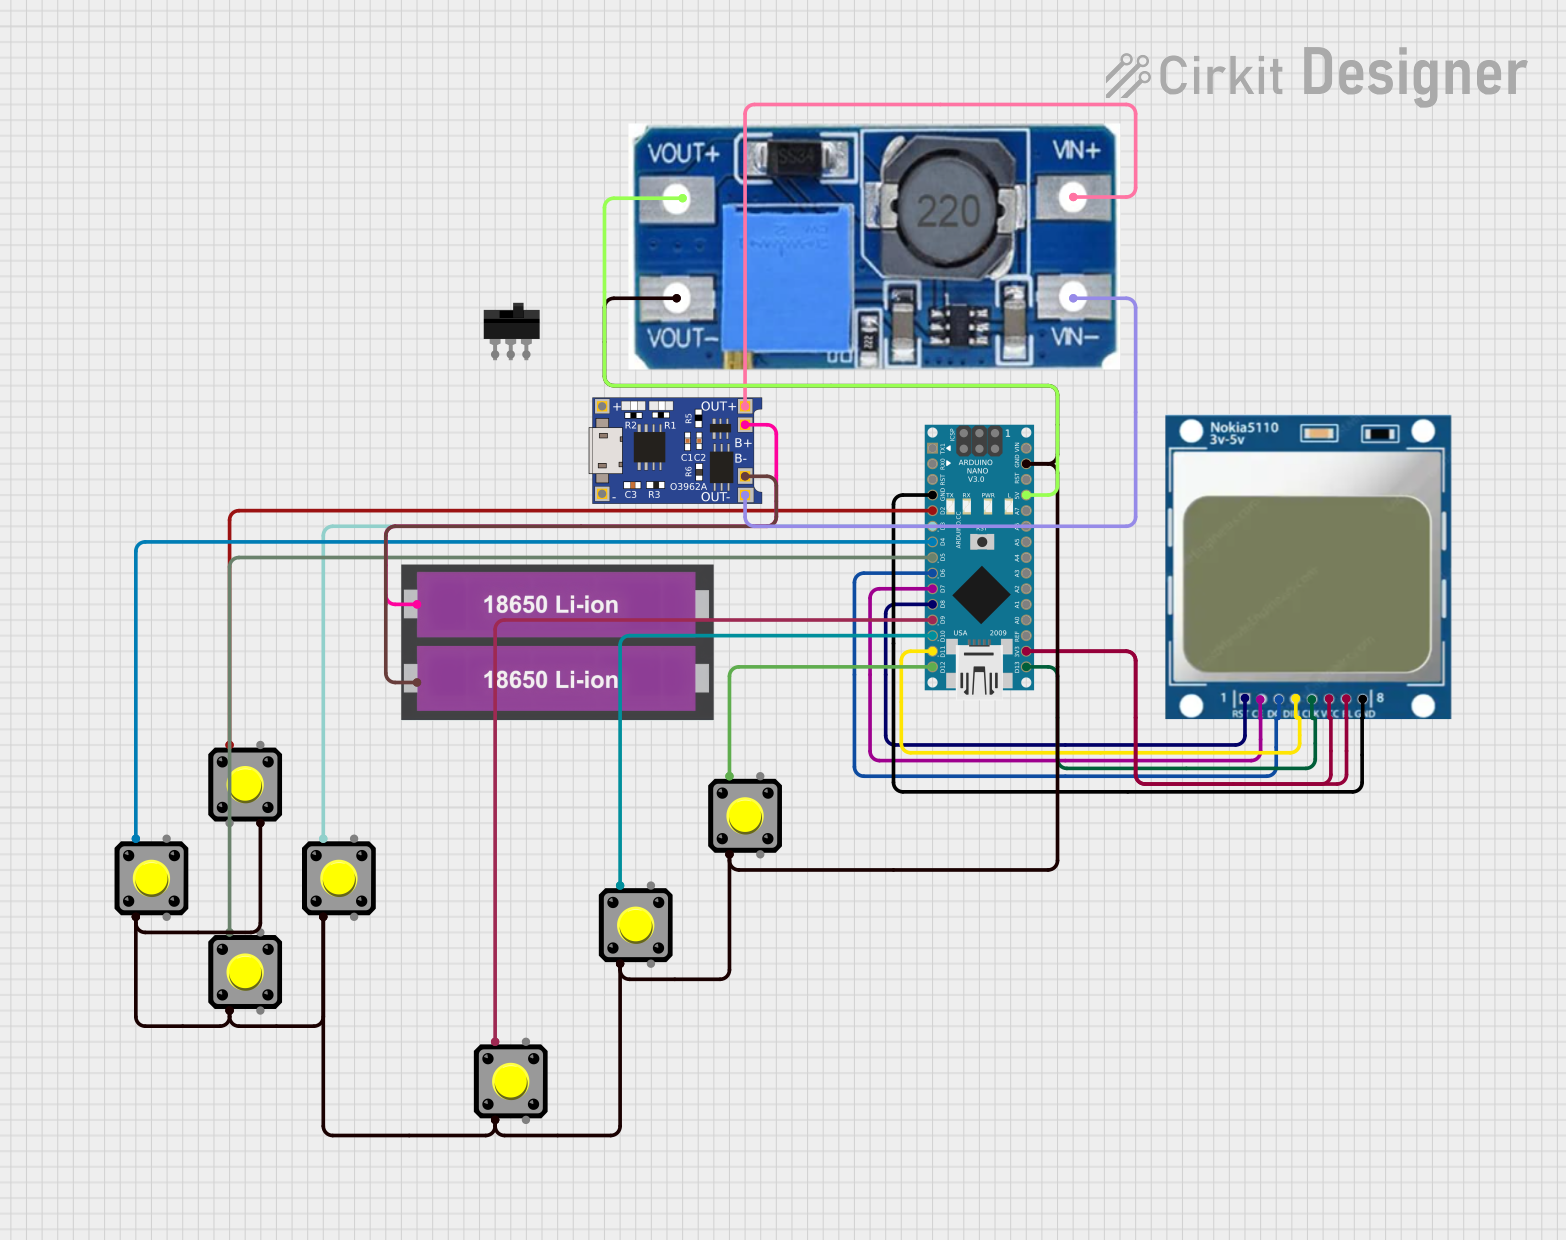
This circuit is a battery-powered system featuring an Arduino Nano that interfaces with a Nokia 5110 LCD and multiple pushbuttons. The TP4056 module charges the 18650 Li-ion batteries, which then power the Arduino through a step-up boost converter. The Arduino controls the LCD display and reads inputs from the pushbuttons for user interaction.
Raspberry Pi 4B and ADS1115 Based Battery Monitoring System
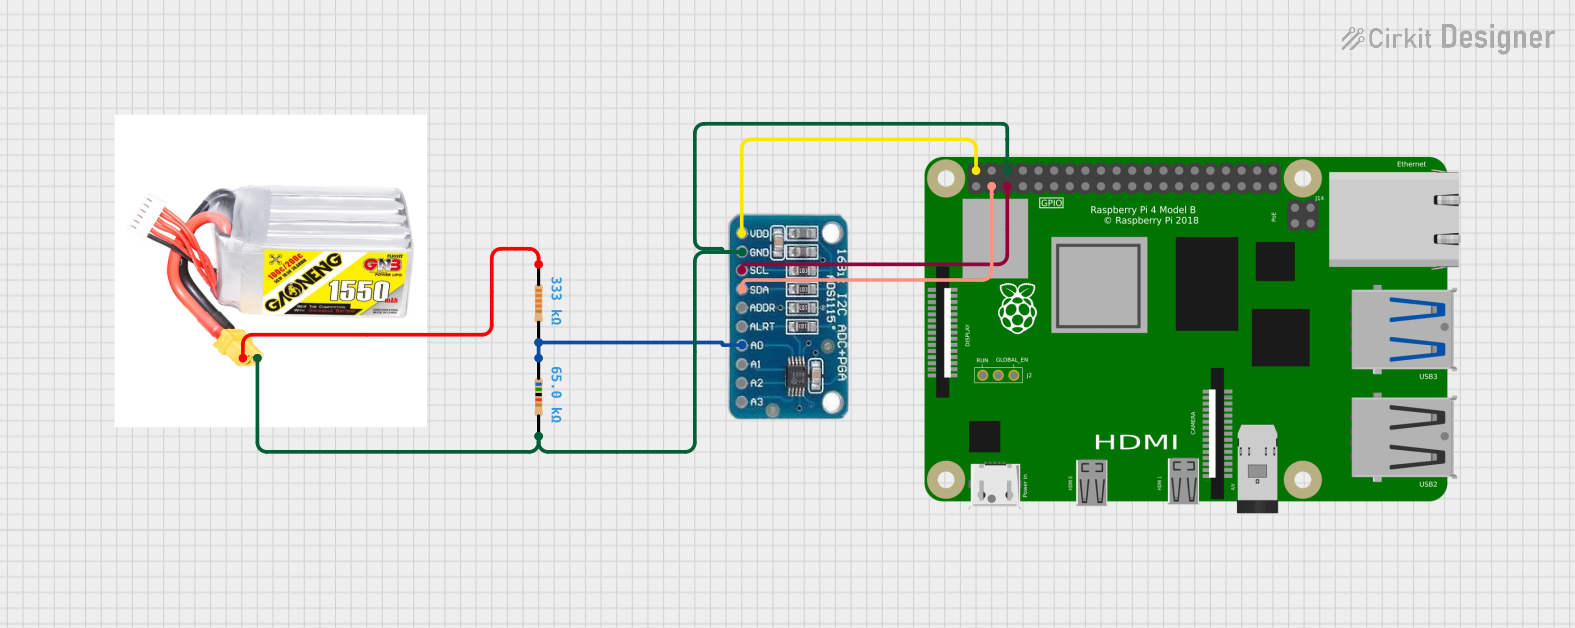
This circuit is designed to monitor the voltage level of a 5s lipo battery using an ADS1115 analog-to-digital converter (ADC) interfaced with a Raspberry Pi 4B. The ADC reads the battery voltage through a voltage divider formed by two resistors, and the Raspberry Pi processes this data to calculate and report the battery's voltage and percentage remaining. The purpose of the circuit is to provide real-time battery status monitoring, with the capability to warn when the battery level is below certain thresholds.
Explore Projects Built with 1.5V Battery
Battery-Powered Raspberry Pi Zero W with MPU-6050 and LCD Display
This circuit is a portable system powered by a 2000mAh battery, which is stepped up to 5V using a boost converter to power a Raspberry Pi Zero W. The Raspberry Pi interfaces with an MPU-6050 sensor for motion detection, an LCD TFT screen for display, and a vibration motor for haptic feedback.
ESP32 Battery Voltage Monitor with OLED Display and Touch Sensor
This circuit is a battery-powered system that monitors and displays the battery voltage on a 0.96" OLED screen using an ESP32 microcontroller. It includes a TP4056 for battery charging, an MT3608 for voltage boosting, and a touch sensor for user interaction.
Battery-Powered Arduino Nano with Nokia 5110 LCD and Pushbutton Interface
This circuit is a battery-powered system featuring an Arduino Nano that interfaces with a Nokia 5110 LCD and multiple pushbuttons. The TP4056 module charges the 18650 Li-ion batteries, which then power the Arduino through a step-up boost converter. The Arduino controls the LCD display and reads inputs from the pushbuttons for user interaction.
Raspberry Pi 4B and ADS1115 Based Battery Monitoring System
This circuit is designed to monitor the voltage level of a 5s lipo battery using an ADS1115 analog-to-digital converter (ADC) interfaced with a Raspberry Pi 4B. The ADC reads the battery voltage through a voltage divider formed by two resistors, and the Raspberry Pi processes this data to calculate and report the battery's voltage and percentage remaining. The purpose of the circuit is to provide real-time battery status monitoring, with the capability to warn when the battery level is below certain thresholds.
Common Applications and Use Cases
- Remote controls
- Wall clocks
- Flashlights
- Portable radios
- Children's toys
- Small electronic gadgets
Technical Specifications
Key Technical Details
- Nominal Voltage: 1.5V
- Chemistry: Alkaline, Zinc-Carbon, Lithium (varies by specific battery type)
- Capacity: Varies by size and chemistry (e.g., AA alkaline typically 1800-2600 mAh)
- Shelf Life: Typically 5-10 years for alkaline, varies for other types
Pin Configuration and Descriptions
| Pin | Description |
|---|---|
| + | Positive terminal (anode) |
| - | Negative terminal (cathode) |
Usage Instructions
How to Use the Component in a Circuit
- Identify the positive (+) and negative (-) terminals of the battery.
- Connect the positive terminal to the power input of your circuit.
- Connect the negative terminal to the ground (GND) of your circuit.
- Ensure that the total voltage and current requirements of your circuit do not exceed the battery's capacity.
Important Considerations and Best Practices
- Do not recharge a non-rechargeable 1.5V battery.
- Avoid mixing old and new batteries in the same device.
- Keep batteries away from high temperatures and direct sunlight.
- Dispose of used batteries properly according to local regulations.
- Check the device's polarity requirements before inserting the battery.
Troubleshooting and FAQs
Common Issues Users Might Face
- Device not powering on: Ensure the battery is inserted correctly with proper polarity.
- Short battery life: Check if the device's power requirements exceed the battery's capacity.
- Leakage: Remove the battery immediately and clean the device's battery compartment.
Solutions and Tips for Troubleshooting
- If the device does not power on, try replacing the battery with a new one.
- For short battery life, ensure you are using the correct battery type recommended by the device manufacturer.
- In case of leakage, use gloves to handle the battery and clean the device with a mild acid like vinegar.
FAQs
Q: Can I use a 1.5V battery in a device that requires 3V?
- A: Yes, by connecting two 1.5V batteries in series, you can achieve 3V.
Q: How do I dispose of 1.5V batteries?
- A: Follow your local regulations for battery disposal, often involving recycling centers.
Q: Can I mix different brands of 1.5V batteries in a device?
- A: It's not recommended as different brands may have slightly different voltage and capacity, leading to uneven discharge.
Example Code for Arduino UNO
// This example demonstrates how to power an Arduino UNO with a 1.5V battery
// using a DC-DC boost converter to step up the voltage to 5V.

void setup() {
  // Initialize digital pin LED_BUILTIN as an output.
  pinMode(LED_BUILTIN, OUTPUT);
}

void loop() {
  // Turn the LED on (HIGH is the voltage level)
  digitalWrite(LED_BUILTIN, HIGH);
  // Wait for a second
  delay(1000);
  // Turn the LED off by making the voltage LOW
  digitalWrite(LED_BUILTIN, LOW);
  // Wait for a second
  delay(1000);
}

// Note: This code assumes that you have a DC-DC boost converter connected
// to the 1.5V battery to step up the voltage to a level suitable for the
// Arduino UNO (5V). The positive terminal of the battery goes to the input
// of the boost converter, and the output of the converter connects to the
// VIN pin on the Arduino.
Remember to ensure that the boost converter can provide sufficient current for the Arduino and any connected peripherals. Always verify the converter's output voltage before connecting it to the Arduino to prevent damage to the board.