How to Use HW-486 LDR Photo Resistor: Examples, Pinouts, and Specs
Introduction
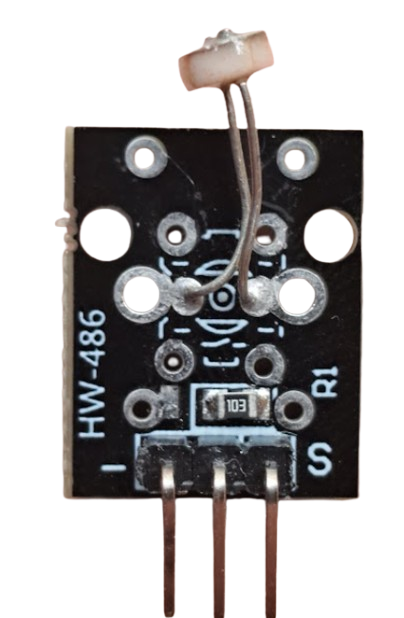
The HW-486 LDR Photo Resistor, manufactured by AZ-Delivery, is a light-dependent resistor that changes its resistance based on the intensity of light falling on it. This component is widely used in light sensing and control applications, such as automatic lighting systems, light meters, and electronic circuits requiring light detection.
Explore Projects Built with HW-486 LDR Photo Resistor
Explore Projects Built with HW-486 LDR Photo Resistor
Common Applications
- Automatic streetlights
- Light-sensitive alarms
- Brightness control systems
- Solar tracking systems
- DIY electronics projects
Technical Specifications
The HW-486 LDR Photo Resistor is designed for reliable performance in light-sensing applications. Below are its key technical details:
| Parameter | Value |
|---|---|
| Manufacturer | AZ-Delivery |
| Part ID | HW-486 |
| Resistance (Dark) | 1 MΩ (typical) |
| Resistance (Light) | 10 kΩ to 20 kΩ (at 10 lux) |
| Maximum Voltage | 150 V |
| Power Dissipation | 100 mW |
| Spectral Peak | 540 nm |
| Response Time (Rise) | 20 ms |
| Response Time (Fall) | 30 ms |
| Operating Temperature | -30°C to +70°C |
Pin Configuration
The HW-486 LDR is a two-terminal device with no polarity. The terminals are interchangeable and can be connected in either orientation. Below is a description of the pins:
| Pin | Description |
|---|---|
| Pin 1 | Connects to one side of the circuit |
| Pin 2 | Connects to the other side of the circuit |
Usage Instructions
The HW-486 LDR Photo Resistor is simple to use in a variety of circuits. Below are the steps and considerations for integrating it into your project:
Connecting the HW-486 LDR
- Determine the application: Decide whether the LDR will be used in a voltage divider circuit, as part of a sensor module, or in another configuration.
- Voltage Divider Circuit:
- Connect one terminal of the LDR to a fixed resistor.
- Connect the junction of the LDR and the fixed resistor to an analog input pin of your microcontroller (e.g., Arduino UNO).
- Connect the other terminal of the LDR to the positive voltage supply (Vcc).
- Connect the other terminal of the fixed resistor to ground (GND).
Important Considerations
- Fixed Resistor Value: Choose a fixed resistor value that matches the expected light conditions. For general use, a 10 kΩ resistor is a good starting point.
- Ambient Light: Ensure the LDR is exposed to the light source you want to measure.
- Voltage Range: Do not exceed the maximum voltage rating of 150 V to avoid damaging the component.
- Response Time: Note that the LDR has a rise time of 20 ms and a fall time of 30 ms, which may affect applications requiring rapid light changes.
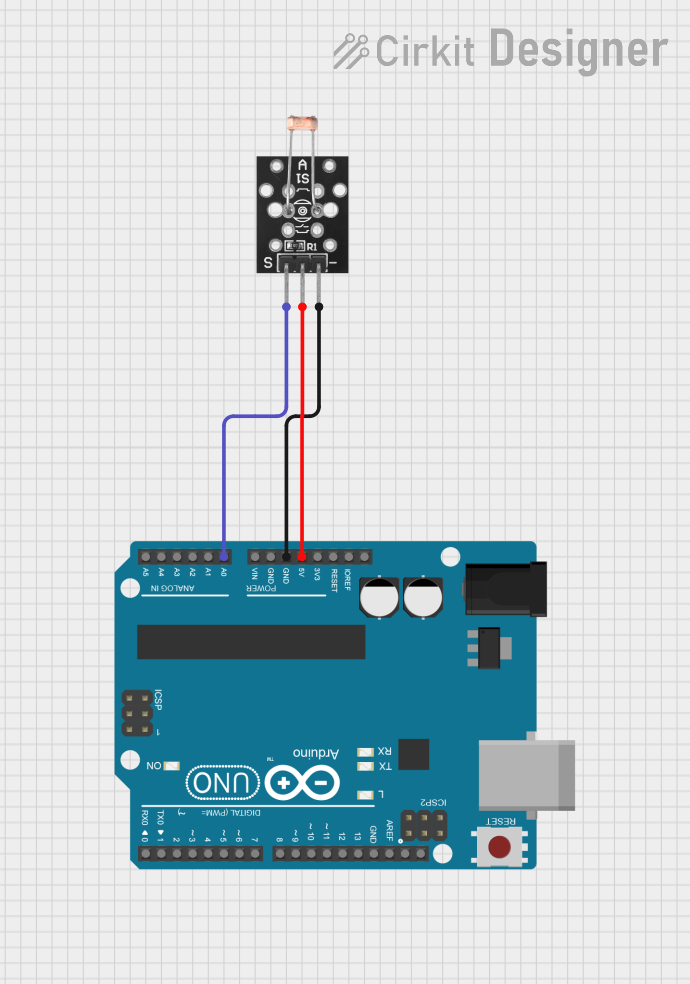
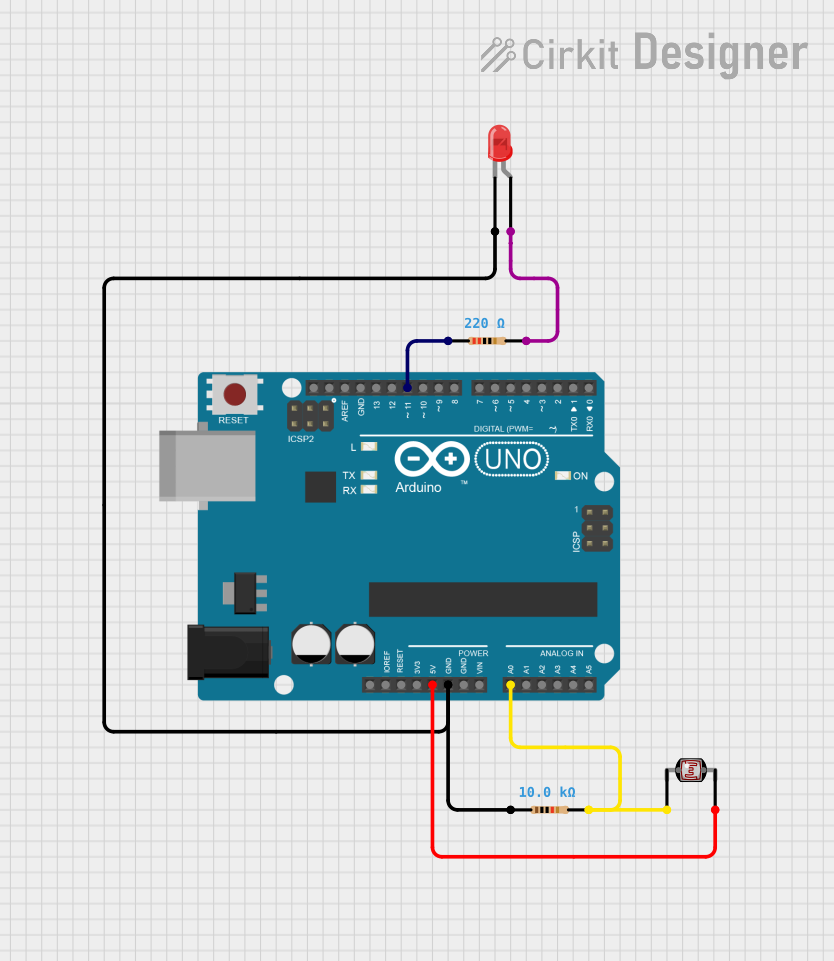
Example: Using HW-486 LDR with Arduino UNO
Below is an example of how to use the HW-486 LDR in a voltage divider circuit to measure light intensity with an Arduino UNO:
// Define the analog pin connected to the LDR
const int ldrPin = A0; // LDR connected to analog pin A0

void setup() {
  Serial.begin(9600); // Initialize serial communication at 9600 baud
}

void loop() {
  int ldrValue = analogRead(ldrPin); // Read the analog value from the LDR
  Serial.print("LDR Value: ");
  Serial.println(ldrValue); // Print the LDR value to the Serial Monitor

  delay(500); // Wait for 500 ms before the next reading
}
Explanation of the Code:
- The LDR is connected to analog pin A0 of the Arduino UNO.
- The
analogRead()function reads the voltage at the pin, which corresponds to the light intensity. - The value is printed to the Serial Monitor for observation.
Troubleshooting and FAQs
Common Issues
No Change in Output:
- Cause: The LDR is not exposed to varying light conditions.
- Solution: Ensure the LDR is positioned correctly to detect light changes.
Incorrect Readings:
- Cause: Improper resistor value in the voltage divider circuit.
- Solution: Adjust the fixed resistor value to better match the light conditions.
Component Overheating:
- Cause: Exceeding the maximum voltage or power dissipation rating.
- Solution: Ensure the voltage across the LDR does not exceed 150 V and the power dissipation stays below 100 mW.
Slow Response:
- Cause: The LDR's inherent response time.
- Solution: Use a faster light sensor if rapid light changes need to be detected.
FAQs
Q1: Can the HW-486 LDR detect infrared light?
A1: The HW-486 LDR is most sensitive to visible light with a spectral peak at 540 nm. It has limited sensitivity to infrared light.
Q2: Can I use the HW-486 LDR in outdoor applications?
A2: Yes, but ensure the operating temperature is within the range of -30°C to +70°C. Protect the LDR from moisture and extreme weather conditions.
Q3: What is the lifespan of the HW-486 LDR?
A3: The HW-486 LDR has a long lifespan when operated within its specified ratings. However, prolonged exposure to high-intensity light or extreme conditions may degrade its performance over time.
Q4: Can I use the HW-486 LDR with a digital input pin?
A4: No, the LDR outputs an analog signal. Use an analog-to-digital converter (ADC) or connect it to an analog input pin of a microcontroller.
By following this documentation, you can effectively integrate the HW-486 LDR Photo Resistor into your projects and troubleshoot common issues with ease.