How to Use Limit Switch 3wires: Examples, Pinouts, and Specs
Introduction
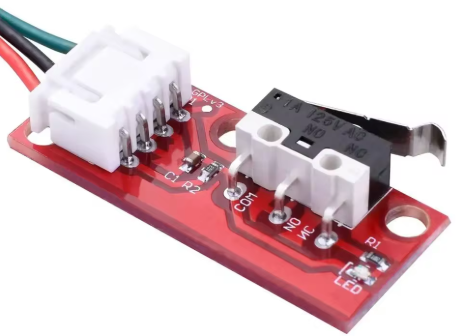
A limit switch with three wires is an electromechanical device used to detect the presence or absence of an object. It is commonly employed in industrial applications for safety and control purposes. The switch operates by making or breaking an electrical connection when an object comes into contact with its actuator. This documentation provides a comprehensive guide to understanding, using, and troubleshooting the 3-wire limit switch.
Explore Projects Built with Limit Switch 3wires

Explore Projects Built with Limit Switch 3wires
Technical Specifications
Key Technical Details
| Parameter | Value |
|---|---|
| Operating Voltage | 5V to 30V DC |
| Operating Current | 5mA to 20mA |
| Contact Type | Normally Open (NO) / Normally Closed (NC) |
| Actuator Type | Roller Lever, Plunger, etc. |
| Housing Material | Plastic or Metal |
| Operating Temperature | -25°C to 85°C |
| Mechanical Life | 1,000,000 operations |
Pin Configuration and Descriptions
| Pin Number | Wire Color | Description |
|---|---|---|
| 1 | Red | VCC (Power Supply) |
| 2 | Black | GND (Ground) |
| 3 | White | Signal (Output) |
Usage Instructions
How to Use the Component in a Circuit
- Power Supply Connection: Connect the red wire (VCC) to the positive terminal of your power supply (5V to 30V DC).
- Ground Connection: Connect the black wire (GND) to the ground terminal of your power supply.
- Signal Connection: Connect the white wire (Signal) to the input pin of your microcontroller or other control circuitry.
Important Considerations and Best Practices
- Debouncing: Mechanical switches can produce noise or "bounce" when actuated. Use a debouncing circuit or software debouncing to ensure reliable operation.
- Current Limiting: Ensure that the current through the switch does not exceed the specified operating current to prevent damage.
- Mounting: Securely mount the limit switch to prevent movement or misalignment during operation.
- Environmental Protection: If used in harsh environments, consider using a limit switch with appropriate IP rating for protection against dust and moisture.
Example: Connecting to an Arduino UNO
Circuit Diagram
Arduino UNO       Limit Switch
-----------       ------------
5V  ------------> Red (VCC)
GND ------------> Black (GND)
D2  ------------> White (Signal)
Sample Code
// Define the pin connected to the limit switch signal
const int limitSwitchPin = 2;

// Variable to store the switch state
int switchState = 0;

void setup() {
  // Initialize the limit switch pin as an input
  pinMode(limitSwitchPin, INPUT);

  // Initialize serial communication for debugging
  Serial.begin(9600);
}

void loop() {
  // Read the state of the limit switch
  switchState = digitalRead(limitSwitchPin);

  // Print the state to the serial monitor
  if (switchState == HIGH) {
    Serial.println("Limit switch is NOT pressed");
  } else {
    Serial.println("Limit switch is pressed");
  }

  // Small delay to avoid flooding the serial monitor
  delay(100);
}
Troubleshooting and FAQs
Common Issues Users Might Face
No Signal Detection: The microcontroller does not detect the signal from the limit switch.
- Solution: Check the wiring connections. Ensure that the VCC and GND are properly connected and that the signal wire is connected to the correct input pin.
False Triggering: The limit switch triggers without any physical contact.
- Solution: Implement debouncing in your circuit or code to filter out noise and false triggers.
Switch Not Operating: The limit switch does not operate when actuated.
- Solution: Verify the operating voltage and current. Ensure that the switch is not damaged and is within its mechanical life.
FAQs
Q1: Can I use the limit switch with an AC power supply?
- A1: No, the limit switch is designed for DC power supply only. Using an AC power supply may damage the switch.
Q2: How do I know if my limit switch is Normally Open (NO) or Normally Closed (NC)?
- A2: Refer to the datasheet or product specifications. You can also test the switch with a multimeter to determine its default state.
Q3: Can I use the limit switch in a high-temperature environment?
- A3: The operating temperature range for the limit switch is -25°C to 85°C. Using it outside this range may affect its performance and lifespan.
By following this documentation, users can effectively integrate and troubleshoot the 3-wire limit switch in their projects, ensuring reliable and safe operation.