Cirkit Designer Logo
Cirkit Designer
Your all-in-one circuit design IDE
Home / 
Component Documentation

How to Use 4A Stepper Phidget: Examples, Pinouts, and Specs

Image of 4A Stepper Phidget
Cirkit Designer LogoDesign with 4A Stepper Phidget in Cirkit Designer

Introduction

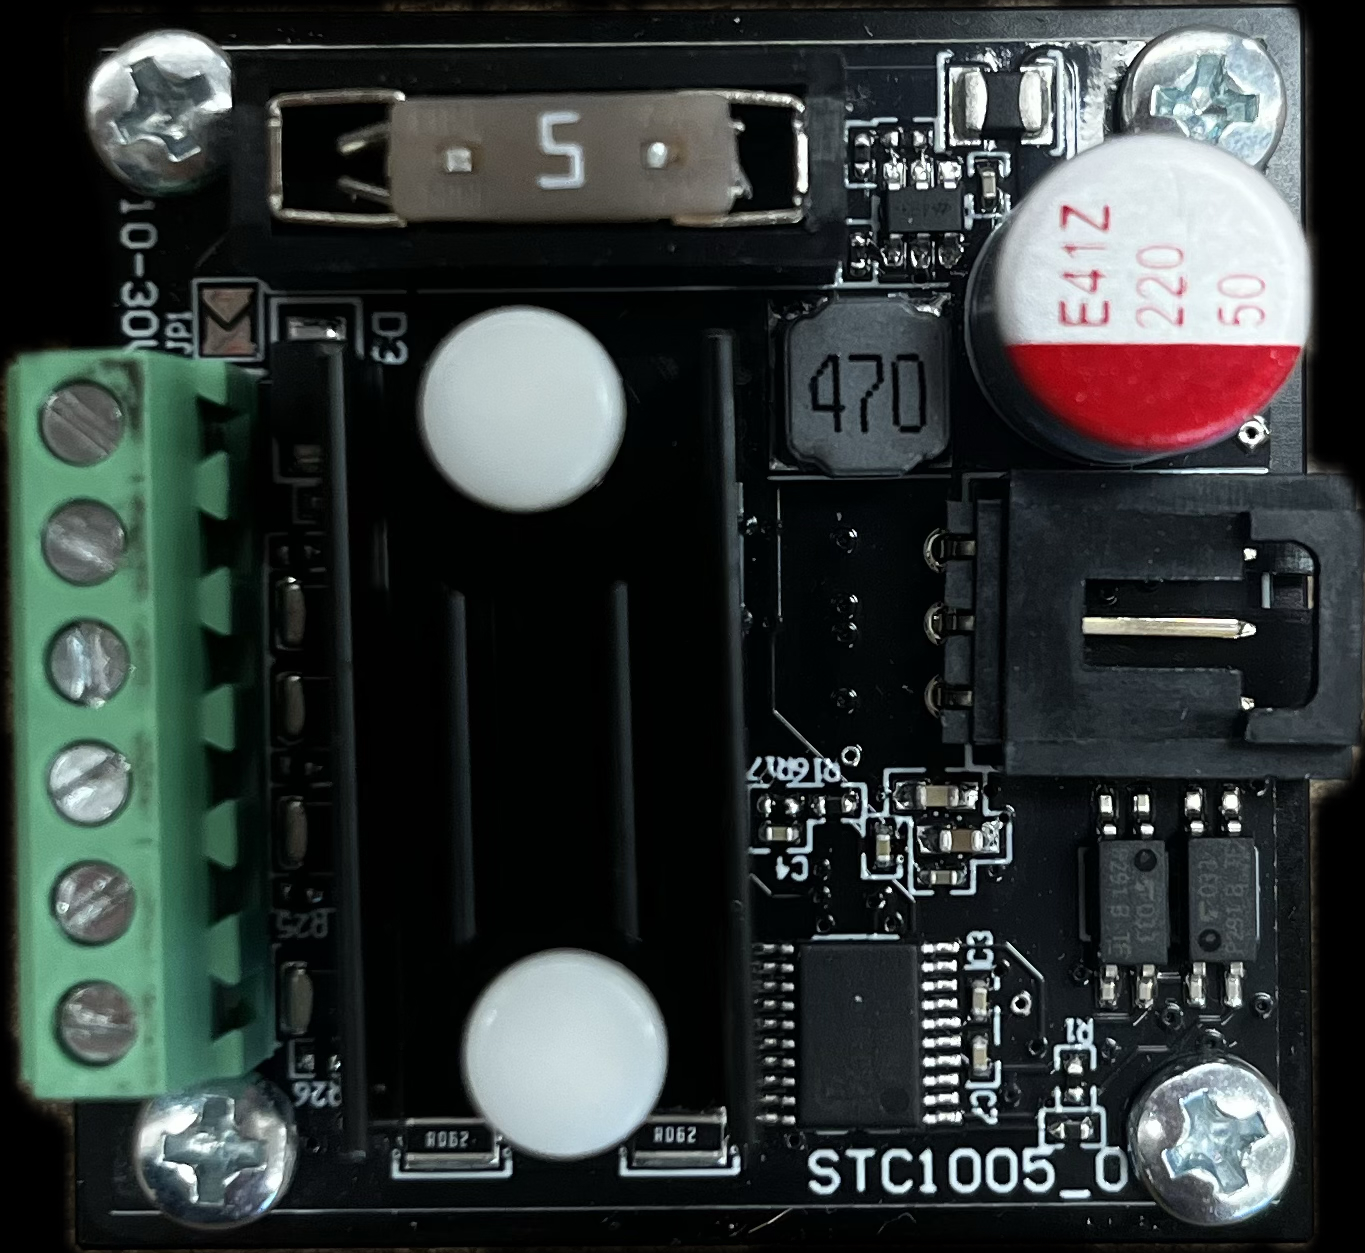
The 4A Stepper Phidget (STC1005_0) is a high-power stepper motor controller designed to precisely control the motion of a stepper motor. It is capable of delivering up to 4A of current, making it suitable for a wide range of applications that require precise positioning and speed control. Common applications include CNC machines, 3D printers, robotics, and automated manufacturing systems.

Explore Projects Built with 4A Stepper Phidget

Use Cirkit Designer to design, explore, and prototype these projects online. Some projects support real-time simulation. Click "Open Project" to start designing instantly!
VINT Hub-Controlled Multi-Stepper Motor System
Image of ENPH454: A project utilizing 4A Stepper Phidget in a practical application
This circuit consists of a VINT Hub Phidget connected to four 4A Stepper Phidgets, which in turn are connected to four NEMA23 stepper motors. The VINT Hub Phidget interfaces with the stepper controllers, likely for the purpose of controlling the stepper motors. A power supply is connected to all the stepper controllers to provide the necessary voltage, and a Square FSR (Force Sensitive Resistor) with a resistor is connected to the VINT Hub, possibly for sensing force or pressure.
Cirkit Designer LogoOpen Project in Cirkit Designer
Arduino-Based Stepper Motor Controller with pH Meter and LCD Display
Image of pws tirtrator: A project utilizing 4A Stepper Phidget in a practical application
This circuit is designed to control a bipolar stepper motor using an Arduino UNO and an A4988 stepper motor driver. It includes pushbuttons and limit switches for user input and safety, a pH meter for sensing, and an LCD display for output. The Arduino UNO coordinates the operation, reading inputs and controlling the motor driver and display.
Cirkit Designer LogoOpen Project in Cirkit Designer
Arduino UNO WiFi-Controlled Stepper Motor with Joystick Interface
Image of KIT 3: LINEAR KIT: A project utilizing 4A Stepper Phidget in a practical application
This circuit controls a bipolar stepper motor using an Arduino UNO R4 WiFi and an A4988 stepper motor driver. The Arduino reads input from a KY-023 dual-axis joystick module to determine the motor's direction and step rate, powered by a 12V battery for the motor and a 9V battery for the Arduino.
Cirkit Designer LogoOpen Project in Cirkit Designer
Arduino Nano-Controlled Environment Monitoring and Stepper Motor System
Image of AUTOMATIC CURTAIN: A project utilizing 4A Stepper Phidget in a practical application
This circuit is designed to control a Nema 17 stepper motor using an A4988 stepper motor driver, with an Arduino Nano as the microcontroller. The Arduino receives input from two potentiometers and a pushbutton, and it interfaces with a DHT11 temperature and humidity sensor and an HC-SR04 ultrasonic sensor. Power is managed by a 12V power supply, a power supply module, and a step-down buck converter, with a rocker switch to control power flow.
Cirkit Designer LogoOpen Project in Cirkit Designer

Explore Projects Built with 4A Stepper Phidget

Use Cirkit Designer to design, explore, and prototype these projects online. Some projects support real-time simulation. Click "Open Project" to start designing instantly!
Image of ENPH454: A project utilizing 4A Stepper Phidget in a practical application
VINT Hub-Controlled Multi-Stepper Motor System
This circuit consists of a VINT Hub Phidget connected to four 4A Stepper Phidgets, which in turn are connected to four NEMA23 stepper motors. The VINT Hub Phidget interfaces with the stepper controllers, likely for the purpose of controlling the stepper motors. A power supply is connected to all the stepper controllers to provide the necessary voltage, and a Square FSR (Force Sensitive Resistor) with a resistor is connected to the VINT Hub, possibly for sensing force or pressure.
Cirkit Designer LogoOpen Project in Cirkit Designer
Image of pws tirtrator: A project utilizing 4A Stepper Phidget in a practical application
Arduino-Based Stepper Motor Controller with pH Meter and LCD Display
This circuit is designed to control a bipolar stepper motor using an Arduino UNO and an A4988 stepper motor driver. It includes pushbuttons and limit switches for user input and safety, a pH meter for sensing, and an LCD display for output. The Arduino UNO coordinates the operation, reading inputs and controlling the motor driver and display.
Cirkit Designer LogoOpen Project in Cirkit Designer
Image of KIT 3: LINEAR KIT: A project utilizing 4A Stepper Phidget in a practical application
Arduino UNO WiFi-Controlled Stepper Motor with Joystick Interface
This circuit controls a bipolar stepper motor using an Arduino UNO R4 WiFi and an A4988 stepper motor driver. The Arduino reads input from a KY-023 dual-axis joystick module to determine the motor's direction and step rate, powered by a 12V battery for the motor and a 9V battery for the Arduino.
Cirkit Designer LogoOpen Project in Cirkit Designer
Image of AUTOMATIC CURTAIN: A project utilizing 4A Stepper Phidget in a practical application
Arduino Nano-Controlled Environment Monitoring and Stepper Motor System
This circuit is designed to control a Nema 17 stepper motor using an A4988 stepper motor driver, with an Arduino Nano as the microcontroller. The Arduino receives input from two potentiometers and a pushbutton, and it interfaces with a DHT11 temperature and humidity sensor and an HC-SR04 ultrasonic sensor. Power is managed by a 12V power supply, a power supply module, and a step-down buck converter, with a rocker switch to control power flow.
Cirkit Designer LogoOpen Project in Cirkit Designer

Technical Specifications

General Specifications

  • Manufacturer: Phidgets Inc.
  • Part Number: STC1005_0
  • Controlled By: VINT
  • API Object Name: Stepper
  • Current Consumption (VINT): 500 μA
  • Motor Current Max: 4 A
  • Motor Voltage Min/Max: 8 - 30 V DC

Pin Configuration and Descriptions

Pin Number Description
1 Ground
2 VINT (Voltage Input)
3 Digital Input
4 Digital Output
5 Encoder Input A
6 Encoder Input B
7 Motor Coil A+
8 Motor Coil A-
9 Motor Coil B+
10 Motor Coil B-

Usage Instructions

Connecting the Stepper Motor

  1. Power Supply: Connect a suitable power supply to the Phidget, ensuring that the voltage is within the specified range (8 - 30 V DC).
  2. Motor Connection: Connect the stepper motor coils to the appropriate pins on the Phidget. Ensure that the polarity is correct for each coil.
  3. VINT Hub: Connect the Phidget to a VINT Hub using the VINT port. The VINT Hub should be connected to your computer or another control device.

Programming with Arduino

To control the 4A Stepper Phidget with an Arduino UNO, you will need to use the Phidget22 library. Below is an example code snippet to initialize and control the stepper motor:

#include <Phidget22.h>

PhidgetStepperHandle stepper;

void setup() {
  PhidgetStepper_create(&stepper);
  Phidget_setDeviceSerialNumber((PhidgetHandle)stepper, 12345); // Replace with your device's serial number
  Phidget_openWaitForAttachment((PhidgetHandle)stepper, 5000);
  PhidgetStepper_setControlMode(stepper, CONTROL_MODE_STEP);
  PhidgetStepper_setTargetPosition(stepper, 10000); // Set target position
  PhidgetStepper_setEngaged(stepper, 1); // Engage the motor
}

void loop() {
  // Your code here to control the stepper motor
}

Important Considerations and Best Practices

  • Current Limit: Always set the current limit to match the specifications of your stepper motor to prevent damage.
  • Heat Dissipation: Ensure adequate heat dissipation for the Phidget, as high currents can generate significant heat.
  • Microstepping: Utilize microstepping for smoother motion and higher resolution control if required by your application.

Troubleshooting and FAQs

Common Issues

  • Motor Not Moving: Check connections and ensure that the power supply is within the specified range. Verify that the current limit is set correctly.
  • Inaccurate Positioning: Ensure that the motor is not overloaded and that the steps per revolution setting matches the motor's specifications.

FAQs

Q: Can I control multiple stepper motors with one 4A Stepper Phidget? A: No, the STC1005_0 is designed to control one stepper motor. To control multiple motors, you will need additional Phidgets.

Q: What is the maximum step rate for the 4A Stepper Phidget? A: The maximum step rate depends on the motor and power supply used. Refer to the Phidgets documentation for detailed specifications.

Q: How do I set the microstepping resolution? A: Microstepping can be set through the Phidget22 API. Refer to the Phidget22 programming guide for detailed instructions.

For further assistance, consult the Phidgets support resources or contact their technical support team.